Understanding Properties
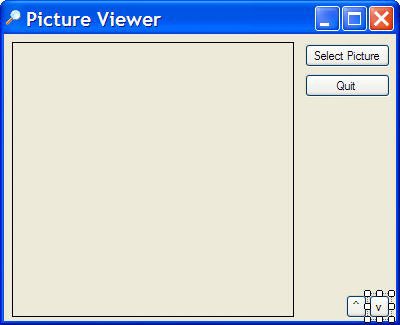
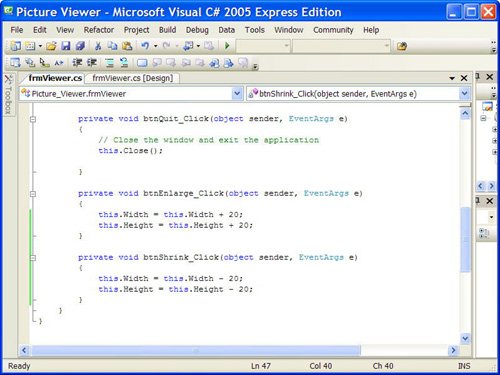
| All objects have attributes used to specify and return the state of the object. These attributes are properties, and you've already used some of them in previous hours using the Properties window. Indeed, every object exposes a specific set of properties, but not every object exposes the same set of properties. To illustrate this point, I'll continue with the hypothetical Pet object. Suppose that you have an object, and the object is a dog. This Dog object has certain properties common to all dogs. These properties include attributes such as the dog's name, the color of its hair, and even the number of legs it has. All dogs have these same properties; however, different dogs have different values for these properties. Figure 3.1 illustrates such a Dog object and its properties. Figure 3.1. Properties are the attributes that describe an object. Getting and Setting PropertiesYou've already seen how to read and change properties using the Properties window. The Properties window is available only at design time, however, and is used only for manipulating the properties of forms and controls. Most getting and changing of properties you'll perform will be done with Visual C# code, not by using the Properties window. When referencing properties in code, you specify the name of the object first, followed by a period (.), and then the property name as in the following syntax: {ObjectName}.{Property}If you had a Dog object named Bruno, for example, you would reference Bruno's hair color this way: Bruno.HairColor This line of code would return whatever value was contained in the HairColor property of the Dog object Bruno. To set a property to some value, you use an equal sign (=). To change the Dog object Bruno's Weight property, for example, you'd use a line of code such as the following: Bruno.Weight = 90; The following line of code places the value of the Weight property of the Dog object called Bruno into a temporary variable. This statement retrieves the value of the Weight property because the Weight property is referenced on the right side of the equal sign. fltWeight = Bruno.Weight; Variables are discussed in detail in Hour 11, "Using Constants, Data Types, Variables, and Arrays." For now, think of a variable as a storage location. When the processor executes this statement, it retrieves the value in the Weight property of the Dog object Bruno and places it in the variable (storage location) titled fltWeightVariable. Assuming that Bruno's Weight is 90, as set in the previous example, the computer would process the code statement like this: fltWeight = 90; Just as in real life, some properties can be read but not changed. Suppose that you have a Sex property to designate the gender of a Dog object. It's impossible for you to change a dog from a male to a female or vice versa (at least I think it is). Because the Sex property can be retrieved but not changed, it's known as a read-only property. You'll often encounter properties that can be set in Design view but become read-only when the program is running. One example of a read-only property is the Height property of the combo box control. Although you can view the value of the Height property in the Properties window, you can't change the valueno matter how hard you try. If you attempt to change the Height property using Visual C# code, Visual C# simply changes the value back to the defaulteerie gremlins. By the Way The best way to determine which properties of an object are read-only is to consult the online help for the object in question. Working with an Object and Its PropertiesNow that you know what properties are and how they can be viewed and changed, you're going to experiment with properties by modifying the Picture Viewer project you built in Hour 1. Recall from Hour 1 how you learned to set the Height and Width properties of a form using the Properties window. Here, you're going to change the same properties using Visual C# code. You're going to add two buttons to your Picture viewer. One button will enlarge the form when clicked, whereas the other will shrink the form. This is a simple example, but it illustrates well how to change object properties in Visual C# code. Start by opening your Picture Viewer project from Hour 1 (you can open the project or the solution file). If you download the code samples from my site, I provide a Picture Viewer project for you to start with. When the project first runs, the form has the Height and Width you specified in the Properties window. You're going to add buttons to the form that a user can click to enlarge or shrink the form at runtime by following these steps:
Did you Know? As you create projects, it's a good idea to save frequently. Save your project now by clicking the Save All button on the toolbar. Once again, display the form designer by clicking the tab frmViewer.cs [Design]. Your Properties Example project is now ready to be run! Press F5 to put the project in Run mode. Before continuing, click the Select Picture button and choose a picture from your hard drive. Next, click the ^ button a few times and notice how the form gets bigger. The form will grow bigger (see Figure 3.5). Figure 3.5. What you see is what you getthe form you created should look just as you designed it.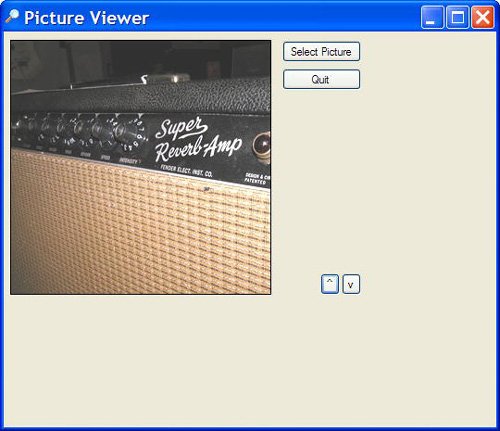 Next, click the v button to make the form smaller. When you've clicked enough to satisfy your curiosity (or until you get bored), end the running program and return to Design mode by clicking the Stop Debugging button on the toolbar. Did you notice how the buttons and the image on the form didn't resize as the form's size was changed? In Hour 6, "Building FormsAdvanced Techniques," you'll learn how to make your forms resize their contents. |


EAN: 2147483647
Pages: 248