Navigating and Customizing the Visual C Environment
Navigating and Customizing the Visual C# EnvironmentVisual C# lets you customize many of its interface elements, such as windows and toolbars, enabling you to be more efficient in the work that you do. Create a new Windows application now by opening the File menu and clicking New Project. This project illustrates manipulating the design environment. Name this project Environment Tutorial and click OK to create the project. (This exercise won't create anything reusable, but it will help you learn how to navigate the design environment.) Your screen should look like the one shown in Figure 2.3. Figure 2.3. This is pretty much how the integrated development environment (IDE) appears when you first install Visual C#.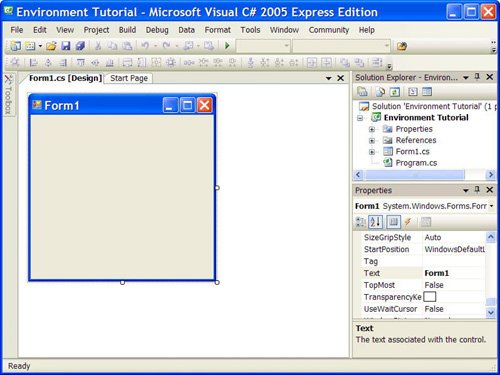 By the Way Your screen might not look exactly like that shown in Figure 2.3, but it'll be close. By the time you've finished this hour, you'll be able to change the appearance of the design environment to match this figureor to any configuration you prefer. Working with Design WindowsDesign windows, such as the Properties window and Solution Explorer shown in Figure 2.3 provide functionality for building complex applications. Just as your desk isn't organized exactly like that of your coworkers, your design environment doesn't have to be the same as anyone else's either. A design window can be placed into one of four primary states:
Showing and Hiding Design WindowsWhen a design window is closed, it doesn't appear anywhere. There is a difference between being closed and being automatically hidden, as you'll learn shortly. To display a closed or hidden window, choose the corresponding menu item from the View menu. For example, if the Properties window isn't displayed in your design environment, you can display it by choosing View, Properties Window from the menu (or by pressing its keyboard shortcutCtrl+W,P). Whenever you need a design window and can't find it, use the View menu to display it. To close a design window, click its Close button (the button on the right side of the title bar with the X on it), just as you would to close an ordinary window. Floating Design WindowsFloating design windows are visible windows that float over the workspace, as shown in Figure 2.4. Floating windows are like typical application windows in that you can drag them around and place them anywhere you please, even on other monitors when you're using a multiple-display setup. In addition to moving a floating window, you can also change its size by dragging a border. To make a window float, click on the title bar of the docked window and drag it away from the edge that is currently docked. Figure 2.4. Floating windows appear over the top of the design environment.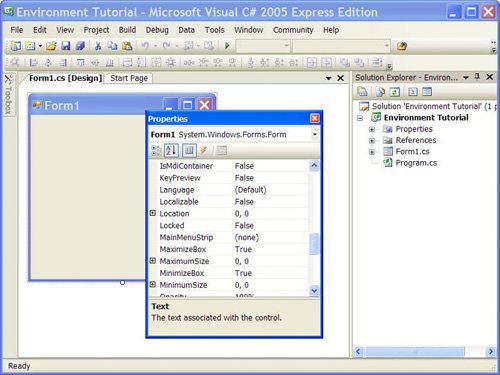 Docking Design WindowsVisible windows appear docked by default. A docked window appears attached to the side, top, or bottom of the work area or to some other window. The Properties window in Figure 2.3, for example, is docked to the right side of the design environment (contrast this to where it's floating in Figure 2.4). To make a floating window become a docked window, drag the title bar of the window toward the edge of the design environment to which you want to dock the window. As you drag the window, guide diamonds appear on the screen (see Figure 2.5). If you move the mouse over one of the icons that appear as part of the guide diamond, Visual C# will show a blue rectangle where the window will appear if you release the mouse button. This is a quick and easy way to dock window. You can also drag the window to an edge and get the same blue rectangle. This rectangle will "stick" in a docked position. Figure 2.5. The Guide Diamond icons make it easy to dock a window.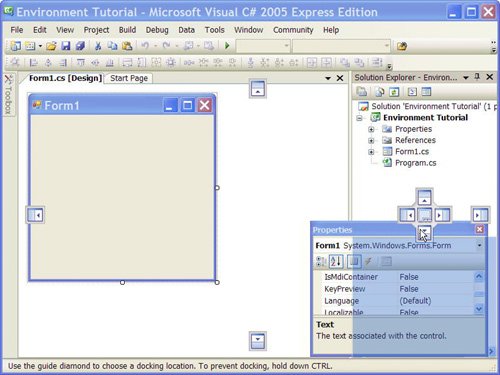 If you release the mouse while the rectangle appears this way, the window will be docked. Although difficult to explain, this is very easy to do. By the Way You can size a docked window by dragging its edge opposite the side that's docked. If two windows are docked to the same edge, dragging the border between them enlarges one while shrinking the other. To try this, you'll need to float a window that's already docked. To float a window, you "tear" the window away from the docked edge by dragging the title bar of the docked window away from the edge to which it's docked. Note that this technique won't work if a window is set to Auto Hide (which is explained next). Try docking and floating windows now by following these steps:
Did you Know? If you don't want a floating window to dock, regardless of where you drag it to, right-click the title bar of the window and choose Floating from the context menu. To allow the window to be docked again, right-click the title bar and choose Dockable. Auto Hiding Design WindowsVisual C# windows have the capability to auto hide themselves when you're not using them. Although you might find this a bit disconcerting at first, after you get the hang of things, this is a productive way to work; your workspace is freed up, yet design windows are available by simply moving the mouse. Windows that are set to Auto Hide are always docked; you can't set a floating window to Auto Hide. When a window auto hides, it appears as a vertical tab on the edge to which it's docked much like minimized applications are placed in the Windows taskbar. Look at the left edge of the design environment. Notice the vertical tab titled Toolbox. This tab represents an auto-hidden window. To display an auto-hidden window, move the pointer over the tab representing the window. When you move the pointer over a tab, Visual C# displays the design window so that you can use its features. When you move the pointer away from the window, the window automatically hides itselfhence the name. To make any window hide itself automatically, right-click its title bar and select Auto Hide from its shortcut menu. You can also click the little picture of a pushpin appearing in the title bar next to the Close button to toggle the window's Auto Hide state. Using the techniques discussed so far, you can tailor the appearance of your design environment in all sorts of ways. There is no one best configuration. You'll find that different configurations work better for different projects and in different stages of development. Sometimes when I'm designing the interface of a form, for example, I want the toolbox to stay visible but out of my way, so I tend to make it float, or I turn off its Auto Hide property and leave it docked to the left edge of the design environment. However, after the majority of the interface elements have been added to a form, I want to focus on code. Then I dock the toolbox and make it Auto Hide itself; it's there when I need it, but it's out of the way when I don't. Don't be afraid to experiment with your design windows, and don't hesitate to modify them to suit your changing needs. |
EAN: 2147483647
Pages: 248