Manipulating the Server
| After you have an instance of an object from an automation server, manipulating the server (creating objects, setting properties, calling methods, and so forth) is accomplished by manipulating the object. In the following sections, you'll manipulate the new Excel object by setting properties and calling methods, and in so doing you will be manipulating Excel itself. Forcing Excel to Show ItselfWhen Excel is started using automation, it's loaded but not shown. Remaining hidden enables the developer to use Excel's functionality and then close it without the user knowing what happened. For example, you could create an instance of an Excel object, perform a complicated formula to obtain a result, close Excel, and return the result to the userall without the user seeing Excel. In this example, you want to see Excel so that you can see what your code is doing. Fortunately, showing Excel couldn't be any easier. Add the following statement to make Excel visible: objExcel.Visible = true; Creating an Excel WorkbookIn Excel, a workbook is the file in which you work and store your data; you can't manipulate data without a workbook. When you first start Excel from the Start menu, an empty workbook is created for you. When you start Excel via automation, however, Excel doesn't create a workbook; you have to do it yourself. To create a new workbook, you use the Add method of the Workbooks collection. Enter the following statements to create a new workbook and reference the default worksheet (explained in the next section): //start a new workbook and a worksheet. Excel.Workbook objBook = objExcel.Workbooks.Add(System.Reflection.Missing.Value); Excel.Worksheet objSheet = (Excel.Worksheet)objBook.Worksheets.get_Item(1); Working with Data in an Excel WorkbookWorkbooks contain a single worksheet by default. In this section, you're going to manipulate data in the worksheet. The following describes what you'll do:
To manipulate cells in the worksheet, you manipulate the ActiveCell object, which is an object property of the Application object. Entering data into a cell involves first selecting a cell and then passing data to it. Selecting a cell is accomplished by calling the Select method of the Range object; the Range object is used to select one or more cells. The Select method accepts a starting column and row and an ending column and row. If you want to select only a single cell, as we do here, you can omit the ending column and row. After the range is set, you pass data to the FormulaR1C1 property of the ActiveCell object (which references the cell specified by the Range object). Setting the FormulaR1C1 property has the effect of sending data to the cell. Sound confusing? Well, it is to some extent. Programs that support automation are often vast and complex, and programming them is usually far from intuitive. Did you Know? If the program you want to automate has a macro builder (as most Microsoft products do), you can save yourself a lot of time and headaches by creating macros of the tasks you want to automate. The macros are actually code, and in the case of Microsoft products, they're VBA code. VBA code is similar to Visual Basic 6 code. Although this code won't port directly to Visual C# 2005, it's rather easy to migrate in most cases, and the macro builder does all or most of the work of determining objects and members for you. The following section of code uses the techniques just described to add data to four cells. Follow these steps now to automate sending the data to Excel:
To help ensure that everything is entered correctly, Listing 22.1 shows the procedure in its entirety. Listing 22.1. Code to Automate Excel
Testing Your Client ApplicationNow that your project is complete, press F5 to run it and click the button to automate Excel. If you entered the code correctly, Excel will start, data will be placed into four cells, the total of the four cells will be placed into a fifth cell, and all cells will be made bold (see Figure 22.2). Figure 22.2. You can control almost every aspect of Excel using its object model.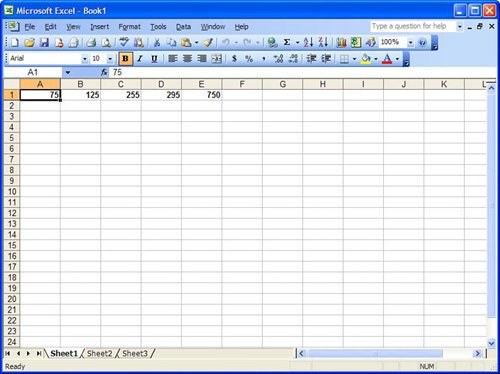 |
EAN: 2147483647
Pages: 248