| As with keyboard input, most controls support mouse input natively; you don't have to write code to deal with mouse input. At times, you might need more control than that offered by the native functionality of a control, however. Visual C# supports eight events that enable you to deal with mouse input directly. These events are listed in Table 17.5 in the order in which they occur. Table 17.5. Events Used to Handle Mouse InputEvent Name | Description |
|---|
MouseEnter | Occurs when the pointer enters a control | MouseMove | Occurs when the pointer moves over a control | MouseHover | Occurs when the pointer hovers over a control | MouseDown | Occurs when the pointer is over a control and a button is pressed | MouseUp | Occurs when the pointer is over a control and a button is released | MouseLeave | Occurs when the pointer leaves a control | Click | Occurs between the MouseDown and MouseUp events | DoubleClick | Occurs when the user presses the mouse button twice in rapid succession |
You're now going to build a project that illustrates interacting with the mouse using the MouseMove event. This project will enable a user to draw on a form, much like you can draw in a paint program. Begin by creating a new Windows Application titled Mouse Paint, and then follow these steps to create the project: 1. | Right-click Form1.cs in the Solution Explorer, choose Rename, and then change the name of the default form to frmMousePaint.cs. Next, set the form's Text property to Paint with the Mouse.
| 2. | Double-click the form to access its default event, the Load event. Enter the following statement into the Load event:
m_objGraphics = this.CreateGraphics();
You've already used a graphics object a few times. What you're doing here is setting a graphics object to the client area of the form; any drawing performed on the object appears on the form. Because you're going to draw to this graphics object each time the mouse moves over the form, there's no point in creating a new graphics object each time you need to draw to it. Therefore, you're going to make m_objGraphics a module-level variable, which is instantiated only oncein the Load event of the form.
| | | 3. | Enter this statement below the opening curly brace after the public partial class frmMousePaint : Form class declaration:
private Graphics m_objGraphics;
As mentioned previously, always destroy objects when you're done with them. In this case, you want the object to remain in existence for the life of the form. Therefore, you'll destroy it in the FormClosed event of the form, which occurs when the form is unloaded.
| 4. | Return to the frmMousePaint.cs[Design] tab, open the events list in the Property window, and double-click the FormClosed event to create and open the code window to the FormClosed event. Enter the following statement in the FormClosed event:
m_objGraphics.Dispose();
Your class should now look like the one shown in Figure 17.10.
Figure 17.10. Code in many places often works together to achieve one goal. 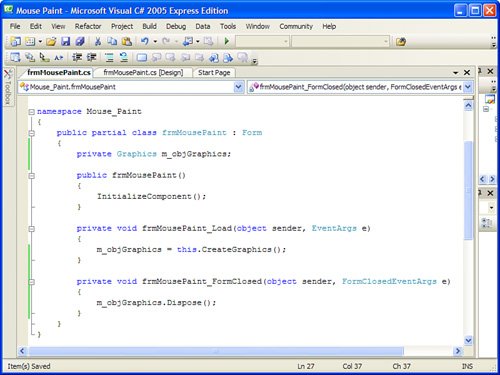
The last bit of code you need to add is the code that will draw on the form. You're going to place code in the MouseMove event of the form to do this. First, the code will make sure that the left mouse button is held down. If it isn't, no drawing takes place; the user must hold down the mouse button to draw. Next, a rectangle will be created. The coordinates of the mouse pointer will be used to create a small rectangle that will be passed to the DrawEllipse() method of the graphics object. This has the effect of drawing a tiny circle where the mouse pointer is positioned.
| | | 5. | Again, return to the frmMousePaint.cs[Design] tab, open the events list in the Property window (if it's not currently displayed), and double-click the MouseMove event to create a new MouseMove event procedure. Add the following code to the MouseMove event:
Rectangle rectEllipse = new Rectangle() ; if (e.Button != MouseButtons.Left) return; rectEllipse.X = e.X - 1; rectEllipse.Y = e.Y - 1; rectEllipse.Width = 2; rectEllipse.Height = 2; m_objGraphics.DrawEllipse(System.Drawing.Pens.Blue, rectEllipse);
|
Like all events, the e object contains information related to the event. In this example, you're using the X and Y properties of the e object, which are the coordinates of the pointer when the event fires. In addition, you're checking the Button property of the object to make sure that the user is pressing the left button. Your project is now complete! Save your work by clicking Save All on the toolbar, and then press F5 to run the project. Move your mouse over the formnothing happens. Now, hold down the left mouse button and move the mouse. This time, you'll be drawing on the form (see Figure 17.11). Figure 17.11. Capturing mouse events opens many exciting possibilities. 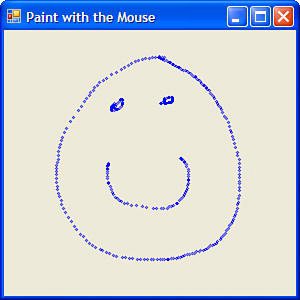
Notice that the faster you move the mouse, the more space appears between circles. This shows you that the user can move the mouse faster than the MouseMove event can fire, so you can't get every single movement of the mouse. This is important to remember. |