| You've already added a module-level constant to your Picture Viewer project earlier in this hour. In this section, you'll create variables to hold the values for the controls on your Options form. In Hour 16, you will complete hooking up the options for your project. Creating the Variables for the Options In past hours, you defined three options for your Picture Viewer project. Let's consider each one now: User Name This is where the user can enter their name, which appears in the title bar of the form. Think for a moment about the type of data that will be stored for this option. If you said String (which is text), you're correct. Prompt to confirm on exit This option has two possible values, true and false, and therefore we need to use a Boolean value to store this option. Default picture background color This is actually a special case. I told you about the common data types, but in addition to those there are dozens of other different data types, one of which is Color. You'll be using a variable of the data type Color to store the user's background color preference.
Follow these steps to create the variables: 1. | Display the code for the frmViewer.cs form (not the frmOptions.cs form).
| 2. | Locate the declarations section of the form's moduleit's where you created the constant c_defPromptOnExit.
| 3. | Enter the following three variable declarations beginning on the line following the constant definition:
string m_strUserName = ""; bool m_blnPromptOnExit = c_defPromptOnExit; Color m_objPictureBackColor;
|
Your code should look like Figure 11.5. Figure 11.5. Class variables go in the declarations section, before code procedures. 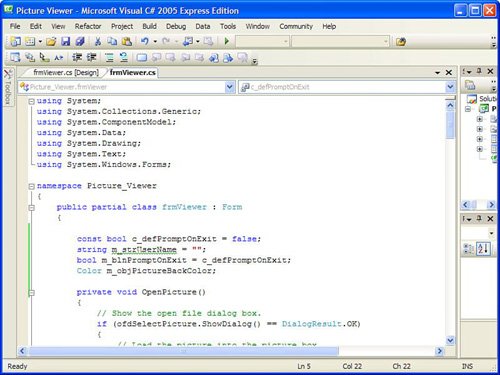
Initializing and Using the Options Variables Now that the variables have been created, you need to initialize them. Actually, you initialized them when you declared them, but you will need to change their values when your project starts up, so you're going to add code that will allow you to do that now by following these steps: 1. | The best place to set up a form is usually in the form's Load event. Start by double-clicking frmViewew.cs in the Solution Explorer to display the form in the form designer, then double-click somewhere on the form (be sure not to double-click a control).
| | | 2. | Your load event already has two lines of code in it: the two statements you entered to set the value of the X and Y labels. Add the following two statements below the existing code:
m_blnPromptOnExit = c_defPromptOnExit; m_objPictureBackColor = System.Drawing.SystemColors.Control;
The first statement simply sets the module variable that stores the user's prompt on exit setting to the value of the constant you created earlier. I set up the example this way so that you can see how constants and variables work together. If you wanted to change the default behavior of the Close on Exit option, all you would have to do is change the value of the constant in the declarations section.
The second statement sets the default back color to the default system color for controls. I've already explained how this works, so I won't go into detail here. Notice that I did not create an initialization statement for the module-level variable m_strUserName. This is because I already initialized the string when I declared it. I did this so you can see there are multiple approaches to solving a problem.
| | | 3. | So far, you've created variables for the options and initialized them in code. However, the option values aren't actually used in the project yet. The Prompt on Exit option will be checked when the user closes the form, but the back color of the picture box needs to be set before the form appears. Enter the following statement right below the two you just created:
picShowPicture.BackColor = m_objPictureBackColor;
OK, all that's left to do in this hour is to hook up the Prompt on Exit function. This takes just a tad more work because you created a menu item that keeps track of whether the Prompt on Exit option is chosen. The first thing you're going to do is make sure that the menu item is in sync with the variable; you don't want the menu item checked if the variable is set to false because this would give the opposite response from what the user expects. Continue with these steps to hook up the Prompt on Exit variable:
| 4. | Add this statement to your Form_Load event, right below the statement you just entered to set the picture box's back color. This statement ensures that when the form loads, the checked state of the menu item matches the state of the variable. Because you initialized the Boolean variable m_blnPromptOnExit to false, the menu item appears unchecked.
mnuConfirmOnExit.Checked = m_blnPromptOnExit;
| 5. | You already created a procedure for the menu item so that it physically changes its Checked state when the user clicks it. You can scroll down the code window and locate the procedure mnuConfirmOnExit_Click, or you can switch to design view and double-click the menu item. Remember, there are usually multiple ways to approach a problem in Visual C#! After you've found the procedure, add this statement below the existing code:
m_blnPromptOnExit = mnuConfirmOnExit.Checked;
Did you notice that this statement is the exact opposite of the statement you entered in step 4? You've just told Visual C# to set the value of the variable to the checked state of the menu item, after the checked state has been updated in the Click event.
| 6. | Now that the variable will stay in sync with the menu item, you need to hook up the actual Prompt on Exit code. Double-click frmViewer.cs in the Solution Explorer to view the form designer and then click the Events button on the Properties Window. Next, locate the FormClosing event and double-click it. This will create a new event handler for the FormClosing event. Enter the following code exactly as it appears here:
if (m_blnPromptOnExit) { if (MessageBox.Show("Close the Picture Viewer program?", "Confirm Exit", MessageBoxButtons.YesNo, MessageBoxIcon.Question) == DialogResult.No) { e.Cancel = true; } }
|
I've already mentioned the MessageBox() function (and I'll explain it in detail in Hour 17, "Interacting with Users"). All that you need to understand here is that when the user closes the Picture Viewer and the variable m_blnPromptOnExit is true, the MessageBox.Show() function asks the user whether he really wants to quit. If the user chooses No, the e.Cancel property is set to TRue, which cancels the form from closing (you can read more about the e object for the FormClosing event in the online help text). Press F5 to run your project now and give it a try. When you first run the application, the variable is false, and the menu item appears unchecked. If you click the Close button in the upper-right corner of the form, the Picture Viewer closes. Run the project again, but this time click the Confirm on Exit menu item to check it before you close the form. This time, when you close the form, you are asked to confirm (see Figure 11.6). Figure 11.6. It's nice to give the user control over their experience! 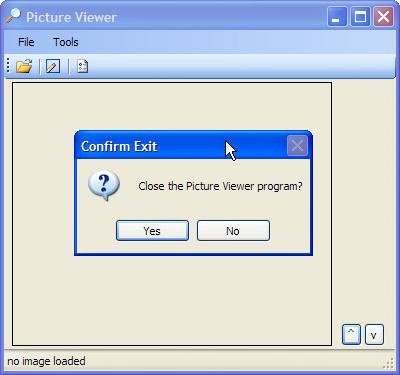
|