Creating Drop-Down Lists Using the Combo Box
List boxes are great, but they have two shortcomings. First, they take up quite a bit of space. Second, users can't enter their own values; they have to select from the items in the list. If you need to conserve space or if you want to allow a user to enter a value that may not exist in the list, use the Combo Box control.
Combo boxes have an Items collection that behaves exactly like that of the List Box control (refer to the previous section for information on manipulating lists). Here I will show you the basics of how a combo box works.
Add a new combo box to the form by double-clicking the ComboBox item in the toolbox. Set the combo box's properties as follows :
| Property | Value |
|---|---|
| Name | cboColors |
| Location | 72,8 |
| Size | 160,21 |
| Text | (make blank) |
The first thing you should note is that the combo box has a Text property, whereas the list box doesn't. This works the same as the Text property of a text box. When the user selects an item from the drop-down list, the value of the selected item is placed in the Text property of the text box. The default behavior of a combo box is to allow the user to enter any text in the text box portion of the control ”even if the text doesn't exist in the list. Shortly, I'll show you how to change this behavior.
Select the Items property of the combo box in the Properties window and click the button that appears. Add the following items to the String Collection editor and click OK to commit your entries.
-
Black
-
Blue
-
Gold
-
Green
-
Red
-
Yellow
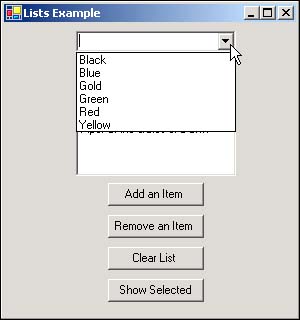
Press F5 to run the project. Click the arrow at the right side of the combo box and a drop-down list appears (see Figure 7.18).
Figure 7.18. Combo boxes conserve space.
Next, try typing in the text Magenta. C# lets you do this. Indeed, you can type any text that you desire . Often, you'll want to restrict a user to entering only values that appear in the list. To do this, you change the DropDownStyle property of the combo box. Close the form to stop the running project and change the DropDownStyle property of the combo box to DropDownList. Press F5 to run the project again and try to type text into the combo box. You can't. However, if you enter a character that is the start of a list item, C# will select the closest matching entry.
As a matter of fact, clicking in the "text box" portion of the combo box opens the list the same as if you clicked the drop-down arrow. When set as a DropDownList, a combo box won't allow any text entry; therefore, the user is limited to selecting items from the list.
Stop the running project now and save your work. As you can see, the combo box and list box offer similar functionality. In fact, the coding of their lists is identical. However, each one of these controls serves a slightly different purpose. Which one is better? That depends entirely on the situation. As you use professional applications, pay attention to their interfaces; you'll start to get a feel for which control is appropriate in a given situation.
| Top |
EAN: 2147483647
Pages: 253