Navigating and Customizing the C Environment
Navigating and Customizing the C# Environment
C# lets you customize many of its interface elements, such as windows and toolbars , enabling you to be more efficient in the work that you do. Create a new Windows Application now (use the New Project dialog box or select File, New) so that you can see and manipulate the design environment. Name this project Environment Tutorial. (This exercise won't create anything reusable, but it will help you learn how to navigate the design environment.) Your screen should look like the one shown in Figure 2.4.
Figure 2.4. This is pretty much how the IDE appears when you first install C#.
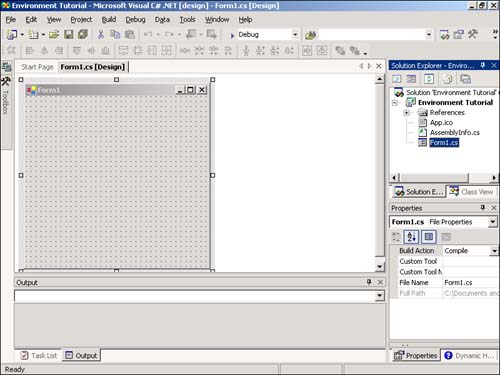
 | Your screen may not look exactly like that shown in Figure 2.4, but it'll be close. For example, the Output window won't be visible unless you've built a project. If you completed Hour 1, the window will be visible. By the time you've finished this hour , you'll be able to change the appearance of the design environment to match this figureor to any configuration you prefer. |
Working with Design Windows
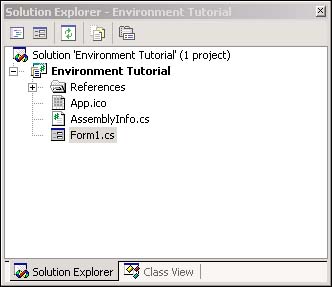
Design windows, such as the Properties and Solution Explorer windows shown in Figure 2.4, provide functionality for building complex applications. Just as your desk isn't organized exactly like that of your co-workers , your design environment doesn't have to be the same as anyone else's, either.
A design window may be placed into one of four primary states:
-
Closed
-
Floating
-
Docked
-
Auto hidden
Showing and Hiding Design Windows
When a design window is closed, it doesn't appear anywhere . There is a difference between being closed and being hidden, as you'll learn shortly. To display a closed or hidden window, choose the corresponding menu item from the View menu. For example, if the Properties window isn't displayed in your design environment, you can display it by choosing Properties Window on the View menu (or press its keyboard shortcutF4). Whenever you need a design window and can't find it, use the View menu to display it. To close a design window, click its Close button (the button on the right side of the title bar with the X on it), just as you would close an ordinary window.
Floating Design Windows
Floating design windows are visible windows that float over the workspace, as shown in Figure 2.5. Floating windows are like typical application windows in that you can drag them around and place them anywhere you please , even on other monitors when you're using a multiple-display setup. In addition to moving a floating window, you can also change its size by dragging a border.
Figure 2.5. Floating windows appear over the top of the design environment.
Docking Design Windows
Visible windows appear docked by default. A docked window is a window that appears attached to the side, top, or bottom of the work area or to some other window. The Properties window in Figure 2.4, for example, is docked to the right side of the design environment. To make a floating window a docked window, drag the title bar of the window toward the edge of the design environment to which you want to dock the window. As you drag the window, you'll drag a rectangle that represents the outline of the window. When you approach an edge of the design environment, the rectangle will change shape and "stick" in a docked position. If you release the mouse while the rectangle appears this way, the window will be docked. Although this is hard to explain, it's very easy to do.
| | You can size a docked window by dragging its edge opposite the side that's docked. If two windows are docked to the same edge, dragging the border between them enlarges one while shrinking the other. |
To try this, you'll need to float a window that's already docked. To float a window, you "tear" the window away from the docked edge by dragging the title bar of the docked window away from the edge to which it is docked. Note that this technique won't work if a window is set to Auto Hide (which is explained next ). Try docking and floating windows now by following these steps:
-
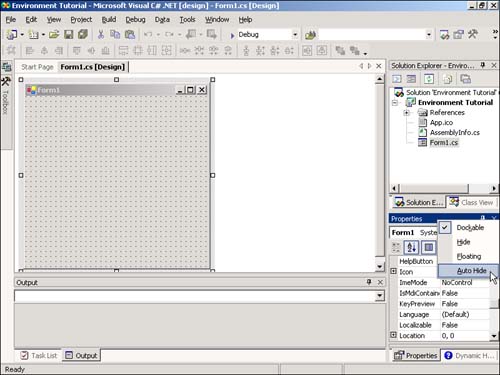
Ensure that the Properties window is currently displayed (if it's not, show it using the View menu). Make sure the Properties window isn't set to Auto Hide by right-clicking its title bar and deselecting Auto Hide (if it's selected) from the shortcut menu, as shown in Figure 2.6.
Figure 2.6. You can't float a window that's set to Auto Hide.
-
Drag the title bar of the Properties window away from the docked edge. When the rectangle representing the border of the window changes shape, release the mouse button. The Properties window should now appear floating.
-
Dock the window once more by dragging the title bar toward the right edge of the design environment. Again, release the mouse button when the rectangle changes shape.
| | If you don't want a floating window to dock, regardless of where you drag it to, right-click the title bar of the window and choose Floating from the context menu. To allow the window to be docked again, right-click the title bar and choose Dockable. |
Auto Hiding Design Windows
A feature of C# design environment is the capability to auto hide windows. Although you might find this a bit disconcerting at first, after you get the hang of things, this is a very productive way in which to work because your workspace is freed up, yet design windows are available by simply moving the mouse. Windows that are set to Auto Hide are always docked; you can't set a floating window to Auto Hide. When a window auto hides, it appears as a tab on the edge to which it's dockedmuch like minimized applications are placed in the Windows taskbar.
Look at the left edge of the design environment in Figure 2.6. Notice the two tabs on the left side of the IDE. One tab has a picture of two computers, and the other is labeled Toolbox. These tabs represent auto-hidden windows. To display an auto-hidden window, move the pointer over the tab representing the window. When you move the pointer over a tab, C# displays the design window so that you can use its features. When you move the pointer away from the window, the window automatically hides itselfhence the name. To make any window hide itself automatically, right-click its title bar and select Auto Hide from its shortcut menu. Alternatively, you can click the little picture of a pushpin appearing in the title bar next to the Close button to toggle the window's Auto Hide state.
Performing Advanced Window Placement
The techniques discussed in this section so far are basic methods for customizing your design environment. Things can actually get a bit more complicated if you want them to. Such complication presents itself primarily as the capability to create tabbed floating windows like the one shown in Figure 2.5. Notice that at the bottom of the floating window is a set of tabs. Clicking a tab shows its corresponding design window, replacing the window currently displayed. These tabs are created much the same way in which you dock and undock windowsby dragging and dropping. For instance, to make the Solution Explorer window a floating window of its own, you would drag the Solution Explorer window tab away from the floating window. As you do so, a rectangle appears, showing you the outline of the new window. Where you release the rectangle determines whether you dock the design window you're dragging or whether you make the window floating. To make a design window a new tab of an already floating window, drag its title bar and drop it in the title bar of a window that is already floating.
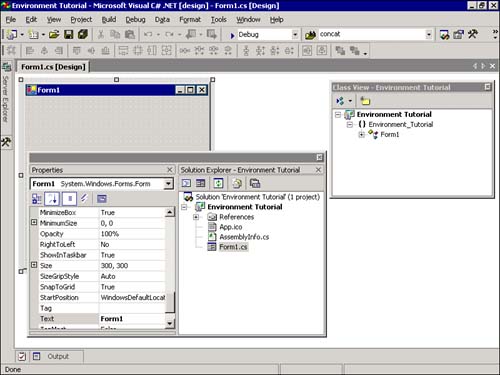
In addition to creating tabbed floating windows, you can dock two floating windows together. To do this, drag the title bar of one window over another window (other than over the title bar) until the shape changes, and then release the mouse. Figure 2.7 shows two floating windows that are docked to one another and a third window that is floating by itself.
Figure 2.7. Floating, docked, floating and dockedthe possibilities are numerous !
Using all the techniques discussed here, you can tailor the appearance of your design environment in all sorts of ways. There is no one best configuration . You'll find that different configurations work better for different projects and in different stages of development. For instance, when I'm designing the interface of a form, I want the toolbox to stay visible but out of my way, so I tend to make it float, or I turn off its Auto Hide property and leave it docked to the left edge of the design environment. However, after the majority of the interface elements have been added to a form, I want to focus on code. Then I dock the toolbox and make it auto hide itself; it's there when I need it, but it's out of the way when I don't. Don't be afraid to experiment with your design windows, and don't hesitate to modify them to suit your changing needs.
Working with Toolbars
Toolbars are the mainstay for performing functions quickly in almost all Windows programs (you'll probably want to add them to your own programs at some point, and Hour 9, "Adding Menus and Toolbars to Forms," shows you how). Every toolbar has a corresponding menu item, and buttons on toolbars are essentially shortcuts to their corresponding menu items. To maximize your efficiency when developing with C#, you should become familiar with the available toolbars. As your C# skills progress, you can customize existing toolbars and even create your own toolbars to more closely fit the way you work.
Showing and Hiding Toolbars
C# includes a number of built-in toolbars for you to use when creating projects. Two toolbars are visible in most of the figures shown so far in this hour. The one on the top is the Standard toolbar, which you'll probably want displayed all the time. The second toolbar is the Layout toolbar, which provides useful tools for building forms.
The previous edition of Visual Studio had about 5 toolbars; Visual Studio .NET, on the other hand, has more than 20 toolbars! The toolbars you'll use most often as a C# developer are the Standard, Text Editor, and Debug toolbars. Therefore, this hour discusses each of these. In addition to these predefined toolbars, you can create your own custom toolbars to contain any functions you think necessary, which you'll learn how to do later in this hour.
To show or hide a toolbar, choose View, Toolbars to display a list of available toolbars. Toolbars currently displayed appear selected (see Figure 2.8). Click a toolbar name to toggle its visible state.
Figure 2.8. Hide or show toolbars to make your work more efficient.
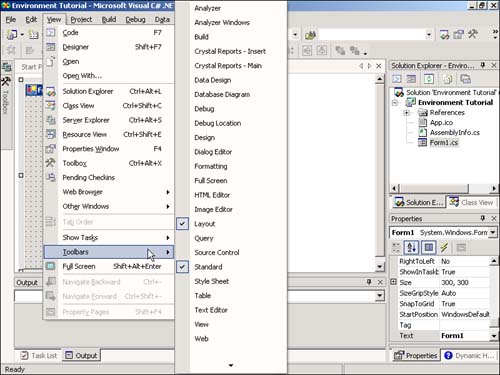
| | A quick way to access the list of toolbars is to right-click any visible toolbar. |
Docking and Resizing Toolbars
Just as you can dock and undock C#'s design windows, you can dock and undock the toolbars. Unlike the design windows, however, C#'s toolbars don't have a title bar that you can click and drag when they're in a docked state. Instead, each docked toolbar has a drag handle (a set of horizontal lines along its left edge) . To float (undock) a toolbar, click and drag the grab handle away from the docked edge. After a toolbar is floating, it has a title bar. To dock a floating toolbar, click and drag its title bar to the edge of the design environment to which you want it docked. This is the same technique you use to dock design windows.
| | A shortcut for docking a toolbar is to double-click its title bar. |
Although you can't change the size of a docked toolbar, you can resize a floating toolbar (a floating toolbar behaves like any other normal window). To resize a floating toolbar, move the pointer over the edge you want to stretch and then click and drag to the border to change the size of the toolbar.
Customizing Toolbars
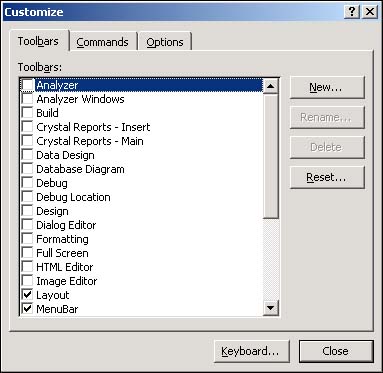
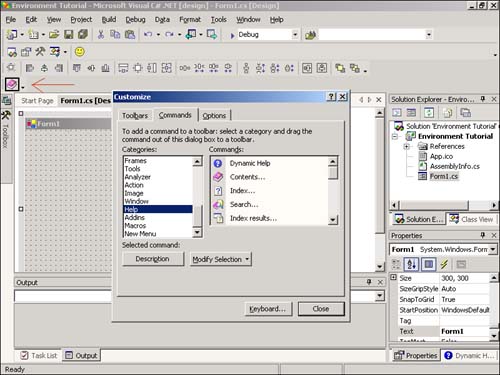
As your experience with C# grows, you'll find that you use certain functions repeatedly. To increase your productivity, you can customize any of C#'s toolbars, and you can create your own from scratch. You can even customize the C# menu and create your own menus. To customize toolbars and menus, you use the Customize dialog box shown in Figure 2.9, which is accessed by choosing View, Toolbars, Customize.
Figure 2.9. Create new toolbars or customize existing ones to fit the way you work.
| | I strongly suggest that you don't modify the existing C# toolbars. Instead, create new toolbars. If you modify the predefined toolbars, you may find that you've removed tools that I refer to in later examples. If you do happen to change a built-in toolbar, you can reset it to its original state by selecting it in the Customize dialog box and clicking Reset. |
The Toolbars tab on the Customize dialog box shows you a list of all the existing toolbars and menus. The toolbars and menus currently visible have a check mark next to them. To toggle a toolbar or menu between visible and hidden, click its check box.
Creating a New Toolbar
You're now going to create a new toolbar to get a feel for how toolbar customization works. Your toolbar will contain only a single button, which will be used to call C#'s Help program.
To create your new toolbar, follow these steps:
-
From the Toolbars tab of the Customize dialog box, click New.
-
Enter My Help as the name for your new toolbar when prompted.
-
Click OK to create the new toolbar.
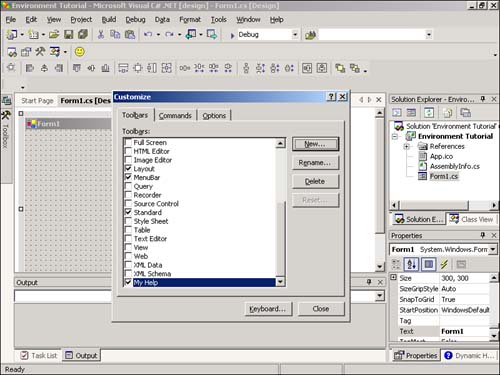
After you've entered a name for your toolbar and clicked OK, your new toolbar appears, floating on the screenmost likely somewhere outside the Customize dialog box (see Figure 2.10). Dock your toolbar now by double-clicking the blank area on the toolbar (the area where a button would ordinarily appear). Your screen should look like the one in Figure 2.11.
Figure 2.10. New toolbars are pretty tiny; they have no buttons on them.
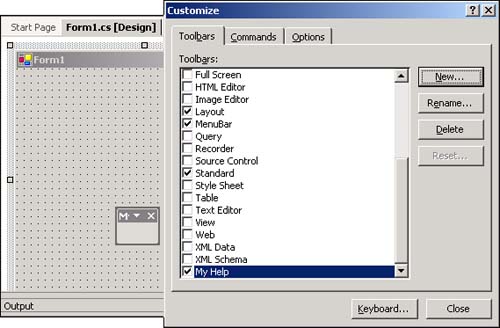
Figure 2.11. It's easier to customize toolbars when they're docked.
Adding Buttons to a Toolbar
Now that you have an empty toolbar, the next step is to add the desired command buttons to it. Click the Commands tab of the Customize dialog box to display all the available commands.
The Commands tab contains the following:
-
A list of command categories
-
A list of the commands for the selected command category
The Categories list shows all available command categories, such as File and Edit functions. When you select a category, all the available commands for that category are shown in the list on the right.
You're going to add a toolbar button that appears as a Help icon and that actually displays Help when clicked.
To add the command button to your toolbar, follow these steps:
-
Locate and select the category Help. All the available commands for the Help category will appear in the list on the right.
-
From the Commands list, click and drag the Contents command to your custom toolbar. As you drag, the pointer changes to an arrow pointing to a small gray box. At the lower-right corner of the pointer is a little hollow box with an x in it. This indicates that the location over which the pointer is positioned is not a valid location to drop the command.
-
As you drag the command over your toolbar (or any other toolbar for that matter), the x in the little box will change to a plus sign (+), indicating that the command can be placed in the current location. In addition, an insertion point (often called an I-beam because that's what it looks like) appears on the toolbar to indicate where the button would be placed if the command were dropped at that spot. When an I-beam appears on your toolbar and the pointer box contains a plus sign, release the mouse button. Your toolbar will now look like the one in Figure 2.12.
Figure 2.12. Building toolbars is a simple matter of dragging and dropping commands.
You can alter any button on a toolbar by right-clicking the button to access its shortcut menu and then choosing Change Button Image. Feel free to experiment with changing the image of the button on your custom toolbar, but be sure to leave the buttons on the built-in toolbars as they are.
To remove a button from a toolbar, drag the button to remove it from the toolbar and drop it somewhere other than on the same toolbar. If you drop the button onto another toolbar, the button is removed from the original toolbar and placed on the toolbar on which you dropped it. If you drop the button in a location where no toolbar exists, the button is simply removed from the toolbar.
| | You can drag command buttons only in Customize mode. If you attempt to drag an item during normal operation, you'll simply click the button. |
| | Although these techniques are illustrated using toolbars, they apply to menus, as well. |
Moving Buttons on a Menu or Toolbar
You should always attempt to group command buttons logically. For example, the Edit functions are all grouped together on the Standard toolbar, as are the File operations. A separator (space) is used to separate groups. To create a separator space, right-click the button that starts a new group and choose Begin a Group from the button's shortcut menu.
You probably won't get the exact groupings you want when you first add commands to a toolbar, but that's not a problem because you can change the position of a button at any time. To move a button on a toolbar, drag the button and drop it in the desired location (remember, you have to be in Customize mode to do this). To move a button from one toolbar to another, drag the button from its toolbar and drop it at the preferred location on the desired toolbar.
Now that your toolbar is complete (Hey, I never said it'd be fancy), click Close on the Customize dialog box to exit Customize mode. All toolbars, including the one you just created, are no longer in Customize mode and they can't be modified. Click the button you placed on your new toolbar and C#'s Help will appear.
Because your custom toolbar really doesn't do much, hide it now to save screen real estate by right-clicking any toolbar to display the Toolbar shortcut menu and then deselecting My Help.
| | As you work your way through this book, you should always have the Standard toolbar and menu bar displayed on your screen. |
Typically, you should customize toolbars only after you're very familiar with the available functions and only after you know which functions you use most often. I recommend that you refrain from modifying any of the predefined toolbars until you're quite familiar with C#. As you become more comfortable with C#, you can customize the toolbars to make your project work area as efficient as possible.
| Top |
EAN: 2147483647
Pages: 253