Section 3.3. Deploying and Managing Agents in a Trusted LAN
3.3. Deploying and Managing Agents in a Trusted LANThe trusted LAN network and security environment is the easiest to work with. The management groups and target computers are all in the same domain and there is high-speed, reliable connectivity between them with no port restrictions. Figure 3-3 shows the Leaky Faucet headquarters site in the LKF domain. You will probably deploy the bulk of your agents into this type of environment. 3.3.1. Preparing the Managed ComputersPreparing for agent deployment starts with preparing the computers that you want to deploy to. Leaky Faucet already knows it must deploy agents to all of its Windows-based servers, so the preparation for the deployment process will be the same for all machines. For each machine that is agent-managed, inventory is taken of the OS and patch level, the amount of free disk space on the system partition, and the size and configuration of the event logs. MOM 2005 can install agents to computers that are running Windows 2000, Professional, or Server with SP4 or higher. Computers that are running an OS and patch level less than this can be monitored in MOM 2005 via agentless management. Because it is noninvasive, agentless management is attractive, but there are trade-offs in functionality. Figure 3-3. Leaky Faucet headquarters site in the LKF domain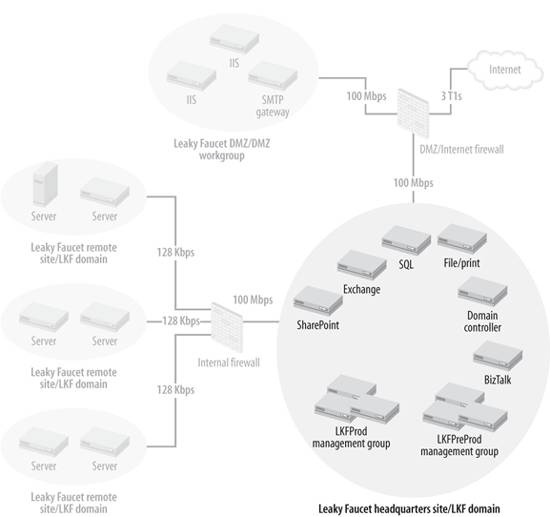 All of Leaky Faucet's servers are running Windows Server 2003 Standard edition. They are not at a consistent patch level across the board, but that is acceptable here. In fact, the Microsoft Baseline Security Analyzer (MBSA) management pack in MOM will tell them where the servers are deficient. The MOM agent is relatively small, requiring only about 3.5 MB when installed with no additional management packs. That being said, there should be at least 100 MB of free space on the drive that is targeted for the agent install. This allows plenty of room for additional management packs and buffers. If the agent is reporting multiple management groups, then add 3 MB more additional space for each additional management group. By default, agents are installed to C:\Program Files\Microsoft Operations Manager 2005; this is configurable based on your needs and can be changed globally, at the management-server level, or when the agent is installed on a per-agent basis. Max, the Leaky Faucet administrator, accepts the default installation location after he inventories the free space on all of the server system partitions via script.
It is important to ensure that the Windows event logs are configured correctly. MOM 2005 gathers a great deal of information from the Windows event logs. If the server stops logging events because the event logs are full, MOM won't able to report on the state of the managed computer accurately. All logs should be configured to "Overwrite events as needed" with a maximum logfile size of at least 25 MB. If you leave the event logs configured to "Overwrite events older than X days" or "Do not overwrite events (clear log manually)," then you will likely miss events while you are manually clearing the logfiles. This is especially true of the security event log, which, on a domain controller, which can generate enough events to wrap on itself in less than a day. Figure 3-4 shows a correctly configured Windows Server 2003 security event log for a domain controller in a small environment. Figure 3-4. A Windows 2003 Security event log configured for MOM 2005 monitoring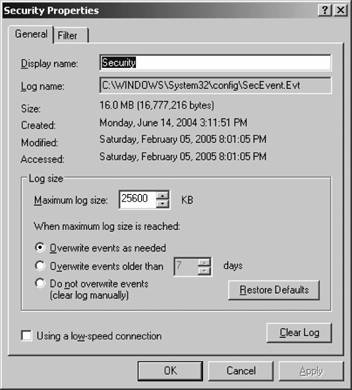 One way to ensure the logfiles are configured correctly is by using AD group policy. AD group policy is a mechanism that enforces configuration settings on computers. Group policies can be applied at the AD site, domain, organizational unit, and local computer levels. Group policies are applied in a specific order, so a policy that is higher in the order can be overridden by one that is lower or inheritance can be disallowed. To access these settings, open Active Directory Users and Computers and select the domain and open its properties. From there, click the Group Policy tab and edit the default domain policy. The settings are under Computer Configuration
You should also be aware of the effective Security Options Audit Group Policy setting that specifies whether the system should be shut down immediately if it is unable to log audit events to the security log. It may be appropriate to have the machine shut down automatically if it can no longer write to the security event log, depending on the security nature of its role. However, if the machine is not in a role that demands a high level of auditing, make sure this setting is disabled. Configuration and application of domain-wide group policy is beyond the scope of this book, so for a detailed treatment of AD group policy, see Learning Windows Server 2003 and Active Directory, both published by O'Reilly. 3.3.2. Preparing the Management GroupAll management group configuration tasks will be performed in the Administration node of the Administrator console. This includes setting the default values for the agents, which was covered in the "Agent Functions" section earlier in this chapter, individual management servers, and the management group globally. To access this node, you must use an account that is a member of the MOM Administrators group. Figure 3-5 shows the default view of the Administrator console with the Administration node selected in the details pane. You can access this Microsoft management console (MMC) tool on the management server and on any computer where the MOM 2005 User Interfaces are installed. Click on Start Figure 3-5. Administration node of the MOM 2005 Administrator console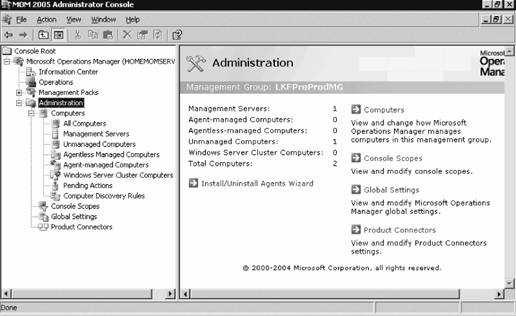 Notice that the details pane shows an inventory and classification of the computers that MOM is aware of and a list of hyperlinks that will take you to the four nodes that are below the Administration node in the hierarchy. To prepare the management group for agent deployment, navigate to the Global Settings node. You can do this either by clicking on the Global Settings hyperlink in the results pane or clicking on the Global Settings node in the navigation pane. Settings configured in the Global Settings node become the defaults for the entire management group. Some defaults can be overridden lower down in the hierarchy and some cannot (see Table 3-1). Familiarizing yourself to the Administrator console, and for that matter the Operator console, can take a bit of time, so be patient. There are multiple entry points into almost every function in both consoles. For the sake of clarity, this book will avoid using hyperlinks and instead show you how to navigate to that point manually. I have found that knowing where an object is located in the hierarchy helps in understanding its function and scope relative to the rest of the objects in the hierarchy. Use the hyperlinks once you know how to navigate the hierarchy and know the purpose of each node. 3.3.2.1. Configure automatic agent installationMOM 2005 can automatically install agents to computers discovered through the computer discovery process, which runs once a day, and uninstall them as well. You may or may not want to this to happen. If you don't care what computers are added to MOM and then start generating alerts, set the discovery process to allow automatic installation, uninstallation, and upgrades. However, if you want more administrative control, accept the default configuration to disallow automatic installation. Figure 3-6 shows the default Automatic Management tab of the Management Servers Properties dialog box. Figure 3-6. The Automatic Management tab controls what MOM 2005 does with computers after each computer discovery cycle is completed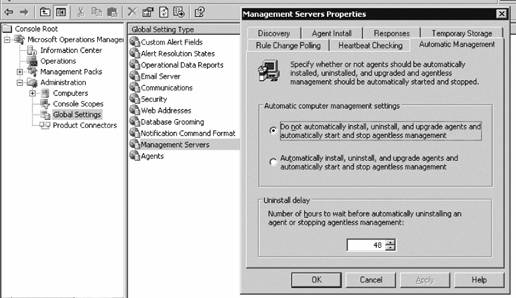 If you allow automatic installation, MOM will attempt to execute whatever install, uninstall, or upgrade action specified on this tab using the management server action account. If the account does not have full administrative permissions on the target computer, these operations will fail. You would receive failure notifications in the Operator console. The "Uninstall delay" setting is useful for allowing a period of time between the creation of a computer discovery rule that will cause the removal of an agent and the actual removal of the agent. This interval can be used to ensure that all critical functions are removed from the node before monitoring is stopped. It is not necessary to modify the default setting for "Uninstall delay" in preparation for agent deployment. By leaving this setting at the default, which is "Do not automatically install" MOM 2005 will place the target computers into the Pending Actions node with an entry indicating what the desired action is after each computer discovery cycle. You can then approve the action and it will be carried out during the next computer discovery cycle, or you can execute the action immediately. This setting can be overridden in the Properties section of each management server. Since Leaky Faucet's administrator, Max, does not want unknown computers using MOM to generate alerts and he doesn't want unexpected configuration changes, he elects to retain the default setting. 3.3.2.2. Configure mutual authenticationWhen you install MOM 2005 into an AD directory services environment, MOM can take advantage of the native Kerberos v5 authentication present in AD. Both clients (managed computers) and servers (management servers) can be required to authenticate each other prior to sending operational or configuration data. AD is required because there must be a valid, secure communications channel between the two machines. Mutual authentication can be used between machines in the same domain and between machines in the same AD tree (AD domains that have a common namespace), but not across domain namespaces (between AD forests) or into untrusted spaces, such as workgroups. For example, if your management groups and agents are in AD domains that share a DNS namespace (are in the same AD tree), such as leakyfaucet.com and headquarters.leakyfaucet.com, you can use mutual authentication. If they are not in domains that share a namespace, such as leakyfaucet.com and drippysink.org, then you can't. For an in-depth treatment of Kerberos, see Kerberos: The Definitive Guide (O'Reilly), and for more details on Microsoft's Active Directory see Learning Windows Server 2003(O'Reilly) and Active Directory (O'Reilly). Mutual authentication can only be configured globally, so there is only one setting for the entire management group. To configure mutual authentication, navigate to the Administrator console Figure 3-7. The Global Settings Security tab with mutual authentication enabled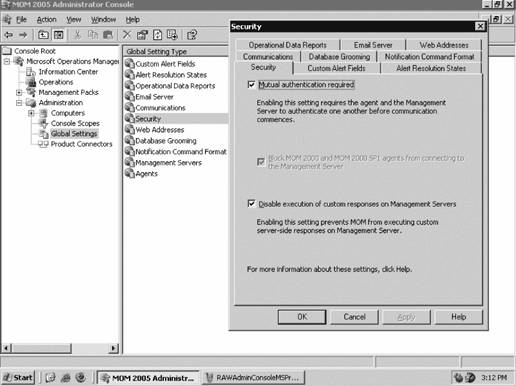 Leaky Faucet has implemented a single AD domain, so mutual authentication was enabled during installation. They choose to accept this configuration because it enhances the overall security of their monitoring solution. 3.3.2.3. Configure rejection of manually installed agentsMOM 2005 agents can be installed on a discovered computer remotely from the management server, or locally at the discovered computer either by manually running the setup from the MOM 2005 installation media, which calls momagent.msi , or by copying the momagent.msi file to the local computer and running it there. The critical difference here is that the remote installation is initiated at the management server and is, therefore, intentional on the part of a MOM administratormanual installation is not. Manual installation can be initiated by anyone with sufficient rights to the machine. When a manual installation is performed, you are prompted for the management group, the management server, and the port to use for communicating with the management group, among other things. The agent connects after it has been given this information. If MOM 2005 couldn't block this type of connection, the management group could be exposed to malicious actions. For manual installation to be enabled, mutual authentication must be enabled as well. Point 1 in Figure 3-8 shows the default configuration at the global level that enables automatic rejection of manually installed agents. Figure 3-8. The default Global Settings rejects manually installed agents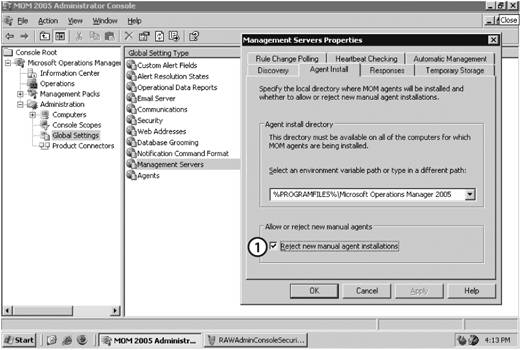 This setting is configurable globally, but can be overridden at the management server level. To install agents manually, which is the only method of installing agents on computers that are separated from the management server by a firewall, you should override this setting on a single management server. When you change this setting, you must also right-click the Management Packs node, select Commit Configuration Change, and then restart the MOM service on all the management servers in the management group for it to take effect. Opening a single management server to manually install agents, rather than all of the management servers in a management group, gives you a higher degree of control and reduces your exposure. You can configure failover to other management servers during manual agent installation without opening up the secondary management server during manual agent installation. After the manual agent installation is complete and the agents have been added to the management group, re-enable this setting until next time. Because Leaky Faucet is first installing agents into a trusted network with no port restrictions between targeted computers and the management servers, Max will use the remote push-type installation of agents. Max overrides the default setting, see Figure 3-9. Figure 3-9. Override the globally set "Reject new manual agent installations" on a specific management server 3.3.3. Configuring and Running Computer DiscoverySo, the servers that you want to manage are now prepared and you've configured the pertinent parameters in the management group to allow the deployment of agents in this environment. The remaining task to do before the agents are deployed and the machines are monitored is to make the management servers aware of the target machines. You do this by creating computer discovery rules , which are really just filters that look for matches to search specified criteria. When a match is found between the scanned computers and the search criteria, a mapping to the managed computer is created on the management server. This mapping makes the management server responsible for agent administration and monitoring on that machine. MOM 2005 has three ways to create the mapping between the scanned computers and the search criteria. Each method has its advantages and drawbacks:
Do your initial discovery by creating your rules in the Computer Discovery Rules node. This method gives you the greatest flexibility and describes the configurable parameters. Skip the wizard to start with, because it does other things at the same time and there are certain restrictions associated with it. The ManualMC.txt method is a holdover from the previous version of MOM. So, you either have to maintain it manually on each management server or develop scripts to do so; either way is prone to human error. 3.3.4. Creating Rules in the Computer Discovery Rules NodeTo start creating rules, navigate to the Computer Discovery Rules node in the Administrator console, then right-click and select Create Computer Discovery Rule. This brings up the Computer Discovery Rule options dialog box (see Figure 3-10). This box holds all the fields that can be configured for this filter. In this management group there are two management servers, homemomserver and homemomserver2, and a separate database server that holds the operations and reporting databases. By default, a fresh installation of MOM 2005 will only install agents on the management servers. So, if the operations database is not on a management server, you will need to configure a discovery rule to map it to a management server and install an agent. Figure 3-10. Computer Discovery Rule options dialog box The computer discovery rule options are as follows:
Finally, the two checkboxes, "Apply query criteria to domain controllers" and "During computer discovery, contact each computer to verify that it exists," change how the query runs. By default, queries are not applied to domain controllers, nor do they verify the existence of a server. So, if you have stale computer entries in AD, the "Verify existence" setting can help weed them out at the cost of increasing the overhead and time required to complete the search. If a computer is accidentally included for management on different management servers in the same management group, it will switch primary management servers every time the discovery cycle is run. This is something you want to avoid, so be careful with your filter construction. If a computer is included for management on management servers that are in different management groups, then it becomes a multi-homed computer and will accept configurations from and send data to both management groups. 3.3.4.1. Running computer discoveryNow that the discovery rule has been configured, you can either initiate a full computer discovery cycle or wait overnight for MOM to kick discovery off automatically. To initiate discovery immediately, right-click the Computer Discovery Rules node or the Management Servers node and select Run Computer Discovery Now. A pop-up box will appear, confirming that a computer discovery task has been submitted to the management servers. The management server then queries the domain that was specified in the rule and applies the search criteria. If you have configured the rule to verify existence or to determine the computer role of the matches it finds, it will perform those actions now as well. What happens next depends on how you configured automatic agent installation. If you allowed it, the management server will attempt to execute whatever action the rule specifies. For example, if you have created an Include rule that specifies the initial management mode as agent-managed, the management server will attempt to push an agent to the newly discovered computer using the management server action account credentials. If you have created an Exclude rule that has all the other settings configured identically, it will schedule an uninstall action for the targeted agents that will wait until the uninstall delay interval has passed and then uninstall the agent.
If you have disallowed automatic agent installation, then the management server will place an entry for the discovered computers in the Pending Actions container, as shown in Figure 3-11. Figure 3-11. The contents of the Pending Actions container after the computer discovery task has run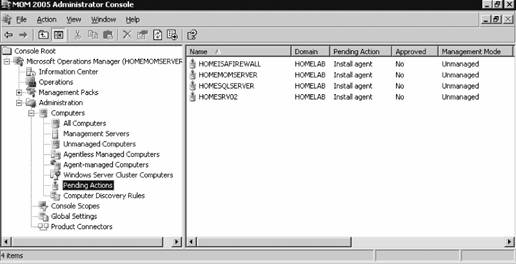 Figure 3-11 shows that four computers have been found that match the search criteria. The domain controller homesrv02 is listed because the search criteria were applied to domain controllers. homesqlserver has been discovered, its management mode is currently Unmanaged, and the desired Management Mode is Agent-Managed. MOM 2005 will hold the discovered computers in this state until an administrator approves or rejects the desired action, or initiates the action immediately. You make this choice by right-clicking the computer or group of computers and selecting the desired action. Again, if you choose to approve the action, MOM will attempt to execute it during the next discovery cycle using the management server action account credentials. Using the Computer Discovery Rules node to create discovery rules, run discovery cycles, and install/uninstall agents gives you the most flexibility of the three methods. It also gives you access to all options and incorporates the best features of the other two methods. 3.3.5. Installing Agents via Computer Discovery RulesBecause Leaky Faucet (and homelab) chose a management server action account that is a domain user account with no administrative rights on any computers except the management servers, approving the desired action for the discovered computers will always fail. The next step is to choose the Install Agent Now option, as shown in Figure 3-12. Figure 3-12. Selecting the Install Agent Now option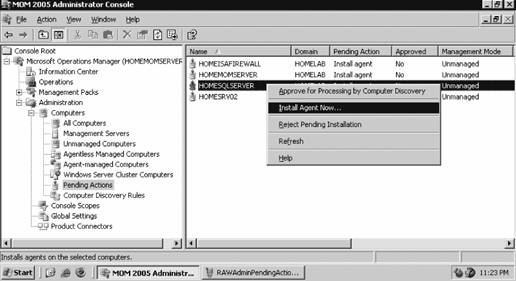 This starts the Install Agent Wizard, which prompts you for a set of credentials to install the agent on the target computer, as shown in Figure 3-13. These credentials are stored securely during the install process and are then disposed of. Choosing to install agents in this manner does not impose any restrictions. This technique is used to build security into your procedures. For example, if the installation account is the domain administrator account or equivalent, or the target machine's local administrator account, then an administrator would enter the credentials at this time. If this person isn't the original MOM administrator, then an additional individual will have to be added to the agent deployment or removal process, which introduces a human checkpoint and bottlenecksecurity is always a trade-off. Figure 3-13. Provide the necessary credentials at agent install time Next, you are prompted to identify and provide the credentials for the Agent Action Account, as shown in Figure 3-14. The local system account is chosen and since this account has full rights to the local machine and the password is automatically managed, you are relieved of that responsibility. The next prompt is for the agent installation directory. Remember this defaults to the %Program Files%\Microsoft Operations Manager 2005 folder, which is on the C: drive. Since this is the drive that was inventoried for space, accept the default. This takes you to the Completing the Install Agent Wizard page shown in Figure 3-15, which provides you with a summary of the actions and allows you to choose to view the task progress. Click Finish to start the installation of the agent. By selecting the "Show task progress" checkbox, the progress of the agent installation is tracked and displayed, as shown in Figure 3-16. Note that if you selected multiple machines, this single display window would have tracked all of the agent installations. Once finished, the tracking window will display the final status of the action. If a successful status is returned, this is the first indicator that the agent installation has completed and the target server is now being monitored. If the installation process encounters an error and fails, the tracking window will return a failure status along with initial diagnostic information for the failure (see Figure 3-17). The failure was caused by not providing the correct agent installation credentials to the agent installation wizard. Figure 3-14. Selecting the agent action account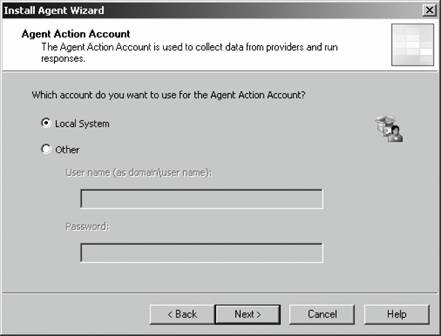 Figure 3-15. The summary of the Agent Installation Wizard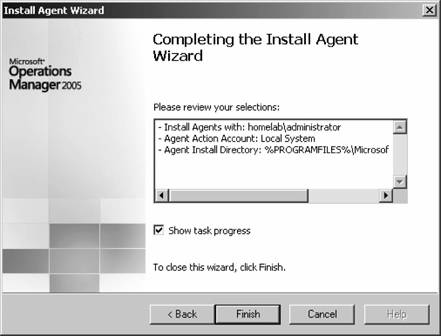 At this point, the server homesqlserver has been removed from the Pending Actions container and placed into the Agent-managed Computers container. The computer is being monitored and will now appear in the operator console as well. The computer that the installation failed on will remain in the Pending Actions container. Figure 3-16. Tracking the progress of the agent installation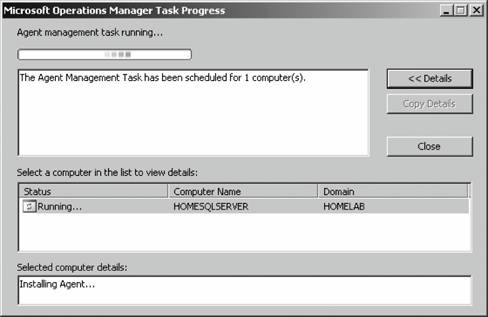 Figure 3-17. Returned failure status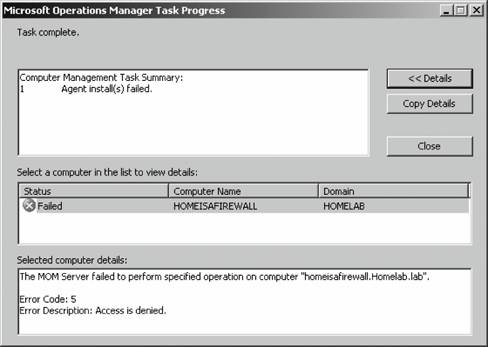 3.3.6. Confirming Agent FunctionalityThe last task in successful agent deployment is to confirm that the agent has installed successfully and is returning data to MOM. The first indication of a successful deployment is the success status returned at the end of the agent installation wizard. The second indication is that you can examine the computer data in the results pane of Agent-managed Computers container and access the properties of the agent on the target computer, in this case homesqlserver (Figure 3-18). Figure 3-18. Agent-managed Computers data in the Administrator console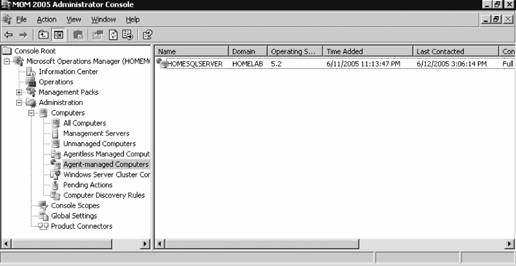 Figure 3-18 shows that the agent is returning data, the time the server was last contacted, the time and date that it was successfully added to MOM, and the primary management server. If you right-click the managed computer and bring up its properties, as shown in Figure 3-19, you can see additional information such as the time of the last good heartbeat and any alerts generated for this computer. These are all definitive indicators that the agent has installed successfully. The last step is to confirm that end-to-end monitoring is occurring successfully. This is done in the Operator console. Navigate to the State view, select the target computer, and launch the Test End to End Monitoring task against it. This should produce a 9898 informational event that is viewable in the Public Views Type: Information Domain: HOMELAB Computer: HOMESQLSERVER Description: The task 'Microsoft Operations Manager\Test End to End Monitoring' has successfully executed against 'Computer:HOMELAB\HOMESQLSERVER'. Launched By: HOMELAB\user1 The following output has been generated: Source: Microsoft Operations Manager Event Number: 9898 Provider Type: Generic Provider Provider Name: Internally-generated Event Source Domain: HOMELAB Source Computer: HOMESQLSERVER Figure 3-19. The properties of a newly installed agent as shown in the Administrator console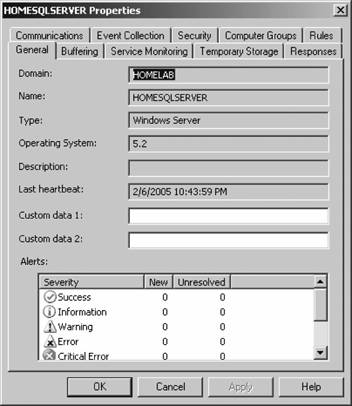 This shows that the agent was successfully deployed and is working. Chapter 4 discusses how processing rules are passed to the agent and what the agent does with them. As far as agent administration, there are only a few other tasks that you can perform: uninstalling the agent, forcing it into unmanaged mode, and updating the agent's settings. 3.3.7. Creating Computer Discovery Rules and Installing Agents via the Install/Uninstall Agents WizardOne alternate method of installing agents combines the creation of the computer discovery rule with a limited discovery cycle and agent install/uninstall. This is probably the quickest method for installing or uninstalling agents, but you lose the ability to configure some of the deployment options. For example, you can only create Include computer discovery rules . But you can browse for target computers in addition to creating the search criteria. To start the Install/Uninstall Agents Wizard, click on the hyperlink by that same name in the results pane, as previously shown in Figure 3-5. Or right-click on the Computers node, the All Computers node, or the Agent-managed Computers node in the navigation pane of the Administrator console. After the welcome page, select the management server to apply the computer discovery rule (see Figure 3-20). In this case, homemomserver2 is selected. Because homemomserver2 currently has no agents reporting to it, the wizard automatically proceeds through the steps to install or uninstall agents. If you selected a management server that was already managing agents, the wizard would prompt you to proceed with the install or uninstall process. Figure 3-20. Selecting a management server to create the Computer Discovery Rule on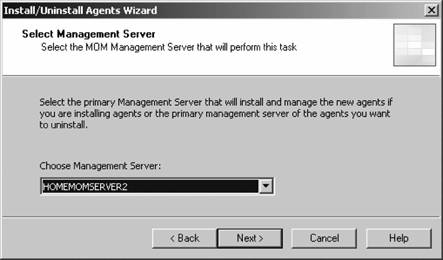 Next, you can browse for a computer or group of computers, or create the search criteria using the same process as the Computer Discovery Rules method (see Figure 3-21). This is described in the previous section, "Confirming Agent Functionality." Figure 3-21. Selecting the method for computer discovery and agent installation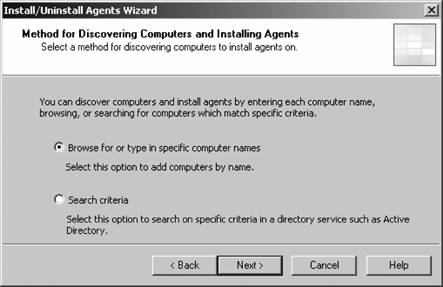 If you select the "Browse for or type in specific computer names" option here, you can enter the specific computer names in either FQDN or domain\NetBIOS name format, as shown in Figure 3-22. Figure 3-22. Enter the specific computer names for the Computer Discovery Rule to search for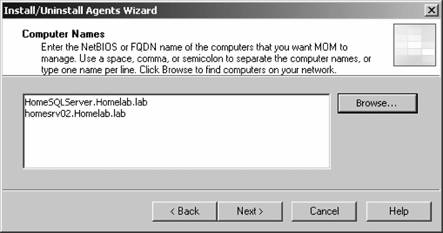 The browse button presents you with the familiar Select Computers (object picker) query configuration box that you use to find objects in the Active Directory Users and Computers tool, as shown in Figure 3-23. Figure 3-23. The Select Computers (object picker) query configuration tool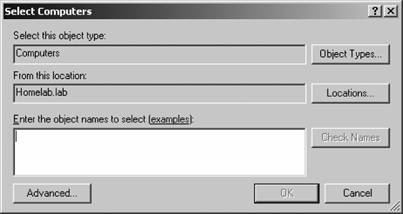 If you select the "Search criteria" option in the Method for Discovering Computers and Installing Agents page (see Figure 3-21), you are presented with the same Computer Discovery Rule dialog box as discussed in the previous section. However, your options for rule configuration are not available, namely the management server, the rule type, and the initial management mode. By default, the wizard also selects to verify the existence of the target computers (Figure 3-24). If you need to control the rule type or management mode options, you should not use the install/uninstall agents wizard. Figure 3-24. Using the agent install/uninstall wizard limits your options for configuring discovery rules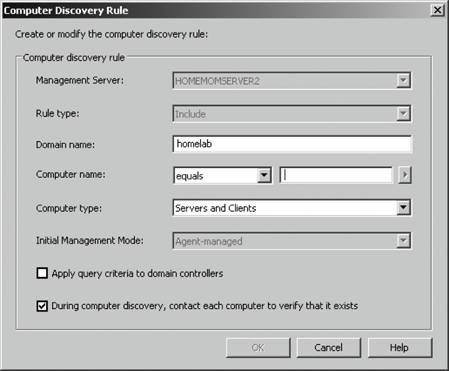 Once you have identified the target computers through one of these methods, the install/uninstall agents wizard behaves identically to the agent install wizard. It prompts you for the credentials to install the agent, for the agent action account, and the directory to install the agent. When you finish the wizard, the same task progress feedback appears. The install/uninstall agents wizard then performs a limited computer discovery cycle that only looks for computers according to the rule/filter that was created in the wizard and executes the install/uninstall action against it. This is unlike the daily full discovery cycle, which will search the network and apply all discovery rules that have been configured, execute the actions specified in those rules, execute any actions that have been approved for computers in the Pending Actions container, and place discovered computer names into the operations database. The difference between the previous method and this one is that in this method, the action will be executed regardless of the automatic agent installation setting. The target computers are never placed into the Pending Actions container, so there is no opportunity to reconsider or to check your work once you click Finish in the wizard. Although this method of installing agents may seem easier, the functionality that is lost is not offset by the ease of use. I don't used this wizard because it adds little value in my eyes. At this point, if you used the wizard to perform an agent install, you should go through the steps to confirm agent functionality. 3.3.8. Discovering and Installing Agents via ManualMC.txtTo use this method of installing agents, simply create a text file named ManualMC.txt on the management server that will own the agents and populate it with the names of the desired target computers. You can use FQDN, NetBIOS name, or domain\NetBIOS format. Here is an example of the contents of a ManualMC.txt file using the FQDN format: avalon.homelab.lab homesrv02.homelab.lab homee2k3server.homelab.lab homememberserver.homelab.lab Note that there is only one entry per line and that there are no spaces between the lines. Also, for the sake of clarity, you should use a single format for the computer name for all entries. If you need to add computers that are not members of a domain, use the workgroup\NetBIOS name format. Place this file in the \%SystemRoot%\Program Files\Microsoft Operations Manager 2005 or the directory you installed MOM into. When the next full discovery cycle runs, the management server will either place these computers into the Pending Actions container for further action or execute the installation based on the automatic agent installation settings. To uninstall an agent that was installed using this method, simply delete its entry from the ManualMC.txt file and either wait for the daily discovery cycle to run or initiate a full discovery cycle yourself. Remember, if you want the management server to perform the install/uninstall tasks automatically, then the management server action account must have full administrative rights on the target computers. This text file method for discovering and installing agents is the easiest to configure but also gives you the fewest options and no immediate feedback except by monitoring the Administrator and Operator consoles for the expected changes. With this method, as with the wizard, you can only identify computers that will be agent managed, and you cannot use the ManualMC.txt file to exclude a computer from being managed by a management server. Using this method overrides all other Include rules but not Exclude rules for that management server. This method is error-prone because it must be manually maintained on a daily basis. 3.3.9. Miscellaneous Agent Management TasksUninstalling the agent is a very simple task. Right-click the managed computer in the Agent-managed Computers container in the Administrator console, select Uninstall Agent, and provide the appropriate credentials. With this method there isn't a convenient toolbar. Forcing the computer into unmanaged mode is the same except there is no prompt for credentials. You'll need to update an agent to change things like the storage space allocation on the agent, the communication port, the "Collect event binary data" settings, and the agent control level if it is set to None. Most significantly, if you need to change the agent action account or if the mutual authentication setting is changed, these modifications will need to be pushed down to the agent by the Update Agent Settings feature in the Administrator console. You can access this feature in the Agent-managed Computers container by right-clicking on the managed computer and selecting Update Agent Settings. When invoked, this prompts for the necessary administrative credentials to update the agent settings, as well as the account to be used as the agent action account, which you do not need to provide. Pushing agent updates to managed computers is a different process than pushing management pack updates to managed computers. For example, if you make a change to a threshold where a processing rule generates an alert, or if you disable a rule, these changes are pushed down automatically once a minute. Updating agent settings is a manual process and is only needed when reconfiguring the agent. |

 Window Settings
  Global Settings
 EAN: 2147483647
Pages: 107