Windows Forms Applications
| for RuBoard |
The user interface for a Windows-based application is built using the set of classes in the System.Windows.Forms namespace, collectively referred to as Windows Forms. These types are found in the System.Windows.Forms.dll assembly and take full advantage of the user interface features of the Windows operating system. You can create a Windows Forms application by selecting the Windows Application project template in the New Project dialog.
From within a user interface built with Windows Forms, there are two primary concerns when using ADO.NET:
-
How you bind data in a DataSet , DataTable , DataView , or DataViewManager object to controls
-
How you validate the contents of those controls
In this section, you'll learn how to do both.
Using Data Binding
When your data services tier returns data to the user interface, the main requirement, of course, is to display that data so that the user can view and/or edit it. Rather than having to write loops that traverse, for example, the rows and columns of a DataTable and place the data in the properties of controls, it is more efficient and productive to take advantage of the data-binding features provided by Windows Forms.
To act as a provider (or data source) to Windows Forms data binding, however, a class must implement particular interfaces. At the most basic level, the System.Collections.IList interface (itself derived from ICollection ) that is the basis for all lists in the framework must be implemented. This interface is implemented by more than 40 classes in the .NET Framework, including Array and ArrayList , in addition to the CollectionBase class that provides the abstract base class for strongly typed collections. In other words, Windows Forms controls can be bound not just to ADO.NET objects, but also to other objects such as arrays and custom collections that implement the IList interface. As a result, you can also use data binding with collections of objects you create, as you'll see tomorrow.
Note
Technically, the DataSet and DataTable classes implement the IListSource interface. This interface contains a method called GetList and a property called ContainListCollection that return an IList that can be bound and that specify whether the collection is a collection of IList objects or other objects, respectively. The IListSource interface is useful because the object might not implement the IList interface directly, as in this case.
At a slightly higher level, a data source can implement the IBindingList interface, which itself implements the IList interface. The IBindingList interface adds additional methods and properties used to enable editing, sorting, and notification of changes to the list by raising the ListChanged event. The DataView class in ADO.NET implements this interface.
Finally, the data source can implement the IEditableObject interface as the DataRowView does to add commit and rollback functionality to the object.
After you have an object capable of acting as a data source, controls or even properties on the Windows Form can act as consumers. The consumer architecture is shown in Figure 16.1.
Figure 16.1. Windows Forms consumer architecture. This diagram shows the data-binding architecture used on a Windows Form.
Basically, when you use data binding, the Windows Form will contain instances of the CurrencyManager and PropertyManager classes for each data source that is used on the form, both of which inherit from the abstract BindingManagerBase class. The PropertyManager class will be used when the data source returns only a single object, whereas the CurrencyManager is used when the data source exposes a collection of objects. The CurrencyManager keeps track of the position of the bound object through its Position property. This architecture is interesting because it implies that the data source object itself doesn't have any notion of a position, so a single data source can be bound to multiple controls and be navigated independently. Both classes then expose a collection of data bindings ( Binding objects) through a BindingCollection object. The Binding object is what actually maps the data source to the property of the control that is being bound. In terms of the control acting as the consumer, the bindings are accessed through the DataBindings property, which returns an instance of the ControlBindingsCollection object.
The form (or actually any class that inherits from Control ) then exposes a BindingContext object that manages the descendants of BindingManagerBase .
Tip
Although you'll typically just use the BindingContext object exposed at the form level, you can create a BindingContext object for a container control such as a Panel or GroupBox . You might want to do this to make your code simpler to write because it eliminates a level in the dot notation you must use.
In the remainder of this section, you'll see how you can use both simple and complex binding to bind data from a data source to controls.
Simple Binding
| | Simple binding refers to the process of binding the property of a control that contains a single value to a data source. In other words, controls such as the TextBox and Label will be simple-bound because their Text properties return a single value, whereas the ListBox control can use complex binding because it returns multiple objects through its Items property. However, a control can use both complex and simple binding because some of its properties might return single values whereas others might return multiple values (as in the case of the MonthCalendar control). In addition, simple binding can be used to bind other properties of controls (or forms) to the data source, like those used to change the display, such as Font , ForeColor , Left , Right , and Top . |
Simple binding can be performed both graphically at design time and programmatically at run time. With ADO.NET, you would typically use design-time binding when you have previously dragged and dropped a strongly typed DataSet or DataView onto the form's designer. In other words, to use the graphical interface, the DataSet or DataView must be accessible at the form level by declaring them with the Friend ( internal in C#), Protected ( protected ), or Public ( public ) keywords in VB. They must also contain tables and strongly typed columns.
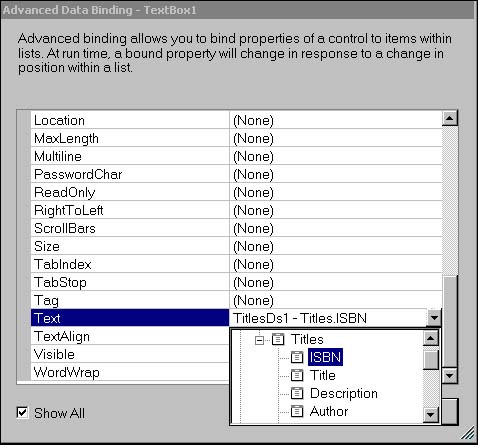
When this is the case, it is a simple exercise to navigate to the DataBindings property in the property window and either enter the binding expression in the appropriate sub-property (such as Tag or Text ) or click on the ellipsis next to the Advanced property to open the Advanced Data Binding dialog. The Advanced dialog allows you to bind to many of the other properties on the control, as shown in Figure 16.2.
Figure 16.2. Using simple binding. This screen shows the Properties window and Advanced Data Binding dialog used to graphically bind a property to a data source.
However, if you're not using strongly typed DataSet objects, you'll need to set up binding programmatically. This can be accomplished by creating a private method within your Windows Form, for example, and creating the Binding objects directly. Listing 16.1 shows an example of programmatic data binding.
Listing 16.1 Programmatic data binding. This method binds the columns of a DataSet to controls on a Windows Form.
Private Sub _setupBinding() ' Set up the DataView dv = New DataView(dsTitles.Tables(0)) ' Set up bindings txtISBN.DataBindings.Add("Text", dv, "ISBN") txtTitle.DataBindings.Add("Text", dv, "Title") txtDesc.DataBindings.Add("Text", dv, "Description") txtPrice.DataBindings.Add("Text", dv, "Price") txtPub.DataBindings.Add("Text", dv, "Publisher") txtAuthor.DataBindings.Add("Text", dv, "Author") txtPubDate.DataBindings.Add("Text", dv, "PubDate") End Sub | | You'll notice in Listing 16.1 that the DataView (also a form-level object like dsTitles ) was created from the first table in the dsTitles DataTable collection. You might want to do this if you need to sort and filter the view of the data that the user will see. The Add method of the DataBindings collection for each control was then invoked and passed the property to bind to, the data source (in this case, the DataView ), and the member within the data source to get the data from. Alternatively, the Add method can accept a separately instantiated Binding object. |
One of the interesting points to note is that the second and third arguments of the Add method may overlap, and that the precise syntax you use has an effect on how many CurrencyManager objects are created within the BindingContext . For example, consider what would happen if the method in Listing 16.1 had contained the following two statements:
txtISBN.DataBindings.Add("Text", dsTitles.Tables(0), "ISBN") txtTitle.DataBindings.Add("Text", dv, "Title") Although both would bind to the DataView correctly, because the second argument doesn't refer to exactly the same data source, the BindingContext of the form will see these as two separate data sources and thus create two CurrencyManager objects. The result is that the Text properties of the two controls won't be synchronized as the data is navigated through. This is important because if you create bindings graphically and then want to add a Binding programmatically that uses the same CurrencyManager , you need to specify only the top-level data source object in the second argument and defer the rest to the third argument. For example, the following two statements both bind the ISBN column, but the second specifies the table name in the third argument rather than the second:
txtISBN.DataBindings.Add("Text", dsTitles.Tables("Table"), "ISBN") txtISBN.DataBindings.Add("Text", dsTitles, "Table.ISBN") Note also that in the third argument, you would use the actual name of the table ”in this case, the default "Table"--as specified in the TableName property.
Note
You can also use this behavior when binding to strongly typed DataSet objects. In this case, you don't have to fully qualify the DataSet and table name in the second argument and defer the table name to the third argument using dot notation.
Although this behavior might be useful if you need to display two different rows on the same form, generally , you'll want all the bindings to exist under the same CurrencyManager for a particular data source.
Navigation
Of course, when using simple binding, you'll also need to implement navigation. This is easily done by manipulating the CurrencyManager object's Position property and noting the current position using its PositionChanged event.
For example, to create an event handler for a button that moves the position of the CurrencyManager created in Listing 16.1, you could use the following code:
Private Sub btnNext_Click(ByVal sender As System.Object, _ ByVal e As System.EventArgs) Handles btnNext.Click Me.BindingContext(dv).Position += 1 End Sub
Notice that the default property for the BindingContext property returns a BindingManagerBase object when passed the data source object for the binding. In this case, a CurrencyManager object is returned and its Position property is incremented.
Note
Manipulating the Position property of the BindingManagerBase object when it is instantiated as a PropertyManager object has no effect.
In the event that the end of the CurrencyManager is reached, no exception will be thrown and its position will remain at the end of the cursor. However, if you want to be notified when the beginning or end occurs, you can catch the PositionChanged event and test the current position as shown in Listing 16.2.
Listing 16.2 Position notification. This event handler can be used to catch the invocation of the PositionChanged event for a CurrencyManager .
Protected Sub titles_PositionChanged(ByVal sender As _ Object, ByVal e As EventArgs) If Me.BindingContext(dv).Position = Me.BindingContext(dv).Count - 1 Then btnNext.Enabled = False Else btnNext.Enabled = True End If If Me.BindingContext(dv).Position = 1 Then btnPrev.Enabled = False Else btnPrev.Enabled = True End If End Sub
You might want to do this to change the user interface, as in this case, where the btnNext and btnPrev buttons are enabled and disabled. Note that the CurrencyManager also fires a CurrentChanged method when the current row in its list changes. The difference is that the CurrentChanged method passes into the handler an instance of ItemChangedEventArgs , which includes the Index property to enable you to determine the locus of the navigation.
In order for the event to be called, you must also set up a handler for it by using the AddHandler statement in VB or by adding to the invocation list of the delegate in C#. In VB, you might use code like the following in the _setupBinding method shown in Listing 16.1:
AddHandler Me.BindingContext(dv).PositionChanged, _ AddressOf Me.titles_PositionChanged
Formatting
When you use simple binding, you also typically need to format the value of the property as it is bound to the control and then parse the value before it's used to update the data source. Fortunately, the Format and Parse events of the Binding object can be used to do this.
The Format event fires as the data from the data source is pushed to the control and again after it has been changed and pushed back to the control. A typical use for the Format event is to format decimal values into currency formats for display in a TextBox . For example, the Price column of the DataView in Listing 16.1 is bound to the txtPrice TextBox control. For the price to display as currency, the event handler in Listing 16.3 could be written.
Listing 16.3 Formatting data. This event handler handles the Format event of a Binding object to format currency for display in a TextBox .
Private Sub _formatCurrency(ByVal sender As Object, ByVal e As ConvertEventArgs) If e.DesiredType Is GetType(String) Then e.Value = Format(e.Value, "currency") End If End Sub
| | Note that this method accepts the ConvertEventArgs object as the second argument, which exposes the DesiredType and Value properties. The DesiredType indicates the type of data that the control is expecting (in this case, String ) when the value from the data source is formatted. The Value property contains the value from the data source. Here, the DesiredType is checked to ensure that the method is being called only when the property of the control expects a String because the Format method returns a String . By changing the Value , you can explicitly determine how the data will be converted. If you don't handle this event, the data will be automatically cast to the appropriate type. Because this event fires after a user has changed the data in the control, it effectively reformats the data for display when the user moves off the control. This has a nice effect because the users can immediately see their changes properly formatted as they navigate the form. If the data can't be formatted correctly, no exception will occur and the old value will be displayed. |
Note
Although the documentation states that the Format event will fire the first time the property is bound, that doesn't appear to be the case. To make sure that the Format event fires, you can set the Position property of the CurrencyManager object to 1 immediately after you set up the bindings; for example, in the _setupBinding method.
Of course, for the _formatCurrency event to fire, you need to add an event handler like so:
AddHandler txtPrice.DataBindings(0).Format, AddressOf Me._formatCurrency
To perform more sophisticated operations, you can also choose to handle the Parse event, which will fire immediately before the data source is updated and before the Format event. The Parse event is useful when the user can enter a more sophisticated string that can't be converted directly to the data type of the data source. For example, if you allow users to enter ISBNs with hyphens (as in 0-6722-1236-5), the parse event could be used to strip the hyphens before the data is sent to the data source. The Parse event also populates an instance of ConvertEventArgs that you can use.
Tip
Although it is beyond the scope of this book, the Parse event is a good place to use regular expressions, as found in the System.Text.RegularExpressions namespace. As a simple example, the RegEx class exposes a Replace method that can be used to replace all occurrences of one pattern with another in a string. The string can then be converted to the appropriate type within the Parse event. See the online documentation for more details.
Complex Binding
| | Some controls support the ability to bind to an entire collection of items exposed by the data source, referred to as a complex binding. Of course, when using ADO.NET this means binding directly to the rows of DataTable objects or indirectly using a DataSet or DataView object. These controls, such as the ListBox , CheckedListBox , ComboBox , and DataGrid , expose their bindings for display through the DataSource property. Those controls that display only a single value for each item, such as ListBox , CheckedListBox , and ComboBox , expose DisplayMember and ValueMember properties that are set to the member (column) to display and the member to update in the data source, respectively. The DataGrid , on the other hand, can display multiple values for each item, so additional properties aren't required. However, the DataGrid does expose a DataMember property that references the actual object (table) within the data source that provides the items to bind to. |
Note
Just as in simple binding, you have the option of creating the bindings graphically or programmatically. Once again, the graphical approach works particularly well for strongly typed DataSet objects.
Programmatically, this means that when using a ComboBox to display a pickable list of publishers, for example, you could use the following code:
cbPub.DataSource = ds.Tables(0) cbPub.DisplayMember = "Description" cbPub.ValueMember = "PubCode"
In this case, cbPub is the ComboBox and you'll notice that the DataSource property can be set to either a DataTable or a DataView . In addition, the DisplayMember property indicates that the Description column from the table will be shown to the user and will be available through the SelectedText property. The PubCode column will be available through the SelectedValue property.
In order to then bind the SelectedValue property to the DataView shown in Listing 16.1, you can simply add a Binding object programmatically as follows :
cbPub.DataBindings.Add("SelectedValue", dv, "PubCode") This ensures that as the CurrencyManager for the DataView is positioned, the correct value in the ComboBox is selected. It also ensures that if the user selects a different value from cbPub , the underlying PubCode column in the DataView will be updated.
For a DataGrid , the DataSource property can be set to either a DataSet or a particular DataTable or DataView . If a DataSet is specified, the DataMember property can also be set to indicate which table is to be displayed. If a table isn't specified in the DataMember property, the grid will display all the table names and the users will have to drill down into the table they want to view. This can be confusing to the user, so you should generally choose one of the tables to display by default.
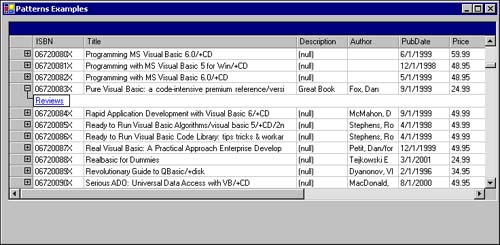
The most interesting behavior of the DataGrid when bound to a DataSet , however, is that if the DataSet contains relationships, the grid provides a drill-down capability to filter the child rows accordingly . For example, if the dsTitles DataSet contains tables that hold both the Titles and Reviews , by drilling down into each Title , the Reviews for that book will be shown. This is depicted in Figure 16.3.
Figure 16.3. Navigating relationships. The DataGrid automatically navigates the relationships when bound to a DataSet .
You should also keep in mind that relations can be useful when combining simple and complex binding. For example, assume that a form contains simple bound controls that display the information for a book. In addition to the columns of the Titles table, you might also want to display the number of stars for each review submitted for the book in a ListBox control. This can be done by binding both the simple controls to the dsTitles DataSet and then binding the ListBox through the relation. For example, the following code displays the Stars column in the ListBox :
txtISBN.DataBindings.Add("Text", dsTitles, "Table.ISBN") ' Other simple controls lbReviews.DataSource = dsTitles lbReviews.DisplayMember = "Table.TitlesReviews.Stars" Here, the simple controls would need to be bound to the DataSet directly and then their columns specified in the third argument to the Add method. The DisplayMember property of the ListBox can then be set to the fully qualified name of the column as navigated to through the view. In this case, the name of the relation is TitlesReviews .
Manual Binding
Although you might think that data readers would be bindable to Windows Forms controls, they aren't because they don't expose the IList or the other interfaces discussed previously. However, data readers can be useful for populating controls that don't support complex data binding, and are typically used for read-only data such as the TreeView and ListView , as shown in Listing 16.4.
Listing 16.4 Manual binding. This listing shows how you might manually bind a data reader to a ListView control.
Private Sub _bindLvTitles(ByVal dr As IDataReader) ' Setup the ListView lvTitles.Columns.Add("ISBN", 250, HorizontalAlignment.Left) lvTitles.Columns.Add("Title", 750, HorizontalAlignment.Left) lvTitles.Columns.Add("Author", 500, HorizontalAlignment.Left) lvTitles.LargeImageList = imgCover imgCover.ImageSize = New Size(35, 50) Dim n As Integer Dim titleItem As ListViewItem Try Do While dr.Read ' Load the ListView Dim bytebuffer() As Byte ' Read the Cover image bytebuffer = CType(dr("Cover"), Byte()) Dim ms As New MemoryStream(bytebuffer) ms.Position = 0 ' Load the image to the list Dim i As New Bitmap(ms) imgCover.Images.Add(i) n += 1 'index into the ImageList ' Add the items to the ListView titleItem = lvTitles.Items.Add(dr("ISBN").ToString(), n) titleItem.SubItems.Add(dr("Title").ToString()) titleItem.SubItems.Add(dr("Author").ToString()) Loop Catch ex As Exception ' Handle Exception Finally dr.Close() End Try End Sub | | You'll notice in Listing 16.4 that the _bindLvTitles method uses the lvTitles ListView control to display information about the Titles . To allow the method to work with any provider, it simply accepts an open data reader specified using the IDataReader interface. |
Within the method, the columns of the lvTitles ListView control are created along with associating an ImageList control with the LargeImageList property of the control. This allows images to be displayed when the ListView control's View property is set to LargeIcon .
Within the Do loop, the Cover image of the book is read into the byteBuffer Byte array and then read into a MemoryStream . The MemoryStream is then used to create a Bitmap object that can be placed into the ImageList .
Finally, a new ListViewItem is created for each row using the ISBN column and is associated with the proper index in the ImageList control. SubItem objects are then created to display the additional columns; in this case, Title and Author .
Validating Controls
The final issue you need to consider when using data binding on Windows Forms is validation. Although validation is not dependent on data binding or vice versa, it is almost always used in conjunction with it.
Of course, the most efficient way to validate the contents of controls is to not validate them at all, but rather restrict the user from entering invalid data in the first place. This can be accomplished by using controls appropriate to the data type you are binding to. For example, if you need to display a date, you should use the DateTimePicker or MonthCalendar controls. Likewise, if you need to bind to a Boolean , you should use the CheckBox . If you're binding to a small numeric value, use the NumericUpDown control, and so on.
Aside from using the appropriate control, you can handle two sets of events to validate data. The first set is the DataTable events ColumnChanged , ColumnChanging , RowChanged , RowChanging , RowDeleted , and RowDeleting (which we discussed on Day 4, "DataSet Internals"). The second set is composed of events associated with the control itself and includes
-
Enter
-
GotFocus
-
Leave
-
Validating
-
Validated
-
LostFocus
These events are fired in the order shown here. Of particular interest are the Validating and Validated events. As in VB 6.0, these events fire only when the CausesValidation property of the control that is navigated to (not the control to be validated) is set to True . Typically, all the controls on the form except Help buttons would have their CausesValidation property set to True in order to validate controls as the user navigates the form. The Validating event is also used in conjunction with the ErrorProvider control to avoid having to use message boxes or custom labels on the form.
Note
Another alternative is to handle the ItemChanged event of the CurrencyManager object, which is fired immediately before a row becomes current.
To illustrate a simple validation scenario, assume that the txtISBN TextBox on a form must be validated to ensure that it contains exactly 10 characters . To do so, you can handle its Validating and Validated events as shown in Listing 16.5.
Listing 16.5 Simple validation. This listing shows how you would handle the Validating and Validated events for a control to restrict the contents of a TextBox .
Private Sub txtISBN_Validating(sender As Object, _ e As System.ComponentModel.CancelEventArgs) Handles txtISBN.Validating If txtISBN.Text.Length <> 10 Then ' Cancel the event and select the text to be corrected e.Cancel = True txtISBN.Select(0, txtISBN.Text.Length) ' Set the ErrorProvider error with the text to display. titlesError.SetError(txtISBN, "Must be 10 characters") End If End Sub Private Sub txtISBN_Validated(sender As Object, _ e As System.EventArgs) Handles txtISBN.Validated ' Clear the error provider of errors titlesError.SetError(txtISBN, "") End Sub
| | As shown in Listing 16.5, the CancelEventArgs object passed into the Validating event can be used to cancel the navigation and keep the focus on the control by setting its Cancel property to True . In addition, the great aspect of using the ErrorProvider control is that by calling the SetError method, it automatically pops up a red icon next to the control passed to it and makes the error message available in a ToolTip window. The Validated event is called only if the validation succeeds, and can be used to clear the error provider of the error. |
Tip
The Validating event is another great place to use regular expressions to perform more sophisticated validation.
| for RuBoard |
EAN: 2147483647
Pages: 158