OPENING MESSAGES
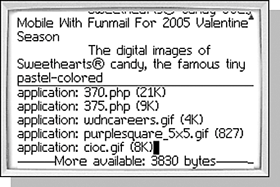
| tip Remember back to Chapter 2 when we talked about lists? The Message list is of course a List field, and all of the tips and tricks mentioned there work here. Of course there are a ton of keyboard shortcuts that we'll go over later as well. You can also open the selected message by pressing the Enter key while in the Message list. One of things you do most often from the Message screen is view an existing message that you have received. All messages are viewed the same way, but the kind of information displayed is different depending on what the message type is. In the Message list, scroll the trackwheel up or down to select the desired message, click, and then select the Open menu item to open the message for viewing. OPENING AN EMAIL OR PIN MESSAGEEmail and PIN messages look and behave the same when opened. The View Email screen also looks similar to the Compose Email screen. The actions and menu items that are available, however, are completely different. When you first open the View Email screen, you can see the sender, subject, and first portion of the email message. Scrolling the trackwheel up or down scrolls the screen displaying more information. Obviously, you can read the body of the message here, but there are many more things you can do as well. The following sections talk about some of the things you can do once an email or PIN message has been opened. VIEWING MORE TEXT IN A LONG EMAILnote The BlackBerry Message Viewer will not display HTML message content. If a message is a MIME multi-part message with HTML content, the HTML is removed and the plain text portion of the email is delivered to the handheld. The body of an email message is not always delivered completely to the handheld. In order to improve the efficiency of the system, only the first 2,000 or so characters of an email message actually reside on the handheld. When this happens, the bottom of the message displays the text "More Available: XXXX bytes" and two new menu items are added, More and More All. Figure 6.2 shows an example of this in a message. Figure 6.2. This newsletter is broken into multiple pieces. The More Available line is shown at the bottom of this screen.
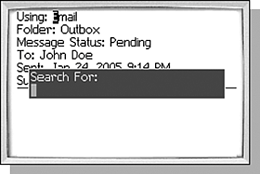
Selecting one of these menu items causes a request to be sent from your handheld to the server asking for more text of the email message. The More menu item simply asks for one piece (about 2,000 characters). The More All menu item tells the server to send as many pieces as necessary to completely deliver the email message. Why is this necessary in the first place? Well, some email messages can be very large and most wireless plans limit the amount of data that you can transfer in a month. Also, transferring a lot of data can take a long time. To save on both time and data transferred, only one part of large messages is sent to the device automatically. If you want the rest of the message, you can get it, but if you don't, then you've saved both time and money. note By default, scrolling to the More Available line automatically requests the next piece of the email message, but this option can be disabled, in which case you can only access the rest of the message using the More and More All items in the menu. SEARCHING TEXT OF AN EMAIL OR PIN MESSAGEEventually there will come a time when you need to find something in an email or PIN message. The Find menu item is there for just such an occasion. When you select the Find menu item, a small dialog appears asking for the text to find, as shown in Figure 6.3. Enter the text and click the trackwheel (or press the Enter key) to do the search. Figure 6.3. Entering the text to find.
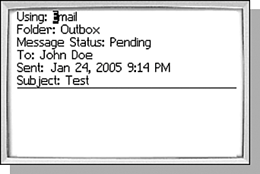
The cursor will be placed at the beginning of the first occurrence of the text found. Selecting the Find Next menu item will continue the search as you would expect. When the last occurrence has been found, a small information dialog saying simply "Not Found" is shown. note The search is always case-insensitive and does not need to match the whole word. There are no options available to change these parameters. Also, it is also not possible to search up; you can only search down. For this reason, you should have the cursor at the top of the message when using the Find feature. Once the Not Found dialog is shown, the Find criterion is reset. That means that the Find Next menu item is not there and selecting the Find menu item will once again show the dialog asking for the text to find. VIEWING MESSAGE HEADER INFORMATIONAs I mentioned earlier, when entering the View Email screen, the cursor is positioned so you can see some of the header information (specifically the sender and subject), and the rest of the screen is devoted to the body of the email. There is other information in the message header, though, and you can bring that into view by scrolling the trackwheel up (see Figure 6.4). This information includes other recipients, date and time, the read status, and the folder the message is stored in. Figure 6.4. Viewing all of the headers in an email message.
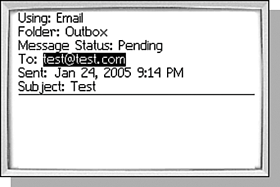
Each of these fields in the header is selectable, and some have special menu items that are only available when that field is selected. One handy menu item is the Copy menu item. This menu is available on the To:, Cc:, Bcc:, Reply-To:, From:, and Sent: fields. Since these fields are not selectable, it's not possible to highlight them to copy the values. The Copy menu item does that for you. Another menu item that is very handy is shown when an address is selected. The text of the menu item is dynamic and says Email WhateverNameIsSelected. This is useful when you want to send an email to only one person in a long list of recipients or when the Reply-To: is set to an address other than the sender's address. If the address of the selected address field matches an entry in your Address Book, there will also be menu called View Contact that enables you to display that Address Book entry. If the Address Book also contains information necessary to create other kinds of messages, those appropriate menus will be shown, such as PIN, Call, or SMS. For instance, if you have John Doe in your address book and have only his email and phone number, then selecting John Doe from one of the header fields will show the menu items Email John Doe, Call John Doe, or SMS John Doe. If the address in the selected address field is not found in your Address Book, there will be an Add to Address Book menu item available to create a new entry with that information. FRIENDLY NAME AND REAL ADDRESSMost of the addresses that are displayed are really two pieces of informationthe email address and the friendly name. The friendly name is intended to be a name that someone will recognize so they do not have to memorize the email addresses of their friends. For instance "John Doe" is much easier to read and understand than "John_D1234-40@cc.eng.myttech.edu". The View Email message screen shows the friendly name whenever possible, but there may be times when you want to see the real address instead. For any address field (To:, From:, CC:, or BCC:) that is selected, the menu item Show Address is available. This option will change that address field to only display the real address, as shown in Figure 6.5. The next time you bring up the menu item, Show Name is available to change it back. Figure 6.5. Viewing the true address of the sender.
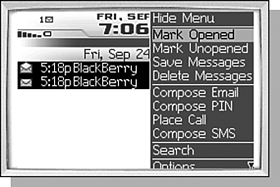
CHANGING THE OPENED STATUS OF A MESSAGEAny time a message arrives to your BlackBerry handheld, it is given a state of unopened, and in the Message list there is a closed envelope icon next to the message. This is to help you notice that a new item has arrived. You can change the message status directly from within the opened message or in the Message list screen by using the Mark Opened and Mark Unopened pair of menu items. Changing the opened status doesn't change anything about the message other than how it is presented to you in the Message list. You may want to mark an item as Unopened after opening it, as a reminder to look at it again later. Conversely, you may want to mark many messages as Opened if you've already read them on your PC or otherwise know that the contents aren't relevant to you. As you would expect, changing the opened status in the View Message screen affects only that message. The menu items to do this are available at any time while viewing a message. You can also change the status of one or more messages at once from the Message list. To select more than one item, scroll to the first item to select it, then press and hold the Shift key while scrolling the trackwheel to the last item to select. Releasing the Shift key ends the multi-select process. At this point, choosing the Mark Unopened menu item will affect all selected messages (except sent messages and most phone callsthe option to change the status of a missed call is discussed a little later). If the selected items include both opened and unopened items, you will see both Mark Opened and Mark Unopened menu items. Choosing either menu item will set the appropriate status on all of the selected items. An example of this is shown in Figure 6.6. Figure 6.6. Changing the Opened status on several messages.
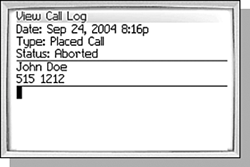
OPENING A CALL MESSAGECall messages are really more like call log entries than messages in the traditional sense. I refer to them as Call messages, though, because the BlackBerry software treats creating email, SMS, and calls in much the same way and stores entries about them all together in the Message list. A typical Call message is shown in Figure 6.7. Figure 6.7. A typical Call message.
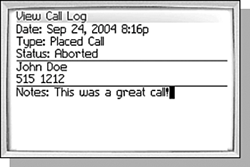
There are three types of call messagesPlaced Calls, Received Calls, and Missed Calls. The type of the call is shown in the header along with the date and time of the call. Placed and Received calls have another field for the Duration of the call, but Missed calls do not. Instead, Missed calls have a Status field to show it as Opened or Unopened. Missed calls can have their status changed in the same way as received emails through the Mark Opened and Mark Unopened menu items. Below the header is the Caller ID information. This will show the phone number on the other end of the connection, regardless of who initiated the call. ADDING A PHONE NUMBER TO THE ADDRESS BOOKIf there is an entry in your Address Book with a phone number that matches this number, the name from the Address Book entry is displayed in the Caller ID information as well as in the Message list itself. As in the View Message screen, several other menu items are available to initiate new messages to that person and to view the Address Book entry. If there is not an entry in your Address Book that matches the phone number of the person on the other end of the call, there is an Add to Address Book menu item in case you want to add it. Choosing this menu automatically places the phone number in the Work field and displays an edit screen so you can enter the name of the contact. ADDING NOTESOne of the most useful features in the Call message is the ability to add additional notes to it. These notes are saved with the message and can be read or edited at a later datethey can even be searched! To add a note to a Call message, open the message, click the trackwheel, and select the Add Notes menu item. The area under the Caller ID information will become an Edit field that you can enter the notes into, as shown in Figure 6.8. When you are done entering the notes, you must save them using the Save Notes menu item. If you press the Escape key or select the Close menu item, you will be prompted with a dialog box to save or discard changes. Figure 6.8. Adding notes to a Call message.
OPENING AN SMS MESSAGEOpening an SMS message is a lot like opening an email message. The top of the View SMS Message screen shows the sender, the date and time it was received, and the body of the message. If the address is in an entry in the Address Book, it shows the name in the Address Book. If not, it shows the phone number that sent the SMS message. One thing that is different, however, is a special feature that shows the history of the SMS message as well. Because a single SMS message is often part of a larger conversation, the context of the conversation can sometimes be important to understanding the message. For this reason, the BlackBerry software automatically shows previous SMS messages sent to and received from the same person. The message history is not part of the SMS message itself. Instead the software automatically searches for SMS messages that were previously received and creates a chain of events that make up the message history. Deleting the original SMS message removes it from the message history and breaks the chain. If you don't want to see the message history, you can also click the Remove History menu item. Be careful, as this is a permanent action, and breaks the chain of messages as well. |
