Using Flash Forms
| Anyone who has spent time online has encountered Macromedia Flash. Be it animated site intros, pop-up advertisements, video, or games, Flash is ubiquitous. In fact, you'd be hard pressed to find any computer that doesn't have a Flash player installed. And while Flash is indeed used for design work and animation, the Flash player is capable of much more. But first, some basics. A Brief Introduction to FlashBefore we go any further, a brief introduction to Flash is in order, and we'll start by clearing up some confusion in names and terminology.
To summarize: Flash is a tool and Flex is a server, and both are used to create SWF files that run inside a Flash Player. If you want to create Flash applications, you'll need a copy of Macromedia Flash or Macromedia Flex, depending on the type of application you're building, and how you will go about building it. NOTE Users often use the term Flash to refer to the player on the actual SWF. Technically this is inaccurate, Flash is the IDE used to create Flash applications. Introducing Flash FormsSo what has all of this got to do with ColdFusion? Flash applications can be embedded in any Web pages, including pages generated by ColdFusion. If you were to create a Flash animation using Macromedia Flash, for example, you could embed it in the generated page so that it would be displayed within the browser. Similarly, applications created using Macromedia Flex could integrate with ColdFusion applications. But it's also possible to leverage Flash without owning Macromedia Flash or Macromedia Flex, and without writing anything more than CFML code. ColdFusion has the ability to write Flash for you, allowing you to use CFML tags to create complete Flash applications. These aren't general-purpose applications; only a very specific type of Flash application can be created this way, namely forms. Using the same <cfform> and <cfinput> used previously, ColdFusion can do the following:
In other words, by using ColdFusion you can build forms that leverage the power and usability of Flash while retaining the development experience that is uniquely ColdFusion. Getting Started With Flash FormsBack in Chapter 14, "Using Forms to Add or Change Data," we created a form to add and edit movie listings. One of the fields in the form prompted for a date (the movie release date), and validation was used to ensure that only valid (and correctly specified) dates were entered. This is the code used in that example: <tr> <td> Release Date: </td> <td> <cfinput type="Text" name="DateInTheaters" value="#DateInTheaters#" message="RELEASE DATE must be a valid date!" required="NO" validate="date" validateAt="onSubmit,onServer" size="10" maxlength="10"> </td> </tr> The field itself, like all the form fields created thus far, is formatted using HTML tables. The field label is in one row cell, and next to it is a <cfinput> tag (which generates an HTML <input> tag). validate="date" is used to ensure that a date is entered, and validation is checked both onSubmit and onServer. That works. If a user entered an invalid date (or something other than a date) the code would display the error text specified in attribute message. But is that really the ideal scenario? Wouldn't it be better to ensure that only a validate date is entered in the first place? If the user were able to select a date from a calendar control, wouldn't that be preferable? This is where ColdFusion-generated Flash Forms can in handy. Let's look at an example. Listing 15.1 contains a simple Flash Form. Save it (in folder 15) and execute it to see a form like the one shown in Figure 15.1. Listing 15.1. flash1.cfmBasic Flash Form<!--- Name: flash1.cfm Author: Ben Forta (ben@forta.com) Description: Flash form example Created: 12/22/04 ---> <cfform format="flash" action="formdump.cfm"> <cfinput name="DateInTheaters" label="Release Date" type="text" width="150"> <cfinput name="btnSubmit" type="submit" value="Process"> </cfform> Figure 15.1. Flash Forms are displayed in the Web browser, but are actually running within the Flash Player loaded invisibly by the browser.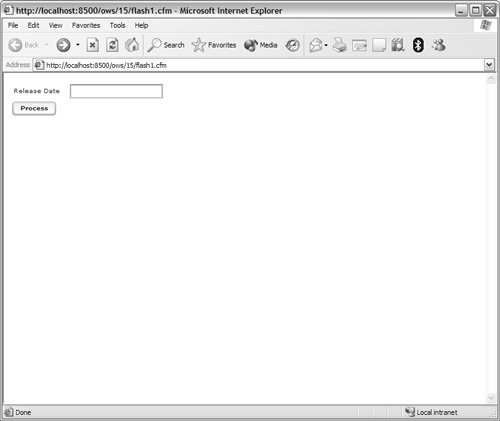 When experimenting with forms, it helps to have a generic page that any forms can be sent to. Listing 15.2 contains code that simply dumps any form values (using <cfdump var="#FORM#">). We'll use formdump.cfm as the action for the forms created here, but in your own applications you'd obviously submit the forms to real action pages (as seen previously). Listing 15.2. formdump.cfmGeneric Form Action Page<!--- Name: formdump.cfm Author: Ben Forta (ben@forta.com) Description: Dump submitted form values Created: 12/22/04 ---> <!--- Dump FORM scope ---> <cfdump var="#FORM#"> The <cfform> code in Listing 15.1 looks like any other <cfform> tag, but here format="flash" is specified, instructing ColdFusion to generate a Flash Form. The form itself is made up of two controls, each defined using a <cfinput> tag. The tags look like the ones seen previously, with the exception of the label attribute. Instead of manually placing labels (as we did previously using table cells), Flash Forms accept label values as attributes making layout much simpler. NOTE In HTML forms the name attribute is optional, and is usually omitted in buttons (for example). In Flash Forms name is always required, and must be specified. TIP Flash Forms controls, by default, will take up the entire width of the browser. To specify a width, use the width attribute, as used in Listing 15.1. The end result is the form seen in Figure 15.1, which looks much like any other form, but actually is very different. This form isn't being rendered by the Web browserit's being executed within the Flash Player. And as such, you can do things in this form that you couldn't do in regular HTML forms. For example, modify the first <cfinput> changing type="text" to type="datefield", like this: <cfinput name="DateInTheaters" label="Release Date" type="datefield" width="150"> Save the changes and reload the page in your browser. When you click on the field a calendar will be displayed, like the one in Figure 15.2. Figure 15.2. Flash Forms support invaluable additional field types not supported by HTML forms.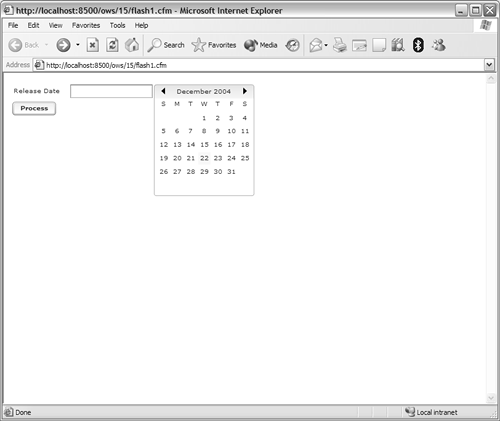 As you can see in Figure 15.2, date selection can now be made using a pop-up calendar. By default, the calendar will starts at today's date and allows the selection of any dates, but this can be changed if needed. What is key is that users can now easily select dates and can no longer specify invalid dates. That's a lot of functionality without having to write any Flash explicitly. And, as the end result is indeed Flash, the control will work properly on all platforms and browsers so long as a Flash player is being used. NOTE Flash Forms require Flash Player version 7 or later. If no player is present, or if an older player is installed, the user will automatically be prompted to download the correct player from Macromedia. Incidentally, the following is what the modified Listing 15.1 actually generated (as seen via a View Source in the browser):
The most important thing to keep in mind here is that Flash Forms are designed to be a plug-in replacement for HTML forms. Forms are still submitted to action pages, and (as you'd have seen if you submitted the example in Listing 15.1) form fields will be present in the FORM scope just like they'd be if you were using HTML forms. While the inner workings of Flash Forms are radically different from HTML forms, ColdFusion hides all that from you. You can use them as you'd use HTML forms, and they'll just work. Flash Forms ControlsYou've seen an example of a datefield control. But what other control types are supported? Table 15.1 lists the form controls along with their CFML tag syntax and usage notes.
NOTE The controls lists here are the ones supported by Flash Forms, and it isn't possible to create your own controls for use with this feature. If you need to create customer controls, you will need to use Macromedia Flash or Macromedia Flex instead of ColdFusion-generated Flash Forms. You've already seen an example of type="datefield", so let's look at a couple of other controls unique to Flash Forms. <cfgrid> is used to create data grids, two-dimensional spreadsheet type views of data as seen in Figure 15.3. Figure 15.3. Flash Forms Data Grids make it easy to display multiple rows in a single scrollable grid.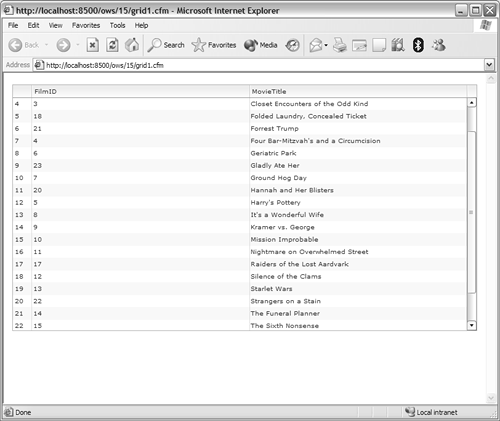 Listing 15.3 contains the code that created the grid seen in Figure 15.3. Listing 15.3. grid1.cfmA Flash Grid Example<!--- Name: grid1.cfm Author: Ben Forta (ben@forta.com) Description: Flash data grid example Created: 12/22/04 ---> <!--- Get movie l0069st ---> <cfinvoke component="ows.14.movies" method="list" returnvariable="movies"> <!--- Display data grid ---> <cfform format="flash"> <!--- Data grid ---> <cfgrid name="gridMovies" query="movies" height="400" /> </cfform> Listing 15.3 uses movies.cfc (created in Chapter 14) to obtain a list of movies. It then created a Flash Form and used a single control, <cfgrid>: it is named, a query is passed to it, and a height is specified. The generated grid can be scrolled (using the scroll bar on the right), sorted (by clicking on column headers; click again to sort descending), and columns may be resized (drag the vertical line between columns). This is a read-only grid; it could be used for browsing data, as well as for record selection. To allow record editing via <cfgrid>, the grid selectmode must be specified. Listing 15.4 is a modified version of Listing 15.3, this time allowing editing (as well as rows inserting and deletion). The code generates a screen like the one seen in Figure 15.4. Listing 15.4. grid2.cfmAn Editable Flash Grid Example<!--- Name: grid2.cfm Author: Ben Forta (ben@forta.com) Description: Flash editable data grid example Created: 12/22/04 ---> <!--- Get movie list ---> <cfinvoke component="ows.14.movies" method="list" returnvariable="movies"> <!--- Display data grid ---> <cfform format="flash" action="formdump.cfm"> <!--- Data grid ---> <cfgrid name="gridMovies" selectmode="edit" query="movies" insert="yes" delete="yes" height="400" /> </cfform> Figure 15.4. Flash Forms Data Grids can be used to edit rows, as well as to insert and delete rows.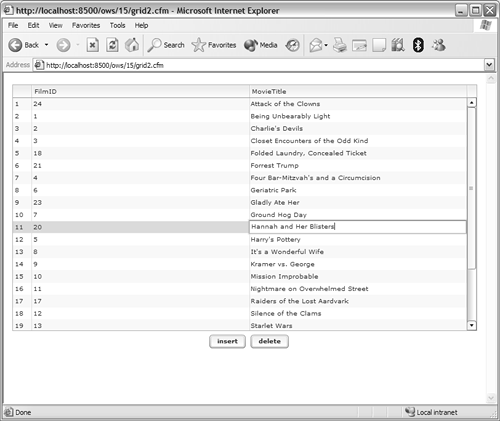 To make a <cfgrid> editable, selectmode must be "edit" (instead of the default "browse"). In addition, to allow insertions insert="yes" is specified; to allow deletions delete="yes" is specified. NOTE <cfgrid> supports a whole range of attributes for greater control over grid contents. Two child tags may also be used, <cfgridcolumn> lets you control the look and behavior of each column, and <cfgridrow> can be used to explicitly provide row values (instead of passing a query). In addition, another tag named <cfgridupdate> can be used to simplify processing grid updates in a form action page.
Another useful Flash control, one not available in HTML, is the tree control. Tree controls are useful for displaying large amounts of hierarchical data, as seen in Figure 15.5. Figure 15.5. Flash Forms tree controls are used for the display the selection of hierarchical data. Listing 15.5 contains the code used to create the tree seen in Figure 15.5. Listing 15.5. TRee.cfmA Flash Tree Example<!--- Name: tree.cfm Author: Ben Forta (ben@forta.com) Description: Flash tree example Created: 12/22/04 ---> <!--- Get movies by rating ---> <cfquery datasource="ows" name="movies"> SELECT Rating, MovieTitle, FilmID FROM Films, FilmsRatings WHERE Films.RatingID = FilmsRatings.RatingID ORDER BY Rating, MovieTitle </cfquery> <cfform format="flash"> <!--- Define tree control ---> <cftree name="treeMovie" height="400" width="500"> <!--- Specify tree data ---> <cftreeitem query="Movies" value="Rating,FilmID" display="Rating,MovieTitle"> </cftree> </cfform> Listing 15.5 starts with a query that returns all movies sorted by rating. (There is no method for this in movies.cfc, which is why I entered the query here. Feel free to add a method to movies.cfc and use that instead.) The tree itself is defined using a <cftree> tag. The items in a <cftree> are specified using <cftreeitem> tags which either specify a query or actual values. If a query is specified (as it is here), then value and display take column names to define the levels of nesting within the tree. In this example Rating is the top branch and MovieTitle is beneath it.
Within a <cfform format="flash"> any HTML tags or plain text are ignored. This means that you can't use <br> for line breaks, <table> tags for layout, <font> <a> for links, and the like. But what if you need to embed literal text, or images or links or the like? To do this you need to use a tag named <cfformitem>, which lets you embed non-controls in Flash Forms. Table 15.2 lists <cfformitem> types.
NOTE Unlike most CFML tags, <cfformitem> always requires an end tag. If using a type that doesn't have a body (like type="spacer"), use <cfformitem type="spacer"><cfformitem> or the shortcut <cfformitem type="spacer" />. Armed with all this information, let's look at another example. Listing 15.6 is a modified version of movie_edit.cfm created at the end of Chapter 14 (feel free to copy that file as a starting point). Figure 15.6 shows the Flash Form generated by this code. Listing 15.6. flash2.cfmA Complete Flash Form <!--- Name: flash2.cfm Author: Ben Forta (ben@forta.com) Description: Flash form example (based on 14/movie_edit.cfm Created: 12/22/04 ---> z<!--- Check that FilmID was provided ---> <!--- If yes, edit, else add ---> <cfset EditMode=IsDefined("URL.FilmID")> <!--- If edit mode then get row to edit ---> <cfif EditMode> <!--- Get the film record ---> <cfinvoke component="ows.14.movies" method="get" film returnvariable="film"> <!--- Save to variables ---> <cfset MovieTitle=Trim(film.MovieTitle)> <cfset PitchText=Trim(film.PitchText)> <cfset AmountBudgeted=Int(film.AmountBudgeted)> <cfset RatingID=film.RatingID> <cfset Summary=Trim(film.Summary)> <cfset ImageName=Trim(film.ImageName)> <cfset DateInTheaters=DateFormat(film.DateInTheaters, "MM/DD/YYYY")> <!--- Form text ---> <cfset FormTitle="Update a Movie"> <cfset ButtonText="Update"> <cfelse> <!--- Save to variables ---> <cfset MovieTitle=""> <cfset PitchText=""> <cfset AmountBudgeted=""> <cfset RatingID=""> <cfset Summary=""> <cfset ImageName=""> <cfset DateInTheaters=""> <!--- Form text ---> <cfset FormTitle="Add a Movie"> <cfset ButtonText="Insert"> </cfif> <!--- Get ratings ---> <cfinvoke component="ows.14.movies" method="getRatings" returnvariable="ratings"> <!--- Page header ---> <cfinclude template="../14/header.cfm"> <!--- Add/update movie form ---> <cfform format="flash" action="formdump.cfm"> <cfif EditMode> <!--- Embed primary key as a hidden field ---> <cfinput type="hidden" name="FilmID" value="#Film.FilmID#"> </cfif> <cfinput type="Text" label="Movie:" name="MovieTitle" value="#MovieTitle#" message="MOVIE TITLE is required!" required="Yes" validateAt="onSubmit,onServer" size="50" maxlength="100"> <cfinput type="Text" label="Tag Line:" name="PitchText" value="#PitchText#" message="TAG LINE is required!" required="Yes" validateAt="onSubmit,onServer" size="50" maxlength="100"> <cfselect name="RatingID" label="Rating:" query="ratings" value="RatingID" display="Rating" selected="#VARIABLES.RatingID#" /> <cftextarea label="Summary:" name="summary" cols="40" rows="5" wrap="virtual"><cfoutput>#Summary#</cfoutput></cftextarea> <cfinput type="Text" label="Budget:" name="AmountBudgeted" value="#AmountBudgeted#" message="BUDGET must be a valid numeric amount!" required="NO" validate="integer" validateAt="onSubmit,onServer" size="10" maxlength="10"> <cfinput type="DateField" label="Release Date:" name="DateInTheaters" value="#DateInTheaters#" message="RELEASE DATE must be a valid date!" required="NO" validate="date" validateAt="onSubmit,onServer" size="10" maxlength="10"> <cfinput type="Text" label="Image File:" name="ImageName" value="#ImageName#" required="NO" size="20" maxlength="50"> <cfinput type="submit" name="BtnSubmit" value="#ButtonText#"> </cfform> <!--- Page footer ---> <cfinclude template="../14/footer.cfm"> Figure 15.6. Flash Forms can be complete replacements for HTML forms.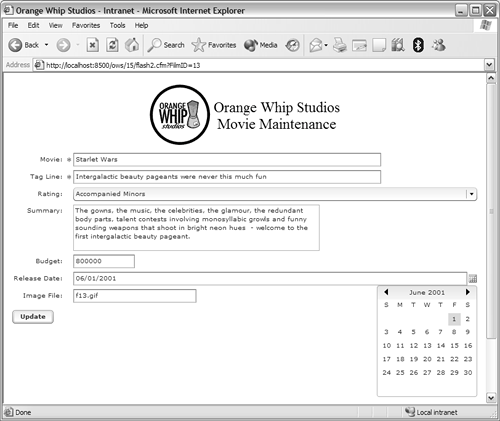 Aside from the form itself, most of Listing 15.6 is unchanged from the original in Chapter 14, with the exception of the <cfinvoke> and <cfinclude> tags, which have been modified to access the 14 folder. The <cfform> tag has been changed so that it contains format="flash" telling ColdFusion to generate a Flash Form. All <table> <tr> and <td> tags have been removed as they would be ignored in a Flash Form anyway. Every <cfinput> now has a label (instead of the label previously displayed in a HTML table cell), the Release Date field has been changed to type="datefield", <textarea> has been changed to a <cftextarea>, and the submit button has now been named. Notice that the validation code introduced in Chapter 14 is used unchanged, even though the client-side validation in Flash Forms is using ActionScript (instead of JavaScript), the same attributes and values work, and ColdFusion does all the hard work for you. NOTE One HTML form control type not supported by Flash Forms is <input type="file">, which is used to upload files. File system access isn't allowed by the Flash Player (this is a security restriction), so this field type can't be supported by ColdFusion-generated Flash Forms. Managing Form LayoutAs seen in Figure 15.6, Flash Forms automatically list form controls vertically, one on top of the other, aligning fields so that the labels are all lined up properly. To change this behavior, and for greater control over form layout, the <cfformgroup> tag is used. Figure 15.7 shows two calendars displayed side by side, with text above each. This layout requires the use of nested <cfformgroup> tags as seen in Listing 15.7. Listing 15.7. flash3.cfmFlash Layout Example<!--- Name: flash3.cfm Author: Ben Forta (ben@forta.com) Description: Horizonal layout example Created: 12/22/04 ---> <cfform format="flash" action="formdump.cfm"> <cfformgroup type="horizontal"> <cfformgroup type="vertical"> <cfformitem type="text">Movie Release</cfformitem> <cfcalendar name="releaseDate"> </cfformgroup> <cfformgroup type="vertical"> <cfformitem type="text">Release on DVD</cfformitem> <cfcalendar name="videoDate"> </cfformgroup> </cfformgroup> </cfform> Figure 15.7. <cfformgroup> is used to control layout in Flash Forms.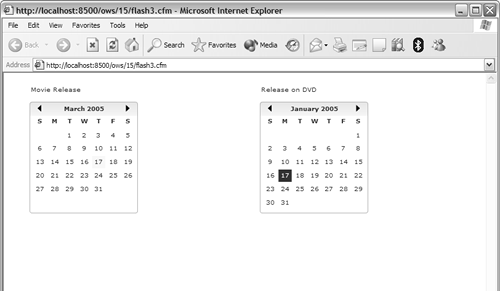 Listing 15.7 uses a <cfformgroup type="horizontal"> to place the calendars side by side. But this would also place the text Movie Release and Release on DVD horizontally too, and so within the horizontal layout are two additional groupings defined as <cfformgroup type="vertical"> so that the text appears above each calendar. You've now seen two types of <cfforggroup>, Table 15.3 lists all the types supported.
Look at the screens seen in Figures 15.8 and 15.9. They contain the same edit screen created in Listing 15.6 (Listing 15.6) but with the fields split over two tabs. This type of presentation is ideal for long forms. Figure 15.8. Tab Navigators are used to break up long forms. Figure 15.9. Each tab in a Tab Navigator is labeled, and that label is displayed above the respective tab.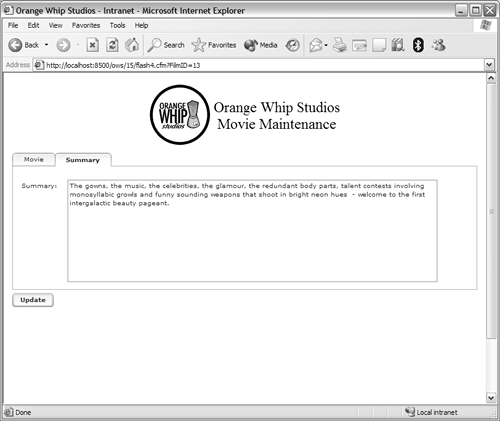 Listing 15.8 contains the code used to create the screens seen in Figure 15.8 and 15.9. Listing 15.8. flash4.cfmTab Navigator Example <!--- Name: flash4.cfm Author: Ben Forta (ben@forta.com) Description: Flash form example (based on 14/movie_edit.cfm Created: 12/22/04 ---> <!--- Check that FilmID was provided ---> <!--- If yes, edit, else add ---> <cfset EditMode=IsDefined("URL.FilmID")> <!--- If edit mode then get row to edit ---> <cfif EditMode> <!--- Get the film record ---> <cfinvoke component="ows.14.movies" method="get" film returnvariable="film"> <!--- Save to variables ---> <cfset MovieTitle=Trim(film.MovieTitle)> <cfset PitchText=Trim(film.PitchText)> <cfset AmountBudgeted=Int(film.AmountBudgeted)> <cfset RatingID=film.RatingID> <cfset Summary=Trim(film.Summary)> <cfset ImageName=Trim(film.ImageName)> <cfset DateInTheaters=DateFormat(film.DateInTheaters, "MM/DD/YYYY")> <!--- Form text ---> <cfset FormTitle="Update a Movie"> <cfset ButtonText="Update"> <cfelse> <!--- Save to variables ---> <cfset MovieTitle=""> <cfset PitchText=""> <cfset AmountBudgeted=""> <cfset RatingID=""> <cfset Summary=""> <cfset ImageName=""> <cfset DateInTheaters=""> <!--- Form text ---> <cfset FormTitle="Add a Movie"> <cfset ButtonText="Insert"> </cfif> <!--- Get ratings ---> <cfinvoke component="ows.14.movies" method="getRatings" returnvariable="ratings"> <!--- Page header ---> <cfinclude template="../14/header.cfm"> <!--- Add/update movie form ---> <cfform format="flash" action="formdump.cfm"> <cfif EditMode> <!--- Embed primary key as a hidden field ---> <cfinput type="hidden" name="FilmID" value="#Film.FilmID#"> </cfif> <!--- Start tab navigator ---> <cfformgroup type="tabnavigator"> <!--- 1st page ---> <cfformgroup type="page" label="Movie"> <cfinput type="Text" label="Movie:" name="MovieTitle" value="#MovieTitle#" message="MOVIE TITLE is required!" required="Yes" validateAt="onSubmit,onServer" size="50" maxlength="100"> <cfinput type="Text" label="Tag Line:" name="PitchText" value="#PitchText#" message="TAG LINE is required!" required="Yes" validateAt="onSubmit,onServer" size="50" maxlength="100"> <cfselect name="RatingID" label="Rating:" query="ratings" value="RatingID" display="Rating" selected="#VARIABLES.RatingID#" /> <cfinput type="Text" label="Budget:" name="AmountBudgeted" value="#AmountBudgeted#" message="BUDGET must be a valid numeric amount!" required="NO" validate="integer" validateAt="onSubmit,onServer" size="10" maxlength="10"> <cfinput type="DateField" label="Release Date:" name="DateInTheaters" value="#DateInTheaters#" message="RELEASE DATE must be a valid date!" required="NO" validate="date" validateAt="onSubmit,onServer" size="10" maxlength="10"> <cfinput type="Text" label="Image File:" name="ImageName" value="#ImageName#" required="NO" size="20" maxlength="50"> <!--- End of 1st page ---> </cfformgroup> <!--- 2nd page ---> <cfformgroup type="page" label="Summary"> <cftextarea label="Summary:" name="summary" cols="60" rows="11" wrap="virtual"><cfoutput>#Summary#</cfoutput></cftextarea> <!--- End of 1st page ---> </cfformgroup> <!--- End of tab navigator ---> </cfformgroup> <cfinput type="submit" name="BtnSubmit" value="#ButtonText#"> </cfform> <!--- Page footer ---> <cfinclude template="../14/footer.cfm"> The code in Listing 15.8 uses the following line of code to define the tab navigator control: <cfformgroup type="tabnavigator"> Within the tab navigator, two pages are defined. The first: <cfformgroup type="page" label="Movie"> contains all of the movie data besides the summary text field which is now placed in the second page: <cfformgroup type="page" label="Summary"> The submit button isn't within either page, so it appears at the bottom of both pages (it's outside of the tab navigator). Figure 15.10 shows another version of this interface, this time using an accordion control (vertical page scrolling instead of tabs). To create this screen, simply change the line: <cfformgroup type="tabnavigator"> Figure 15.10. For vertical page scrolling use <cfformgroup type="accordion">.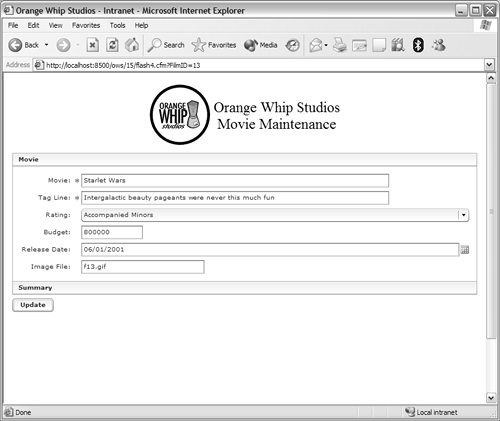 so that is reads: <cfformgroup type="accordion"> NOTE The tab navigator and accordion controls are intelligent controls. They can detect the browser Back and Forward buttons and will move back and forwards between control pages rather than entire Web pages. Controlling Form AppearanceYou probably noticed that all the Flash Forms created thus far have a similar color and look. This is the Macromedia "Halo" look, and it's the default used by ColdFusion-generated Flash Forms. It's implemented as a skin. The following skins are supported:
To specify an alternate skin, use the <cfform> skin attribute, as follows: <cfform format="flash" action="formdump.cfm" skin="haloOrange"> NOTE It isn't possible to define your own skins, although this functionality may be added in the future. However, form appearance can still be controlled using style attributes as explained below. For more granular control, style values may be used. Style values may be specified at various levels:
style names and values are modeled on HTML CSS styles, and Flash controls supports lots (although not all) of the styles supported by CSS. Styles are specified as name:value pairs divided by semicolons, as seen in this snippet: <cfinput type="text" name="title" label="Movie Title" style="fontSize:12; backgroundColor:##FF9900"> TIP When specifying RGB values, or any text containing # chars, be sure to escape # characters as ##. NOTE A full list of all supported styles is beyond the scope of this book. Refer to the online Flash and Flex documentation at http://livedocs.macromedia.com, or consult any book on Flash or Flex controls. NOTE Unlike CSS styles, which may be defined externally and linked to, Flash styles must be specified inline. Using Data BindingsIn addition to the controls, layout, and consistency advantages of Flash Forms, there is one other very important feature that must be mentioned. Binding allows controls to be connected to each other, so that they are aware of values or changes in other controls and can react or change accordingly. Using bindings requires referring to other controls and properties within them. These are specified using ActionScript syntax (as the bindings you create are executed in the Flash Player). ActionScript uses { and } to delimit expressions (in much the same way as ColdFusion uses #). Listing 15.9 is a simple binding example. Listing 15.9. flash5.cfmSimple Binding Example <!--- Name: flash5.cfm Author: Ben Forta (ben@forta.com) Description: Simple binding example Created: 12/22/04 ---> <cfform format="flash" action="formdump.cfm"> <cfcalendar name="releaseDate"> <cfinput name="displayDate" type="text" label="You selected:" bind="{releaseDate.selectedDate}"> </cfform> Listing 15.9 defines two controls, a calendar and a text field. The text field contains the following binding: bind="{releaseDate.selectedDate}" This tells Flash to bind the text field to the calendar, populating the text field with whatever the currently selected date is in the calendar. releaseDate.selectedDate means the selectedDate in the control named releaseDate, as seen in Figure 15.11. Figure 15.11. Bindings are used to link controls so that changes in one impact another.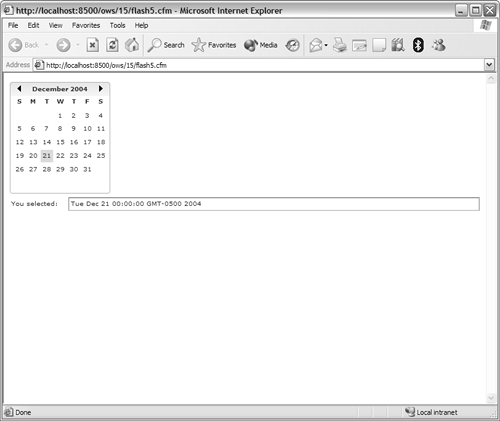 Bindings like this can be made between all sorts of controls, even controls on different pages within an accordion or tab navigator. To refer to values in other controls you need to use the syntax listed in Table 15.4 (replacing control with the name of the actual control).
Here's another more complete (and more complex) binding example. As seen in Figure 15.12, this screen displays a grid containing movie information (just the MovieTitle and PitchText columns). As any movie is selected, its details are displayed in <cfinput> fields where they can be edited. The code for this example is Listing 15.10. Listing 15.10. flash6.cfmComplete Binding Example <!--- Name: flash6.cfm Author: Ben Forta (ben@forta.com) Description: Flash data binding example Created: 12/22/04 ---> <!--- Get movie list ---> <cfquery datasource="ows" name="movies"> SELECT * FROM Films ORDER BY MovieTitle </cfquery> <!--- Display data grid ---> <cfform format="flash" action="formdump.cfm"> <!--- Data grid ---> <cfgrid name="gridMovies" query="movies" rowheaders="no" height="200"> <!--- Don't show all coluns ---> <cfgridcolumn name="MovieTitle" header="Title"> <cfgridcolumn name="PitchText" header="Tag Line"> </cfgrid> <!--- Input fields ---> <cfinput type="text" name="MovieTitle" label="Title:" bind="{gridMovies.dataProvider[gridMovies.selectedIndex] ['MovieTitle']}" onChange="gridMovies.dataProvider. editField(gridMovies.selectedIndex, 'MovieTitle', MovieTitle.text);"> <cfinput type="text" name="PitchText" label="Tag Line:" bind="{gridMovies.dataProvider[gridMovies.selectedIndex] ['PitchText']}" onChange="gridMovies.dataProvider. editField(gridMovies.selectedIndex, 'PitchText', PitchText.text);"> <cfinput type="text" name="AmountBudgeted" label="Amount Budgeted:" bind="{gridMovies.dataProvider[gridMovies.selectedIndex] ['AmountBudgeted']}" onChange="gridMovies.dataProvider. editField(gridMovies.selectedIndex, 'AmountBudgeted', AmountBudgeted.text);"> <cfinput type="text" name="ImageName" label="Image File:" bind="{gridMovies.dataProvider[gridMovies.selectedIndex] ['ImageName']}" onChange="gridMovies.dataProvider. editField(gridMovies.selectedIndex, 'ImageName', ImageName.text);"> <cftextarea name="Summary" label="Summary:" rows="10" bind="{gridMovies.dataProvider[gridMovies.selectedIndex] ['Summary']}" onChange="gridMovies.dataProvider. editField(gridMovies.selectedIndex, 'Summary', Summary.text);" /> <cfinput name="submitButton" type="submit" value="Save"> </cfform> Figure 15.12. Combining bindings with events allows for complete control over form interaction.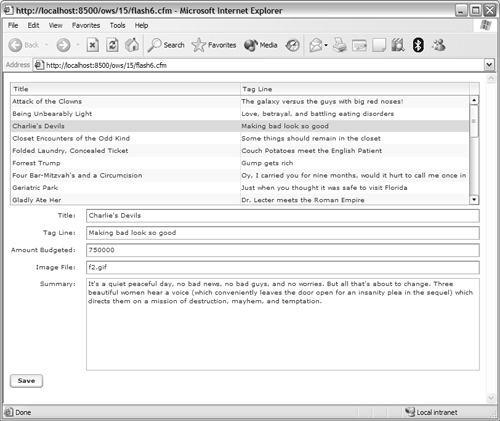 Listing 15.9 requires some explanation. It starts with a query to obtain movie information. The data is used to populate a grid (as seen previously), but instead of displaying all columns a pair of <cfgridcolumn> tags is used to explicitly list the desired columns (and to give them alternate headers, as database column names seldom make readable headings). Then comes the list of <cfinput> tags and a single <cftextarea> tags. Each of these tags contains two new attributes, bind and onChange. The former binds each field to the appropriate column in the grid (even columns not shown); the latter ensures that changes made in the input fields are populated back to the data grid. Let's look at the first example: bind="{gridMovies.dataProvider[gridMovies.selectedIndex]['MovieTitle']}" dataProvider is the grid property that contains the data that was passed to the grid, our query. dataProvider is a two-dimensional data type; to extract data from it you need the row and column. selectedIndex is another grid property; this one returns the number of the row currently selected, for row 5 [gridMovies.selectedIndex] will become [5]. With the row number returned by selectedIndex and the row name specified, the actual value for a specific column in a specific row can be returned. As as it's bound to an input field, that value is displayed. If a value is edited in an input field, the grids dataProvider must be updated (so that the grid is updated). Here is the code used to perform this update: onChange="gridMovies.dataProvider.editField(gridMovies.selectedIndex, 'MovieTitle', MovieTitle.text);"> onChange is an event; whenever anything changes in the field the event code will be executed automatically. gridMovies.dataProvider.editField is a method, the editField method in the grid dataProvider. This method requires three parameters be passed to it: the row to update is specified as gridMovies.selectedIndex, the column to update is specified as the column name, and the new value is specified as MovieTitle.text. This same logic is used for each of the input fields, and the result is the interface seen in Figure 15.12. NOTE A full list of all control properties is beyond the scope of this book. Refer to the online Flash and Flex documentation at http://livedocs.macromedia.com, or consult any book on Flash or Flex controls. |
 See Appendix B for more on these tags.
EAN: N/A
Pages: 282