ITERATIVE PROCESSING
Loops provide programmers with the ability to do a lot of work with a little code. Thanks to loops, it is possible to process dozens, hundreds, or tens of thousands of elements using the same number of programming statements. Loops are especially adept at processing the contents of arrays and collections, such as the collection associated with the ListBox control. Loops can also be set up to drive any form or iterative logic, such as when you want to repeatedly prompt a user to supply additional information, or when you want to run a particular group of programming statements over and over again until a certain result is achieved.
Visual Basic provides you with a number of different ways to set up a loop, including:
-
Do...While. Creates a loop that iterates as long as a condition remains true
-
Do...until. Creates a loop that iterates until a condition becomes true

DEFINITION A loop is a group of programming statements that are executed repeatedly. Loops provide an effective tool for processing large amounts of data.

-
For...Next. Creates a loop that iterates a specific number of times
-
For…Each…Next. Creates a loop that iterates through every property belonging to an object, such as all the elements in an array or all the elements in a ListBox control
-
While. Creates a loop that iterates as long as a condition remains true
Each of these different types of loops are discussed in greater detail in the sections that follow.
Do Loops
You can set up Do loops to iterate until or while a specific condition is true. Do loops are well suited to situations where you know in advance what specific condition must occur in order for the tested condition to become true. For example, you might set up a Do…Until or Do…while loop to allow a user to enter as much input as desired, terminating the loop's execution only when the user enters a trigger word such as "Quit" or "Exit."
Do…While
A Do…While loop iterates as long as a specified condition remains true. Visual Basic allows you to construct a Do…While loop in either of two formats. The syntax of the first format is shown below.
Do While condition statements Loop Dim intCounter As Integer = 0 Do While intCounter < 10 intCounter += 1 Loop
Condition represents an expression that is tested upon each iteration of the loop, as demonstrated in the following example.
In this example, an Integerinteger type variable named intCounter is declared and then used to control the iteration of a Do…While loop. The loop iterates for as long as the value of intCounter is less than 10. As you can see, the value of intCounter is increased by 1 at the end of each iteration, causing the loop to iterate 10 times.
However, if the value of intCounter had been set to a value greater than or equal to 10 at the beginning of the example, the loop would never have executed, because the While keyword and the tested expression have been placed on the same line as the Do keyword.
The syntax for the second format of the Do…while statement is shown below.
Do statements Loop While condition
As you can see, the While keyword and the tested condition have been moved to the end of the loop and placed on the same line as the Loop keyword. The result is that the loop will always execute at least once, even if the tested condition is initially false.
To get a better feel for how to work with the Do…While loop, take a look at the following example.
Public Class Form1 Private Sub Button1_Click(ByVal sender As System.Object, _ ByVal e As System.EventArgs) Handles btnBooks.Click Dim strTitleAndAuthor As String = "", strInput As String = "" Do While strInput.ToLower <> "quit" strInput = InputBox("Enter a book title or type Quit to " & _ "exit the application.", "Book Tracker") If strInput.ToLower <> "quit" Then strTitleAndAuthor = strTitleAndAuthor & strInput & _ ControlChars.CrLf End If Loop MessageBox.Show(strTitleAndAuthor, "New Book Entries") End Sub End Class In this example, a Do…While loop was set up to collect names of books, using the InputBox() function. Each new book name is added to the end of a variable string, which is formatted so that it will display each book's title on its own line when later displayed. The loop has been set up to iterate until the user enters the word "Quit." Take note of the use of the ToLower method to translate the user's input to all lowercase letters when the example checks to see if the player entered the word "Quit." By converting the player's input to all lowercase like this, the example eliminates any concerns over the case the user might choose to use when typing in the word "Quit."
Figures 7.7 and 7.8 show the interaction between the above example and the user when executed.
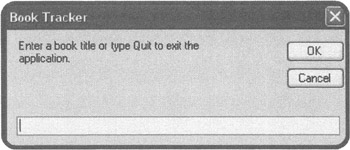
Figure 7.7: Processing the names of books using a Do…While loop.

Figure 7.8: Displaying the information that was collected by the Do…While loop.
In this example, the first format of the Do…While loop was used. However, you could just as easily rewrite this example and move the While keyword and the tested expression to the end of the loop, as demonstrated below. Regardless, the results are the same.
Public Class Form1 Private Sub Button1_Click(ByVal sender As System.Object, _ ByVal e As System.EventArgs) Handles btnBooks.Click Dim strTitleAndAuthor As String = "" Dim strInput As String = "" Do strInput = InputBox("Enter a book title or type Quit to" &_ "exit the application.", "Book Tracker") If strInput.ToLower <> "quit" Then strTitleAndAuthor = strTitleAndAuthor & strInput & - ControlChars.CrLf End If Loop While strInput.ToLower <> "quit" MessageBox.Show(strTitleAndAuthor, "New Book Entries") End Sub End Class
Do…Until
The Do…Until loop iterates as long as a condition is false. In other words, it iterates until a condition becomes true. As with the Do…While loop, Visual Basic supports two different forms of the Do…Until loop. The syntax of the first format is shown below.
Do Until condition statements Loop
To get a better feel for how the Do…Until loop works, take a look at the following example.
Public Class Form1 Private Sub Button1_Click(ByVal sender As System.Object, _ ByVal e As System.EventArgs) Handles Button1.Click Dim strPlayerInput As String = "" Dim blnStopGame As Boolean = False Do Until blnStopGame = True strPlayerInput = MessageBox.Show("Do you want to quit?", _ "Continue?", MessageBoxButtons.YesNo, _ MessageBoxIcon.Question) 'Check to see if the user clicked on Yes when prompted to quit If Int32.Parse(strPlayerInput) = 6 Then blnStopGame = True Else MessageBox.Show("Oh, I see...") End If Loop Application.Exit() End Sub End Class In this example, a loop has been set up that requires the user to enter the word "Quit" in order to terminate the application. If the user enters the word "Quit," the application stops; otherwise, refusing to give up, this stubborn little example continues to prompt the user to type "Quit." Figures 7.9 and 7.10 demonstrate the interaction between the above example and the user when executed.
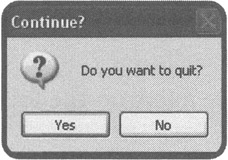
Figure 7.9: Using a Do…Until loop to prompt the player to terminate the game.
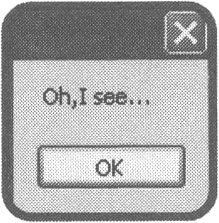
Figure 7.10: The game sarcastically responds to the player when he or she fails to enter the word "Quit."
The syntax for the second form of the Do...Until statement is outlined below.
Do statements Loop Until condition
As you can see, the Until keyword and the condition to be tested have been placed on the third line just after the Loop keyword.
For…Next
The For...Next loop is an excellent choice when you know in advance how many times a loop will need to execute. The For…Next loop executes a specific number of times as determined by a counter, which can increase or decrease based on the logic you are implementing.
The syntax for the For…Next statement is shown below.
For counter [As DataType] = begin To end [Step StepValue] statements Next
Counter is a variable that controls the execution of the loop. DataType is an Optional parameter allowing you to define the loop's counter within the loop itself. If you choose not to supply the DataType here, you will still have to define it elsewhere in your application. Begin specifies the starting value of the counter variable, and end specifies its ending value. StepValue is optional. When supplied, StepValue specifies an increment value to be used by the For...Next statement when incrementing the value assigned to the counter variable. If you don't specify a value for StepValue, a value of 1 is assumed.
The following example, taken from Chapter 5, "Storing and Retrieving Data in Memory," demonstrates how to use a For…Next loop to iterate through the contents of an array.
Public Class Form1 Private Sub Form1_Load(ByVal sender As System.Object, _ ByVal e As System.EventArgs) Handles MyBase.Load Dim strMessage As String = "" Dim intCounter As Integer = 0 Dim strCustomerNamesArray(4) As String strCustomerNamesArray(0) = "Markland B." strCustomerNamesArray(1) = "Mike M." strCustomerNamesArray(2) = "Nick C." strCustomerNamesArray(3) = "Jerry F." strCustomerNamesArray(4) = "Rocky B." For intCounter = 0 To 4 strMessage &= strCustomerNamesArray(intCounter) & _ ControlChars.NewLine Next intCounter MessageBox.Show(strMessage) End Sub End Class
In this example, the For…Next loop is set up to iterate five times (from 0 to 4). Upon each iteration, the value assigned to intCounter is automatically incremented by 1. By plugging in the intCounter variable in place of a number (strCustomerNamesArray(intCounter)), a display string is assembled that shows all of the contents of the array.
It is important to understand that the value assigned to the StepValue can be something other than just 1. You could set it equal to 2 in the previous example to skip every other element stored in the array, or as the following example demonstrates, you could assign it a negative number in order to process the array in reverse order.
For intCounter = 4 To 0 Step -1 strMessage &= strCustomerNamesArray(intCounter) & _ ControlChars.NewLine Next intCounter
You can also use the For…Next loop to work with Visual Basic controls that have collections, such as the ListBox control. The following example demonstrates how to use a For…Next loop to add elements to a ListBox control at run time.
| Trick | The first step in working with the ListBox control is to add an instance of the control from the ToolBox window to a form. Once added to a form, you can populate and access the contents of a ListBox using the methods and properties belonging to its Items property. The Items property is actually a collection and any items that you add to a ListBox are referenced by their index position within the Items collection. You can add items to a ListBox control using the Items collection's Add() method. You can then refer to any item in the Items collection using the Items collection's Items property. |
A ListBox is a control that displays a list of items from which a selection can be made.
Public Class frmMain Private Sub Button1_Click(ByVal sender As System.Object, _ ByVal e As System.EventArgs) Handles Button1.Click Static intSheep As Integer = 0 For intCounter As Integer = 0 To 9 Step 1 intSheep += 1 lbxNumbers.Items.Add(intSheep.ToString & " Sheep") Next End Sub End Class
In this example, a Visual Basic application was created that consists of a Button control and a ListBox control. The application promises to help the user get to sleep by helping to count sheep, 10 at a time, whenever the user clicks on the Button control.
The For…Next loop in this example will iterate 10 times (0 to 9). Within the loop, the value of an Integer type variable named intSheep is incremented by 1, and the ListBox control's (lbxNumbers)Items property's (which itself is an object or collection) Add() method is used to load new items into the ListBox. Figure 7.11 shows output that is produced after this application is started and the user clicks on the button for the first time.
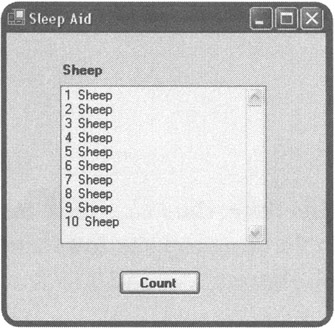
Figure 7.11: Using a For…Next loop to populate the contents of a ListBox.
| Hint | As is the case with this chapter's game project example, you will find a copy of the source code for the Sleep Aid application available for download on this book's companion Web site. |
In addition to adding elements to a control's collection, you can use the For…Next loop to retrieve elements from a collection, as demonstrated in the next example.
Public Class Form1 Private Sub Button2_Click(ByVal sender As System.Object, _ ByVal e As System.EventArgs) Handles btnExit.Click Application.Exit() End Sub Private Sub Buttonl_Click(ByVal sender As System.Object, _ ByVal e As System.EventArgs) Handles btnDisplay.Click Dim strMessage As String = "" Dim intCounter As Integer For intCounter = 1 To lbxCustomers.Items.Count - 1 strMessage &= lbxCustomers.Items.Item(intCounter) & _ ControlChars.CrLf Next MessageBox.Show("Customer List: " & ControlChars.CrLf & _ ControlChars.CrLf & strMessage, "Customer Listing") End Sub End Class As you can see, this time, the For…Next loop uses the ListBox (lbxCustomers) control's Items collection's Item property to retrieve an element, using its index number from the ListBox control. Figures 7.12 and 7.13 demonstrate the operation of this application.
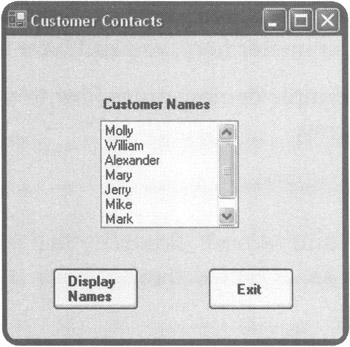
Figure 7.12: You can set up a For…Next loop that processes all of the contents of a ListBox control.
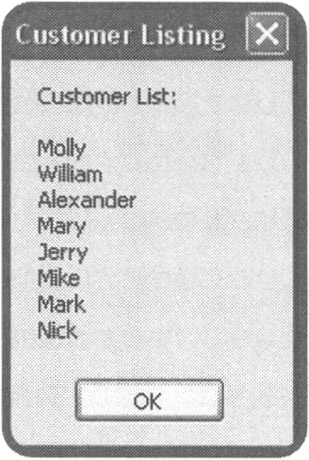
Figure 7.13: The For…Next loop spins through the contents of the ListBox and uses the data to display a list of customers.
| Hint | As is the case with this chapter's game project example, you will find a copy of the source code for the Customer Contacts application available for download on this book's companion Web site. |
For…Each…Next
The For…Each…Next loop is perfect for processing the contents of arrays and collections when you don't know in advance the exact number of elements that are being stored. The For…Each…Next automatically iterates through each member and alleviates any concern regarding the tracking of index numbers.
The syntax of the For…Each…Next statement is shown below:
For Each element [As DataType] In collection statements Next [element]
Element is a variable that represents a property (that is, a member) associated with the specified collection. The DataType parameter is optional. When used, it allows you to define the element variable's data type within the loop itself. If you choose not to supply the DataType parameter here, you still have to define it elsewhere in your application.
The following example demonstrates how to set up a For…Each…Next loop to process the contents of an array.
Public Class Form1 Private Sub Form1_Load(ByVal sender As System.object,_ ByVal e As System.EventArgs) Handles MyBase.Load Dim strMessage As String = "" Dim strName As String = "" Dim strCustomerNamesArray(4) As String strCustomerNamesArray(0) = "Markland B." strCustomerNamesArray(1) = "Mike M." strCustomerNamesArray(2) = "Nick C." strCustomerNamesArray(3) = "Jerry F." strCustomerNamesArray(4) = "Rocky B." For Each strName In strCustomerNamesArray strMessage &= strName & ControlChars.NewLine Next strName MessageBox.Show(strMessage, "Customer Contact Names") End Sub End Class
As you can see from this example, the For…Each…Next loop automatically iterates through each element in the array without requiring the use of a counter or any additional logic. Figure 7.14 shows the output that is generated when this example is executed.
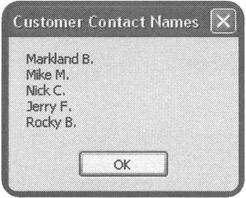
Figure 7.14: Using a For…Each…Next loop to process the contents of an array.
While
One last type of loop that I want to introduce you to is the While loop. The While loop is designed to run as long as a stated condition is true. The While loop has the following syntax.
While condition statements End While
Condition is expressed in the form of an expression, as demonstrated below.
Dim strUserResponse As String, blnTerminateFlag As Boolean =False While blnTerminateFlag = False strUserResponse = InputBox("Enter Quit to stop the application.") If strUserResponse.ToLower = "quit" Then blnTerminateFlag = True Else MessageBox.Show ("The current date and time is " & Now()) End If End While In this example, the user is prompted to enter the word "Quit" in order to stop the application from continuing to execute. If the user enters anything other than the word "Quit," or if the user clicks on the pop-up window's Cancel button, the While loop displays the current date and time and then iterates and continues prompting the user to enter the word "Quit."
The previous example demonstrates that the While loop requires its tested condition to be checked at the beginning of the loop. Although useful, the While loop is not as flexible as the Do…while and Do…Until loops, which can test a condition before or after initial loop execution and provide the same capabilities as the while loop.
EAN: 2147483647
Pages: 126