Manually Configuring Accessibility Options
To open the Accessibility Options folder, click on Start/Control Panel and then select Accessibility Options, as shown in Figure 8.9. Links to the following accessibility applications are listed in the See Also section on the left-hand side of the folder.
-
Magnifier
-
On-Screen Keyboard
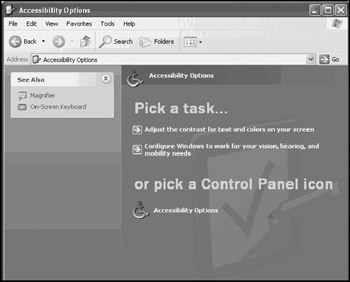
Figure 8.9: The Accessibility Options folder provides access to several accessibility applications as well as the Accessibility Options dialog
In addition, the Configure Windows to work for your vision, hearing, and mobility needs link in the Pick a task section starts the Accessibility Wizard.
The remaining links on the Accessibility Options folder provide access to different property sheets on the Accessibility Options dialog. This dialog provides access to the same accessibility settings managed by the various accessibilityoption applications and the Accessibility Wizard.The Accessibility Options dialog is organized into five property sheets, as listed below.
-
Keyboard
-
Sound
-
Display
-
Mouse
-
General
Each of the accessory settings located on each of these property sheets is explained in the sections that follow.
Setting Keyboard Accessibility Settings
The Keyboard property sheet on the Accessibility Options dialog, shown in Figure 8.10, displays four keyboard-related settings, which include:
-
Use StickyKeys. When selected, this option allows the Shift, Ctrl, Alt and Windows logo keys to be pressed one key at a time.
-
Use FilterKeys. When selected, this option tells Windows XP to briefly ignore repeated keystrokes.
-
Use ToggleKeys. When selected, this option plays an audio tone when the Caps Lock, Num Lock, or Scroll Lock keys are pressed.
-
Show extra keyboard help in programs. Causes applications to display extra keyboard help when available.
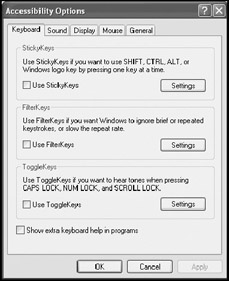
Figure 8.10: The Keyboard property sheet on the Accessibility Options dialog provides access to an assortment of keyboard configuration settings
The following procedure outlines the steps involved in configuring the Sticky Keys options.
-
Click on Start/Control Panel and then click on the Accessibility Options icon. The Accessibility Options folder appears.
-
Click on Accessibility Options. The Accessibility Options dialog appears.
-
Select the Keyboard property sheet.
-
Select Use StickyKeys and then click on the Settings button located in the StickyKeys section of the Accessibility Options dialog.
-
The Settings for StickyKeys dialog appears, as shown in Figure 8.11, displaying the following settings:
-
Use shortcut. Allows the StickyKeys settings to be disabled by pressing the Shift key five times in a row.
-
Press modifier key twice to lock. Causes the Ctrl, Alt, Shift, or Windows logo key to remain active once pressed and to remain that way until pressed again.
-
Turn StickyKeys off if two keys are pressed at once. Turns off StickyKeys as soon as a modifier key and another key are pressed at the same time.
-
Make sounds when modifier key is pressed. Plays an audio tone whenever a modifier key is pressed.
-
Show Sticky Keys status on screen. Displays a StickyKeys icon on the Windows XP notification area, as shown in Figure 8.12. Each component of the icon represents a different StickyKey. A cleared square or rectangle indicates that the key is not selected. A colored-in square or rectangle indicates an active key.
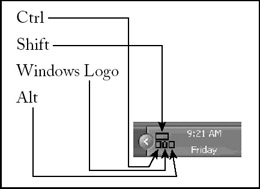
Figure 8.12: The Show StickyKeys status on-screen option displays a graphical representation of the status of StickyKeys
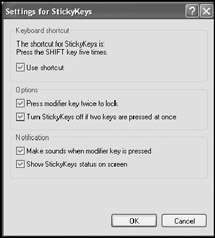
Figure 8.11: Configuring StickyKeys settingsSelect the appropriate options and click on OK to close the Settings for StickyKeys dialog.
-
-
Click on OK to close the Accessibility Options dialog.
The following procedure outlines the steps involved in configuring the FilterKeys options.
-
Click on Start/Control Panel and then click on the Accessibility Options icon. The Accessibility Options folder appears.
-
Click on the Accessibility Options. The Accessibility Options dialog appears.
-
Select the Keyboard property sheet.
-
Select Use FilterKeys and then click on the Settings button located in the FilterKeys section of the Accessibility Options dialog.
-
The Settings for FilterKeys dialog appears, as shown in Figure 8.13, displaying the following settings:
-
Use shortcut. Allows the FilterKeys settings to be disabled by holding down the Shift key for eight seconds.
-
Ignore repeated keystrokes. Tells Windows XP to ignore repeated keystrokes.
-
Ignore quick keystrokes and slow down the repeat rate. Tells Windows XP to ignore any briefly repeated keystrokes. When selected, the Settings button is enabled to allow for the specification of the length of time that a key must be pressed down for a repeated keystroke to register and be accepted as input.
-
Beep when keys pressed or accepted. Plays an audio beep whenever a key is pressed and another beep when the keystroke is accepted.
-
Show FilterKeys status on screen. Displays a FilterKeys icon in the Windows XP taskbar notification area signifying that the FilterKeys option is active, as shown in Figure 8.14.
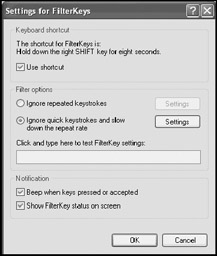
Figure 8.13: Configuring FilterKeys settings
Figure 8.14: The Show FilterKey status on screen option displays a graphical stopwatch, indicating that FilterKey settings are being usedSelect the appropriate options and click on OK to close the Settings for FilterKeys dialog.
-
-
Click on OK to close the Accessibility Options dialog.
The following procedure outlines the steps involved in configuring the ToggleKeys options.
-
Click on Start/Control Panel and then click on the Accessibility Options icon. The Accessibility Options folder appears.
-
Click on the Accessibility Options. The Accessibility Options dialog appears.
-
Select the Keyboard property sheet.
-
Select Use ToggleKeys and then click on the Settings button located in the ToggleKeys section of the Accessibility Options dialog.
-
The Settings for ToggleKeys dialog appears as shown in Figure 8.15. Select the Use Shortcut setting to turn on the ability to enable and disable ToggleKeys by holding down the Num Lock key for five seconds.
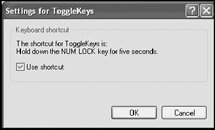
Figure 8.15: Configuring the ToggleKeys Use Shortcut setting -
Click on OK to close the Settings for ToggleKeys dialog.
-
Click on OK to close the Accessibility Options dialog.
Setting Sound Accessibility Settings
The Sound property sheet on the Accessibility Options dialog, shown in Figure 8.16, displays three sound-related settings as shown below.
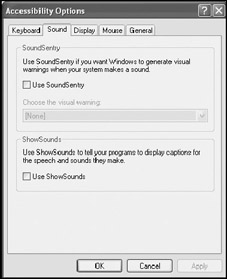
Figure 8.16: The Sound property sheet on the Accessibility Options dialog provides access to an assortment of audio configuration setting
-
Use SoundSentry. Flashes a part of the screen every time a audio event occurs.
-
Choose the visual warning. This option is enabled when the Use
SoundSentry option is selected. It specifies what area of the screen will flash when an audio event occurs. Available options include Flash active caption bar, Flash active window, Flash desktop, and None.
-
Use ShowSounds. Tells applications that notify the user via audio sounds to add visual notifications.
The following procedure outlines the steps involved in configuring the settings found on the Sound property sheet.
-
Click on Start/Control Panel and then click on the Accessibility Options icon. The Accessibility Options folder appears.
-
Click on the Accessibility Options. The Accessibility Options dialog appears.
-
Select the Sound property sheet.
-
Select Use SoundSentry to enable a flash notification. The Choose the visual warning option is then enabled.
-
Select one of the visual warnings available in the Choose the visual warning drop-down list.
-
Select Use ShowSounds to configure applications to supplement audio sounds with video notifications.
-
Click on OK to close the Accessibility Options dialog.
Setting Display Accessibility Settings
The Display property sheet on the Accessibility Options dialog, shown in Figure 8.17, contains one display-related setting and two cursor settings, as shown below.
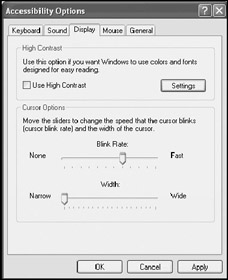
Figure 8.17: The Display property sheet on the Accessibility Options dialog provides access to display and cursor configuration settings
-
Use High Contrast. Increases screen legibility in supporting applications by expanding font sizes and changing color schemes
-
Cursor Option None. Sets the speed at which the cursor blinks
-
Cursor Options Narrow. Sets cursor width
| Note | Administrators may be able to further assist users by changing resolution, color, and appearance settings in the Display Properties dialog, as explained in "Configuring the Windows XP Display"found in Chapter 7", Configuring Desktop Settings". |
The following procedure outlines the steps involved in configuring the settings found on the Display property sheet.
-
Click on Start/Control Panel and then click on the Accessibility Options icon. The Accessibility Options folder appears.
-
Click on the Accessibility Options folder. The Accessibility Options dialog appears.
-
Select the Display property sheet.
-
Select Use High Contrast and click on Settings to change the computer's color scheme and increase legibility. The Settings for High Contrast dialog appears, as shown in Figure 8.18.
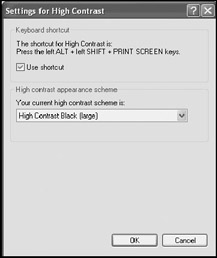
Figure 8.18: Refining High Contrast display settings -
Select Use shortcut to turn the left Alt+left Shift+Print Screen keys into a toggle switch for the normal and high contrast color schemes.
-
Select a high contrast color scheme from the drop-down list in the High contrast appearance scheme section and click on OK.
-
Move the Blink Rate slider bar left or right to adjust the rate at which the cursor blinks.
-
Move the Width slider bar to adjust the cursor's width.
-
Click on OK to close the Accessibility Options dialog.
Setting Mouse Accessibility Settings
The Mouse property sheet on the Accessibility Options dialog, shown in Figure 8.19, displays keyboard-related settings, as shown below.
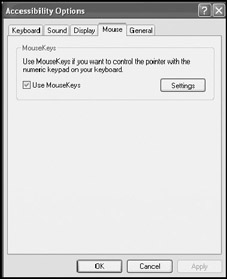
Figure 8.19: The Mouse property sheet on the Accessibility Options dialog provides access to settings that allow the keyboard to be substituted for the mouse
-
Use shortcut. Allows MouseKeys to be enabled and disabled by pressing the left Alt+left Shift+Num Lock keys
-
Top speed. Sets the maximum speed at which the pointer can be moved around the screen
-
Acceleration. Determines how quickly the pointer can reach its maximum speed once moved
-
Hold down Ctrl to speed up and Shift to slow down. Enables the ability to increase or decrease mouse speed by holding down the Ctrl and Shift keys while moving the mouse
-
Use MouseKeys when NumLock is_. Provides the ability to toggle MouseKeys on and off using the NumLock key
-
Show MouseKey status on-screen. Displays a MouseKeys icon in the taskbar notification area when MouseKeys settings are active, as shown in Figure 8.20

Figure 8.20: The MouseKeys icon will be displayed in the taskbar's notification area whenever MouseKeys are enabled
The following procedure outlines the steps involved in configuring the settings found on the Mouse property sheet.
-
Click on Start/Control Panel and then click on the Accessibility Options icon. The Accessibility Options folder appears.
-
Click on the Accessibility Options folder. The Accessibility Options dialog appears.
-
Select the Mouse property sheet.
-
Select Use MouseKeys and click on Settings to specify detailed MouseKeys configuration settings. The Settings for MouseKeys dialog appears, as shown in Figure 8.21.
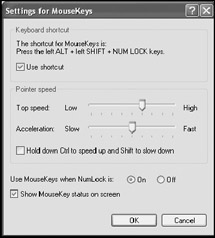
Figure 8.21: Modifying MouseKeys settings -
Select Use shortcut to set the left Alt+left Shift+NumLock keys as toggle switch for controlling MouseKeys.
-
Move the Top speed slider bar left or right to set the pointer's top speed.
-
Move the Acceleration slider bar left or right to specify how quickly the pointer switches to top speed.
-
Select the Hold down Ctrl to speed up and Shift to slow down option to provide additional control over pointer speed.
-
Select the Use MouseKeys when NumLock is_setting to specify how the Num Lock key is used to toggle MouseKeys on and off.
-
Select Show MouseKey status on screen to display the MouseKey icon in the notification area whenever MouseKeys are in effect.
-
Click on OK to close the Accessibility Options dialog.
Setting General Accessibility Settings
The General property sheet on the Accessibility Options dialog, shown in Figure 8.22, displays a collection of Accessibility settings that do not fit into the categories located on the other property sheets. The following settings are located on the General property sheet.
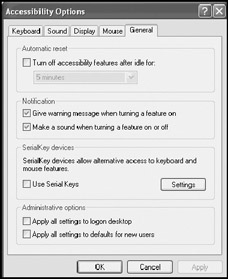
Figure 8.22: The General property sheet provides access to a miscellaneous collection of Accessibility settings
-
Turn off accessibility features after idle for-
-
Give warning message when turning a feature on
-
Make a sound when turning a feature on or off
-
Use Serial Keys
-
Apply all settings to logon desktop
-
Apply all settings to defaults for new users
The following procedure outlines the steps involved in configuring the settings found on the General property sheet.
-
Click on Start/Control Panel and then click on the Accessibility Options icon. The Accessibility Options folder appears.
-
Click on the Accessibility Options folder. The Accessibility Options dialog appears.
-
Select the General property sheet.
-
If two or more users share the computer, it can be configured to automatically turn off StickyKeys, SoundSentry, MouseKeys, FilterKeys, ToggleKeys, and High Contrast after a specified period of inactivity by selecting the Turn off accessibility features after idle for option and selecting a time frame from the drop-down list.
-
Select the Give warning message when turning a feature on option to tell Windows XP to display a confirmation prompt before enabling or disabling an accessibility option.
-
Select the Make a sound when turning a feature on or off option to tell Windows XP to play an audio sound when enabling or disabling an accessibility option.
-
To set up a serial device such as a joystick to provide input in place of a mouse or keyboard, select the Use Serial keys option and click on Settings. This displays the Settings for SerialKeys dialog, as shown in Figure 8.23. Select the serial port to which the device is connected and the speed at which it operates and click on OK.
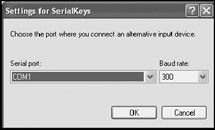
Figure 8.23: Configuring the communications port and baud rate for an alternate input device -
Select the Apply all settings to logon desktop option to tell Windows XP to apply the current user's Accessibility settings to all users of the computer. Only administrators can set this option.
-
Select the Apply all settings to defaults for new users option to make the current Accessibility settings the default setup for all new users' accounts created on the computer. Only administrators can set this option.
-
Click on OK to close the Accessibility Options dialog.
EAN: 2147483647
Pages: 358