Windows Workgroup Networks
A network based on the workgroup model is known as a peer-to-peer network.A workgroup is a collection of computers that have been grouped together for the purposes of making resource sharing easier. On a peer-to-peer network, any computer can share its disk and printer resources with other computers. Peer-topeer networks can be organized into one or more workgroups, although no more than one or two workgroups are typically defined.
Membership in one workgroup does not preclude the ability to access resources located on a computer that is a member of another workgroup. In fact, workgroup membership only means that users within the same workgroup automatically see each other's computers when clicking on the View workgroup computers task in the Network Tasks section of the Network Places folder.
One of the limitations of a peer-to-peer network is that a user who needs to be able to access resources on more than one computer must have a user account defined on each computer to which access is required. In other words, if a peer-to-peer network consists of 10 computers, an administrator needs to define a separate but identical user account for him or herself on each computer in order to be able to administer all network computers. In addition, unless the username assigned to each account and the associated passwords are synchronized across every computer, administration becomes a headache because of the need to remember multiple account names and passwords.
User Accounts
When connected to a workgroup-based network, Windows XP Professional only supports a single type of user account known as a local account. These accounts are local because they only allow access to resources located on the computer on which the accounts are defined. These accounts differ significantly from the domain user accounts used on domain-based networks. Domain user accounts allow a user to log in to the domain and then access any computer or resource to which the domain user's account has been granted access.
Each user on a workgroup-based network should be assigned a specific user account, which should then be defined on each computer to which the user will require access. A user account contains a number of pieces of information about the user, including the username and password. User accounts on workgroup-based networks are stored locally on the computer in the SAM (Security Accounts Manager).
When a user logs on to a stand-alone computer running Windows XP Professional or a computer connected to a workgroup-based network, his or her user ID and password are passed to the SAM, where they are compared to the user account information stored there. If a match occurs, the user is allowed to log in and an access token is generated. Windows XP Professional uses the information stored in the token for the rest of the user's login session to determine what resources the user has access to. If the SAM does not have a corresponding user account with a matching password, the user's login is rejected.
When a logged-in user attempts to access a network resource on another computer Windows XP Professional automatically passes the user's username and password to the other network computer. If the user has a matching user account on the other network computer and the account's password matches the password used to log in to the local computer, access is then granted (based on the account permissions specified on the network computer). If the user's account name or password does not match up with an account name or password on the network computer, the user is prompted to supply an account name and password that is valid on the network computer.
Controlling User Login
Administrators can configure a computer that is part of a workgroup network to use either of two login options. The default option is the Windows XP Welcome screen, which displays an icon and username for each user account defined to the computer. To log in, the user only has to click on the icon representing his or her user account and, if required, supply a password. By default, the Fast User Switching option is also enabled. This option allows users to log on to Windows XP without first logging off another active user.
| Note | For more information about the Windows XP Welcome screen, refer to "Logging On" and "Logging Off and Shutting Down" in Chapter 1, "Introducing Windows XP Professional." |
The more secure option is to enable the Welcome to Windows dialog, which requires that users press the Ctrl+Alt+Delete keys in order to initiate the login process. Only the last logged-on username is displayed. This forces users to supply both their usernames and passwords in order to log in.
The following procedure outlines the steps involved in disabling the Welcome screen and Fast User Switching.
-
Click on Start and then Control Panel. The Windows XP Control Panel appears.
-
Double-click on User Accounts. The User Accounts folder appears.
-
Click on Change the way users log on or off.
-
Clear the Use the Welcome Screen option. This automatically disables Fast User Switching.
-
Click on Apply Options.
Using the Network Setup Wizard
In a workgroup-based network, Windows XP Professional's networking options are configured using the Network Setup Wizard. This wizard assists in the configuration of the following networking features:
-
Setting up an ICS server
-
Setting up ICS clients
-
Modifying computer name and workgroup membership
In addition to configuring each of the above network options, the Network Setup Wizard provides a complete overview of the steps involved in setting up a small home or office network. Use this information, if necessary, to complete the setup of the network. The following procedure outlines the steps involved in accessing this information.
-
Click on Start and then Control Panel. The Windows XP Control Panel appears.
-
Click on Network and Internet Connections. The Network and Internet Connections folder appears.
-
Click on Setup or change your home or small office network.
-
The Network Setup Wizard starts. Click on Next.
-
Click on the checklist for creating a network link. The Windows XP Help and Support Center opens and displays a list of steps to be followed in order to assemble a small network, as shown in Figure 18.7.
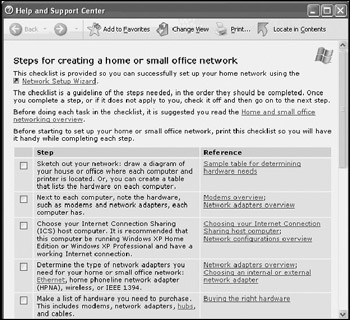
Figure 18.7: The Windows XP Help and Support Center provides detailed instructions for assembling a small home or office network
| Note | If the Network Setup Wizard detects that multiple network adapters are installed on a computer running Windows XP Professional, it will prompt the administrator to create a Network Bridge. A Network Bridge is a service that allows a computer running Windows XP Professional to connect multiple network segments into a single logical subnet. For example, a Windows XP Network Bridge allows a network consisting of different network media, such as Ethernet, phone line, or wireless, to work together by routing data packets from one segment to another as required to facilitate network communications. |
Setting Up an ICS Server
ICS allows one computer on a workgroup-based network to share its Internet connection with the rest of the computers on the network. This connection can be a regular dial-up connection or a high-speed connection, such as cable or DSL.
ICS protects the computers on the network from the Internet by hiding private network addresses. Only the Internet IP address assigned to the computer running the ICS service is visible to the Internet. The ICS server simplifies network setup by providing a DHCP service, which automates the assignment of TCP/ IP settings for all of the other ICS client computers on the network.
| Note | For detailed information on the way that ICS manages TCP/IP configuration settings, refer to Chapter 16, "Windows XP and TCP/IP." |
The following procedure outlines how to use the Network Setup Wizard to configure a computer that already has an Internet connection to act as an ICS server.
-
Click on Start and then My Network Places. The My Network Places folder appears.
-
Click the Set up a home or small office network task. The Network Setup Wizard starts.
-
Click on Next two times. The Select a connection method screen is displayed, as shown in Figure 18.8.
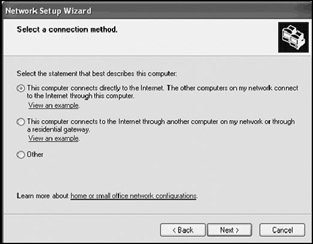
Figure 18.8: The Network Setup Wizard assists in configuring a number of different network optionsThe following options are available:
-
This computer connects directly to the Internet. The other computers on my network connect to the Internet through this computer. Select this option to set up the ICS server.
-
This computer connects to the Internet through another computer or my network or through a residential gateway. Select this option to set up ICS clients.
-
Other. Select this option to configure a computer to connect to the Internet using a shared network hub; to configure a computer with a stand-alone cable, DSL, or dial-up connection; or to set up a computer to run on a stand-alone network with no Internet access.
Select the first option and click on Next.
Note A residential gateway is a small network appliance that provides the same basic set of features as ICS. In addition, it functions as a network hub or switch and provides advanced personal firewall protection.
-
-
If the computer has more than one network connection, select the local area network connection with which the ICS server is to share its Internet connection and click on Next, as shown in Figure 18.9.
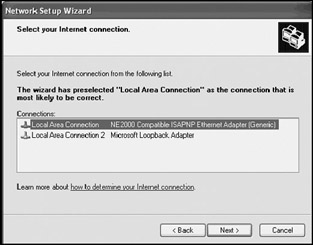
Figure 18.9: Select the local area network connection with which the Internet connection should be shared -
Type a description for the computer that will help identify the computer to other network users in the Computer description field.
-
Type a unique computer name in the Computer name field and click on Next.
Note Every computer on a workgroup-based network must be assigned a unique name. Windows XP Professional limits computer names to 15 or fewer characters. In addition, the computer's name cannot contain any of the following characters:
: ; " < > + * = \ ? | ,
-
Type the name of the workgroup to which the ICS server should be added and click on Next.
Note If the specified workgroup does not already exist on the network, a new workgroup with that name will be defined.
-
The wizard displays a summary of all the information that it has collected. Verify that this information is correct and click on Next.
-
The wizard applies the configuration settings to the computer. This includes assigning it an IP address of 168.192.0.1 with a subnet mask of 255.255.255.0. The wizard then asks if it should create a disk that contains a copy of the Network Setup Wizard so that it can be run on non Windows XP computers, as shown in Figure 18.10. This wizard can also be run from the Windows XP Professional CD. Select Just finish the wizard; I don't need to run the wizard on other computers, and click on Next.
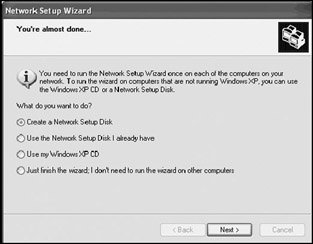
Figure 18.10: The Network Setup Wizard can be used to create a setup disk for configuring non Windows XP computers on a workgroup network
| Note | For more information on how the ICS server administers TCP/IP configuration settings, refer to "Using Windows XP Professional on Smaller Networks" in Chapter 16, "Windows XP and TCP/IP." |
Setting Up ICS Clients
The Network Setup Wizard is also used to configure ICS clients by helping them to locate ICS servers and configuring them to act as DHCP clients. Once configured, ICS clients will receive their TCP/IP settings from the ICS server or a residential gateway and will be able to share its Internet access.
The following procedure outlines the steps involved in configuring an ICS client.
-
Click on Start and My Network Places. The My Network Places folder appears.
-
Click the Set up a home or small office network task. The Network Setup Wizard starts.
-
Click on Next two times. The Select a connection method screen is displayed.
-
Select This computer connects to the Internet through another computer or my network or through a residential gateway and click on Next.
-
Select Determine the appropriate connections for me and click on Next.
-
Type a description for the computer and a computer name and click on Next.
-
Type the name of the workgroup to which the computer should be joined and click on Next.
-
The wizard displays a summary of all the information that it has collected. Verify that this information is correct and click on Next.
-
The wizard applies the configuration settings to the computer. The wizard asks if it should create a Network Setup Disk. Select Just finish the wizard; I don't need to run the wizard on other computers, and click on Next.
-
Click on Finish.
Setting Up Other Types of Network Connections
The Network Setup Wizard can be used to configure several other network options, including:
-
Setting up a network connection through a shared network hub.Configures a computer running Windows XP Professional to directly access the Internet using a shared network hub
-
Setting up a direct cable or DSL connection to the Internet. Sets up an always-on high-speed cable or DSL Internet connection for a computer that is not connected to a local area network
-
Setting up access to a stand-alone network. Sets up a local area connection for a network that does not have shared Internet access
Setting Up Internet Access through a Network Hub
The Network Setup Wizard can also be used to set up Windows XP Professional to operate on a small network that uses a network hub to provide shared Internet access. In this setup an arrangement is made with an ISP (Internet Service Provider) to lease an additional IP address for each network computer. Unlike networks that use ICS or residential gateways, all network computers have visible connections to the Internet. Because of the cost savings and security provided by ICS and residential gateways, this option is not usually used.
The following procedure outlines the steps involved in configuring Windows XP Professional to work with this type of setup.
-
Click on Start and then My Network Places. The My Network Places folder appears.
-
Click the Set up a home or small office network task. The Network Setup Wizard starts.
-
Click on Next two times. The Select a connection method screen is displayed.
-
Select Other and click on Next.
-
The Other Internet connection methods screen is displayed, as shown in Figure 18.11. The following options are available:
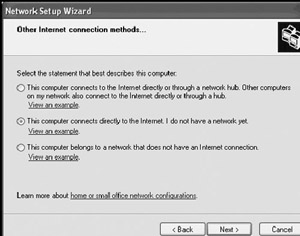
Figure 18.11: The Network Setup Wizard can also be used to set up several non-ICS network configurations-
This computer connects to the Internet directly or through a network hub. Other computers on my network also connect to the Internet directly or through a hub.
-
This computer connects directly to the Internet. I do not have a network yet.
-
This computer belongs to a network that does not have an Internet connection.
Select the first option and click on Next.
-
-
Select the network connection that connects the computer to the network hub that provides Internet access and click on Next.
-
The wizard displays a warning stating that the option being configured is not recommended and that ICS or a residential gateway would provide a better solution. Click on Next.
-
Type a description and a computer name and click on Next.
-
Type a workgroup name and click on Next.
-
The wizard displays a summary of all the information that it has collected. Verify that this information is correct and click on Next.
-
The wizard applies the configuration settings to the computer. The wizard asks if it should create a Network Setup Disk. Select Just finish the wizard; I don't need to run the wizard on other computers and click on Next.
-
Click on Finish.
Setting Up a Direct High-Speed Internet Connection
The Network Setup Wizard can also be used to set up a high-speed Internet connection for a computer that is not connected to a local area network. The steps involved in completing this procedure are outlined below.
-
Click on Start and then My Network Places. The My Network Places folder appears.
-
Click the Set up a home or small office network task. The Network Setup Wizard starts.
-
Click on Next two times. The Select a connection method screen is displayed.
-
Select Other and click on Next.
-
The Other Internet connection methods screen is displayed. Select This computer connects directly to the Internet. I do not have a network yet and click on Next.
-
Select the network connection that connects to the high-speed connection's cable or DSL modem and click on Next.
-
Type a description and a computer name and click on Next.
-
Type a workgroup name and click on Next.
-
The wizard displays a summary of all the information that it has collected. Verify that this information is correct and click on Next.
-
The wizard applies the configuration settings to the computer. The wizard asks if it should create a Network Setup Disk. Select Just finish the wizard; I don't need to run the wizard on other computers, and click on Next.
-
Click on Finish.
Setting Up a Stand-Alone Network
Not all networks require shared Internet access. A stand-alone local area network reduces the cost of the network and makes it more secure by eliminating any possibility of external intrusion from the Internet.The steps involved in con-figuring Windows XP Professional to participate on a stand-alone local area network are outlined below.
-
Click on Start and then My Network Places. The My Network Places folder appears.
-
Click the Set up a home or small office network task. The Network Setup Wizard starts.
-
Click on Next two times. The Select a connection method screen is displayed.
-
Select Other and click on Next.
-
The Other Internet connection methods screen is displayed. Select This computer belongs to a network that does not have an Internet connection and click on Next.
-
Select Determine the appropriate connections for me and click on Next.
-
Type a description and a computer name and click on Next.
-
Type a workgroup name and click on Next.
-
The wizard displays a summary of all the information that it has collected. Verify that this information is correct and click on Next.
-
The wizard applies the configuration settings to the computer. The wizard asks if it should create a Network Setup Disk. Select Just finish the wizard; I don't need to run the wizard on other computers, and click on Next.
-
Click on Finish.
The Network Setup Wizard configures the computer to participate on a local area network with a network address of 169.254.0.0 and a subnet mask of 255.255.0.0.
| Note | For more information on how Windows XP Professional operates on small stand alone networks, refer to "Using Windows XP Professional on Smaller Networks" in Chapter 16, "Windows XP and TCP/IP." |
EAN: 2147483647
Pages: 358