Working with Attachments
We’ve already talked about how attachments are added to a message and the resulting conversion to a DIME message. We’ll consider how to add and process attachments by looking at a simple Web service that accepts an image attachment. The Attachments Web service, located at http://localhost/wscr/13/attachmentsws.asmx, has one method, FlipMe, that accepts the image and reverses the palette before returning the image to the client.
| Note | The code here for modifying the image in the Web service method is far from ideal. It creates four versions of the same buffer, each in a slightly different format, which would play havoc with memory usage on the server if we were to attempt to scale up the application. We’re using it here simply to show how attachments are passed between clients and servers. |
This example removes all of the filters from the WSE pipeline except the Trace filters. We’ll show that the Trace filters don’t really help you when you’re trying to debug an application that uses attachments.
If you open the AttachmentsClient application in sample code, you’ll see a very simple form that allows the selection of an image by using the Browse button. The image is loaded and resized to fit the form. The important part occurs when you click the Flip Me button and a call to the Web service is made.
As with all Web service calls, the first thing you need to do is create an instance of the proxy class—in this case, the WSE-enabled version of the proxy. You then create a MemoryStream object that contains the image, retrieved as a JPEG, that you want to reverse:
// create the proxy AttachmentsWSWse proxy = new AttachmentsWSWse(); // save the image as a stream MemoryStream streamImage = new MemoryStream(); picMain.Image.Save(streamImage, ImageFormat.Jpeg);
Attachments in WSE are handled using streams, and everything you want to pass as a DIME attachment must be available as a stream. Because you can create streams from just about anything, this isn’t a problem.
To add the image to our message, we can create a new DimeAttachment object. The constructor for DimeAttachment we’re calling expects three parameters—the MIME type that we’re creating, an enumeration value that specifies the type format of the attachment, and the stream that we want to create the attachment from. When creating a JPEG image attachment, we specify that the MIME type is image/jpg and that we’re using a MediaType. As the final parameter, we pass the stream object we created earlier.
To add attachments to a request, you need to access the Attachments collection of the RequestSoapContext object of the proxy class. This returns a DimeAttachmentCollection— a class that’s derived from the CollectionBase object. As with all classes that derive from CollectionBase, it offers access to an Add method. We can simply use this to add the attachment to the collection:
// add the stream to the response DimeAttachment dimeAttach= new DimeAttachment("image/jpg", TypeFormatEnum.MediaType, streamImage); proxy.RequestSoapContext.Attachments.Add(dimeAttach); Once the attachment has been added to the message, we can make a call to the Web service by calling the FlipMe method of the proxy.
On the server, the FlipMe method first checks to see that only one attachment is attached to the message by accessing the Count property of the DimeAttachmentCollection exposed by HttpSoapContext.RequestContext:
if(HttpSoapContext.RequestContext.Attachments.Count == 1)
If we don’t have one attachment, we don’t do any more processing in the method. If we have exactly one attachment, we need to check that it is of the correct format.
You access individual members of the Attachments collection by using the Item property. This is also the indexer for the class, so we can use the shortened format for accessing the item we require:
DimeAttachment receivedItem=HttpSoapContext.RequestContext.Attachments[0];
Each item in the Attachments collection is a DimeAttachment, and this class exposes several properties that allow you to interrogate the attachment to determine what it actually is. This relies on the sender being truthful about what she’s attached, however.
We’ll use two of these properties, Type and TypeFormat. These expose the details that we passed to the constructor when we created the attachment at the client. We simply check that the Type and TypeFormat values of the DimeAttachment are what we expect:
if(receivedItem.TypeFormat == TypeFormatEnum.MediaType && receivedItem.Type == "image/jpg")
If the attachment is not of the correct format, we don’t do any more processing. If it is the correct format, we process the received attachment.
The DimeAttachment class exposes a copy of the stream that we used at the server to create the attachment; this can be accessed by using the Stream property. It’s a simple matter to use this property to extract the stream receivedItem and pass it to the constructor to create a new Bitmap:
// get the image Bitmap imgReceived = new Bitmap(receivedItem.Stream);
Once we create the Bitmap, we can flip the palette by reversing the color of each pixel. This code isn’t complex; it’s not efficient, either, but it performs its intended task. You can see what it actually does in the sample code.
After we alter the image, we instantiate a new DimeAttachment and add it to the ResponseContext. This is exactly the same process we perform at the client.
// save the image as a stream MemoryStream streamImage = new MemoryStream(); imgReceived.Save(streamImage, ImageFormat.Jpeg); // add the stream to the response DimeAttachment dimeAttach = new DimeAttachment("image/jpg", TypeFormatEnum.MediaType, streamImage); HttpSoapContext.ResponseContext.Attachments.Add(dimeAttach); On returning to the client, we now have the bitmap but with the palette reversed. We first check to see that there is only one attachment and that the attachment is of the correct type. We then retrieve the stream from the attachment and use this to create a new bitmap to replace the original image:
if(proxy.ResponseSoapContext.Attachments.Count == 1) { DimeAttachment receivedItem = proxy.ResponseSoapContext.Attachments[0]; if(receivedItem.TypeFormat == TypeFormatEnum.MediaType && receivedItem.Type == "image/jpg") { picMain.Image = new Bitmap(receivedItem.Stream); } } That’s it. We’ve now sent an attachment to a Web service and received an attachment back from the Web service. All attachments follow the same process no matter what the type of the attachment.
When you send an attachment, you create a DimeAttachment object and add it to the Attachments collection of the request context. If you receive an attachment, you have to be a little more careful. You might not need to check for the correct number of attachments, but you usually need to check the type of the attachment. You can then extract the attachment as a stream and construct the original object as required.
Debugging Attachments
As you saw earlier, the process of converting an outgoing message into DIME format is handled outside of the filter pipeline. The Trace filters are in the pipeline and won’t see that you have an attachment with your message.
If you open the output trace file for the previous application, as shown in Figure 13-7, you’ll see that there is no reference to any DIME message. Nor can you see that we added a DIME attachment to the message.
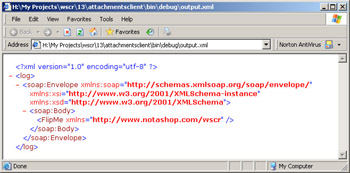
Figure 13-7: Trace filters don’t show DIME messages.
If you think back to the point at which the DIME message is constructed, it’s easy to see why you can’t use the Trace filters. An outgoing message is converted to DIME after all the filters in the pipeline have been executed, and an incoming message is converted from DIME before any of the filters in the pipeline are executed. We need some other means to debug what is being sent across the wire.
The solution is a tool we dismissed earlier in the chapter—the trace utility from the SOAP Toolkit. You saw this tool in action in Chapter 2; we’ll use it here to look at the structure of the DIME message that we’re sending across the wire.
Figure 13-8 shows the trace utility view of the structure of the DIME message that’s sent to the FlipMe method of the Attachments Web service.
By clicking on the Dime entry in the tree on the left, you can see the DIME structure of the message. At the top of the right pane, you can see that the DIME message actually contains two individual DIME records. If you look at the <Type> element for the two DIME records, you can see that the first record is a SOAP envelope and the second is an image.
We’ve seen the structure of the DIME message, but sometimes you want to see the actual contents of the message as well as the details of the SOAP envelope that makes up the first DIME record. You can do all of this using the trace utility.
Click on the Message # 1 entry in the tree on the left to show the SOAP envelope that was transmitted. It will be identical to the SOAP envelope seen by the output trace filter.
The HTTPHeaders entry lets you view the HTTP headers sent with the message, and you can see the actual binary message that was sent by clicking on the Binary entry.
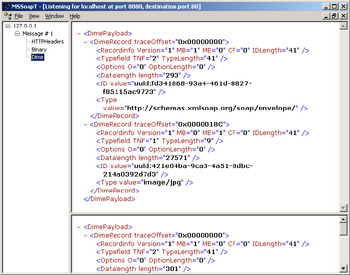
Figure 13-8: The trace utility allows you to debug DIME messages.
EAN: 2147483647
Pages: 172