HTTP Handlers
So what is an HTTP handler? Put simply, it’s an object that processes requests for individual URLs or URLs with certain file extensions (such as .asmx or .aspx). It’s the endpoint for an HTTP request. Thus far, the examples in this book have all used the default handler for .asmx files to handle the communication between client and service. You might want to replace this handler for a number of reasons.
Between them, the client-side proxy class and server-side handler perform eight tasks you can take for granted when you use the Web method abstraction (as shown in Figure 5-1). But you might want to skip these steps or change how they’re accomplished, such as in the following situations:
-
The server or client or both are already working with raw XML rather than .NET objects. They therefore have the option of skipping some or all of the four serialization steps and building and parsing SOAP requests directly.
-
The serializer used automatically by the built-in Web handler doesn’t do all that you need it to do. For example, in both version 1.0 and version 1.1 of the .NET Framework, the serializer supports only SOAP 1.1 messages. If you want to use SOAP 1.2, you must augment the serializer’s abilities or write your own serializer.
-
The server needs to preprocess or postprocess the request before the contents can be translated into a call on the Web service. For example, the server might need to decrypt or decompress the contents of the payload. You can’t do this with Web methods as they stand.
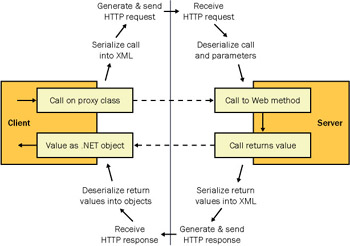
Figure 5-1: The steps beneath the Web method abstraction
You shouldn’t be afraid of working at this lower level. As long as you adhere to the standards that Web services are built on, your handlers will work happily with other systems. If it helps, you can think of a custom handler as a Web service that parses and builds its own SOAP messages.
Building a custom handler doesn’t mean you need a custom client. If you write a valid WSDL document for the service that the handler implements, developers can generate a proxy class against it in the normal way. Likewise, you can create a custom client over any Web service. As long as you know the shape of the SOAP request it requires and the response it will return, it doesn’t matter how those messages are built or parsed.
Approximating the Default Handler
Let’s get to it and start coding. Our first task is to determine how a handler works and then build on it so it can mirror the functionality of the default .asmx handler.
The IHttpHandler Interface
We’ll start by building the simplest kind of handler—one that responds in exactly the same way whenever it’s used. Open a new file in Notepad and write the following code:
<%@ WebHandler language="C#" %> using System; using System.Web; public class SimpleHandler1 : IHttpHandler { public void ProcessRequest(HttpContext context) { context.Response.Write("<b>I only return this message</b>"); } public bool IsReusable { get { return true; } } } Create a new folder called wscr\05 under your Web server’s root folder, and save the file there as SimpleHandler1.ashx. The extension .ashx identifies your file as an ASP.NET handler to be dealt with by—you guessed it—another handler. Now open up a browser and access the handler at http://localhost/wscr/05/SimpleHandler1.ashx. The handler returns a simple response (as shown in Figure 5-2).
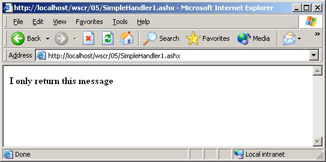
Figure 5-2: A simple response from a simple handler
As you can see from the code, building your own handler is ultimately a matter of writing a class that inherits from and implements a single interface—IHttpHandler. As you’ll see later in the chapter, if you want to implement an asynchronous HTTP service handler, you should implement IHttpAsyncHandler instead, but we’ll leave that to one side for now. The first line of the handler file identifies the file as a WebHandler listing and identifies the class that implements the interface. If the class isn’t in the handler file or its code-behind file, you must place the DLL that contains it in the bin directory of the Web application containing the handler or in the global assembly cache (GAC).
<%@ WebHandler language="C#" %> ⋮ public class SimpleHandler1 : IHttpHandler { The class inherits a property and a method from IHttpHandler that you must implement:
-
IsReusable, a property that indicates whether the single handler object should be reused to field all incoming requests.
-
ProcessRequest, a method that is called when a request is received; this is where you implement the code that constructs the response and sends it back. It takes one argument—the HttpContext object for this request.
The ProcessRequest method is the key to building a handler. By telling the handler how to deal with each type of request (GET, POST), you effectively implement the same functionality as the default Web service handler but retain complete control over what happens and what doesn’t.
In this example, for instance, ProcessMessage just returns a message, regardless of how the request to the handler was made, using the context object to write to the response stream:
public void ProcessRequest(HttpContext context) { context.Response.Write("<b>I only return this message</b>"); } | Note | Visual Studio. NET does not support the editing of ASHX files, but Web Matrix does. In fact, Web Matrix practically writes this simple handler for you as example code. |
Accounting for Request Types
The first task our replacement default handler has to undertake is to identify which type of request has been sent and then execute the appropriate code. As you learned in Chapter 1, ASP.NET Web services respond to four types of request binding:
-
Requests for user-readable service documentation, which are sent as HTTP- GET requests to the service with no additional information attached to the URL
-
HTTP-GET requests, which supply the method to be called and any parameters required in the call as part of the query string attached to the URL
-
HTTP-POST requests, which identify the method to be called in the URL being requested but store any parameters needed in the body of the HTTP request
-
HTTP-SOAP requests, which identify the service to be used in the URL, the method to be called in the HTTP SOAPAction header, and both method and parameters in the SOAP message stored in the body of the request
Our handlers should be able to deal with some or all of these types of requests and return the appropriate response. The second piece of code, SimpleHandler2.ashx, illustrates how to achieve this. We start as before with the WebHandler directive. Note that if the handler’s implementation class has been defined in a namespace, the directive must include the complete class name:
<%@ WebHandler language="C#" %> using System; using System.Web; namespace notashop.wscr.C5 { public class SimpleHandler2 : IHttpHandler { Inside ProcessRequest, we can determine what type of HTTP request was sent to the handler using the Request object’s HttpMethod property:
public void ProcessRequest(HttpContext context) { try { switch (context.Request.HttpMethod) { If the request type is GET, the client is either looking for a documentation page or has sent an HTTP-GET request. If the former is true, the query string is empty and we can redirect the browser to the help page. If the latter is true, we must retrieve the method name and its parameters from the query string and act on them:
case "GET": if (context.Request.QueryString.Count==0) context.Response.Write ("A documentation request has been made"); else { context.Response.Write ("An HttpGet request has been made"); } break; If we detect a POST request type, we can distinguish between HTTP-POST and HTTP-SOAP according to the content type of the request body. If the type is plain text or the contents of a HTML form, it’s an HTTP-POST request:
case "POST": switch (context.Request.ContentType) { case "text/plain": case "application/x-www-form-urlencoded": context.Response.Write ("An HttpPost request has been made"); break; If the body of the request contains XML, the request is probably an HTTP-SOAP request. If it is, the SOAPAction header will be present, so we can retrieve the method being called from the SOAPAction header, and we’ll know the format of the SOAP request we have to parse or deserialize. If the SOAPAction header is not present or contains an unknown method, we need to return a SOAP fault message:
case "text/xml": switch (context.Request.Headers["SOAPAction"]) { case "method_one": context.Response.Write("An HttpSoap " + "request for Method One " + "has been made"); break; case "method_two": context.Response.Write("An HttpSoap " + "request for Method Two " + "has been made"); break; default: context.Response.Write("A bad HttpSoap " + "request has been made"); break; } break; Finally, we need to account for the requests we cannot accommodate and return errors appropriately. Note that if the request wasn’t in XML, we need use only regular error messages and not return SOAP faults.
//Content-type not text, form or XML default: throw new Exception("Your request must be either" + "written plain text " + "or as a SOAP message."); } break; default: throw new Exception("This service accepts only " + "GET and POST requests"); } } catch(Exception e) { context.Response.Write(String.Format("error: {0}", e.Message)); } } We’ve created only a skeleton for our handler here. The actual determination of the method being called and the parsing or deserializing of the parameters of that method has been left blank to keep things clear. However, a question arises: does the method being called have to be a part of the handler? No—it can be any part of an application and shouldn’t have to be grouped with the handler. So there are two possible relationships between the handler and the method the client is calling:
-
Like a Web service, the handler is requested directly by the client and contains the method being called.
-
Like the default Web service handler, our custom handler looks after requests to several different Web services and passes on the deserialized request to the appropriate method in a separate file or assembly, or in a class that inherits from the handler’s class.
Our first two examples demonstrate the first scenario neatly, so we’ll look next at how to associate a handler with a set of requests using the same file extension.
Mapping a Handler to a File Extension
If you need to handle the processing of files with a certain file extension, you must first compile your class into an assembly and then place that assembly in either the GAC or, preferably, your Web application’s bin directory. You cannot associate a class inside a handler or code-behind file to a file extension.
In this example, we’ll associate requests for .wbsvc files with the following class, which has been compiled using Visual Studio .NET (you can also compile it from the command line) into an assembly called notashop.wscr.c5.wbsvc.dll.
using System.Web; public class wbsvcHandler : IHttpHandler { public void ProcessRequest(HttpContext context) { context.Response.Write("You asked for a .wbsvc file"); } public bool IsReusable { get { return true; } } } We must notify two processes of our new mapping before our handler is properly set up. The first is Microsoft Internet Information Services (IIS). We must specify the virtual application within which the association of requests and handler is valid. We can restrict this association to requests within the wscr\05 directory by making the directory a virtual application and working within it, or we can make the association valid across the whole Web site by working on the root application in IIS. Either way, you first bring up the Properties dialog box for your virtual application in the IIS Administration tool and click the Configuration button in the Application Settings section of the Directory tab. The Mappings tab of the Application Configuration dialog box shows you all the current associations between file extensions and the DLLs hosting the processing pipeline that the request goes through. We need to send .wbsvc to ASP.NET before we can forward it to our handler.
Click the Add button under the Application Mappings grid, and you’ll get to the dialog box shown in Figure 5-3.
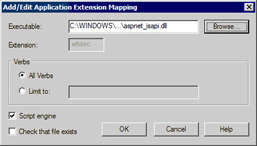
Figure 5-3: The Add/Edit Application Extension Mapping dialog box
The dialog box lets you specify two options:
-
The Executable option points to the DLL that hosts the processing pipeline for the request. In our case, it’s ASP.NET. Click Browse and navigate to WindowsDirectory\Microsoft.NET\Framework\Version\aspnet_isapi.dll, where Version is the build of .NET you’re using.
-
The Extension option contains the file extension you want to use. In our case, it’s .wbsvc (including the period).
Finally, deselect the Check That File Exists check box and click OK.
| Tip | Because of a bug in the IIS Administration tool, you sometimes can’t click OK after you specify the Executable or Extension option. The cure is to click the text box containing the location of your pipeline DLL. The OK button will become enabled again, and you can proceed. |
The second process to configure is the ASP.NET pipeline itself. You do this by creating a web.config file in the root directory of your virtual application (if there isn’t one already) and adding a <httpHandlers> section to it:
<?xml version="1.0" encoding="UTF-8" ?> <configuration> <system.web> <httpHandlers> <add verb="*" path="*.wbsvc" type="wbsvcHandler, notashop.wscr.c5.wbsvc" /> </httpHandlers> </system.web> </configuration>
The <add /> element maps all requests for files with the extension .wbsvc to the wbsvcHandler class in the assembly notashop.wscr.c5.wbsvc. Once you save the new web.config, copy notashop.wscr.c5.wbsvc.dll into the virtual application’s bin directory. (If there isn’t a bin directory, create it.) Try browsing to, for example, test.wbsvc in your Web application. Even though the file doesn’t exist, our handler is passed the request for a .wbsvc page and returns the simple message we gave it.
Constraining the Mapping
The previous example is the most lenient mapping you can make to a handler. However, you can constrain it against a couple of criteria on the request. You can return a standard 404 File Not Found error if the .wbsvc file does not exist in the virtual application. To do this, you reselect the Check That File Exists check box in the Edit Application Extension Mapping dialog box for .wbsvc (as shown previously in Figure 5-3).
You can also limit the type of HTTP requests that make it through to the handler. Both IIS and the pipeline .config file allow you to specify the HTTP verbs—generally GET and POST—that you want to handle and those you don’t. In IIS, select the Limit To option in the Edit Application Extension Mapping dialog box and type GET, POST (as shown in Figure 5-4).
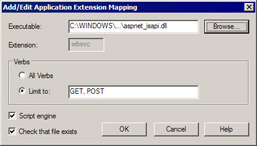
Figure 5-4: Restricting the HTTP request types allowed for a file extension.
In web.config, we can mirror this restriction by changing the verb attribute of our <add /> elements from * (representing all verbs) to, for example, “GET, POST”.
<add verb="GET, POST" path="*.wbsvc" type="wbsvcHandler, notashop.wscr.c5.wbsvc" />
Note that IIS and web.config must agree that the request type should be forwarded to the handler before it actually is. If IIS forbids it, the client is returned a 403.1 Forbidden error. If web.config forbids it, you get a 404 Resource Not Found error.
EAN: 2147483647
Pages: 172