X509 Certificate Security
As we’ve pointed out, sending username and password security credentials across a nonsecure transport protocol is completely insecure. And as bindings for more transport protocols are released, the probability that you’ll want to use a transport protocol without an intrinsic security mechanism will increase. Therefore, you’re likely to want a more secure security-credential mechanism that will be consistent across a wide variety of transport protocols. WSE supports the use of X509 certificates for this purpose.
X509 certificates are managed by a third-party issuer, such as VeriSign, and are granted only to people and organizations that have passed strict security checks. In what is known as a trust chain, you can trust any X509 certificates that an issuer has granted if you trust that issuer.
| Note | X509 certificates combine a public key and a private key that together allow you to sign and encrypt messages that you want to send. You make the public key available to anyone who wants it and keep the private key secret. The relationship between the public and private keys is such that you can use the public key to decrypt something encrypted with the private key, and you can use the private key to decrypt something encrypted with the public key. Although there is a relationship between the two keys, it is impossible to deduce the private key from the public key in a reasonable amount of time, so you can be assured of the security of the system. |
In a difference from username and password credentials, you can use X509 certificates to fulfill all three of the security requirements we’ve discussed. However, due to the nature of X509 certificates, you cannot guarantee any level of security if you use the certificate for authentication. With X509 certificates, the only part of the certificate you can make available is the public key, and this is used as the security credential for authentication. However, the public key is, well, public—and anyone can use it and attempt to spoof your identity. Even when you use a secure transport protocol, this problem still exists. So if you want to use X509 certificates as the security credentials for your Web services, you must ensure that the messages are signed before they are transmitted to the Web service. You can then be sure that the message has not been altered and also confirm the authenticity of the message.
When a sender signs a message, the sender generates a hash of the message, uses his private key to encrypt the hash, and attaches the encrypted hash to the message. Upon receiving a signed message, the recipient generates the hash for the message, decrypts the sender’s hash using the sender’s public key, and compares the two hashes. If the two hash values are different, the message has been altered.
Using X509 certificates to encrypt a message also uses the relationship between the pubic and private keys to ensure the security of the message. The sender encrypts the message using the recipient’s public key and sends the encrypted message. Only the recipient possesses the corresponding private key that can be used to decrypt the message.
Generating Test X509 Certificates
Before you can go live with a Web service that uses X509 certificates, you must obviously have a certificate from a trusted source. But for testing purposes, you can create test certificates that don’t have a trust chain that is validated to a trusted source. In all other respects, the test certificates you generate are identical to real certificates.
To generate a test certificate, you can use the makecert tool provided in the current release of the Microsoft .NET SDK. Using this tool, you can create certificates and add them to the correct certificate store. Each user has a separate certificate store, referred to as the Current User store, that is available only to that user; there is also a certificate store, the Local Computer store, that is available to all users of the machine. When you use WSE, it is assumed that the certificates are in the Local Computer certificate store, but as you’ll see shortly, it is possible for WSE to be configured to access the Current User certificate store instead.
| Note | The makecert tool provided in the current release of the .NET SDK does not correctly create certificates that are added to the Local Computer certificate store. Although the certificate will appear in the Local Computer certificate store, the private key of the certificate will be added to the Current User certificate store for the user that ran the makecert tool. Therefore, the private key won’t be available to anyone other than the user who created the certificate. To create valid test certificates, you must obtain the fully functional version of the tool from the Platform SDK. You can download this by navigating to http: //www.microsoft.com/msdownload/platformsdk/sdkupdate/update.htm and downloading the Build Environment from the Core SDK. |
Using the makecert tool is relatively easy, except for a couple of gotchas that you should be aware of. First, when you use test certificates, you must tell the security filters that you’re allowing test certificates to be used. If you don’t do this, the certificates will be invalid because they don’t have a trust chain back to a trusted source. You inform the security filters by adding an entry to the configuration file for the application:
<microsoft.web.services> <security> <x509 allowTestRoot="true" /> </security> </microsoft.web.services>
Second, when you create a test certificate, you must specify the -sky “exchange” and –sk “unique name” parameters. The –sk parameter value must be unique for the machine on which the certificate is used. When you purchase a certificate this occurs automatically, but when you’re testing it is easy to create a certificate that doesn’t have a unique value.
To create a certificate, you simply specify which store you want the certificate to be created in, by using the –sr option, and what part of the store you want the certificate to be created in, by using the –ss option. You specify the name of the certificate, according to the X500 standard, by using the –n option.
Client Configuration
Let’s create a certificate for the current user, Joe Bloggs:
makecert –sky "exchange" –sk "joebloggs" –sr CurrentUser –ss MyŒ –n "CN=Joe Bloggs"
This creates the key in the Personal folder of the Current User certificate store. The name option simply specifies the common name of the user; this is extracted and used as the Issued To parameter when you look at the certificate.
Many more options are available in the makecert tool, but for our purposes we don’t need to consider them. You can refer to the documentation for a full list.
You can view the certificates that the current user has installed in two ways: through Internet Explorer or through the Certificates snap-in to the Microsoft Management Console (MMC). In Internet Explorer, you view the certificates via the Content tab of the Internet Options dialog box. Clicking the Certificates button opens the Certificates dialog box, which lists the certificates installed, as shown in Figure 15-1.
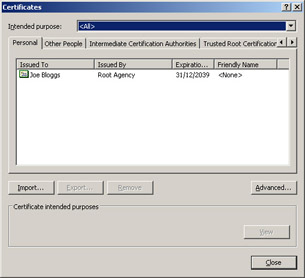
Figure 15-1: Viewing certificates for the current user
Although we’ve installed the certificate and can use it for signing, it still cannot be used to decrypt messages that we receive. WSE assumes that the X509 certificates it will use are in the Local Computer store, whereas a user’s X509 certificate will be in the Current User certificate store. You must configure client applications to look in the Current User store and not the Local Computer store. We can do this in the configuration file for the client application by using the storeLocation attribute of the <x509> element within the <security> section:
<microsoft.web.services> <security> <x509 allowTestRoot="true" storeLocation="CurrentUser" /> </security> </microsoft.web.services>
This configuration forces WSE to look for certificates in the Current User store and also allows test certificates.
Server Configuration
Creating certificates for the server is no more difficult than creating a certificate for the client. We can use the same command that we used when we created a client certificate, but we’ll specify the Local Computer store rather than the Current User store:
makecert –sky "exchange" –sk "notashop.com" –sr LocalMachine –ss MyŒ –n "CN=NotAShop.com"
Before we can use this certificate, we must also give the ASP.NET process permission to read the certificate from disk. But finding the certificate that we want to allow the ASP.NET process to use is not as easy as it could be.
All of the certificates for the Local Machine are stored in the C:\Documents and Settings\All Users\Application Data\Microsoft\Crypto\RSA\Machine Keys directory, and we must find the one that we’ve just created. However, the filenames in this directory are GUIDs and have no relationship to the real name of the certificate. We’re left to determine which is the correct certificate by looking at the creation date for the files. We then have to give the ASP.NET account full control of the file in question.
You can view the certificates that are installed for the local machine by using the Certificates MMC snap-in. Add the snap-in, and select Computer Account when you’re prompted for the account for which to manage certificates. Figure 15-2 shows the MMC displaying the NotAShop.com certificate in the Local Computer certificate store.
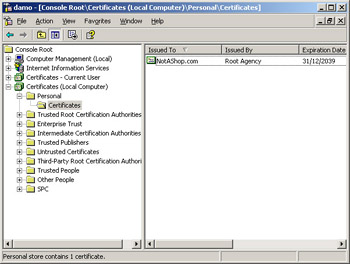
Figure 15-2: Viewing certificates in the Local Computer certificate store
We can now sign and decrypt using this certificate without any further configuration changes. However, we must make the public key of the certificate available to users so they can use it to encrypt messages to send to the server. You can do this from the Certificates MMC snap-in by choosing Export from the All Tasks shortcut menu for that certificate. This launches the Certificate Export Wizard, which allows you to export the certificate, and you can then make this available for users to download and install on their machines. But be careful: if you have the option to export the private key, select No!
Importing X509 Certificates
The easiest way to import a certificate is to right-click on the certificate file in Windows Explorer and choose Install Certificate from the shortcut menu. This starts the Certificate Import Wizard, which allows you to add the certificate to the Current User certificate store. You can allow the wizard to determine which folder to place the certificate in, or you can select the folder yourself.
You can also import certificates through the Certificates MMC snap-in; if we want to import certificates into the Local Computer certificate store, you have to take this route. If you right-click on a folder in the Current User certificate store or the Local Computer certificate store and then from the shortcut menu choose All Tasks and then Import, the Certificate Import Wizard will launch. You select the certificate you want to import, and then you can let the wizard determine the best folder for the certificate or you can select the folder yourself.
Getting Real X509 Certificates
So far, we’ve looked only at using test certificates at the client and the server. As a user of a site that requires messages to be signed with an X509 certificate, you must purchase a personal certificate before a site will trust you. If you’re responsible for Web services that require the use of an X509 certificate, you must also purchase a certificate for the server. We’ll look at both of these options.
Personal Certificates
Personal certificates, commonly referred to as digital IDs, are available from a number of sources, but the most widely used digital IDs are supplied by VeriSign. The VeriSign digital ID homepage is at http://www.verisign.com/products/class1/index.html .
The process of purchasing a VeriSign digital ID is largely automated and simply requires that you fill in payment details as well as the details about the user to whom the certificate is to be issued. Completing the purchasing process automatically installs the certificate in the Personal folder of the Current User certificate store.
Server Certificates
Although you can purchase a personal certificate and use it at the server, it makes more sense to use certificates that are designed expressly for the purposes of securing communication with a server—SSL certificates. Chances are that if you’re building Web services that are secure, you’ll also have a Web site that requires secure communication; you can use the existing SSL certificate to implement security for your Web services.
SSL certificates are provided by several companies, and the process of purchasing and installing real SSL certificates is relatively straightforward. Most SSL certificates in use today are provided by VeriSign; full details of the purchase and installation process are available at http://www.verisign.com/products/site/index.html .
When an SSL certificate is installed on a server, the certificate is added to the Personal folder of the Local Computer store and the public key can be exported and made available for users of your Web services. The only thing you have to remember is to update the available public key whenever the SSL certificate is renewed.
EAN: 2147483647
Pages: 172