4.11. The ipchains Program
| | ||
| | ||
| | ||
4.11. The ipchains Program
The most commonly used program for creating firewall rules is the ipchains program. The following options can be specified after the command name :
-
-A chain rule Append a rule to the chain. The chain argument can be input, output , or output .
-
-D chain number Delete the rule with the specified number from the specified chain.
-
-R chain number rule Replace the rule with the specified number in the specified chain.
-
-I chain number rule Insert the rule into the specified chain under the specified number. For example, if number equals 1, the rule will be the first one in the chain.
-
-L chain View the contents of the specified chain.
-
-F chain Delete all rules from the specified chain.
-
-N name Create a chain with the specified name.
-
-X name Delete the chain with the specified name.
-
-P chain rule Modify the default policy.
-
-p protocol Define the protocol covered by the rule. The value of the protocol argument can be tcp, udp, icmp , or all (the latter indicates that the rule extends to all protocols).
-
-i interface Define the network interface covered by the rule. If this argument is not specified, the rule will extend to all interfaces.
-
--j action Define the action to apply to the packet. Either ACCEPT, REJECT, or DENY can be specified as arguments.
-
--s address port Set the attributes of the packet's sender. The address argument specifies the source IP address; the port argument (optional) specifies the source port. Be careful: ICMP has no ports.
-
-d address port Set the attributes of the packet's recipient. The address argument specifies the destination IP address; the port argument (optional) specifies the destination port.
4.11.1. A Default Filter
Based on the total prohibition principle, the default rule should prohibit any actions. The default ipchains settings permit everything, which is only safe for a standalone computer, not connected to a network. You can check the default setting by executing the ipchains -L command.
It should display something similar to the following:
Chain input (policy ACCEPT): Chain forward (policy ACCEPT): Chain output (policy ACCEPT): Chain icmp (0 references):
In some distributions, the default ipchains settings may be absent; then the system will issue the following error message:
ipchains: Incompatible with this kernel
This message can be issued if ipchains is not installed or has been started incorrectly. I have been greeted with this message several times because the distribution's developers did not configure the system default settings properly. This bug is easy to fix and does not require any operations on the kernel.
Open the /etc/rc.d/init.d/ipchains file in a text editor or display it using the cat command. Locate the following entry in the file:
TPCHATNS CONFTG = /etc/sysconfig/ipchains
The path to the file in IPCHAINS_CONFIG may be different depending on the particular distribution. In modern distributions, configuration files for services are located in the /etc/sysconfig directory. The configuration file for the ipchains service is appropriately named ipchains. You can check whether it exists by giving the following command:
ls /etc/sysconfig/ipchains
If the file does not exist, it has to be created. This is done by executing the following command:
cat >> /etc/sysconfig/ipchains
Now, commands that you enter from the console will be saved to the file. To make the ipchains service work, enter the following command from the console:
:input ACCEPT
Now press the <Ctrl>+<D> key combination and restart the ipchains service using the following command:
/etc/rc.d/init.d/ipchains restart
Be careful to specify the full path in the command. Otherwise , the ipchains utility will be started and will not launch the script from the /etc/rc.d/init.d/ directory.
Now the service should start without problems.
For starters, prohibit all traffic. Before moving on to creating rules, I want to make one more remark You should start configuring any system from scratch, because the default settings often turn out to be not too effective and safe. Execute the ipchains -F command to flush the current rules. It is important to do this operation so that the new rules won't be corrupted by the old ones.
Now specify the default policy. This is done by executing the ipchains command with the -P parameter and specifying the security policy for each chain:
ipchains -P input DENY ipchains -P output REJECT ipchains -P forward DENY
Note that for the incoming (input) and transiting (forward) packets I specified complete denial, so they will be deleted without any warnings. The default policy rule for the outgoing packets can be specified as REJECT so that the inside clients could be informed of the error when attempting to connect to the server.
Now, your computer is invisible and cannot be accessed from the network. Try to scan the server's ports or ping it. Both actions will produce no results, as if the computer were not connected to the network.
4.11.2. Examples of Adding ipchains Rules
Now you can start specifying rules to allow some access to the server. You should be aware that a rule appended to a chain may not work as intended. There may already be a rule in the chain before the one being added that will prevent packet processing against the new rule. To avoid this pitfall, I place new rules at the head of the chain (by specifying the -I and 1 options).
The rule prohibiting everything should be placed at the end of the chain. Rules for a specific action, port, or address should be placed at the head of the chain.
Suppose that all users should be able to work with port 80 (the default Web server port) of the public Web server. This is achieved by executing the following commands:
ipchains -I input 1 -p tcp -d 192.168.77.1 80 -j ACCEPT ipchains -I output 1 -p tcp -s 192.168.77.1 80 -j ACCEPT
The port can be specified by either its name or its numerical identifier. Thus, to specify the port by its name, the preceding commands will look like the following:
ipchains -I input 1 -p tcp -d 192.168.77.1 web -j ACCEPT ipchains -I output 1 -p tcp -s 192.168.77.1 web -j ACCEPT
Here, the port is specified by its name, web , instead of its numerical identifier, 80 . The ipchains program will process either argument correctly.
Examine each option of the first command:
-
-I input 1 The -I option indicates that the rule should be placed in the chain in the specified position. The argument following -I specifies the chain, to which the rule is to be added: input . The number 1 specifies the position in the chain to place the rule in; that is, it will be the first one in the chain.
-
-p tcp The Web server operates under HTTP, which uses TCP as the transport protocol. Do not forget to specify the protocol explicitly using the -p option. Otherwise, you will open access to services on two ports: TCP and UDP. If you are lucky, there will be no program using UDP port 80 at this time.
-
-d 192.168.77.1 80 The rule states that the destination of the incoming packets is port 80 (or web ) of the server whose address is 192.168.77.1. In the instant case, this is the address of my server. What this means is that I allowed all incoming packets to be received on port 80 of my computer. The address of the sender is not specified in the rule, so packets can come from a computer with any IP address.
-
-j ACCEPT This option allows packets to be received. If an incoming packet meets the requirements specified by the rule's options (the destination address and port and the protocol in this case), it will be accepted.
So the first rule allows everyone to send requests to the server. But the main function of a Web server is to serve the pages requested by clients. This requires port 80 of my server (192.168.77.1) to be open for outgoing packets. This is achieved by the second command.
Executing the ipchains -L command will display the following contents of all your chains:
Chain input (policy DENY): target prot opt source destination ports ACCEPT tcp ------ anywhere flenovm.ru any -> http Chain forward (policy DENY): Chain output (policy DENY): target prot opt source destination ports ACCEPT tcp ------ flenovm.ru anywhere http -> any Chain icmp (0 references):
A new entry has been added to the input and output chains. Note that the IP address of my computer in the source and destination fields was replaced with its domain name: flenovm.ru . The server will do this substitution if it can map the address to the name. Also, the numerical designation of the port is replaced with its symbolic name in the ports fields: http instead of 80 .
I recommend that you study carefully the list of created filters to be able to understand clearly each of its parameters. Consider the structure of rule chains using the input chain as an example:
target prot opt source destination ports ACCEPT tcp ------ anywhere flenovm.ru any -> http
The first line lists the name of each field in the rule chain filter shown in the second line. There are the following six fields:
-
target The action that will be performed on the packet meeting the filter requirements. In this case, the ACCEPT value means that the packet will be let through; otherwise, the packet is destroyed .
-
prot The protocol, tcp in this case.
-
opt Extra options. These were not specified in the example, so there are dashes in their place.
-
source The packet's source. The word anywhere means that the packet can originate on any computer.
-
destination The packet's destination. This can be specified by either the computer's name or its IP address.
-
ports The ports, specified in the source -> destination format. In this case, the source port can be any, while the destination port can be only 80 (http) .
A Web server's contents must be frequently updated, for which purpose an FTP service is normally used. In this case, not just anyone can connect to the server through the FTP port (port 21); only the computer at address 192.168.77.10 can connect. The rules implementing these requirements are added by the following commands:
ipchains -I input 1 -p tcp -d 192.168.77.1 21 \ -s 192.168.77.10 -j ACCEPT ipchains -I output 1 -p tcp -s 192.168.77.1 21 \ -d 192.168.77.10 -j ACCEPT
The first command allows packets originating from any port of the computer with the IP address 192.168.77.10 to reach port 21 of the server with the IP address 192.168.77.1. The second command allows outgoing packets from port 21 of the server with the IP address 192.168.77.1 to be addressed to the client computer with the address 192.168.77.10.
This, however, will not put the FTP service into operation. An FTP server requires two ports: Port 21 is used to exchange commands and port 20 is used to exchange data. Access to port 20 is opened by executing the following commands:
ipchains -I input 1 -p tcp -d 192.168.77.1 20 \ -s 192.168.77.10 -j ACCEPT ipchains -I output 1 -p tcp -s 192.168.77.1 20 \ -d 192.168.77.10 -j ACCEPT
Now the computer with the address 192.168.77.10 has full access to the FTP service, which is not available to any other IP addresses. Scanning the server from any computer in your network will show that only port 80 is open; ports 21 and 20 can be seen only from the 192.168.77.10 computer.
Examine the current state of the rule chains by executing the ipchains -L command. The displayed information should look similar to the following:
Chain input (policy DENY): target prot opt source Destination ports ACCEPT tcp ------ 192.168.77.10 flenovm.ru any -> ftp-data ACCEPT tcp ------ 192.168.77.10 flenovm.ru any -> ftp ACCEPT tcp ------ anywhere flenovm.ru any -> http Chain forward (policy DENY): Chain output (policy DENY): target prot opt source destination ports ACCEPT tcp ------ flenovm.ru 192.168.77.10 ftp-data -> any ACCEPT tcp ------ flenovm.ru 192.168.77.10 ftp -> any ACCEPT tcp ------ flenovm.ru anywhere http -> any Chain icmp (0 references):
The filters described in this section let through any packets regardless of the interface. This is justified in most cases, but the loopback interface (which always points to the local machine) requires no protection. It can only be used locally; no hacker can connect to your computer through this virtual interface from a remote computer. So it will be only logical to allow all packets through the loopback:
ipchains -A input -i lo -j ACCEPT ipchains -A output -i lo -j ACCEPT
Most administrators do not like to allow complete access through the loopback, because the policies for the external and the virtual interfaces will be different. This makes it more difficult to test network programs. A program that works without any problems over the loopback is not guaranteed to function properly over a remote connection, because the firewall filters may interfere with its normal operation.
4.11.3. Deleting ipchains Rules
Try to cancel access to the FTP service by deleting rules from the input chain. I picked the FTP service as an example because here two rules have to be deleted and you have to be careful about how you do this. At first glance, it may seem that the following two commands will produce the desired result:
ipchains -D input 1 ipchains -D input 2
Do not rush off to execute them. In the preceding commands, the -D option indicates that the specified number rule should be deleted in the specified chain. The order, in which the commands are issued, means that first rule 1 will be deleted and then rule 2. But will this command sequence really achieve the desired result?
Executing the first command will modify the contents of the input chain to the following:
Chain input (policy DENY): target prot opt source Destination ports ACCEPT tcp ------ 192.168.77.10 flenovm.ru any -> ftp ACCEPT tcp ------ anywhere flenovm.ru any -> http
The rule for the ftp-data port, the former rule number 1 , is gone, which shifted the order of the remaining rules in the chain one position up. Thus, executing the second command intended to delete the rule for the ftp port (port 21) will delete the rule for the http server, which is now the current rule 2, leaving access to the ftp port intact. This mix up is easy to notice and correct with only three rules in the chain. But what if there are a hundred rules? It will be rather difficult to figure out which rule was deleted improperly.
To avoid this problem, start deleting higher numbered rules and proceed downward. In this case, the commands should be executed in the following order:
ipchains -D input 2 ipchains -D input 1
There is another way of deleting rules from a chain, which is more reliable. To consider it, you will need to create a rule in the forward chain. Execute the following command:
ipchains -A forward -p icmp -j DENY
Here the -A option is used, which appends the rule to chain (empty in this case).
| Note | If forwarding is disabled in your system, the rule will be added but the system may issue a warning. Forwarding will be considered in detail in Section 4.11.7 . |
Investigate what this rule does. It will be triggered by an ICMP packet that has to be forwarded. The DENY filter means that the packet will be simply deleted. In this way you will have blocked forwarding of the ICMP traffic. To prohibit ICMP packets altogether, the following rule has to be added:
ipchains -A input -p icmp -j DENY
Now delete a rule from the forward chain. This is done by executing the same command as used for adding the rule but with the -D option instead of -A (or instead of -I , if you used the insert option to add the rule). The resulting command should look like the following:
ipchains -D forward -p icmp -j DENY
Execute it and ascertain that the rule has been deleted.
4.11.4. "Everything but" Rules
Rules often have to be specified in the "everything but" format. For example, you have to forbid access to the Telnet port to all except the computer with the 192.168.77.10 IP address. The best way to proceed will be to first allow access to the port for the 192.168.77.10 computer and then forbid access to anyone else. The input chain will have the following two rules in this case:
-
Allow connections to Telnet from the 192.168.77.10 address
-
Prohibit connections to Telnet from any address
These rules are based on the assumption that the default policy is to allow connections from any address. In that case, all incoming packets will be checked for compliance with the first rule and either let through (meeting the 192.168.10 requirement) or passed to the second rule (not meeting the 192.168.77.10 requirement). The second rule simply deletes all incoming packets that reach it.
The same result can be achieved with only one command. The rule in this case is formulated as follows :
ipchains -I input 1 -p tcp -s ! 192.168.77.10 telnet -j DENY
In this command, all TCP packets (as indicated by the -p tcp option) not originating from the 192.168.77.10 address (the -s option) are prohibited (by the -j DENY option) from connecting. The ! character denotes the not-equal logical condition; that is, all packets not originating from the specified source will meet the condition.
This command will work only if the default policy is to allow all packets. Otherwise, packets sourced by the 192.168.77.10 computer will be deleted anyway.
The ! character can also be used with ports. For example, you need allow full access to the server with the exception of the Telnet port from the 192.168.77.12 address. Then the default policy should be denying all traffic and issuing the following command:
ipchains -I input 1 -p tcp -s 192.168.77.12 ! telnet -j ACCEPT
This command allows full access to the server to all TCP packets from the 192.168.77.12 address with the exception of the Telnet port, the latter prohibition indicated by the ! character in front of the port name.
4.11.5. Network Filters
It is rather difficult to describe each computer individually in large networks. This task is simplified by using group rules. Suppose you have to allow Internet access only to the 192.168.1. x network (the corresponding mask is 255.255.255.0). The first 24 bits in the address (the first three octets) are the network ID, and the last 8 bits (the last octet) are the computer ID in this network. The entire network can be granted access by the following command:
ipchains -I input 1 -p tcp -s 192.168.1.0/24 -j ACCEPT
Here, the computer address is specified as 192.168.1.0/24. The slash is followed by the number specifying how many bits define the network ID. This means that this filter extends to all computers in this network.
There are three main network categories, which differ by the number of bits in their network IDs. These are the following:
-
Category A The network ID is the first 8 bits. Networks in this category use addresses in the 01.0.0.0 to 126.0.0.0 range.
-
Category B The network ID is the first 12 bits. Networks in this category use addresses in the 128.0.0.0 to 191.255.0.0 range.
-
Category C The network ID is the first 16 bits. Networks in this category use addresses in the 192.0.1.0 to 223.255.255.0 range.
There are some exceptions to this breakdown, which were considered in Section 4.10.2 . If you are not familiar with TCP, I recommend that you get acquainted with it now. This knowledge will be of great use to you in administering your system.
4.11.6. ICMP Traffic
The protocol that many administrators find most difficult is ICMP, which is required by RFC 792 for the TCP/IP operation. But standards are not always followed in everyday life, and TCP/IP can work on computers, on which ICMP is prohibited.
TCP is the most commonly used protocol, and anyone involved with networks has to deal with it to a varying extent. The UDP in its characteristics is similar to TCP, so most of those who are familiar with TCP have no problems with this protocol either. But few are familiar with ICMP, and many even fear this protocol. Some people even believe that it would cause no harm at the worst and be beneficial at the best to simply eliminate this protocol. This opinion, however, is formed because of lack of understanding of this protocol's importance.
ICMP allows two network nodes to share information about the errors. It is used to send packets not to a certain program but to the computer as a whole; therefore, it does not use any ports. Its packets, however, do have a type and a code. You can view these parameters by executing the ipchains -h icmp command.
Most often, ICMP packets are sent in response to a nonstandard situation. Table 4.1 lists the main types and codes of the packets.
| Type | Code | Description |
|---|---|---|
|
|
| echo-reply These packets are employed by the ping utility to verify that there is a connection with a remote computer. |
| 3 | 07 | destination-unreachable Packets of this type indicate that the addressee is unreachable. Codes provide more specific information:
|
| 8 |
| echo-reply These packets are employed by the ping utility verifying that there is a connection with a remote computer to request a reply from the host. |
| 9 and 10 |
| These message types are sent by routers. |
| 12 | 1 | This is the wrong IP header. |
| 12 | 2 | There are no required options. |
When creating a rule, the type of the ICMP message is specified in the same way as the port for TCP; the code is placed after the -d option. For example, the following command prohibits type 3 code 1 ICMP packets:
ipchains -I output 1 -p icmp -s 192.168.8.1 3 -d 1 -j DENY
Some administrators do not pay enough attention to ICMP. They make a serious mistake doing this, because ICMP was used to perpetrate many attacks. Moreover, TCP traffic can be transmitted using ICMP messages employing the tunneling technique.
4.11.7. Forwarding
All previously-considered rules only regulate access to the computer. But if a computer is used as a dedicated firewall, it will mostly deal with forward rules.
A firewall protecting the entire network consists, at a minimum, of a computer with two interfaces. One of the interfaces (the modem) faces the Internet; the other (the network adapter) faces the local network. The local network connects to the Internet through this computer, so the firewall forwards the traffic from one interface to the other that is, from the network adapter to the modem, and vice versa. A computer used in this way is called a gateway. Users do not connect to the gateway but use it only to forward their packets.
It is possible to install services directly on the gateway computer, but I do not recommend doing this. It is preferable not to install them on this computer. Public services should be on the Internet side of the firewall; closed services should be installed on servers within your local network (see Fig. 4.6).
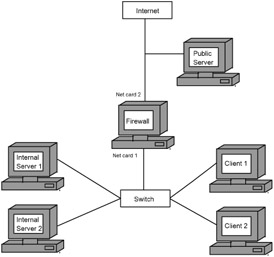
Figure 4.6: Location of the public and closed service servers
This arrangement makes it possible to not create permission rules for the public services for the firewall because it does not protect them. But the local access policy can also be applied on the public server. I do not recommend using public services on your own network. There are numerous hosting companies that specialize in providing this type of service, and you will be better off to let them take care of this for you.
If you place a server providing public services within the network, you will have to create firewall rules allowing all users from the Internet to access it. Such rules were considered in Section 4.12.2 ; but that was only an example, and in real life all public services must be placed outside of the private network.
Each firewall permission is a potential doorway into the local network. If you maintain a public Web server on your network and a bug is discovered in the server's scripts, your entire network will be endangered.
If, for some reason, you have no other way to provide Web service but placing the server on your network, I recommend that you organize the arrangement as shown in Fig. 4.7. This will require an additional server, however, to organize the second firewall.
Figure 4.7: Doubled network protection
In the network arrangement shown in Fig. 4.7, Firewall 1 protects the Web server. Its policy should be relatively mild to allow public access to some of the server's ports, such as port 80 for Web site browsing. The important thing is that the filters allow public access to the address of the public server and the designated ports on it only.
The second firewall protects the local network; consequently, its rules must be more stringent and restrict any outside connections. Moreover, there should be no trusting relations between the public server and the local network. Allowing this server to freely connect to any of the ports on the local network negates the whole idea of using this arrangement. Should there be a bug in the Web server's software or the sites it serves, it can be exploited to execute commands on the server and establish connections with the network on behalf of the Web server without even having to break through the second firewall.
Some organizations, in addition to the public servers, place several computers between the two firewalls in the arrangement shown in Fig. 4.7. These are usually obsolete computers creating an appearance of a network to confuse hackers. There is no important information on such sham networks. There are, however, various intrusion-detection tools installed on them to inform the administrators about unauthorized access attempts.
These bogus networks provide a certain level of protection against hackers by taking them off the right track at least for a while. The machines can have various ports opened and store seemingly important but actually useless information to whet the intruders' appetite and keep them rummaging in the junkyard.
Another way to provide some extra protection for your network is to equip the firewall computer with three network cards. One of the cards provides the Internet connection, another connects the private local network, and the last one connects the public network (see Fig. 4.8). Access to the public interface is quite liberal , and the private interface is protected with all available means.
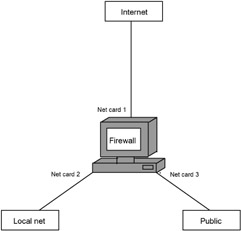
Figure 4.8: Protecting two networks with one firewall
The arrangement shown in Fig. 4.7 has more effective security than the one in Fig. 4.8. There the local network is protected by two firewalls, which are also easier to configure. The arrangement shown in Fig. 4.8 is simpler and less expensive, because it does not require an additional computer for the second firewall. However, this arrangement provides less security. Once a hacker penetrates this firewall computer, he or she will experience fewer difficulties breaking into the private local network.
But let me return to the subject of forwarding. Fig. 4.6 shows a local network connected using twisted pair to the central switch. Trace the routes that packets in this network can follow. To reach the Internet, a packet from any network computer passes through the switch, enters the firewall computer through one network adapter (call it eth0 ), and exits the firewall computer through another network adapter (call it eth1 ) onto the Internet.
The firewall computer must have forwarding permitted to allow packets to pass from one network card to the other. This is done either by writing 1 to the /proc/sys/net/ ipv4/ip_forward file (it may contain the default value 0) or by executing the following command:
echo 1 > /proc/sys/net/ipv4/ip_forward
The kernel must be compiled to support forwarding among network interfaces, because the forwarding process takes place on this level. In addition, the net.ipv4.ip_forward parameter in /etc/sysctl.conf has to be changed to 1 .
The subject of allowing Internet access is covered in detail in Chapter 9 . For now, only the subject of configuring traffic-forwarding security will be considered.
A firewall not only can inspect packets for compliance with the filter rules but also can hide addresses of the network's computers. This is done as follows:
-
A packed placed by a client on the network travels to the firewall with its own IP address.
-
The firewall replaces the IP address of the sender with its own and forwards the packet in its name.
Consequently, all packets sent by any computer of a particular network on the Internet will appear as if they were sent by the firewall computer. This allows the internal organization of the network to be concealed and IP addresses to be saved. Computers within the network can be assigned addresses from one of the reserved address ranges (considered in Section 4.10.2 ), with only the firewall computer assigned a real IP address. This addressing method makes it impossible to connect to the network's computers from the Internet directly, because before any of the network's computers can be broken into, this has to be done to the firewall computer. This makes it much more difficult to break into the network. Inexperienced hackers never become involved with firewalls, because they have neither the extensive knowledge of the security principles nor the great experience required for breaking through a firewall.
Consider a rule allowing the forwarding of packets from the local network to the external interface:
ipchains -A forward -i eth1 -s 192.168.1.0/24 -j MASQ
Because this is a general rule, I placed it at the end of the forward chain using the -A option to avoid blocking the filters specific for individual users but interrelated with this rule.
The interface is indicated by eth1 parameter (the Internet-side network adapter). The address range corresponds to the entire 192.168.1 .x network. The permission (the -j option) is MASQ: address masking. This means that the client's address with be replaced with the address of the firewall computer.
This permission only allows packets from the 192.168.1.x network to be sent to the eth1 interface. This, however, does not mean that the traffic will be able to enter the interface and be forwarded to the Internet. For the firewall to accept user packets, there should be an ACCEPT rule in the input chain. It may look as follows:
ipchains -A input -i eth0 -s 192.168.1.0/24 -j ACCEPT
This filter opens access to the eth0 network interface to any packets originating at the 192.168.1. x addresses.
Now, a rule to permit packets to exit the eth1 interface has to be added to the output chain, and all of your network's computers will have access to the Internet. The IP address of the firewall computer has to be specified as the gateway on all client machines.
If your network is organized as shown in Fig. 4.7, both firewall machines must have forwarding enabled. But address masking is better done on the Firewall 2 machine. This will make the firewall conceal even the local network from the public server.
Frequently, the Internet-side network device is a modem and not a network adapter. In this case, the masking rule for the forward chain will look like the following:
ipchains -A forward -i ppp0 -s 192.168.1.0/24 -j MASQ
The traffic is forwarded to the modem interface, which is denoted by the ppp0 parameter.
Clients often must have access to Internet resources even though the reverse connection is unwanted. When a TCP-connection request to a remote computer is made, a packet with the syn bit set is sent. Regular packets (such as responses to connection requests or data transmissions) are not supposed to have this bit. Consequently, prohibiting TCP packets with this flag set will make it impossible for a remote computer to connect to either the firewall computer or the network. This can be implements as follows:
ipchains -I input 1 -i ppp0 -p tcp --syn -j DENY
This command places the new rule in the input chain. The rule checks for TCP packets with the syn flag set (as indicated by the --syn option). Any packets meeting this criterion are deleted.
To mask IP addresses, the corresponding support must be compiled into the kernel, because the address substitution process takes place on the kernel level.
4.11.8. Saving Filter Information
Rules that you create for ipchains are stored in the memory. Restarting the system will clear the memory and, naturally, any rules that you set. The operating system does not automatically save rule changes; you have to take care of this yourself. This can be done using the ipchain-save utility as follows:
ipchain-save > file
When I started considering the ipchains command, I mentioned the /etc/sysconfig/ipchains file (see Section 4.11.1 ). This configuration file is loaded on the system boot. I recommend saving rule changes in this file by executing the following command:
ipchain-save > /etc/sysconfig/ipchains
Save the changes every time you change the ipchains configuration. Should you have to reload the server for some reason, you will most likely forget to restore the changes.
It is possible to automate the process of saving rule changes, but I do not recommend that you rely on this. It will be more reliable to do this manually.
This file can also be used to restore chain rules. This is done by executing the following command:
ipchain-restore < file
This is a handy feature. Suppose you want to test a new set of rules but do not want to corrupt the already-configured chains. In this case, you can save the existing state in some file and then experiment all you want. If something goes wrong, you can return to the starting point by restoring the chains from the backup file.