| As with many software tools, educational tools and facilitators like the Report Wizards are often the best way to begin a learning process. They are by their nature, however, limited in functionality and it generally does not take long before maturing students want to roll up their sleeves and discover the raw power and incredible flexibility that lies beneath. This section reintroduces the report just created in the Report Wizard through a manual design process in the Crystal Reports Designer. The beginnings of that same Sales Report are created from scratch with the following steps: 1. | Select a blank report. After opening Crystal Reports, select the New option from the File menu. From the submenu that appears, select the Blank Report option.
| 2. | Select an appropriate data source. From the Database Expert dialog that comes up, in the Available Data Sources list, browse to Create New Connection, ODBC. As soon as you choose ODBC, the ODBC (RDO) dialog pops up. Scroll until you find the Xtreme Sample Database 11. Select it and click Finish. (There are no other settings to get this database working, so you can ignore the Next button.)
| 3. | Select the appropriate tables. After choosing the appropriate database to connect to, you need to select the tables for this report. Move down in the left list box and expand the Tables item. Choose the Customer and Orders tables by using the right-arrow (>) button, shown in Figure 1.27.
Figure 1.27. The Data tab from the Database Expert dialog shows the two tables you just added to the report. 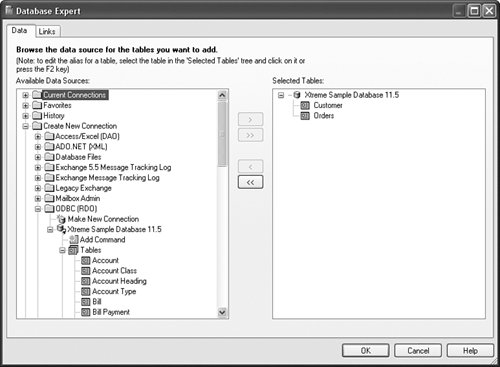
Tip Remember that you can choose each table separately and click the arrow button or hold down the Ctrl key to select all tables that you want and then press the arrow button only once. Also, if you want to select several tables in a row, the Shift key helps you with that. | | | 4. | Link tables from the database. Move to the next tab in the Database Expert dialog by either clicking the OK button or selecting the Links tab. Notice that all the tables have already been linked. Crystal Reports attempts to link tables using similar field names and sizes whenever possible. You can optionally turn off this automatic smart linking in the Database tab (accessed from File, Options).
Tip You can enlarge this dialog by using the stretch markers so that you can increase the display area and see more tables at once. The next time you enter this dialog, your adjusted size will be remembered. You don't need to make any changes at this point, so just click the OK button.
| 5. | Add detail records to the report. First, confirm that the Field Explorer is being displayed so that you can use it to add the fields to the report. If it is not, choose View, Field Explorer. In the Field Explorer that becomes available, open the Database Fields item and then the Orders and Customer tables to expose the fields that you'd like to add. Select each field separately and drag it to the Design tab using your mouse. Place them side-by-side in the Details Section: Customer Name and Customer City from the Customer table, and Order Date and Order Amount from the Orders table. Figure 1.28 highlights the desired result.
Figure 1.28. This is the Design window after you've added all the fields. 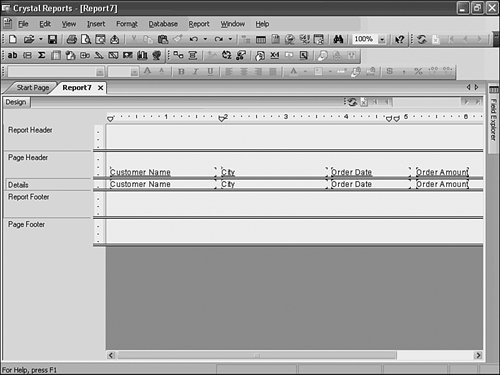
| | | 6. | Create a logical grouping of data by Country. To accomplish this, choose Insert, Group. When the Insert Group dialog appears, scroll down the first list box until Country under the Customer table is available. Select it, as shown in Figure 1.29, and then click OK.
Figure 1.29. The Common tab of the Insert Group dialog with the Country field selected. 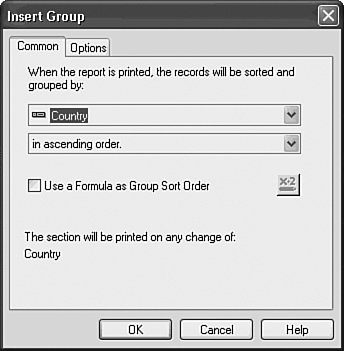
Notice that in the Design view of the report, two new sections become available called Group Header #1 and Group Footer #1. Within Group Header #1, the Group Name #1 field is also automatically added.
| | | 7. | Add a summary value of total Historical Order Amount by Country to the report. Choose Insert, Summary to get the Insert Summary dialog to appear. In this dialog, select the Order Amount field in the Field to Summarize drop-down box. Next, because you plan on finding out how much has been ordered in each country, you need to set the summary operation in the second list box to Sum. Last, because the desired summary is per Country, set the location of the summary to show Group #1, as shown in Figure 1.30. Click OK.
Figure 1.30. The Insert Summary dialog with Order Amount summed by Customer Country selected. 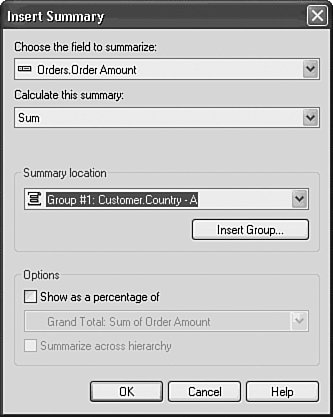
Tip A shortcut to the Insert Summary command (and running total command described later) is accessible for each field on the report by right-clicking the involved field in the Report Designer. Notice that in the Design view, in the Group Footer #1, the Sum of Order Amount field has been added.
| 8. | View the report. Take a look at the report by choosing Report, Refresh Report Data or by either pressing the F5 key or clicking the Refresh button in your Crystal Reports Designer. A report with all the data represented in the last wizard-driven report you created is returned in the Preview tab as shown in Figure 1.31.
Figure 1.31. The resulting report based on steps 1 through 8 in the Preview tab. 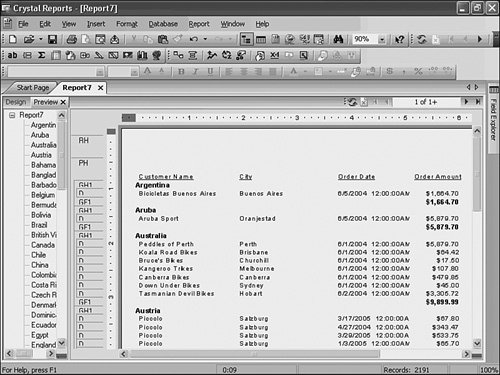
| 9. | Save the report. Choosing File, Save opens the Save dialog. Provide a suitable name for the report, such as Chap1Manual.rpt. You are welcome to explore the charting and report template features now to replicate the Chap1Wizard report but they are covered in detail in Chapter 8, "Visualizing Your Data with Charts and Maps," and Chapter 14, "Designing Effective Report Templates."
|
Tip If you are concerned about losing work between manual saves of a report, Crystal Reports has an autosave feature that you can enable. Set this option by navigating to File, Options, and then selecting the Reporting tab. The Autosave Reports After option can be set and the length of time in minutes between saves can be specified in the edit box for this option.
|