| iMovie's stock QuickTime format settings are good for most situations, but you can also use other compression formats and options by way of the Expert option under the Formats popup menu (Table 15.2). Table 15.2. Video Compressors Included with QuickTime[*]COMPRESSOR NAME | COMMENTS |
|---|
Animation | Works best on computer-generated animations with broad areas of flat color. Doesn't work well for scenes with lots of color changes. | BMP | Used for still images to be exported in BMP format. Does minimal compression. Inappropriate for video-based movie playback. | Cinepak | Commonly used for video movies that require CD-ROM playback. Compresses very slowly. | Component Video | High-quality compressor. Good for capture on Macs with built-in video capture capabilities and for use as an intermediate storage format. Low compression ratios (larger files). | DV-PAL, DV/DVCPRONTSC, DVCPRO-PAL | Used with digital video cameras. | Graphics | Good for 8-bit graphics files. Usually better than the Animation compressor in 8 bits. Slower to decompress than Animation. | H.261 | Originally designed for videoconferencing. Extremely high compression ratios. | H.263 | Originally designed for videoconferencing. Very high compression ratios. Sometimes good for Web video. | JPEG 2000 | High image quality and resolution for still images, using wavelet compression. | Motion JPEG A, Motion JPEG B | Used to decompress files made with certain Motion-JPEG cards when the card isn't available or to compress in a format that can be played by certain hardware Motion-JPEG cards. | MPEG-4 Video | High quality compressed video based on QuickTime. | None | Good for capture only. Does almost no compression. | Photo-JPEG | Ideal for high-quality compressed still images. Also useful as an intermediate storage format for movies and QuickTime VR panoramas. Decompresses too slowly for video-based playback. | Planar RGB | For images with an alpha channel. | PNG | Typically used for still-image compression. Can get high compression ratios. | Sorenson Video | Very high compression ratios and high quality. Excellent for Web and CD-ROM. | Sorenson Video 3 | Very high compression ratios and very high quality (better than Sorenson Video). Currently the best choice for Web and CD-ROM. | Targa | Typically used for still-image compression. Does minimal compression. | TIFF | Typically used for still-image compression. Does minimal compression. | Video | Very fast video compression and decompression. Decent compression ratios. Good for real-time capture of video, particularly when hard disk space is at a premium. Good for testing clips. OK for hard disk playback. Image quality is poor when compressing enough for CD-ROM playback. | Note: The Minimum Install of QuickTime (which many users will choose) doesn't install all these compressors. If the computer being used to play a movie that requires one of these compressors has an Internet connection, QuickTime downloads the necessary compressor when it is needed for decompression. |
[*] This table has been adapted from one that originally appeared in QuickTime 5 for Macintosh and Windows: Visual QuickStart Guide, by Judith Stern and Robert Lettieri, and is used here with their permission. www.judyandrobert.com/quicktime/
To change image settings: Choose Export from the File menu, or press Command-Shift-E. In the iMove: Export dialog box, choose Expert Settings from the Formats popup menu (Figure 15.5). Click Export. Figure 15.5. The Expert QuickTime Settings provide many more options for controlling the compression.  In the Save Exported File As dialog, make sure Movie to QuickTime Movie is selected in the Export popup menu, and click the Options button. The Movie Settings dialog box displays the current video and sound settings (Figure 15.6). To fine-tune the type and amount of video compression applied, click the Settings button under Video. Figure 15.6. The Movie Settings dialog box presents an overview of the current export settings.  In the top area of the Compression Settings dialog box, choose a compression method from the first popup menu (Figure 15.7). The Depth popup menu specifies how many colors to use when exporting the file (fewer colors equal more compression, but lower image quality). Figure 15.7. After that long progression of dialog boxes, you finally reach Compression Settings, where you can adjust the type and amount of compression used for exporting. 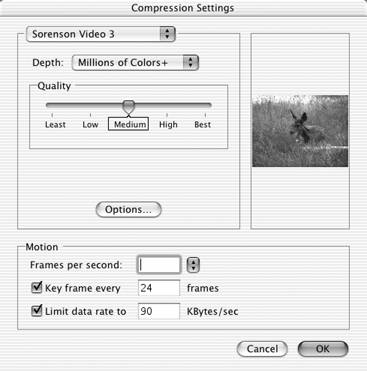 Move the Quality slider to the lowest level you can that maintains good image quality; the thumbnail in the upper-right corner of the dialog box shows you how much compression is being applied. In the Motion area, select the number of frames per second from the popup menu beside the field, or just enter a value. Enter a number in the Key frame every [number] frames field to set how often a key frame is generated. If you don't want iMovie to generate key frames (i.e., every frame is a full frame), deselect this option. To target a specific data rate, enter a value in the field labeled Limit data rate to [number] KBytes/sec. Click OK to return to the Expert QuickTime Settings dialog box.
 Tips Tips
To get a sense for how the compressors compare, create a short movie (30 seconds or so) that's representative of your footage and export it using the various formats, and then compare the results. The Sorenson Video codecs are highly regarded for having high video quality with good compression. For some suggested Sorenson settings, select iMovie Help from the Help menu and search for "Sorenson Codec".
QuickTime versus QuickTime Pro Every Mac comes with QuickTime, including the free QuickTime Player, which allows you to play back QuickTime movies and a host of other file formats (ranging from MPEG-formatted movies to MP3 audio files). If you're serious about optimizing your QuickTime movies for the Web, however, consider paying the $30 for a QuickTime Pro license, which turns QuickTime Player into a sophisticated movie editor. Not only does it give you an easy way to resize or recompress QuickTime movies, it also lets you save your movies into other formats, such as AVI, which Windows users can view if they don't have QuickTime installed. |
To change audio settings: Choose Export from the File menu, or press Command-Shift-E. In the iMove: Export dialog box, choose Expert Settings from the Formats popup menu. Click Export. In the Save Exported File As dialog, make sure Movie to QuickTime Movie is selected in the Export popup menu, and click the Options button. In the Sound portion of the Movie Settings dialog box, click the Settings button to display the Sound Settings dialog box (Figure 15.8). Figure 15.8. Choose an audio compressor to fine-tune how your movie's audio sounds after exporting.  Choose a format from the Compressor popup menu. Some of the compressors include further settings, which are accessed by clicking the Options button. These usually determine how the data is encoded or specify a data rate (or bit rate) (Figure 15.9). Figure 15.9. Some compressors include other settings to help reduce your movie's file size without sacrificing too much quality.  In the Rate field, type a kHz value or select one from the popup menu to the right. Lower kHz settings will degrade the sound quality. Click either the 8 bit or 16 bit button to determine how much audio data is included in the file. The higher number provides for better sound quality, but at the expense of a larger file size. Decide whether the audio will play back in stereo or mono by checking a button next to the Use option. Stereo sounds better, but Mono offers a smaller file size. Click OK to return to the Movie Settings dialog box.
To prepare a movie for Internet streaming: Choose Export from the File menu, or press Command-Shift-E. In the iMovie: Export dialog box, choose Expert Settings from the Formats popup menu. Click Export. In the Save Exported File As dialog, make sure Movie to QuickTime Movie is selected in the Export popup menu, and click the Options button. In the Movie Settings dialog box, click the Prepare for Internet Streaming box in the lower-right corner (Figure 15.10). Figure 15.10. To enable Web streaming, click the Prepare for Internet Streaming box and choose a streaming method.  From the popup menu, select a streaming method: Fast Start. The movie file is downloaded like any other media file, and begins playing once enough data has been transferred. Fast Start - Compressed Header. Like Fast Start, the movie is downloaded as one file, but the header information is compressed to save disk space. Hinted Streaming. Use this option if the movie will be hosted by a QuickTime Streaming Server. Hinting the data breaks it up into more manageable chunks for streaming. With Hinted Streaming selected, you can click the Options button to further tweak the settings (Figure 15.11). For more information, see Apple's article: http://docs.info.apple.com/article.html?artnum=36640. Figure 15.11. Preparing a QuickTime movie for streaming can get into a lot of geeky detail, but if you know what you're doing, you can improve streaming quality. 
QuickTime Geekery Trust me: everything described so far in this chapter is really just the tip of a very large iceberg. If you're willing to shell out the bucks, software such as Discreet's Cleaner can encode and compress your movies into nearly any possible movie format, with more control than can be found in iMovie's or QuickTime Player's export features. |
|