| You can edit and add products in volume by using a spreadsheet program such as Microsoft Excel and uploading your product file into Catalog Manager. The Database Upload feature enables you to automatically create all your product pages and sections by simply uploading a .csv file. Using this feature saves you a tremendous amount of time and repetitive work. Although you can use a text editor such as Notepad to add and edit your products, it is recommended that you use Microsoft Excel so that you can more easily visually add, organize, and edit your product data (see Figure 6.23). Using a text editor can cause confusion when adding or editing products because there are no visually formatted columns. Database Upload is available for Store Editorin fact, if you are building in Store Editor, you should use this feature because it enables merchants to include a path to create the hierarchy of a site, to avoid orphan product pages. Figure 6.23. Microsoft Excel makes it easier for you to add and edit products because of the visual column and row structure. 
Take a look at this sample data file using a text editor: code, price, path, name S123,59.95,Shoes: Sneakers, Nike Air Jordans F345,39.95,Shoes: Boots, Marc Nason
Database Upload also works with advanced features such as breadcrumbs, a site map, cascading menus, and more, if programmed properly. These features automatically are updated with your new product data file. You will want to speak to your programmer or development company about synchronizing those features with your database upload. If you are using the Database Upload feature for the first time, it is recommended that you download the spreadsheet file and use it as your starting point. To download the .csv file, follow these steps: 1. | In Store Manger, click the Catalog Manager link under the Edit column.
| 2. | Click the Upload Items link.
| 3. | Click the Download button on the far right of the page.
| 4. | Click the Download button with the default table selected.
| 5. | Select the location where you want to save your file.
|
These required and optional fields are available in the file: Name The name of your product. The name also is used as the Title tag for the product Web page. Code A unique code. You can use a product SKU (Stock Keeping Unit), if available. ID Another unique code that can contain only letters and numbers, no spacing. The ID is important because it must exactly match the image filename when using the multiple-image upload feature. Price The amount you want to sell the item for. Sale-price The discounted price. Ship-weight The weight of the product only if you are using weight to calculate shipping price. Options Product options, such as size and color. Headline Any text in the Headline field replaces the page name. A more descriptive name can be added here for display. Caption The text for the description of the product. The text is displayed underneath the Headline. Abstract Used when text is needed for a description on another page. Product-URL The exact Web page location of the product page. Because you are using the Database Upload feature, the URL is generated for you. The product ID is used as your page filename (www.yourdomain.com/id.html). Tip You can also separate your products by creating more than one table or data file. Using multiple tables can help you manage your products better. This is also a great idea especially if you have products that are seasonal.
Path The section or category the product will be located in. By entering a name, the section button also automatically is created for you. You can create subsections by entering a colonfor example, Shoes: Sneakers. Warning Using the Database Upload feature can overwrite your entire site. When uploading a data file, you have the choice to add or rebuild the database. If you choose the rebuild option, all current products are deleted and only products in your new data file are available.
When you have all the product information in your data file, you need to upload the file. To upload the .csv file, follow these steps: 1. | In Store Manger, click the Catalog Manager link under the Edit column.
| 2. | Click the Upload Items link.
| 3. | Click the Upload button on the far left.
| 4. | Here, you are given two options (see Figure 6.24). The first option asks which table you would like to upload the file. If you plan to create multiple tables, you must create them before you upload the file. The second option asks if you would like to rebuild or add to the table. Note: The rebuild option completely erases all your products in the current table and replaces them with your new product in your data file. When you have selected the two options, you need to click the Browse button to locate your new data file.
Figure 6.24. When uploading a .csv data file, you have an option to either rebuild or add to the database. 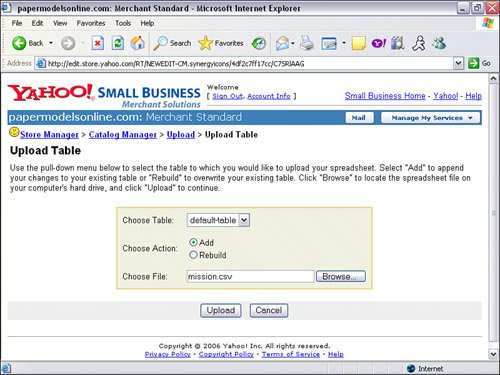
Tip: Reverting back to a previous .csv file You can roll back to the last version of your data file if you made a mistake with the new data file. Simply click the Revert button on the upload page. Any new products in the new data file are erased because the previous data file did not include the new products. | | | 5. | When you locate your file, click the Upload button. This takes you to a page to report any errors. If there are errors, correct the errors in the .csv file and upload the file again.
| 6. | If there are no errors, click the Commit button. This takes you to a screen to confirm that you want to rebuild the product table. Click the Rebuild button. Note: If you are adding to the product table, an Add button appears instead of a Rebuild button.
|
|