The Torque GUI Editor
Torque has an editor built in for creating and tweaking interfaces. You can invoke the GUI Editor by pressing the F10 key (this is defined in the common code base scripts, but you can change it if you want). You are perfectly free to ship your game with this editor code, or you can remove it in any shipping version to ensure that people will not fiddle with the interfaces. Or you can modify it to suit your heart's desire!
The Cook's Tour of the Editor
When you launch the editor by pressing the F10 key, the editor will appear and load whatever interface is current, making it ready for editing.
Visually, there are four components to the GUI Editor: the Content Editor, the Control Tree, the Control Inspector, and the Tool Bar. Figure 10.12 shows the GUI Editor open and working with one of the earlier main menu screens from the Emaga sample game.
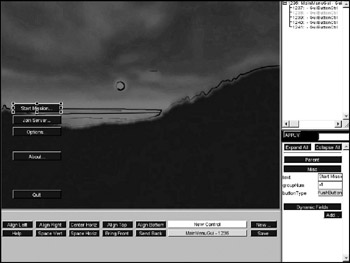
Figure 10.12: The Torque GUI Editor.
The Content Editor
The Content Editor is where you can place, move, and resize controls. In Figure 10.12 the Content Editor is the large rectangular area at the upper left in the GUI Editor view.
Selection
Normally, you select a control by clicking the mouse on it. Some controls can be difficult to select because of their positions. Another way to select controls is by using the Control Tree, which is covered in a later section.
If you hold down the Shift key while clicking the mouse (shift-clicking) on several controls, you can select more than one control at once. Each time you shift-click you add that control to the selection. The sizing knobs turn white and can no longer be used to size the control. You can still move the controls. Only controls that share the same parent can be selected at the same time.
Movement
Move a control by clicking and dragging its content area after selecting it. When you move controls, be aware of which controls they may be contained by—when you drag the control to one side or another, you may be dragging it outside the display area of its parent control, and you don't want that.
Resizing
You resize a control after selection by clicking on and dragging one of the eight black sizing knobs. As with movement, you need to stay aware of how the control you are resizing is related to other controls. The sizing might be restricted by a parent control's display area. Figure 10.12 shows the sizing knobs, attached to the Start Mission button.
Adding
The parent control of the currently selected control is outlined with a yellow and blue band. This control is known as the Current Add Parent. Any new control created from the toolbar or pasted from the Clipboard will be added to this control. The Current Add Parent control can be set manually by either clicking one of its children or right-clicking the control itself.
The Control Tree
The Control Tree shows the current content control hierarchy. It is in the upper-right corner of the GUI Editor view.
Parent controls, also called containers—controls that contain other controls—have a little box to the left of their entry in the tree. If the box is a plus sign, clicking it will expand that control into the list, bringing the child controls into view. If you click it when it looks like a minus sign, it will contract the control's list back to a single entry comprising solely the parent control.
Clicking any control in the tree will cause it to be selected in the Content Editor view and cause the control's properties to be displayed in the Control Inspector view. You can see this effect by looking back at Figure 10.12.
The Control Inspector
The Control Inspector is where the currently selected control's attributes are displayed. It is located in the lower-right corner of the GUI Editor, below the Control Tree. All of the properties of a control are displayed in the Inspector and can be changed here. After changing a value, you must click the Apply button to assert the changes.
When first displayed, all of the properties are collapsed visually within categories, such as Parent, Misc, and Dynamic Fields. To access the properties within those categories, simply click the buttons in the Inspector view that have those category names, and the list expands, giving you edit boxes and buttons with which you can manipulate the properties.
The Tool Bar
The Tool Bar contains functions for creating new controls and for aligning and spacing them. It has several command buttons that operate on the current selection set, and create and save GUIs. The Tool Bar also has pop-up menus for creating new controls and changing the currently edited GUI. The functions of the buttons are described in Table 10.1.
| Button | Description |
|---|---|
| Align Left | Aligns the left edge of all selected controls to the leftmost point of all the selected controls. |
| Align Right | Aligns the right edge of all selected controls to the rightmost point of all the selected controls. |
| Center Horiz | Horizontally centers all selected controls in the rectangle that bounds all the selected controls. |
| Align Top | Aligns the top edge of all selected controls to the topmost point of all the selected controls. |
| Align Bottom | Aligns the bottom edge of all selected controls to the bottommost point of all the selected controls. |
| Help | Displays the Help dialog box. |
| Space Vert | Vertically spaces all selected controls evenly. |
| Space Horiz | Horizontally spaces all selected controls evenly. |
| Bring Front | Arranges the selected control in front of its sibling controls. |
| Send Back | Arranges the selected control behind its sibling controls. |
| New | Brings up a dialog box with which the user can create and name a new control for editing. |
| Save | Brings up a dialog box with which the user can save the current interface to a file. |
| New Control (pop-up) | Displays a list of all controls from which the user can select one to add to the current content control. |
| Show GUI (pop-up) | Displays the name of the interface (GUI) currently being edited. Selecting this pop-up allows the user to choose a screen to edit from all loaded interfaces. |
Keyboard Commands
In addition to using mouse selection and GUI button clicks, the user has a number of keyboard commands available. Table 10.2 shows these commands.
| Keys | Name | Description |
|---|---|---|
| Ctrl+A | Select All | Selects all the controls in the Current Add Parent. |
| Ctrl+C | Copy | Copies the currently selected control(s) to the Clipboard. |
| Ctrl+X | Cut | Cuts the currently selected control(s) to the Clipboard. |
| Ctrl+V | Paste | Pastes any control on the Clipboard into the Current Add Parent. |
| Arrow Keys | Movement | Moves the current control selection 1 pixel in the direction of the arrow. |
| Shift+Arrow Keys | Movement | Moves the current control selection 10 pixels in the direction of the arrow. |
| Delete/Backspace | Delete | Deletes the current control selection. |
EAN: 2147483647
Pages: 197