Making a Soup Can Skin
So let's dive right in and create a skin. We can use the bare model of the soup can I showed you in the last section. The procedure has quite a few steps—more than 30—so we'd better roll up our sleeves and get to it.
The Soup Can Skinning Procedure
This is how you skin a soup can:
-
Open C:\3DGPAi1\resources\ch9\can.bmp in Paint Shop Pro. This file contains the UV mapping template.
Tip Remember when I said that the only file types we would need to use are JPG and PNG in the last chapter? Well, that was sort of a lie, though not quite—you see, the only file types we will be using for making games will be those two types. However, the UVMapper program outputs its UV mapping templates as one of two types: BMP (Windows bitmap) or TGA (Targa) format. So I've picked BMP to be our standard UV mapping template format. We won't be creating any game files in this format, however.
-
Choose Image, Increase Color Depth, 16 Million Colors. You need to do this to get access to the full palette.
-
Save the file as C:\3DGPAi1\resources\ch9\mycan.psp. This way you can re-use the layers over and over at later times if necessary. Make sure you save your work often as you follow the steps, in case you royally mess up, like I frequently do.
-
Right-click the Layer palette (see Figure 9.5), and then choose New Raster Layer.
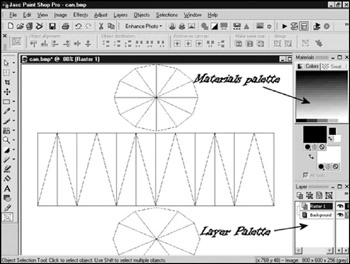
Figure 9.5: Materials and Layer palettes. -
Accept the default settings and click OK.
-
Click Raster 1 to make that layer active.
-
Click the Preset Shape tool, third icon from the bottom of the Tools toolbar on the left.
-
In the Tool Options palette (if it is not visible, choose View, Palettes, Tool Options to make it visible), click the Shapes List icon. The Shapes List will appear, as in Figure 9.6.
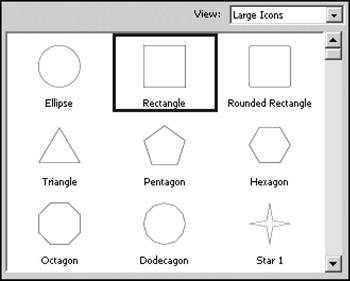
Figure 9.6: The Shapes List. -
Choose the Rectangle from the Shapes List control; the list will go away automatically.
-
If the Create As Vector box on the Tool Options palette is checked, clear it.
-
If the Retain Style box on the Tool Options palette is checked, clear it.
-
In the Materials palette, locate the Foreground and Stroke Properties control. It is the upper-left box in the larger pair of boxes in the Materials palette.
-
Along the bottom of the Foreground and Stroke Properties are three buttons. Click the one on the far right with the No Entry icon, called Transparent. Now that it is depressed, the foreground or stroke of the object you draw will be transparent.
-
Click the Background and Fill Properties control, the lower-right control of the larger pair of boxes in the Materials palette. When the Color dialog box opens, select a bright red, and make sure it appears in the box marked Current. Then click OK to close the dialog box.
-
Now draw a rectangle that completely covers the rectangle containing the triangles in the middle of your mycan.psp image, as in Figure 9.7.
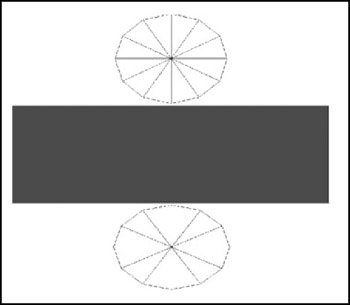
Figure 9.7: The red rectangle. -
Now use the Background and Fill Properties control to set the fill to white, and draw a thin white rectangle across the middle of the red rectangle you just made (see Figure 9.8).
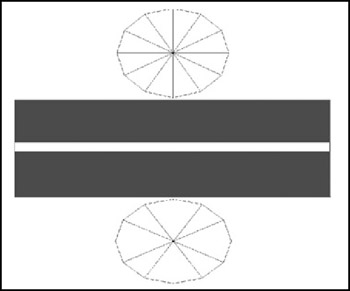
Figure 9.8: The white rectangle.So now you have your basic red-and-white pattern on the sides of the can. If you look at Figure 9.3 again, you'll notice that the red blends into the white gradually. There are several ways to do this. For example, you could have used a gradient fill in the rectangles you created. But you're going to use another method, one that is more of a touchup technique.
-
First, you're going to select the sides of the can. Use the Square Selection tool (fifth icon down on the Tools toolbar) to select the entire rectangle that encloses all of the red and white rectangles you've just made, but only those areas. Use Figure 9.9 as a guide.
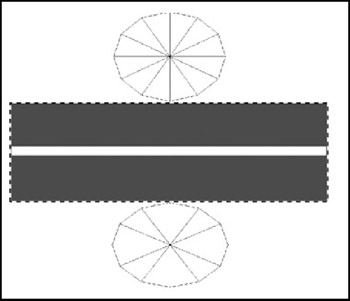
Figure 9.9: Selecting the mapped sides of the can. -
Next, soften the transition between the red and the white. Choose Adjust, Softness, Soft Focus. You will get the Soft Focus dialog box, as shown in Figure 9.10.
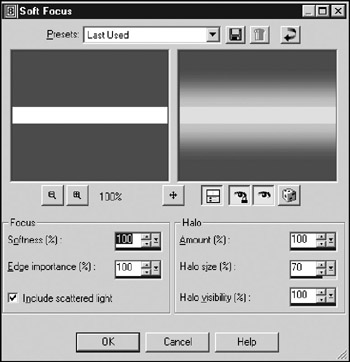
Figure 9.10: Soft Focus dialog box. -
Set all of the values in the boxes to 100 percent, except for Halo size. Set Halo size to 70 percent, and then click OK to close the box. You'll see the edges between the red and the white go blurry.
-
Repeat the last two steps—choose Adjust, Softness, Soft Focus, and then make sure all values are set to 100 percent (except Halo Size, which is set to 70 percent) and close the dialog box. There now—you have your blended pattern.
-
Next you'll want to add metal lips to the top and bottom of the can sides. Do this by creating a thin light gray rectangle all the way across the top and another at the bottom, as shown in Figure 9.11. The black arrows indicate the location of the lip line.

Figure 9.11: Adding the metal lips. -
Now you'll want to create the surface texture for the ends, or lids, of the can. Once again, select the Preset Shape tool.
-
In the Tool Options palette, click on the Shapes List icon.
-
Choose the Ellipse from the Shapes List control.
-
This time make sure that the Create as vector box is checked.
-
Set the foreground color to a light gray and the background color to transparent, using the same technique you used when drawing the rectangles earlier.
-
Draw a series of concentric ellipses in both the top and bottom list shapes (see Figure 9.12). Make sure to leave a sizable gap between the inner ellipse and the one next to it.
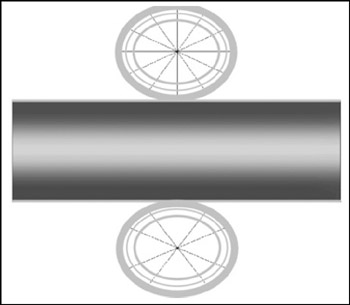
Figure 9.12: Adding the ridges.Also use a line width of about 15 for the outermost ellipse, 2 for the middle ellipse, and 4 for the innermost one. The ellipses are drawn from the center out. You may need to fiddle a bit before you get it right.
Tip You can adjust the size of your vector object ellipses by grabbing the little black handles on the shapes while the object is selected. If it isn't selected, use the Object Selection tool (the bottom tool of the Tools toolbar) to select your ellipse by clicking on it.
You can also drag your ellipses around this way. Press Ctrl+Left Arrow to nudge the object a bit to the left. Press the Ctrl key with the other arrow keys to nudge the object in other directions.
-
Next, select the Text tool, which is fourth from the bottom of the Tools toolbar. If you have any objects already selected, deselect them by clicking the Object Selection tool on an empty part of the image before selecting the Text tool.
-
As you move the Text tool cursor around, it will have an icon like the one on the left in Figure 9.13. When you move it over a vector object, the cursor will change to the one on the right in Figure 9.13.
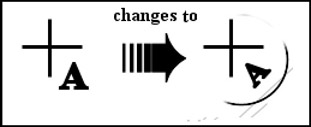
Figure 9.13: Text tool cursors.Move the cursor over the top part of the innermost ellipse object in the upper set of concentric rings.
-
Now click on that object; you will get the Text Entry dialog box. Select the font you want from the Tool Options palette.
-
Use a font size of 12 and make sure you set the stroke width to 1.0.
-
Type in your text, something like 16 Fluid Ounces.
-
Make sure you have vector set in the Create As control; then click Apply.
-
Voil ! You will have text that follows the curve of the ellipse around in an arc.
-
Now add your main label text using the Text tool. You can type whatever you want and position it wherever you want.
-
When you are finished, save your file one final time as C:\3DGPAi1\resources\ch9\mycan.psp. This is your source file.
-
Next, save your work as C:\3DGPAi1\resources\ch9\mycan.jpg. Make sure you've selected the "JPEG – JIFF Compliant" type in the Save As dialog box when you do this.
-
You will get an alert saying that it will have to save the file as a merged image and asking if you want to continue. This is expected because the JPG format doesn't support layers. Click Yes.
Testing the Soup Can Skin
Congratulations! You've made your first skin! I suppose now you want to see what it looks like all wrapped around a tin can and everything. Okay, so do this:
-
Browse your way to C:\3DGPAi1 and then double-click on the Show Book Models shortcut.
-
The Torque Engine will fire up with a special program called the Show Tool. Click on Load Model.
-
Find
 mycan.dts and load it.
 -
Presto! That's your skin on that there soup can! Good job!
-
You can admire your creation in all its splendor by using the navigation keys to move the can back and forth and rotate it about the various axes. See Table 9.1 for the Show Tool key commands.
Table 9.1: Torque Show Tool Navigation Commands Key
Description
A
rotate left
D
rotate right
W
bring closer
S
move farther away
E
rotate top backward
C
rotate top forward
-
You can view my original soup can skin by loading the
soupcan.dts model.
EAN: 2147483647
Pages: 197