3D Programming
With the Torque Engine, most of the really grubby low-level programming is done for you. Instead of writing program code to construct a 3D object, you use a modeling tool (which we cover in later chapters) to create your object and a few lines of script code to insert the object in a scene. You don't even need to worry about where in the scene graph the object should be inserted—Torque handles that as well, through the use of information contained in the datablocks that you define for objects.
Even functions like moving objects around in the world are handled for us by Torque, simply by defining the object to be of a certain class and then inserting the object appropriately.
The kinds of objects we will normally be using are called shapes. In general, shapes in Torque are considered to be dynamic objects that can move or otherwise be manipulated by the engine at run time.
There are many shape classes; some are fairly specific, like vehicles, players, weapons, and projectiles. Some are more general-purpose classes, like items and static shapes. Many of the classes know how their objects should respond to game stimuli and are able to respond in the game with motion or some other behavior inherent to the object's class definition.
Usually, you will let the game engine worry about the low-level mechanics of moving your 3D objects around the game world. However, there will probably be times while creating a game that you are going to want to cause objects to move in some nonstandard way—some method not defined by the class definition of the object. With Torque, this is easy to do!
Programmed Translation
When an object in 3D world space moves, it is translating its position, in a manner similar to that shown earlier in the discussion about transformations.
You don't, however, absolutely need to use the built-in classes to manipulate shapes in your game world. For example, you can write code to load in an Interior (a class of objects used for structures like buildings) or an Item (a class of objects used for smaller mobile and static items in a game world, like signs, boxes, and powerups).You can then move that object around the world any way you like.
You can also write code to monitor the location of dynamic shapes that are moving around in the world, detect when they reach a certain location, and then arbitrarily move, or teleport, those objects to some other location.
Simple Direct Movement
What we are going to do is select an object in a 3D scene in Torque and then move it from one location to another using some script instructions entered directly into the game console. The first step is to identify the object.
-
In the 3DGPAi1 folder locate the Run Chapter 3 shortcut and double-click it to launch the demo.
-
Click Start.
-
Using the mouse, turn your player-character to the left or right a bit, if necessary, until you have a good view of the pyramid.
-
Press F11. Torque's built-in World Editor will appear. As you move your cursor over the scene, you'll notice it change to a hand icon.
-
Click the hand on the pyramid to select it.
-
Move the cursor over to the right side, and click once on the plus sign to the left of the words "MissionGroup - SimGroup". You will see the list expand, and one of the entries, of the type InteriorInstance, will be highlighted. Take note of the number to the left, which is the object's instance ID. See Figure 3.27 for help, if necessary. The ID I get from the figure is 1359; your result should be the same.
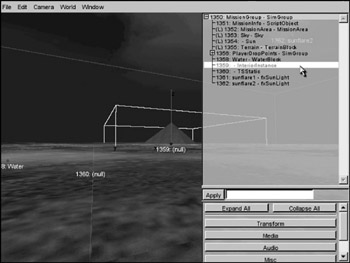
Figure 3.27: Finding the pyramid object's instance ID. -
Press the Tilde ("~") key, and the console will pop open. The console interface allows us to directly type in program code and get immediate results.
-
In the console window, type echo(1353.get-Transform() ); and then press the Enter key. Don't forget to include the semicolon at the end of the line before you press the Enter key. You should get a result like 49.2144 -66.1692 0.4 0 0 -1 9.74027, which is the transform of the pyramid. The first three numbers are the XYZ coordinates of the geometric center of the pyramid. The next three are the axis normals, which in this case indicates that the Z-axis is pointing straight up. The final value indicates how much rotation is applied around the rotation axes. We'll look at rotation in more detail a little later. Here, the rotation amount (in degrees) is applied to only the Z-axis.
-
In the console window, type 1353.setTransform("0 0 190 0 0 1 0"); and then press the Enter key.
-
Press the Escape key to remove the console window, and take a look. You will notice that the pyramid has moved.
-
Take the next several minutes to experiment with different transforms. Try rotating the pyramid around different axes or several axes at the same time.
-
When you are done, press the Tilde key to exit the console window, press Escape to exit the World Editor, and then press Escape one more time to exit the game.
| Tip | In the little exercise in the "Simple Direct Movement" section, you saw a command that looked like this: echo(1353.getTransform() );. The number 1353 is an object ID, and the getTransform() part is what is called a methodof that object. A method is a function that belongs to a specific object class. We'll cover these topics in more detail in a later chapter. |
Programmed Movement
Now we are going to explore how we can move things in the 3D world using program code. We are going to use the Item class to create an object based on a model of a stylized heart, insert the object in the game world, and then start it slowly moving across the terrain—all using Torque Script.
Something to know about the Item class is that Torque defines it as being affected by gravity. So if we insert the object into the scene at some distance above the ground level of the terrain, the object will actually fall to the ground—a little more slowly than it would in the real world, but what the hey! It's a game, after all. Anyway, this also means that we have to specify a mass and a friction drag value in order to prevent the item from sliding down hills if it lands on a slope.
Okay, now—so on to the program. Type the following code module into a file and save the file as 3DGPAi1\CH3\moveshape.cs.
// ======================================================================== // moveshape.cs // // This module contains the definition of a test shape, which uses // a model of a stylized heart. It also contains functions for placing // the test shape in the game world and moving the shape. // ======================================================================== datablock ItemData(TestShape) // ---------------------------------------------------- // Definition of the shape object // ---------------------------------------------------- { // Basic Item properties shapeFile = "~/data/shapes/items/heart.dts"; mass = 1; //we give the shape mass and friction = 1; // friction to stop the item from sliding // down hills }; function InsertTestShape() // ---------------------------------------------------- // Instantiates the test shape, then inserts it // into the game world roughly in front of // the player's default spawn location. // ---------------------------------------------------- { // An example function which creates a new TestShape object %shape = new Item() { datablock = TestShape; rotation = "0 0 1 0"; // initialize the values // to something meaningful }; MissionCleanup.add(%shape); // Player setup %shape.setTransform("-90 -2 20 0 0 1 0"); echo("Inserting Shape " @ %shape); return %shape; } function MoveShape(%shape, %dist) // ---------------------------------------------------- // moves the %shape by %dist amount // ---------------------------------------------------- { %xfrm = %shape.getTransform(); %lx = getword(%xfrm,0); // get the current transform values %ly = getword(%xfrm,1); %lz = getword(%xfrm,2); %lx += %dist; // adjust the x axis position %shape.setTransform(%lx SPC %ly SPC %lz SPC "0 0 1 0"); } function DoMoveTest() // ---------------------------------------------------- // a function to tie together the instantiation // and the movement in one easy to type function // call. // ---------------------------------------------------- { %ms = InsertTestShape(); MoveShape(%ms,15); } In this module there are three functions and a datablock definition. A datablock is a construct that is used to organize properties for objects together in a way that is important for the server. We will cover datablocks in more detail in a later chapter. The datablock begins with the line datablock ItemData(TestShape)—it specifies static properties of the Item class that can't be changed while the game is running. The most important part of the preceding datablock is the shapeFile property, which tells Torque where to find the model that will be used to represent the object. The mass and friction values, as mentioned previously, prevent the item from sliding down hills because of the pernicious tug of gravity.
The function InsertTestShape() creates a new instance of TestShape with the call to new Item(). It specifies the TestShape datablock, defined earlier, and then sets the object's rotation to some sensible values.
Next, MissionCleanup.add(%shape);adds the shape instance to a special mission-related group maintained by Torque. When the mission ends, objects assigned to this group are deleted from memory (cleaned up) before a new mission is started.
After that, the program sets the initial location of the object by setting the transform.
Next, the echo statement prints the shape's handle to the console.
Finally, the shape's handle (ID number) is returned from the function. This allows us to save the handle in a variable when we call this function, so that we can refer to this same item instance at a later time.
The function MoveShape accepts a shape handle and a distance as arguments, and uses these to move whatever shape the handle indicates.
First, it gets the current position of the shape using the %shape.getTransform() method of the Item class.
Next, the program employs the getword() function to extract the parts of the transform string that are of interest and store them in local variables. We do this because, for this particular program, we want to move the shape in the X-axis. Therefore, we strip out all three axes and increment the X value by the distance that the object should move. Then we prepend all three axis values to a dummy rotation and set the item's transform to be this new string value. This last bit is done with the %shape.setTransform() statement.
The DoMoveTest() function is like a wrapper folded around the other functions.When we call this function, first it inserts the new instance of the shape object using the InsertTestShape() function and saves the handle to the new object in the variable %ms. It then calls the MoveShape() function, specifying which shape to move by passing in the handle to the shape as the first argument and also indicating the distance with the second argument.
To use the program, follow these steps:
-
Make sure you've saved the file as 3DGPAi1\CH3\moveshape.cs.
-
Run the Chapter 3 demo using the shortcut in the 3DGPAi1 folder.
-
Press the Start button when the CH3 demo screen comes up.
-
Make sure you don't move your player-character after it spawns into the game world.
-
Bring up the console window by pressing the Tilde key.
-
Type in the following, and press Enter after the semicolon:
exec("CH3/moveshape.cs");You should get a response in the console window similar to this:
Compiling CH3/moveshape.cs... Loading compiled script CH3/moveshape.cs.
This means that the Torque Engine has compiled your program and then loaded it into memory. The datablock definition and the three functions are in memory, waiting with barely suppressed anticipation for your next instruction.
Tip About those slashes… You've probably noticed that when you see the file names and paths written out, the back slash ("\") is used, and when you type in those same paths in the console window, the forward slash ("/") is used. This is not a mistake. Torque is a cross-platform program that is available for Macintosh and Linux as well as Windows. It's only on Windows-based systems that back slashes are used—everyone else uses forward slashes.
Therefore, the back slashes for Windows-based paths are the exception here. Just thought I'd clear that up!
-
Type the following into the console window:
$tt = InsertTestShape();
You should see the following response:
Inserting Shape 1388
The number you get may be different—that's not an issue. But it will probably be the same. Take note of the number.
You also may see a warning about not locating a texture—that's of no importance here either.
-
Close the console window. You should see a heart on the ground in front of your player.
-
Type the following into the console:
echo($tt);
Torque will respond by printing the contents of the variable $tt to the console window. It should be the same number that you got as a response after using the InsertTestShape instruction above.
-
Type the following into the console:
MoveShape(%tt,50);
-
Press the Tilde key to close the console window. You should see the heart move away from you to the left.
You should be familiar with opening and closing the console window by now, so I won't bother explaining that part in the instruction sequences anymore.
-
Now, type this into the console, and close the console quickly afterward:
DoMoveTest();
What you should see now is the heart dropping from the air to the ground; it then moves away just like the first heart, except not as far this time.
The reason why the heart drops from the air is because the object's initial location was set in the InsertTestShape() function to be -90 -2 20, where the Z value is set to 20 units up. As mentioned earlier, Torque will automatically make objects of the Item class fall under gravity until they hit something that stops the fall. If you don't close the console window quickly enough, you won't see it fall.
Go ahead and experiment with the program. Try moving the item through several axes at once, or try changing the distance.
Programmed Rotation
As you've probably figured out already, we can rotate an object programmatically (or directly, for that matter) using the same setTransform() method that we used to translate an object.
Type the following program and save it as 3DGPAi1\CH3\turnshape.cs.
// ======================================================================== // turnshape.cs // // This module contains the definition of a test shape. // It contains functions for placing // the test shape in the game world and rotating the shape // ======================================================================== datablock ItemData(TestShape) // ---------------------------------------------------- // Definition of the shape object // ---------------------------------------------------- { // Basic Item properties shapeFile = "~/data/shapes/items/heart.dts"; mass = 1; //we give the shape mass and friction = 1; // friction to stop the item from sliding // down hills }; function InsertTestShape() // ---------------------------------------------------- // Instantiates the test shape, then inserts it // into the game world roughly in front of // the player's default spawn location. // ---------------------------------------------------- { // An example function which creates a new TestShape object %shape = new Item() { datablock = TestShape; rotation = "0 0 1 0"; // initialize the values // to something meaningful }; MissionCleanup.add(%shape); // Player setup %shape.setTransform("-90 -2 20 0 0 1 0"); echo("Inserting Shape " @ %shape); return %shape; } function TurnShape(%shape, %angle) // ---------------------------------------------------- // turns the %shape by %angle amount. // ---------------------------------------------------- { %xfrm = %shape.getTransform(); %lx = getword(%xfrm,0); // first, get the current transform values %ly = getword(%xfrm,1); %lz = getword(%xfrm,2); %rx = getword(%xfrm,3); %ry = getword(%xfrm,4); %rz = getword(%xfrm,5); %angle += 1.0; %rd = %angle; // Set the rotation angle %shape.setTransform(%lx SPC %ly SPC %lz SPC %rx SPC %ry SPC %rz SPC %rd); } function DoTurnTest() // ---------------------------------------------------- // a function to tie together the instantiation // and the movement in one easy to type function // call. // ---------------------------------------------------- { %ts = InsertTestShape(); TurnShape(%ts,30); } The program is quite similar to the ![]() moveshape.cs program that you were just working with. You can load and run the program in exactly the same way, except that you want to use DoTurnTest() instead of DoMoveTest() and TurnShape() instead of MoveShape().
moveshape.cs program that you were just working with. You can load and run the program in exactly the same way, except that you want to use DoTurnTest() instead of DoMoveTest() and TurnShape() instead of MoveShape().
Things of interest to explore are the variables %rx, %ry, %rz, and %rd in the TurnShape() function. Try making changes to each of these and observing the effects your changes have on the item.
Programmed Scaling
We can also quite easily change the scale of an object using program code.
Type the following program and save it as 3DGPAi1\CH3\sizeshape.cs.
// ======================================================================== // Sizeshape.cs // // This module contains the definition of a test shape, which uses // a model of a stylized heart. It also contains functions for placing // the test shape in the game world and then sizing the shape. // ======================================================================== datablock ItemData(TestShape) // ---------------------------------------------------- // Definition of the shape object // ---------------------------------------------------- { // Basic Item properties shapeFile = "~/data/shapes/items/heart.dts"; mass = 1; //we give the shape mass and friction = 1; // friction to stop the item from sliding // down hills }; function InsertTestShape() // ---------------------------------------------------- // Instantiates the test shape, then inserts it // into the game world roughly in front of // the player's default spawn location. // ---------------------------------------------------- { // An example function which creates a new TestShape object %shape = new Item() { datablock = TestShape; rotation = "0 0 1 0"; // initialize the values // to something meaningful }; MissionCleanup.add(%shape); // Player setup %shape.setTransform("-90 -2 20 0 0 1 0"); echo("Inserting Shape " @ %shape); return %shape; } function SizeShape(%shape, %scale) // ---------------------------------------------------- // moves the %shape by %scale amount // ---------------------------------------------------- { %shape.setScale(%scale SPC %scale SPC %scale); } function DoSizeTest() // ---------------------------------------------------- // a function to tie together the instantiation // and the movement in one easy to type function // call. // ---------------------------------------------------- { %ms = InsertTestShape(); SizeShape(%ms,5); } The program is obviously similar to the ![]() moveshape.cs and
moveshape.cs and ![]() turnshape.cs programs. You can load and run the program in exactly the same way, except that you want to use DoSizeTest() instead of DoMoveTest() and SizeShape() instead of MoveShape().
turnshape.cs programs. You can load and run the program in exactly the same way, except that you want to use DoSizeTest() instead of DoMoveTest() and SizeShape() instead of MoveShape().
You'll note that we don't call the object's %shape.getScale() function (there is one), because in this case, we don't need to. Also notice that the three arguments to our call to %shape.setScale() all use the same value. This is to make sure the object scales equally in all dimensions. Try making changes to each of these and observing the effects your changes have on the item.
Another exercise would be to modify the SizeShape function to accept a different parameter for each dimension (X, Y, or Z) so that you can change all three to different scales at the same time.
Programmed Animation
You can animate objects by stringing together a bunch of translation, rotation, and scale operations in a continuous loop. Like the transformations, most of the animation in Torque can be left up to an object's class methods to perform. However, you can create your own ad hoc animations quite easily by using the schedule() function.
Type the following program and save it as 3DGPAi1\CH3\animshape.cs.
// ======================================================================== // animshape.cs // // This module contains the definition of a test shape, which uses // a model of a stylized heart. It also contains functions for placing // the test shape in the game world and then animating the shape using // a recurring scheduled function call. // ======================================================================== datablock ItemData(TestShape) // ---------------------------------------------------- // Definition of the shape object // ---------------------------------------------------- { // Basic Item properties shapeFile = "~/data/shapes/items/heart.dts"; mass = 1; //we give the shape mass and friction = 1; // friction to stop the item from sliding // down hills }; function InsertTestShape() // ---------------------------------------------------- // Instantiates the test shape, then inserts it // into the game world roughly in front of // the player's default spawn location. // ---------------------------------------------------- { // An example function which creates a new TestShape object %shape = new Item() { datablock = TestShape; rotation = "0 0 1 0"; // initialize the values // to something meaningful }; MissionCleanup.add(%shape); // Player setup %shape.setTransform("-90 -2 20 0 0 1 0"); echo("Inserting Shape " @ %shape); return %shape; } function AnimShape(%shape, %dist, %angle, %scale) // ---------------------------------------------------- // moves the %shape by %dist amount, and then // schedules itself to be called again in 1/5 // of a second. // ---------------------------------------------------- { %xfrm = %shape.getTransform(); %lx = getword(%xfrm,0); // first, get the current transform values %ly = getword(%xfrm,1); %lz = getword(%xfrm,2); %rx = getword(%xfrm,3); %ry = getword(%xfrm,4); %rz = getword(%xfrm,5); %lx += %dist; // set the new x position %angle += 1.0; %rd = %angle; // Set the rotation angle if ($grow) // if the shape is growing larger { if (%scale < 5.0) // and hasn't gotten too big %scale += 0.3; // make it bigger else $grow = false; // if it's too big, don't let it grow more } else // if it's shrinking { if (%scale > 3.0) // and isn't too small %scale -= 0.3; // then make it smaller else $grow = true; // if it's too small, don't let it grow smaller } %shape.setScale(%scale SPC %scale SPC %scale); %shape.setTransform(%lx SPC %ly SPC %lz SPC %rx SPC %ry SPC %rz SPC %rd); schedule(200,0,AnimShape, %shape, %dist, %angle, %scale); } function DoAnimTest() // ---------------------------------------------------- // a function to tie together the instantiation // and the movement in one easy to type function // call. // ---------------------------------------------------- { %as = InsertTestShape(); $grow = true; AnimShape(%as,0.2, -1, -2); } This module is almost identical to the MoveShape() module we worked with earlier.
The function AnimShape accepts a shape handle in %shape, a distance step as %dist, an angle value as %angle, and a scaling value as %scale and uses these to transform the shape indicated by the %shape handle.
First, it obtains the current position of the shape using the %shape.getTransform() method of the Item class.
As with the earlier MoveShape() function, the AnimShape() function fetches the transform of the shape and updates one of the axis values.
Then it updates the rotation value stored %rd.
Then it adjusts the scale value by determining if the shape is growing or shrinking. Depending on which way the size is changing, the scale is incremented, unless the scale exceeds the too large or too small limits. When a limit is exceeded, the change direction is reversed.
Next, the scale of the shape is changed to the new values using the %shape.setScale() method for the shape.
Finally, the function sets the item's transform to be the new transform values within the %shape.setTransform() statement.
The DoAnimTest() function first inserts the new instance of the shape object using the InsertTestShape() function and saves the handle to the new object in the variable %as. It then calls the AnimShape() function, specifying which shape to animate by passing in the handle to the shape as the first argument and also indicating the discrete movement step distance, the discrete rotation angle, and the discrete size change value with the second, third, and fourth arguments.
To use the program, follow these steps:
-
Make sure you've saved the file as 3DGPAi1\CH3\animshape.cs.
-
Run the Chapter 3 demo using the shortcut in the 3DGPAi1 folder.
-
Press the Start button when the demo screen comes up.
-
Make sure you don't move your player-character after it spawns into the game world.
-
Bring up the console window.
-
Type in the following, and press Enter after the semicolon:
exec("CH3/animshape.cs");You should get a response in the console window similar to this:
Compiling CH3/animshape.cs... Loading compiled script CH3/animshape.cs.
This means that the Torque Engine has compiled your program and then loaded it into memory. The datablock definition and the three functions are in memory, waiting to be used.
-
Now, type the following into the console, and close the console quickly afterward:
DoAnimTest();
What you should see now is the heart dropping from the air to the ground; it then begins moving away from you toward the right. Go chase after it if you like, to get a sense of how fast it is moving.
Go ahead and experiment with the program. Try moving the item through several axes at once, or try changing the distance.
3D Audio
Environmental sounds with a 3D component contribute greatly to the immersive aspect of a game by providing positional cues that mimic the way sounds happen in real life.
We can control 3D audio in the scene in much the same way we do 3D visual objects.
Type the following program and save it as 3DGPAi1\CH3\animaudio.cs.
// ======================================================================== // animaudio.cs // // This module contains the definition of an audio emitter, which uses // a synthetic water drop sound. It also contains functions for placing // the test emitter in the game world and moving the emitter. // ======================================================================== datablock AudioProfile(TestSound) // ---------------------------------------------------- // Definition of the audio profile // ---------------------------------------------------- { filename = "~/data/sound/testing.wav"; // wave file to use for the sound description = "AudioDefaultLooping3d"; // monophonic sound that repeats preload = false; // Engine will only load sound if it encounters it // in the mission }; function InsertTestEmitter() // ---------------------------------------------------- // Instantiates the test sound, then inserts it // into the game world to the right and offset somewhat // from the player's default spawn location. // ---------------------------------------------------- { // An example function which creates a new TestSound object %emtr = new AudioEmitter() { position = "0 0 0"; rotation = "1 0 0 0"; scale = "1 1 1"; profile = "TestSound"; // Use the profile in the datablock above useProfileDescription = "1"; type = "2"; volume = "1"; outsideAmbient = "1"; referenceDistance = "1"; maxDistance = "100"; isLooping = "1"; is3D = "1"; loopCount = "-1"; minLoopGap = "0"; maxLoopGap = "0"; coneInsideAngle = "360"; coneOutsideAngle = "360"; coneOutsideVolume = "1"; coneVector = "0 0 1"; minDistance = "20.0"; }; MissionCleanup.add(%emtr); // Player setup- %emtr.setTransform("-200 -30 12 0 0 1 0"); // starting location echo("Inserting Audio Emitter " @ %emtr); return %emtr; } function AnimSound(%snd, %dist) // ---------------------------------------------------- // moves the %snd by %dist amount each time // ---------------------------------------------------- { %xfrm = %snd.getTransform(); %lx = getword(%xfrm,0); // first, get the current transform values %ly = getword(%xfrm,1); %lz = getword(%xfrm,2); %rx = getword(%xfrm,3); %ry = getword(%xfrm,4); %rz = getword(%xfrm,5); %lx += %dist; // set the new x position %snd.setTransform(%lx SPC %ly SPC %lz SPC %rx SPC %ry SPC %rz SPC %rd); schedule(200,0,AnimSound, %snd, %dist); } function DoMoveTest() // ---------------------------------------------------- // a function to tie together the instantiation // and the movement in one easy to type function // call. // ---------------------------------------------------- { %ms = InsertTestEmitter(); AnimSound(%ms,1); } DoMoveTest(); // by putting this here, we cause the test to start // as soon as this module has been loaded into memory In this program, we also have a datablock, but you'll notice that it is different this time. This datablock defines an audio profile. It contains the name of the wave file that contains the sound to be played, a descriptor that tells Torque how to treat the sound, and a flag to indicate whether the engine should automatically load the sound or wait until it encounters a need for the sound. In this case, the engine will wait until it knows it needs the file.
The InsertTestEmitter function is structured the same as the earlier InsertTestShape function, but this time it creates the object with a call to new AudioEmitter, and there are quite a few properties to be set. These properties will be explained in much greater detail in Chapters 19 and 20.
Another difference to note is the last line, which is a call to DoMoveTest. This allows us to load and run the program in one go, using the exec call. After the Torque Engine compiles the program, it loads it into memory and runs through the code. In our earlier program, like the AnimShape module, Torque would encounter the datablock and function definitions. Because they are definitions, they aren't executed, just loaded into memory. The last line, however, is not a definition. It is a statement that calls a function. So when Torque encounters it, Torque looks to see if it has the function resident in memory, and if so, it executes the function according to the syntax of the statement.
To use the program, follow these steps:
-
Make sure you've saved the file as 3DGPAi1\CH3\
 animaudio.cs.
 -
Run the Chapter 3 demo using the shortcut in the 3DGPAi1 folder.
-
Press the Start button when the demo screen comes up.
-
Make sure you don't move your player-character after it spawns into the game world.
-
Bring up the console window.
-
Type in the following, and press Enter after the semicolon:
exec("CH3/animaudio.cs");You should get a response in the console window similar to this:
Compiling CH3/animaudio.cs... Loading compiled script CH3/animaudio.cs.
You should also begin to hear the dripping sound off to the right-hand side. If you wait without moving your player in any way, not even using the mouse to turn his head, you will notice the sound slowly approach you from the left, pass over to the right in front of you, and then pass off into the distance to the left. Pretty neat, huh?
EAN: 2147483647
Pages: 197