Chapter 2: Introduction to Programming
![]() Download CD Content
Download CD Content
My intent with this chapter is to help you understand programming concepts and techniques and leave you with a foundation upon which you can build more advanced skills. By the end of this chapter, you will be proficient with a powerful programming editor; understand how to create, compile, and run programs you've written yourself; have a reasonable sense of programming problem-solving methods; and become familiar with valuable debugging tips and techniques.
UltraEdit-32
To write our programs, we will need to use a text editor, or programming editor. This kind of editor differs from a word processor, which is what most people use for writing documents, books, memos, and church bulletins.
A good programming editor has several useful features:
-
A project feature that allows you to organize your source files
-
A fully featured grep (find, search, and replace) capability
-
Syntax highlighting
-
A function finder or reference
-
Macro capability
-
Bookmarks
-
Text balancing or matching
I use a shareware editor called UltraEdit-32 (UltraEdit), written by Ian D. Meade, included on the companion CD for this book. It also has several other useful features that I'll demonstrate later in this chapter.
The name grep comes from the UNIX world, where strange and wonderful names and incantations for programs abound. grep is derived from the command string "g/re/p" which first appeared in old line editor programs on early UNIX systems. The "g" meant global, the "re" meant regular expression, and the "p" meant print, as in print to the screen. If you entered that command into the editor's command line, you were telling the editor to globally search, using regular expression syntax, and then print the results—and the expression would then follow those characters. Eventually that command string was migrated outside of the editor program and incorporated into a command that was usable from the UNIX command shell as a way of specifying how to look and what to look for when you are searching files that contain a particular piece of text. Over time, the name grep became synonymous with searching files for embedded text and has become a common term in the programming world, even in non-UNIX environments. Now it is often used as a verb meaning "search for text in files."
Program Setup and Configuration
After you insert the companion CD into your computer's CD drive, use Windows Explorer to browse your way on the CD into the folder called 3DGPAi1. Find setup.exe, double-click it, and follow the installation instructions.
Next, browse your way on the CD into the folder called UltraEdit-32. Find setup.exe, double-click it, and follow the installation instructions.
Finally, browse your way on the CD into the folder called UE Tools. Find setup.exe and double-click it to run it and follow the installation instructions. This will install UE Project Maker in the 3DGPAi1 folder on your C drive. This tool will automatically generate project files that you can use with UltraEdit-32.
Setting Up Projects and Files
| Note | Use the UE sample folder in the 3DGPAi1 folder. |
Like any decent editor environment, UltraEdit-32 allows us to organize the files we want to work with using a projects concept. You can create, in UltraEdit-32, virtual folders and save links to your files in these folders. By doing this, you can create a quick and convenient access channel to files that are stored anywhere, even somewhere on the network! Setting up your projects can be a bit tedious, however, depending on your needs. To help you with setup, I have written a utility called UltraEdit Project Maker (UEPM), which is included on the companion CD. I'll tell you more about using UEPM later, but right now, let's dive in and manually set up a project.
Configuring UltraEdit
To configure UltraEdit, follow these steps:
-
Launch UltraEdit by selecting Start, Program Files, UltraEdit, UltraEdit-32 Text Editor.
-
Close any open files you may have in UltraEdit by selecting Window, Close All Files.
-
In UltraEdit, select View, Views/Lists, File Tree View. A new docked window will appear on the left side (see Figure 2.1). This is the File Tree View.

Figure 2.1: Locating the File Tree/Project View. -
In the File Tree View there is a drop-down combo box (it has a down-pointing arrow at its right end; see Figure 2.2). If the text in the combo box does not say "Project Files," then click the arrow on the right and select Project Files from the list that drops down. When the name has been set to Project Files, we refer to this as the Project View.
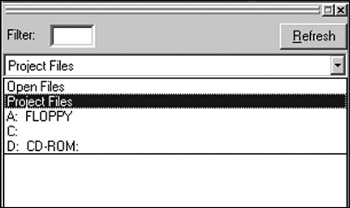
Figure 2.2: Changing the File List View to the Project View. -
Right-click in the white area of the Project View to get a pop-up menu. Select Show Names Only.
-
If the Project View is free-floating (not docked), then repeat the right-click and this time select Allow Docking if it isn't already selected. Then click and hold (grab) the colored bar at the top of the File List View/Project View window where it says "File List View" and drag it to the left side of your UltraEdit window such that the colored bar remains in the dark gray space, but the left side of the view window disappears off the left side of the UltraEdit window. You should see the outline of the view window change from a wide gray line to a thin black line. Let go of the mouse button and the view will be docked.
-
Select the menu item Project, New Project/Workspace. Browse your way to C:\3DGPAi1\UESampleProject. A Save dialog box will appear. Type in the project name (uesample), and make sure you have the Project Files type selected in the combo box of the dialog box. Next, the Project dialog box will appear. If you are given an alert that tells you the file already exists, and asks if you want to save, click "Yes".
-
Click the Relative Paths and Relative to Project File check boxes and make sure they are checked.
-
Click New Group and type in SubFolder and then click on the OK button. The SubFolder entry will appear in the list.
-
Select the SubFolder entry so that it is highlighted, and then click New Group and type in SubSubFolder, then click on the OK button. The SubSubFolder entry will appear in the list nested under SubFolder. You may need to click on the SubFolder icon to make the plus sign appear next to SubFolder, and then click on the plus sign to ensure that SubSubFolder appears nested inside.
-
Select the root entry (it's marked by the [ - ] symbol). Next click on the New Group button and type in SubFolderTwo. The SubFolderTwo entry will appear in the list.
-
Double-check your entries and compare the results with Figure 2.3. Click Close to make the dialog box go away.
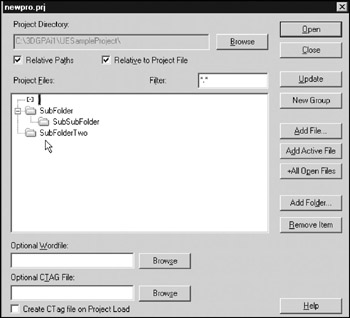
Figure 2.3: Project dialog box with folder hierarchy. -
Using the menu item File, Open, browse your way to C:\3DGPAi1\UESampleProject and open the file called sample file 1.txt. Do the same for C:\3DGPAi1\UESampleProject\sample file 2.txt. You should now have only these two files open.
-
Open the Project dialog box again, by selecting Project, File/Settings, and click the root entry to select it.
-
Click +All Open Files. The two open files will be added to the project's file list at the root level. Close the Project dialog box.
-
Close both of your open files.
-
Next, open C:\3DGPAi1\UESampleProject\SubFolder\sample file 3.txt and C:\3DGPAi1\UESampleProject\SubFolder\sample file 4.txt.
-
Now reopen the Project dialog box, select the SubFolder entry, and click +All Open Files.
-
Close all of your open files.
-
Repeat steps 18 and 19 for the files located in C:\3DGPAi1\UESampleProject\Sub-FolderTwo and C:\3DGPAi1\UESampleProject\SubFolder\SubSubFolder, ensuring that you add the file links in the appropriate project folder.
After following these steps, you should have a Project Setup dialog box that looks like Figure 2.4, and your Project View should look like Figure 2.5. You may need to click on the plus sign in front of the folder entries in order to expand the folders to match the view in the figure.
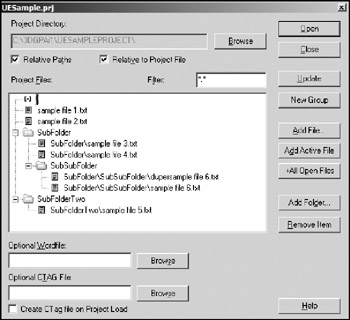
Figure 2.4: Final form of the Project/Workspace Setup dialog box.
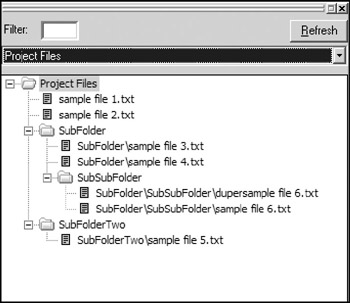
Figure 2.5: Final form of the Example Project View.
As the saying goes, there is more than one way to skin a cat, and in this case there are other ways to set up your project. You can do it all from within the Project/Workspace dialog box using the Add File button. You can also use the Add Active File button to add whatever file is currently the one being edited in UltraEdit. You can experiment and find the method that works best for you. I tend to use a combination of All Files and Add Active File, depending on my needs at the time.
Go ahead and open a few files and close them again, to get a feel for how the Project View works.
Search and Replace
The search capabilities of UltraEdit are quite extensive and thorough. I'm going to focus on the few most important: finding specific text, finding specific text and replacing it, jumping to a line number, and advanced searching using wildcards and patterns. To practice the various features, open the UESample project, and open the file called sample file 1.txt. It has some text extracted from an early revision of Chapter 1 that we can hack away at.
Find
Select the Search, Find menu item, and you should get the Find dialog box (see Figure 2.6). Make sure the option check boxes match the ones in Figure 2.6. Now, type in the word you want to find, then click the OK button. The Find dialog box will go away, your text insertion point will jump to the first found instance of the word you want, and the word will be highlighted. Try this using the word "indie". See that?
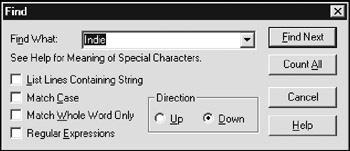
Figure 2.6: The Find dialog box set for a basic search.
Okay, now get your Find dialog box back and try doing this with the various options. Notice that the Find operates on the currently active file in the editor. Check out the various options, like searching "down" the file and then searching back "up" the file. Change your search word to "INDIE" (all capital letters) and then try your search again. Note that the Find still locates the word. Now try it with the Match Case option checked. Notice that you get an error message: Search String Not Found.
When searching, you will often have more than one match to your search criteria. If you are not using the List Lines option, then you can move through each match in the text by using Search, Find Next to continue to find matching terms as you move toward the end of the file (down). Using Search, Find Prev will do the same thing moving toward the start of the file (up). However, you will probably want to quickly get acquainted with using the keyboard shortcut F3 for Find Next and Ctrl+F3 for Find Prev.
| Tip | A quick and convenient way to search for other occurrences of a word that is already written and visible in the active window is to highlight the word (double-click it), press Ctrl+F (the shortcut for Find), and then press Enter. The insertion point will jump to the next occurrence of the word. Then keep pressing F3 to move to the next, and the next, and the next, ad infinitum. UltraEdit will keep starting over from the beginning of the file until it finds no more matches. |
A feature of the Find dialog box that I think is particularly useful is the List Lines Containing String option. With this checked, all instances of the word you are looking for will be listed as complete lines in a separate window. Try it by searching for the word "action" with case sensitivity turned off. This should give you a window with a list of lines in it. Each line contains at least one instance of the search term you used. If you double-click a line, you will see the text and insertion point in your edit window jump to where that line is located and highlight the line.
When using Find, there are some things you may want to search for that are not normal alphanumeric characters or punctuation marks—the end of a line, for example.
These are handled by using special characters that are a combination of an escape character and a symbol. The escape character is the caret ("⁁"; you get this when you hold down the Shift key and type the number "6" on North American keyboards) and is paired with a symbol that is a normal character. Whenever Find sees the combination of the caret in front of a character, it knows it is doing a special character search.
Of course, the first special character is the caret itself; otherwise we would never be able to do a search for a caret in text. Look at the following table for a list of the most common special Find characters.
These do not require you to turn on the Regular Expressions switch in the Find dialog box, although they are the same as some of the Regular Expressions entries.
| Special Characters Used in a Basic Find Function | |
|---|---|
| Special Symbol | What the Program Looks For |
| ⁁⁁ | caret character ("⁁"; sometimes called Up Arrow) |
| ⁁s | highlighted text (only while a macro is running) |
| ⁁c | contents of the Clipboard (only while a macro is running) |
| ⁁b | page break |
| ⁁p | new line (carriage return and line feed) (Windows/DOS files) |
| ⁁r | new line (carriage return only) (Macintosh files) |
| ⁁n | new line (line feed only) (UNIX files) |
| ⁁t | tab character |
Replace
Select the Search, Replace menu item, and you should get the Replace dialog box (see Figure 2.7). This dialog box is similar to the Find dialog box, but with more options and a field in which to enter the replacement text.
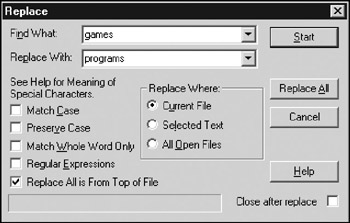
Figure 2.7: The Replace dialog box set for a basic search-and-replace operation.
Find in Files
The Find in Files feature is UltraEdit's closest implementation of grep, which I mentioned earlier in the chapter. The basic Find in Files capability allows you to specify what word or phrase you are looking for and where to look for it in files other than the one you are currently editing (the active file). Figure 2.8 shows the Find in Files dialog box. You'll notice that you can specify one of three different sets of files to search.
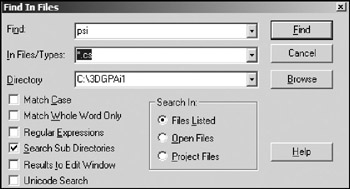
Figure 2.8: The Find in Files dialog box.
First, you can search through the Listed files. This means you can specify a file name search pattern with extension and a folder to look in. This is quite similar to the built-in Windows Search or Find feature. You can use wildcards to fine-tune which files will be checked. Searching with the In Files/Types box set to "new*.txt", for example, will search inside files with the names newfile.txt, new_data.txt, and so on. Setting the pattern to "*.*" will cause the program to search inside every file it finds in the specified folder. If you have the Search Sub Directories box checked, then it will also look inside every file inside every folder contained in the specified folder.
When the program finds a match in the file with the word you are looking for, it will print a listing at the bottom of the UltraEdit window containing a reference to the file where the word was found, plus the line in which it was found. If you double-click the line in the bottom window, UltraEdit will open the file and position the line in your window for viewing.
Next, you can search only in the Open Files—that is, only within the files that are currently open in the editor. If you click the Open Files radio button in the Search In: box, you see that now you only enter the word to search for; you don't need to specify file names or a folder.
Finally, the method I use the most is to search in Project Files. With this option checked, the program will search through all of the files in the project you currently have open—and only those files. It doesn't matter whether the files are open or not.
grep
The grep capability in UltraEdit (also see the sidebar earlier in this chapter) is an advanced way of finding text within files and replacing it with other text when desired. You can use it in Search-related topics covered so far by putting a check mark in the Regular Expressions box—then Find will operate using standard UNIX-like grep or the older UltraEdit-specific form of grep.
You can configure UltraEdit to use its own grep syntax or the UNIX-style syntax in the configuration menu. Select the Advanced, Configuration menu item and then select the Find tab. Change the check box labeled UNIX-style Regular Expressions to suit your taste.
UltraEdit-Style grep Syntax
Table 2.1 shows the available UltraEdit-style grep functions. Let's do a few example grep searches to get a feel for how it works. Use the file sample file 1.txt from the UESample project to do the searches. For this section make sure you have the UltraEdit configuration setting for UNIX style Regular Expressions turned off.
| Symbol | Purpose |
|---|---|
| % | Matches the start of line. Indicates the search string must be at the beginning of a line but does not include any line terminator characters in the resulting string selected. |
| $ | Matches the end of line. Indicates the search string must be at the end of a line but does not include any line terminator characters in the resulting string selected. |
| ? | Matches any single character except newline. |
| * | Matches any number of occurrences of any character except newline. |
| + | Matches one or more instances of the preceding character. At least one occurrence of the character must be found. Does not match repeated newlines. |
| ++ | Matches the preceding character/expression zero or more times. Does not match repeated newlines. |
| ⁁b | Matches a page break. |
| ⁁p | Matches a newline (CR/LF) (Windows/DOS Files). |
| ⁁r | Matches a newline (CR Only) (Mac Files). |
| ⁁n | Matches a newline (LF Only) (UNIX Files). |
| ⁁t | Matches a tab character. |
| [ ] | Matches any single character, or range in the brackets. |
| ⁁{A⁁}⁁{B⁁} | Matches expression A OR B. |
| ⁁ | Overrides the following regular expression character. |
| ⁁(…⁁) | Brackets or tags an expression to use in the replace command. A regular expression may have up to nine tagged expressions, numbered according to their order in the regular expression. The corresponding replacement expression is ⁁x, for x in the range 1-9. Example: If ⁁(h*o⁁) ⁁(f*s⁁) matches "hello folks", ⁁2 ⁁1 would replace it with "folks hello". |
Let us suppose that we want to find some reference to dungeons in games in the sample file. We'll grep for (notice that I'm verbing the noun here!) the term "game*dungeon".
Press Ctrl+F to bring up the Find dialog box, and then make sure the Regular Expressions box is checked. Type in the search term game*dungeon, and click the Find Next button. The string it finds starts with "game" and ends with "dungeon". The words that appear in between were inconsequential to the search, because the asterisk means that the search program will match any string of characters of any length between the words "game" and "dungeon", as long as it doesn't encounter a new line character or a carriage return. Try it again, but this time use the term "computer*game" and see what you find. Remember that you can use F3 as a shortcut to find the next match.
The operator that is the same as the asterisk, only different, is the question mark ("?"). Instead of matching any number of any characters, it will match only one instance of any character. For example, "s?n" matches "sun", "son", and "sin" but not "sign" or "soon".
Here are some more examples of how the matching criteria work:
| Be+st | will find "best", "beest", "beeeest", and so on, but will not find "bst". |
| [aeiou] | will find every lowercase vowel. |
| [,.?] | will find a literal ",", ".", or "?". |
| [0-9a-z] | will find any digit or lowercase letter. |
| [~0-9] | will find any character except a numeral (the tilde ["~"] means to not include whatever follows). |
UNIX-Style Syntax
The UNIX-style syntax is used in the same way as the UltraEdit-style, but is different in many ways. The advantages of using the UNIX style are:
-
It is somewhat of a standard, so you may be familiar with it from elsewhere.
-
It has more capabilities than the UltraEdit syntax.
-
At some point in the future it may be the only syntax for grep supported by UltraEdit, when the program's author decides to stop supporting the old UltraEdit-style.
You can see the differences by checking out Table 2.2. The first obvious difference is that the escape character has changed from the caret to the back slash. Our example searches would be a little different; the asterisk doesn't match any character anymore, now it matches any number of occurrences of the character that appears just before it. Also, now we use the period "." to match any single character instead of the question mark.
| Symbol | Purpose |
|---|---|
| \ | Indicates the next character has a special meaning. "n" on its own matches the character "n". "\n" matches a linefeed or newline character. See examples below (\d, \f, \n ). |
| ⁁ | Matches or anchors the beginning of line. |
| $ | Matches or anchors the end of line. |
| * | Matches the preceding character zero or more times. |
| + | Matches the preceding character one or more times. Does not match repeated newlines. Matches any single character except a newline character. Does not match repeated newlines. |
| (expression) | Tags an expression to use in the replace command. A regular expression may have up to 9 tagged expressions, numbered according to their order in the regular expression. The corresponding replacement expression is \x, for x in the range 1-9. Example: If (h.*o) (f.*s) matches "hello folks", \2 \1 would replace it with "folks hello". |
| [xyz] | A character set. Matches any characters between brackets. |
| [⁁xyz] | A negative character set. Matches any characters NOT between brackets. |
| \d | Matches a number character. Same as [0-9]. |
| \D | Matches a non-number character. Same as [⁁0-9]. |
| \f | Matches a form-feed character. |
| \n | Matches a linefeed character. |
| \r | Matches a carriage return character. |
| \s | Matches any white space including space, tab, form-feed, and so on, but not newline. |
| \S | Matches any non-white space character but not newline. |
| \t | Matches a tab character. |
| \v | Matches a vertical tab character. |
| \w | Matches any word character including underscore. |
| \W | Matches any non-word character. |
| \p | Matches CR/LF (same as \r\n) to match a DOS line terminator. |
Before proceeding, make sure you have your editor set to use the proper UNIX-style syntax in the Advanced, Configuration menu under the Find tab.
Now—to go back to our dungeon games example, the way the search term in UNIX-style grep syntax would look is "game.*dungeon".
Compare these examples with the ones for the UltraEdit-style:
| be+st | matches "best", "beest", "beeeest", and so on, BUT NOT "bst". |
| be*st | matches "best", "beest", "beeeest", and so on, AND "bst". |
| [aeiou] | matches every lowercase vowel. |
| [,.?] | matches a literal ",", ".", or "?". |
| [0-9a-z] | matches any digit, or lowercase letter. |
| [⁁0-9] | matches any character except a digit (⁁ means NOT the following). |
Bookmarks
One feature I use quite frequently is the Bookmark capability. Its purpose is to help you find your way around large files quickly. When you are working in an area that you think you may need to come back to later, just set a bookmark, and then when you are working in another place in your document, you can use the Goto Bookmark command to jump through each bookmark you've set until you find the one you want. This sure beats scrolling through all your open files looking for that one spot you worked on two hours ago!
To set a bookmark, click your mouse on a line of text and then select the menu item Search, Toggle Bookmark. The line where the bookmark is set will be highlighted in a different color (See Figure 2.9). In the figure, the lower highlighted line is the bookmarked line.
Figure 2.9: Bookmarked text shown in lighter gray.
To remove a bookmark, click your mouse in the highlighted bookmark line, and select Search, Toggle Bookmark again. This will turn off the bookmark for that line.
To remove all bookmarks, select Search, Clear All Bookmarks, and all bookmarks that you previously set will vanish.
| Tip | If you are using the Project View, when you close your documents, all the bookmarks you've set will be saved, and restored the next time you open that document. This does not happen with documents that are not associated with the Project View. |
To navigate between the bookmarks, select Search, Goto Bookmark and your insertion point will jump to the next bookmark in sequence. You can also select Search, Goto Previous Bookmark, to jump in the reverse direction from bookmark to bookmark.
| Tip | Most commands available in the menus have keyboard shortcuts available. Rather than listing them here, I'll just point you to the menu items. The keyboard shortcuts for the command, if available, are written next to the menu selection. Some menu items, like Clear All Bookmarks, have no shortcut assigned, but don't despair. You can assign your keyboard shortcuts by using the Key Mapping tab in the Advanced, Configuration menu, and following the instructions. Note that the command names in the list are written with their main menu entry as the first part of the command.The Clear All Bookmarks command is written as SearchClearBookmarks.The commands are listed in alphabetical order. |
Macros
Macro commands are like shortcuts. You can string together a whole series of tedious editing operations into a group, called a macro, that you can invoke at any time later by a simple keystroke, or menu item, or toolbar button.
UltraEdit has two forms of macros—the standard and the Quick Record macro. Let's take a look at both, starting with the Quick Record macro.
Quick Record Macro
The Quick Record macro is a bare-bones macro function.
-
Select the Macro, Quick Record menu item (or press Shift+Ctrl+R).
-
Start performing all the editing actions you want recorded. In this case just type in the text blah blah blah somewhere.
-
Select Macro, Stop Quick Recording (or press Shift+Ctrl+R again).
Now replay your edit actions over again at any place in your text by simply placing your text insertion point where appropriate, and typing Ctrl+M, or selecting the Macro, Play Again menu item.
You can only ever have one Quick Record macro—each time you record one, it replaces the earlier recording.
Standard Macro
Standard macros are a bit more complex. The procedure for recording them is somewhat similar, but you can assign them to key combinations of your choice, or to menus, or even to toolbar buttons. This gives you much more flexibility than the Quick Record macro, but at the cost of a bit of setup twiddling, of course.
Let's make a couple of standard macros. One will insert the words This is cool and the other will jump to the beginning of whatever line the insertion point is on, then capitalize the first word, put a period at the end, and then insert the phrase Capital Idea! after the period.
-
Place your insertion point in a blank line somewhere.
-
Select the Macro, Record menu item.
-
In the Macro Name box, give it a name, something like "InsertCool".
-
Click the mouse in the HotKey edit box to the right of where it says "Press New Key" and then press and hold Shift+Ctrl+I.
-
Click the OK button.
-
Type in the phrase This is cool.
-
Select Macro, Stop Recording.
-
Place your insertion point at the end of the line with the phrase "This is cool" in it.
-
Select the Macro, Record menu item.
-
In the Macro Name box, give it a name, something like "MakeCapital".
-
Click the mouse in the HotKey edit box to the right of where it says "Press New Key", and then press and hold Shift+Ctrl+M.
-
Click the OK button.
-
Type the following key sequence, one at a time (don't type the text in parentheses):
-
Home
-
Shift+Ctrl+Right Arrow
-
F5
-
End
-
. (that's a period)
-
spacebar
-
-
Now type the phrase Capital Idea!
-
Now select the Macro, Stop Recording menu item.
There, that's done. So now let's test it out.
First, find or create a blank line, place your insertion point on it, and then press Shift+Ctrl+I. See the text that gets inserted? Okay, now leave your text insertion point in that new text, anywhere, and then press Shift+Ctrl+M. You should end with a line that says, "This is cool. Capital Idea!", with the same capitalization. Macros are cool!
UltraEdit Review
So now you've seen how to use what are, in my opinion, the most important editing features of UltraEdit—grep (Find and Replace), macros, and bookmarks—and you've seen how UltraEdit can be configured in a project format to make it easy to use files in an organized fashion.
UltraEdit has a good Help feature that covers all aspects of the program, so I encourage you to use it.
Remember that UltraEdit is an editor, not a word processor, so there aren't a great deal of formatting features in the program, which is just as well because we are using it to write code and not to write documents or books. The focus is on the steak, not the sizzle.
Speaking of steak, it is now time to get to the meat of this chapter, coming up next!
EAN: 2147483647
Pages: 197