| Let's share the good news firstif you are using SharePoint Portal Server out-of-the-box, the index will be kept up to date. The Web Storage System, the place where all documents are maintained by SharePoint Portal Server, sends notifications to the index engine. The same notification mechanism is available for content sources pointing to a file share. The notification mechanism does not work, however, when indexing other workspaces, Web sites, Exchange Public Folders, and Lotus Notes databases. To keep the index accurate, you must fall back to mechanisms that actively crawl for changes.  To learn more about incremental updates, see "Building the Index," p. 99. To learn more about incremental updates, see "Building the Index," p. 99. The incremental update ensures that all changes in content (not necessarily in links to that content) are detected . This mechanism, however, requires that each URL will get checked for changes, while most of them may not. Microsoft has added the adaptive update capability to overcome the load that is generated with checking every URL. An adaptive update will only check those URLs thatbased on the history of changesare likely out of date. Each URL will be checked at least every two weeks to ensure that changes on documents that remained unchanged for a long while are detected. Whenever possible, you should use adaptive overnight crawling to optimize the resource usage. Incremental updates, which will take much longer, should be scheduled for the weekend . For both types of updates, a scheduled task must be configured. CAUTION Adaptive updates are set by default for content sources other than the local Web Storage System and the file system. But the adaptive update will only be performed if a schedule is defined. No schedule is defined with SharePoint Portal Server out-of-the-box.
Scheduling and Configuring Adaptive Updates Adaptive updates can either be scheduled or executed manually. In a production environment, the scheduled operation is to be preferred, in particular because the additional network and other load can occur in off-peak hours, such as late at night. If you have not run any other updates, the first time you run an adaptive update is equal to running a full update, and the second time you run an adaptive update is equal to running an incremental update. You see the first improvement the third time you run an adaptive update. The efficiency increases over time and over multiple updates because more history is available for the algorithm to work with. Perform the following steps for updating: -
Log in as Administrator. -
Open the Management / Content Sources Web Folder of your workspace. -
Click Additional Settings. -
Select the Scheduled Updates tab. -
Check, if necessary, Adaptive Updates; otherwise click Schedule. -
The Adaptive Update Properties dialog opens (see Figure 19.4). Figure 19.4. The figure shows an adaptive update schedule that is run every working day at 10:00 p.m. 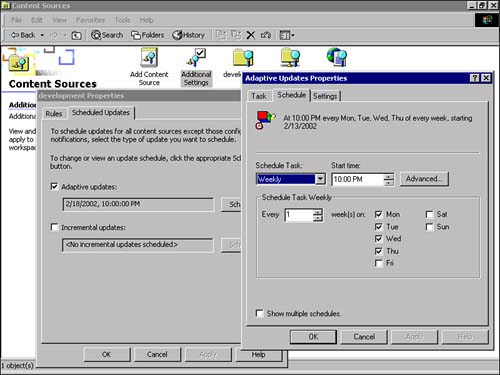 -
Fill in the details of your schedule on the Schedule tab. You can fine-tune the task on the Settings tab. Do not modify the settings on the Task tab. -
Click OK. -
If you are creating a new task, the Account Information dialog will open. Specify the password and confirm the password; then click OK. -
Click OK The schedule is implemented as Windows tasks. You can see these tasks if you take a look in the C:\WINNT\ Tasks directory. TIP The scheduled update tasks are not part of the backup procedure of SharePoint Portal Server; back them up separately for a complete restore of your system.
A Coordinator can access the Additional Setting tab to create schedules, but for a new schedule you need to supply an account with administrative privileges. If the schedule already exists, and thus is created with administrative privileges, you may find that you cannot open the existing schedule. Therefore always maintain schedules through a single account with local administration privileges. Full Updates Some operations affect the accuracy of the index. These operations include -
Installation of a new filter -
Completion of new Auto Categorization Training -
Removal of a content source (reclaiming disk space) -
Change of site rules that affect existing content sources -
Definition or rename of a Search Scope for an existing content source -
Detection of unreferenced Web pages Therefore, you should consider starting a full index in off-time hours if such a situation occurs. Indexing can take a considerable amount of timeeven more than 24 hours. Use your past experience to determine a moment with the least impact to the users. There are several ways to start an index update. If you want to update all content sources,do the following: -
Log in as Coordinator. -
Open the Management Web Folder and right-click the Content Sources folder. -
Select the update method you want to perform. TIP This operation, unlike the operation for an individual content source as outlined below, can also be started from the SharePoint Portal Server Microsoft Management Console by right-clicking the workspace node.
If you know that the changes apply only for some content sources, for example, if you changed the site path rule that is specific to that content source, you should use the following procedure: -
Log in as Coordinator. -
Open the Management, Content Sources Web Folder. -
Right-click the appropriate content source icon. -
Select the update method you want to perform. When starting a full index, you will notice that the document will be reported as changed and consequently matching subscriptions will fire. This can be very annoying, aside from the fact that if many users requested email notifications, the mail server could become extremely busy when you perform a full update. Before performing a full update, you can disable notifications by adding a property to the workspace, which will disable all notifications. Make sure that after the full update completes, you re-enable notifications again. You can add and toggle the property urn:schemas-microsoft-com:publishing:DisableSubscriptionNotifications, which allows you to disable the notifications on the workspace folder by using the Visual Basic Script below. Listing 19.1 Toggle Subscription Notifications Script const adModeReadWrite = 3 Set wshArguments = wscript.Arguments If wshArguments.Count < 2 Then wscript.Echo "This little tool will toggle the subscription notifications" wscript.Echo "Usage subnot <server> <workspace>" End If ' We need to open the Exchange OLEDB provider directly on the server. strURL = "http://" & wshArguments.Item(0) & _ "/SharePoint Portal Server/workspaces/" & wshArguments.Item(1) Set adoCon = CreateObject("ADODB.Connection") adoCon.ConnectionString = strURL adoCon.Provider = "Exoledb.datasource" adoCon.Open ' Open the workspace directory read/write to set a property on that folder Set adoRec = CreateObject("ADODB.Record") adoRec.Open strURL, adoCon, adModeReadWrite bDisableNotifications = _ adoRec.Fields ("urn:schemas-microsoft-com:publishing:DisableSubscriptionNotifications") ' The property may not be present, which means that the default behavior ' to send notifications is active If bDisableNotifications = "" Then bDisableNotifications = false End If ' Toggle the property or create if necessary the property with a not default value adoRec.Fields ("urn:schemas-microsoft-com:publishing:DisableSubscriptionNotifications") = _ not bDisableNotifications adoRec.Fields.Update Restart the Microsoft Search service such that the changes take affect immediately. Which Account is used to crawl for data? SharePoint Portal Server will crawl all data using a dedicated account, the default access account, unless a specific account is defined for a specific URL. These specific accounts can be set through Site Paths, which are described in general in Chapter 18. Default Content Access Account If no site access account is specified, the default content access account will be used for index updates. If this account has not been configured, SharePoint Portal Server will use the anonymous account. If the account used has no Read permission for the data that gets crawled, the content is not indexed and an access error is reported in the gatherer log. The default content access account is typically set with the installation of SharePoint Portal Server. To change the account at a later moment, do the following: -
Log in as Administrator on the server running SharePoint Portal Server. -
Open the SharePoint Portal Server Microsoft Management Console by clicking Programs, Administrative Tools, SharePoint Portal Server Administration. -
Right-click the SharePoint Portal Server computer name , select Properties, and then click the Accounts tab. -
Select Default Content Access Account. The description and account properties for this account appear. -
Click Configure. The Account Information dialog box appears. -
Specify the account information: Type the domain, account ( user name), and password, and then confirm the password typing it again. -
Click OK. -
Click Apply. Defining Site Access Account If you want to configure an account for a specific content source, you can define a site path rule for that content source and associate an account with it by performing the following steps: -
Log in as Coordinator. -
Open the Management / Content Sources Web Folder of your workspace. -
Click Additional Settings. -
Select the Rules tab. -
Click Site Path to open the Site Paths dialog. -
Click New. -
Enter the path that resembles the content source. To apply the site path to all items of that content source, the path should end with the * wildcard. If your content source pointed to a document, substitute the document name with *. For example, for a content source http://www.microsoft.com/sharepoint/portalserver.asp, use http://www.microsoft.com/sharepoint/*. -
Select Include this path; the Options button will be enabled. -
Click Options to open the Options dialog. -
Click Account. -
Specify the account information: Type the domain, account (user name), and password, and confirm the password by typing it again. -
Select the appropriate authentication method. For remote Web sites, you likely need to select Basic Authentication. -
Click OK to leave the Options dialog. -
Click OK to leave the Site Paths dialog. -
Click No in the Index Update Required dialog, as you do not know which specific content source needs to be updated. -
Click OK to leave the Additional Settings dialog. -
Right-click in the Web folder on the content source for which you created the site access account. -
Select Start Full Update. NOTE Site Paths Accounts allow you to index information that resides in a different, untrusted domain. By default the credentials of the default content access account are used and passed using the secure integrated Windows authentication method. For information in an untrusted account, however, you need to use basic authentication unless you can use an identical username and password in each domain.
| 