| SharePoint Portal Server crawls or reads through content to create an index of the content. In this way, searches for content requested by the portal's end- user community yield results outside of the content physically residing on the portal. The crawling process includes or touches upon the following SharePoint Portal Server resources or capabilities: -
Content sources -
Crawling -
Building an index -
Searching Each of these is covered in greater detail in the following sections. As you read through these next few sections, keep in mind the goal of crawlingto facilitate searching. Content and Content Sources Content is the phenomenal collection of data that organizations struggle to manage and publish. Microsoft has developed a number of products over the years that address content managementSharePoint Portal Server and Content Management Server are just two examples. In SPS's case, content may include any information stored in almost any file share, Web share, Exchange 5.5 or Exchange 2000 public folder, Lotus Notes databases, or other SPS workspace. It is indexed, stored, and made accessible via a Web browser, Microsoft Office 2000/XP, or the Windows Explorer. Content also refers to information that is of value to a particular audience or end-user community, whether a department in an organization or an entire corporation. This content that the corporate portal crawls and indexes is created and maintained by subject-matter experts within the organization, folks with the goal of sharing their content with other folks who presumably require access to the content for any number of business and other reasons. A content source, on the other hand, is a starting point that SharePoint Portal Server leverages to build an index of documents stored in a precise location outside the workspace. These documents are then available for users to search for and view via the dashboard site. Content sources are added to the workspace, and include Web links, file shares, Exchange Server 5.5 public folders, Exchange 2000 public folders, Lotus Notes databases, and other SPS workspace Web folders. The next few pages detail how to generically add or crawl content sources, and then specifically how to configure SPS to crawl each of the content sources listed previously. Adding a Content Source The first steps to enabling crawling are to define and then add content sources to be crawled by SharePoint Portal Server. This is accomplished by using the Add Content Source Wizard: -
Determine the content source to be added. -
Select the content type to be included in the index (such as one of the content sources described previously). -
Open the Management folder, and then open the Content Sources folder. -
Double-click Add Content Source. -
The Add Content Source Wizard opens. Follow the on-screen instructions to complete the wizard. First, provide a path an address or URLthat guides SharePoint Portal Server to the content to be crawled. Then, address any other details like scheduling index updates, creating search scopes for use with content sources, and creating rules for the content to be included in the index. -
At this point, SharePoint Portal Server places the new content source in the Content Sources folder, thereby making the source available for users to search for and view on the dashboard site.  | If you experience general problems with crawling content sources, see "Troubleshooting Crawling a Content Source" in the "Troubleshooting" section at the end of the chapter . | Configuring SPS to Crawl Web Links Configuring SharePoint Portal Server to crawl Web links is perhaps the simplest crawling to compose. To do this is simply a matter of adding a content source that points to a Web site or Web page, by providing an address or URL for the site or page to be accessed. For example, enter the path http://www.hp.com/. TIP To crawl Web links, note that no specific configuration is required in SharePoint Server Administration (this is very different from the work required to set up crawling Exchange 5.5 or Lotus Notes content sources, described later).
| | If you have problems crawling a Web site that has successfully been crawled in the past, see "Failure in Crawling a Web Site" in the "Troubleshooting" section at the end of the chapter. | Configuring SPS to Crawl File Shares Like configuring SPS to crawl Web links, crawling file shares is also a straightforward process. To add a content source for a file system or folder, simply provide the path to the location of the file or folder to be accessed, such as //server/share/page.htm or \\server\share\folder. CAUTION When creating a file share content source, do not specify a local or a mapped address, like C:\My Documents\mydoc.doc. Content sources that point to a file share must specify a path that follows universal naming convention (UNC), such as \\server\share or http://server/share. If you specify a local address, SharePoint Portal Server looks on that user's local drive C: for the document, rather than the drive C: from which the content source was created.
Using SharePoint Portal Server Administration Unlike crawling Web sites or file shares, SharePoint Portal Server must be specifically configured to crawl Exchange Server 5.5 public folders or Lotus Notes content sources. This configuration is performed via SharePoint Portal Server Administration. To access this utility from a SharePoint Portal Server machine -
Click the Start button. -
Click Programs. -
Click Administrative Tools. -
Click SharePoint Portal Server Administration. -
At this point, the utility starts and displays the Console Root. Find the SPS server icon to be configured for crawling an Exchange 5.5 or Lotus Notes content source, and highlight it by clicking it once. -
Finally, right-click this icon, and click Propertiesfrom here, a number of tabs and options are presented. See Figure 18.1. We will discuss these tabs, and the configuration options that are presented, throughout this chapter. Figure 18.1. SharePoint Portal Server propertiesin this case, we are drilling down into the SharePoint Portal Server named "SPS." 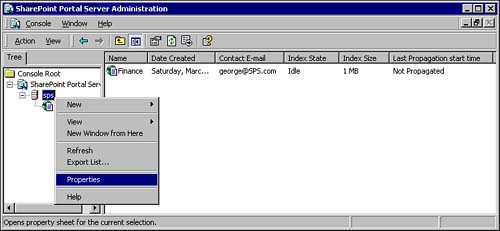 Crawling Exchange Server 5.5 Public Folders To add a content source for an Exchange Server 5.5 public folder, the location of the public folder must be provided. An example of an Exchange 5.5 public folder address is http://server/Public/Public_Folders. To specify the Exchange 5.5 server to crawl, open up SharePoint Server Administration, and -
In the console tree, select the server from which you want to crawl Exchange public folders. -
On the Action menu, click Properties (or right-click the server name , and then select Properties on the shortcut menu). -
Click the Exchange 5.5 tab. -
Ensure that the Enable Exchange 5.5 Crawl check box is selected. -
In the Exchange server name field, type the name of the Exchange server that contains the public folder which you want SharePoint Portal Server to crawl. -
In the Exchange server site name field, type the name of the Exchange server site that contains the public folder which you want SharePoint Portal Server to crawl. -
In the Exchange server organization name field, type the name of the Exchange server organization that contains the public folder which you want SharePoint Portal Server to crawl. -
Click Apply. SPS only crawls public folder messages and contents of any attachments with supported filters. SharePoint Portal Server includes filters for Microsoft Office documents, HTML files, Tagged Image File Format (TIFF) files, and text files. CAUTION Private Exchange mailboxes, personal folders, and public favorites folders are not crawled.
To enable users to access information in Exchange 5.5 public folders, the Outlook Web Access Server (OWA) must be specified. OWA enables users to access Exchange server information from any Web browser. The OWA server can be a dedicated server, or it can be an Exchange server with OWA enabled. The OWA server does not need to be the same server specified in the Exchange server name box. To specify the OWA server, refer to the following figure and steps: -
In the console tree, select the server from which you want to crawl Exchange 5.5 public folders. -
On the Action menu, click Properties (or right-click the server name, and then select Properties on the shortcut menu). -
Click the Exchange 5.5 tab. -
Verify that the Enable Exchange 5.5 Crawl check box is selected. -
In the Outlook Web Access server name field, type the name of the OWA server/name of the OWA-enabled Exchange server. -
Click Apply. Figure 18.2. SharePoint Portal Server properties, completing the Exchange 5.5 tab's Outlook Web Access server name field. 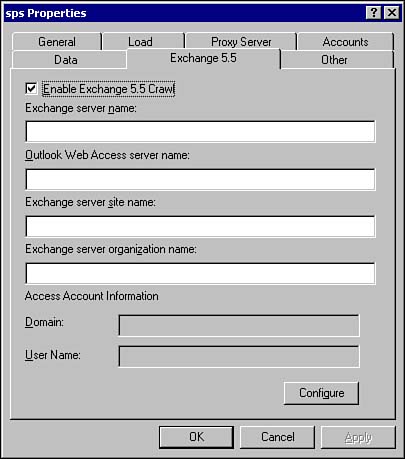 | | If you run into issues crawling Exchange 5.5, see "Exchange 5.5 Content Source Crawling Issues" in the "Troubleshooting" section at the end of the chapter . | Crawling Exchange 2000 Public Folders Given the use of the Web Storage System, or WSS, in Exchange 2000, crawling Exchange 2000 public folders is nearly as simple as crawling Web sites. For example, assume that you want to crawl a folder named http://server/Public/Public Folders/Some Folder. To add a content source for an Exchange 2000 public folder, simply provide the location of the public folder. CAUTION The default Number of seconds to wait for request acknowledgement under the Load tab is 20 seconds, which may not be enough time for SPS to effectively crawl Exchange and other large content sources. Microsoft recommends that this wait time setting be modified to 60 seconds in such cases, allowing enough time for SPS to index the public folders of Exchange servers that might be quite busy during certain times of the day. See Figure 18.3 for clarification . Figure 18.3. From the SharePoint Portal Server properties, modify the Load tab parameter indicating the number of seconds to wait for request acknowledgement here. 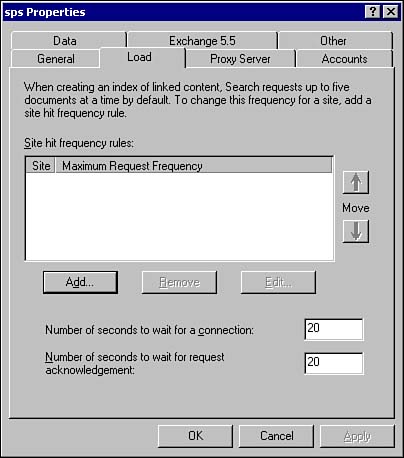
Configuring SPS to Crawl Lotus Notes Databases Both Lotus Domino 4.6a and R5 may be crawled. SharePoint does not differentiate between .NSF file types, regardless of the type of database, email or otherwise . However, the process to crawl these content sources is a bit more complex than other content sources. -
First, the Lotus Notes client must be installed on the SharePoint Portal Server. -
The server must be configured with the NotesSetup utility before content sources based on Lotus Notes databases may be added. -
To actually add a content source for a Lotus Notes database, the name of the database and the address of the database server to be accessed must be provided. An example of such a database might be data1.nsf, and an address might look like //lotusnoteserver. -
SharePoint Portal Server cannot crawl the database until the Lotus Notes protocol handler is finally configured. The protocol handler is simply a tool used to map property types between SPS and Lotus Notes. The protocol handler supports both number and text property types, and resolves numeric and string types to these two types. When a content source for SPS is mapped to Lotus Notes, the property type for each Notes property is displayed, whereas the property type for each SharePoint Portal Server property is not. Before the Lotus Notes protocol handler may be configured, though, the following must be addressed: -
SharePoint Portal Server must be installed on the computer. -
A Lotus Notes server, version 4.6a or R5, must be available on the network. TIP Ensure that the Lotus Notes server computer name does not contain a space. SharePoint Portal Server cannot crawl a Lotus Notes server that contains a space in its name.
-
A Lotus Notes client must be installed (and tested for connectivity to the Lotus Notes server) on the same server as SharePoint Portal Serverthis must occur prior to configuring the protocol handler. Once the protocol handler is configured, Web folders may be edited to create a content source for the Lotus Notes database. At that time, an index could also be created to include the database. Again, note that once the content source for Lotus Notes is created, and SharePoint Portal Server properties are mapped to Notes properties, only the property type for each Notes property is subsequently displayedthe property type for each SharePoint Portal Server property is not displayed. CAUTION If the user maps a number to a string (or a string to a number), no error message displays.
The Lotus Notes Security Model When SharePoint Portal Server creates an index of content stored on a Lotus Notes server, it uses the security settings for each Notes object to re-create security settings for that object in SharePoint Portal Server. This is done by using the Windows 2000 security model, not Notes' security. The Lotus Notes security model differs significantly from Windows 2000. To maintain a secure content source while maintaining the security settings of the Notes database, user names must be set up to map one-for-one every Notes user name to a Windows 2000 user name. If this level of security is not required of the content residing in the Notes database, the protocol handler may be configured differently. That is, the security settings of the Notes database may be ignored if everyone who has access to the index created by SharePoint Portal Server also has access to the content stored in the Notes database.  For details on planning and managing security in an SPS environment, including that related to Lotus Notes, see "Lotus Notes Servers," p. 289. For details on planning and managing security in an SPS environment, including that related to Lotus Notes, see "Lotus Notes Servers," p. 289. TIP If Lotus Notes security is "ignored," SharePoint Portal Server will actually perform a bit faster than otherwise during index creation and searching. In this case, SharePoint Portal Server also requires less time to configure because there is no need to map user names between Notes and Windows 2000, too.
CAUTION The extra bit of performance gained in lieu of ignoring Lotus Notes security is asinine if the result compromises data that should otherwise be secured. Understand the security requirements of your data before determining security configurations!
Creating a Lotus Notes View If security is a consideration, and therefore Lotus Notes user names must be mapped to Windows 2000 user names, a shared view is essential. This is a job of the Lotus Notes administrator, who not only creates the user names, but also formats the Notes user names and ensures that the view is sorted on the Notes user name column. CAUTION The view must be registered as a Shared View so that all clients can access it. Similarly, the database upon which this view is built contains the security mappings and should be protected accordingly . However, it must be accessible to the SharePoint Portal Server administrator.
Configuring the Lotus Notes Protocol Handler Determine the following before the protocol handler is configured: -
Location of the notes.ini file on SharePoint Portal Server. The full path name is required, for example. E:\lotus\domino\notes.ini. -
Location of the Lotus Notes installation directory on the SharePoint Portal Server computer, plus the full path name again (for example, E:\lotus\domino\notes). -
Notes user password (used by the default Notes account on the Notes client), and the protocol handler, to access the Notes server by impersonating the Notes user. Parenthetically, no password is required if the Notes user does not need a password to access the Notes server from the Notes client. -
To honor the security settings of the Notes database, SharePoint Portal Server must also contend with the following: Name of the Notes server with the view mapping the Notes user names to Windows user names. Name of the Notes database file that contains the view. Name of the view itself. Name of the columns in the view that map Notes to Windows user names. At this point, now that Lotus Notes has been prepared for use with SPS, the protocol handler needs to be configured: -
Execute the Lotus Notes Index Setup Wizardin the console tree, select the server for which you want to install the Notes Protocol Handler. -
In the Action menu, click Properties (or right-click the server name, and then select Properties on the shortcut menu). -
Click the Other tab. -
Click the Run Wizard button, as displayed in Figure 18.4the Lotus Notes Index Setup Wizard is displayed. Figure 18.4. The importance of running the Lotus Notes Index Setup Wizard prior to creating Notes content sources is clearly illustrated here.  -
Click Next. -
On the Register Lotus Notes For Use With Microsoft SharePoint Portal Server page, verify the following: Location of the notes.ini file (if necessary, type it in, such as E:\lotus\domino\notes.ini). Location of the Notes installation (if necessary, type it in, such as E:\lotus\domino\notes) . -
Type the Notes user password in the Password box, and then confirm it via Confirm Password. -
If you wish to ignore the security settings of the Notes database, select the option to Ignore Lotus Notes security. -
Click Next. -
On the Specify Lotus Notes Owner Field to Windows User Name Mapping page: Enter the name of the Notes server in the Lotus Notes server name box. This represents the Notes server hosting the Notes-to-Windows NT mapping. Enter the Notes database file namenote that the database file ends in .nsf. Enter the name of the view in View name. This is the name of the view that contains the Notes and Windows NT ID columns. Enter the name of the Notes ID column in Lotus Notes field name column title. This is the title of the column in the view. Enter the name of the Windows user name column in the Windows user name column title. Click Next. Finally, at the Completing the Lotus Notes Index Setup Wizard page, click Finish. CAUTION If the wizard fails, the MSSearch Service must be stopped and started again prior to rerunning the wizard. Also note that troubleshooting issues may be complicated by the fact that the wizard will display only one error message, regardless of the number of actual errors generated.
Crawling Other SPS Workspaces SharePoint Portal Server may crawl workspaces external to the local workspace. To add a content source for a Web folder that is external to your workspace, simply provide the location of the Web folder, such as http://server/workspace/folder. CAUTION You may only add content sources that point to Web folders which are external to the workspace in which you are currently working. That is, you cannot add a content source to crawl the same workspace that contains the content source, and by the same token, you cannot add a content source in the current workspace that points to the same workspace.
Crawling Without a Proxy Server As we have seen, SharePoint Portal Server can be configured to crawl a variety of content sources. In some cases, it might be advantageous to set up an external Web site crawl so that a proxy server is not required. SharePoint Portal Server can create indexes of external sites if another means of access to these sites is available, such as remote Winsock. To configure SPS to not use a proxy server -
In the console tree, select the server to be configured to not use a proxy server. -
In the Action menu, click Properties (or right-click the server name, and then select Properties on the shortcut menu). -
Click the Proxy Server tab. -
Click Do not connect using a proxy server. -
Click Apply. It's that easy! Figure 18.5. Click the Proxy Server tab in Server Properties to change, configure, or disable the use of a proxy server. 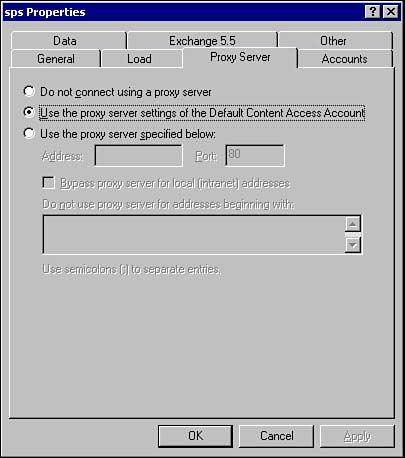 | | For those of you running into problems configuring crawling with a proxy server in place, see "Proxy Server Issues" in the "Troubleshooting" section at the end of the chapter . | Building an Index via Crawled Content Now that we have seen how to crawl various content sources, we are back on track looking at the end-to-end process. At this point, we will assume that all of the crawls we have performed have created or updated one or more of our workplace indexes. Back when we initially created our SPS workspace, SharePoint Portal Server automatically created an index for that workspace. When we added documents to the workspace or modified existing documents, SharePoint Portal Server modified the index to include the changes. When we added content sources or changed their settings, we then crawled the content sources to update the index. TIP Indexes may also be updated manually by using SharePoint Portal Server Administration via the Microsoft Management Console (MMC), or by using Web folders. Indexes may also be updated automatically by sending notifications (available only for file shares located on an NTFS partition of a server running Windows NT 4.0 or 2000) .
The actual process employed by SharePoint Portal Server to add a document in an index is accomplished by For additional information regarding word breaking, see "Word Breaking", p. 114 . Leveraging the Work of Crawling by Searching After indexes are created, SharePoint Portal Server may then be used to search for content. Ultimately, this is what crawling is all aboutfacilitating end-user searching. To do so, the dashboard site (like the initial workspace index, also created automatically upon installing SPS) is most often employed. The content being searched may reside in the current workspace, or it may reside outside of the workspace and linked to it by a content source. The culmination of the search provides us with "search results". As end users become more knowledgeable regarding the content that they are searching, their searches will naturally become more pointed and narrow. In this way, users will enjoy faster response times as they specify better search criteria that ultimately thins the search results.  |
