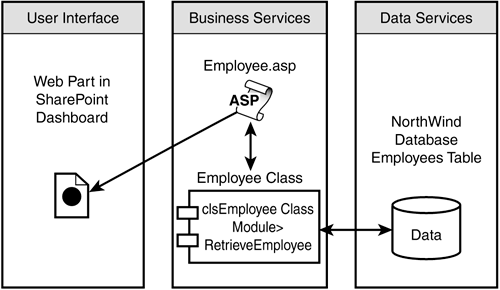
| In the first version of the Employee Locator Web Part, you saw how we can retrieve data from a SQL Server database, save it in an offline form in an XML file, and transform it into an HTML format using an XSL file. In the second version, we used the same approach for representing employee information, but with real-time access to the SQL Server database using an ADO stream object. Both versions showed how the data is separated from the interface, which makes the code much easier to follow and more reusable. As you saw in the second version, we changed the logic of data retrieval without changing the XSL file that is responsible for reformatting XML into HTML. In spite of the separation of data and the interface, both versions use a two- tier model. However perfect this approach might be for these examples, it would be difficult to manage if we had a more complex set of business rules. Business rules are usually dynamic. For example, we may want to show only employee information based on specific criteria. In the third version, we extend the concept of code reusability by applying a three-tiered model and use of components . In this version, we add a middle tier that can host business rules. Now let's look at a logical diagram of a three-tier model. As you can see in Figure 15.11, there are three tiers, layers , or services. The first layer is the user interface that will be shown in the Web Part as HTML. The second tier is where business logic resides, and is called the business layer; in this layer, the Employee3.vbs file communicates with the VB component (clsEmployee class) by passing required parameters. The VB component connects to the database and retrieves data from the employee database, located in the third tier, the data tier. Figure 15.11. A logical diagram of a three-tier model.  In Employee Locator Web Part 3, we move the logic of data retrieval into a data component and we call it clsEmployee. Listing 15.6 A Code Segment That Will Be Moved to the Employee Class strSQL = " select EmployeeID, LastName, FirstName, HomePhone, email from Employees " set rs = CreateObject ("ADODB.RECORDSET") rs.CursorLocation = adUseClient rs.Open strSQL, strConnection, adOpenKeyset, adLockOptimistic set oStream = CreateObject ("ADODB.STREAM") rs.Save oStream, adPersistXML strRst = oStream.ReadText(adReadAll) Let's go through each step in detail and look at the code. I will explain what happens in each part. Creating the VB Component To create the VB component, we use Visual Basic 6 to create a new ActiveX DLL project. Then we create a new class (clsEmployee) with a public method (RetrieveEmployee) . Listing 15.7 The RetrieveEmployee Function That Captures Employee Table Data into a Stream Object Public Function RetrieveEmployee(ByVal strConnection As String) As String Dim strSQL As String Dim oConn As New ADODB.Connection Dim rs As New ADODB.Recordset Dim oStream As New ADODB.Stream strSQL = " select EmployeeID, LastName, FirstName, HomePhone, email from Employees " rs.CursorLocation = adUseClient rs.Open strSQL, strConnection, adOpenKeyset, adLockOptimistic rs.Save oStream, adPersistXML RetrieveEmployee = oStream.ReadText(adReadAll) End Function Finally, we create the employee.dll file by selecting File from the top menu bar and then clicking on Make employee.dll. We have finished the VB component. Now we can create an Active Server page or a VBScript file to call the VB component. In this example, we modify the VBScript code that we used for Employee Locator 2, and replace the code segment for data retrieval with the Employee component. The final code is shown in Listing 15.8. Listing 15.8 The VBScript code That Generates Employee Table Data into an XML DOMDocument Object and Applies XSL for Transformation into HTML Option Explicit Dim strConnection Dim oEmployee Dim strRst Dim xmlBody Dim displayweb Dim strBody strConnection = "Provider=SQLOLEDB;Data Source=dianatr;Initial Catalog=NorthWind;User  Id=sa;Password=;Connect Timeout=30;" Set oEmployee = CreateObject("Employee.clsEmployee") strRst = oEmployee.RetrieveEmployee (strConnection) Set xmlBody = CreateObject("MSXML2.domdocument") xmlBody.async = False xmlBody.LoadXML strRst Set displayWeb = CreateObject("MSXML2.domdocument") displayWeb.async = False displayWeb.Load "e:\projects\SPSbook\employee1.xsl" strBody = xmlBody.transformNode(displayWeb) Id=sa;Password=;Connect Timeout=30;" Set oEmployee = CreateObject("Employee.clsEmployee") strRst = oEmployee.RetrieveEmployee (strConnection) Set xmlBody = CreateObject("MSXML2.domdocument") xmlBody.async = False xmlBody.LoadXML strRst Set displayWeb = CreateObject("MSXML2.domdocument") displayWeb.async = False displayWeb.Load "e:\projects\SPSbook\employee1.xsl" strBody = xmlBody.transformNode(displayWeb) To make the third version of the Employee Locator Web Part, we follow the same steps for creating the Employee Locator 2 Web Part. We select VBScript for Content Type, and insert the previous code in the Embedded Content text area box, in the Advanced Settings section of New Part “ Settings .  |