Developing with the Security Application Block
| The previous section covered the Security Application Block's various design features and how each of these features can be extended. Of all the application blocks, the Security Application Block probably has the most features that can be used in isolation of other features in a block. For example, using an AuthorizationProvider does not require that an AuthorizationProvider, RoleProvider, or ProfileProvider be used. Likewise, using any of the other providers does not require the AuthenticationProvider. Using these providers is straightforwardthat was the primary design goal for the Security Application Block. The previous section showed how the features of the Security Application Block work "under the covers" and how they have been designed for easy extension. This section details how to use those features by configuring and developing against the Security Application Block. The Security Database Administration ConsoleThe DbAuthenticationProvider, DbRolesProvider, and DbProfileProvider depend on the existence of the Security Application Block's Security Database. These providers aren't of much use if there is no data in the database for them to retrieve. The Security Database Administration Console is provided with Enterprise Library to facilitate the creation, modification, and removal of users and roles from the Security Database. Sometimes you will need to modify the configuration of the Security Database Administration Console because it must use different databases, database servers, or hashing algorithms. For example, the default configuration for the Security Database Administration Console is to look for the Security Database on the local computer. However, this is typically not how it will be used in an enterprise environment. You can use the Enterprise Library Configuration Tool to configure the Security Database Administration Console just like any other application that uses Enterprise Library. You modify the database information by changing the properties for the DatabaseInstance for which the relevant DbAuthenticationProvider is configured. Figure 7.18 shows how this DbAuthenticationProvider relates to a hash provider in the Cryptography Application Block and a DatabaseInstance in the Data Access Application Block. It also shows that changing the server for the database that is used for this provider equates to changing the value for the server parameter in the Data Access Application Block. Figure 7.18. Configuration for the Security Database Administration Console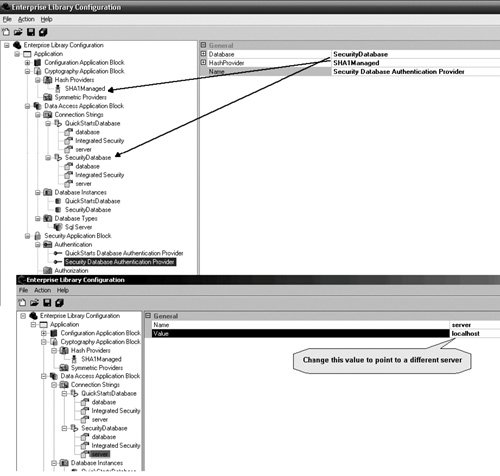 Note that Figure 7.18 does not contain any defined RoleProviders. Another important point about the Security Database Administration Console is that it assumes the Users and Roles tables will exist in the same database. Therefore, the tool uses the database connection information obtained from the DatabaseInstance defined for the AuthenticationProvider to get information about roles. Because both users and roles are assumed to be in the same database, the tool cannot be used to manage users in one database and roles in another. If this need exists in your organization, you will need to modify the tool (or create your own). After the AuthenticationProvider for the Security Database Administration Console is pointing at the proper database, the tool can be used to manage users and roles in the Security Database. The first task when managing the users and roles is to select the AuthenticationProvider that will be used. The details for the AuthenticationProvider are core to the way this tool will store information about the users. Not only is its DatabaseInstance used to determine which database to use to store the user and role information, but its HashProvider is also used to hash the passwords for the users in the database. This is extremely important, because an application that uses the DbAuthenticationProvider configured for this same Security Database must also be configured to use the same hashing algorithm. Failure to do this will result in failed authentication for all users. Adding, modifying, and removing roles and users is accomplished using the buttons at the bottom of the toolNew Role, Edit Role, Delete Role, New User, Edit User, and Delete User. Creating or modifying a user involves creating or modifying the password for that user, respectively. The arrow buttons in the middle of the tool are used to add users to and remove users from a role. To add a user to a role, select the role from the Roles drop-down box, select the user to add in the list box on the right, and click the top button (<<<). To remove a user from a role, select the user in the list box on the left and click the bottom button (>>>). Figure 7.19 shows this tool and how the password for a user can be modified using this tool. Figure 7.19. The Security Database Administration Console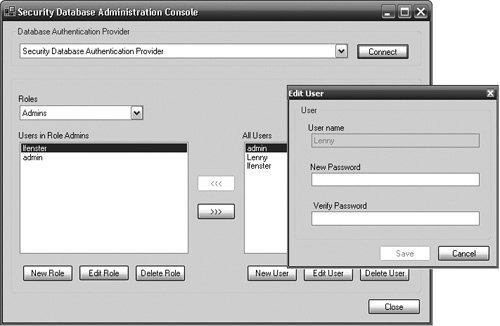 The Security Database Administration Tool uses the UserRoleManager class to accomplish these administrative activities. Because of this, the UserRoleManager contains many administrative functions that parallel the features of the Security Database Administration Tool. Table 7.4 lists these methods.
This class is available to applications outside of the Security Database Administration Tool. It is a public class that ships with the Security Application Block and can be used in any application to perform the same type of administrative functionality. However, unlike most of the other classes that are covered in this book, this class does not subscribe to the Provider pattern. If this class is used in an application, that application will be coupled to the Security Database schema in the same way that the Security Database Administration Tool is. Therefore, a best practice for using this class is to create a façade that hides its specific use. In this way, if this UserRoleManager must be replaced by a different class, only the code in the façade needs to change. For example, in a portal application that includes administrative functions for adding users, roles, and so on, such a class might begin like the code shown in Listing 7.11. Listing 7.11. Sample Code for Creating a Façade Around the UserRoleManager class
AuthenticationConfiguring an AuthenticationProvider starts with right-clicking on the Authentication node, selecting New, and then selecting the AuthenticationProvider. As illustrated in Figure 7.20, Enterprise Library ships with the Custom AuthenticationProvider and Database AuthenticationProvider. (You'll also see that the custom Active Directory AuthenticationProvider created earlier in this chapter also exists in Figure 7.20; I deployed this provider to the same directory as the Configuration Tool when I created it.) Figure 7.20. Configuring a Database AuthenticationProvider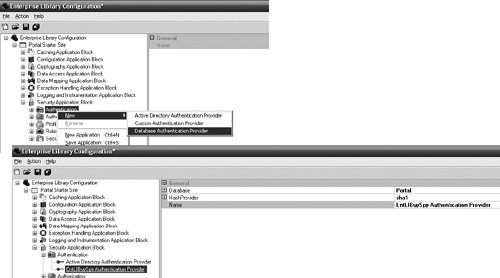 Figure 7.18 illustrated how the properties for a DbAuthenticationProvider relate back to settings in the Data Access Application Block and the Cryptography Application Block. The Data Access Application Block and Cryptography Application Block should be added to the configuration prior to configuring the Database AuthenticationProvider. A DatabaseInstance should be configured in the Data Access Application Block for the database where the user information will be kept. Often this will be the Security Database; however, in Figure 7.20 the Portal database was used. To accomplish this, the SQL script that creates the Security Database was simply modified to point to the Portal database so that the user and role information can be kept with the other application data for this Portal application. A HashProvider was also added and configured in the Cryptography Application Block so the Database AuthenticationProvider can compare password hashes when authenticating a user. (For more information about creating and configuring DatabaseInstances and HashProviders, see Chapters 1 and 8, respectively.) Configuring any of the custom providers consists of selecting the type of provider for the TypeName property and adding any necessary items to the Extensions dictionary property. For example, if a custom AuthenticationProvider existed that needed information like an AccountName to authenticate a user, that information would have to be added to the Extensions Dictionary and referenced from that same dictionary in the provider implementation. Figure 7.21 shows how to add configuration data to the Extensions property for a custom AuthenticationProvider. Figure 7.21. Configuring a Custom AuthenticationProvider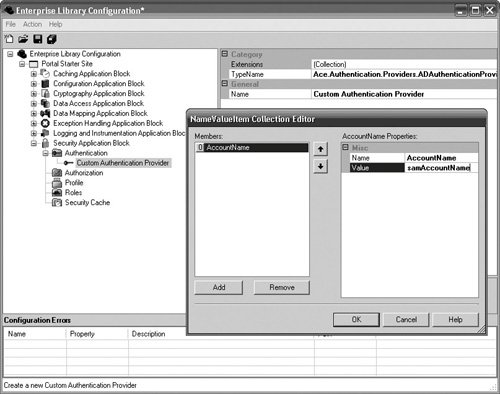 The first step to authenticating an entity with the Security Application Block involves using the AuthenticationFactory to create an AuthenticationProvider. There are two ways to retrieve an AuthenticationProvider: retrieve the default AuthenticationProvider or retrieve one by name. To retrieve the default AuthenticationProvider, call the AuthenticationFactory's static GetAuthenticationProvider method with no arguments. To retrieve a specific AuthenticationProvider, the name of the provider must be supplied to the GetAuthenticationProvider method. Using the same methods for an instance of the AuthenticationProviderFactory is an alternative to the static methods of the AuthenticationFactory, since the AuthenticationFactory just passes through to an instance of the AuthenticationProviderFactory. Once an AuthenticationProvider has been obtained, the only method that needs to be called to accomplish authentication is Authenticate.Authenticate accepts two parameters: the first one is an object like NamePasswordCredential that contains the information the provider needs to authenticate the user. Note that it accepts an object and not a specific type of credential. This was intentional. The type of credential that is used is an unenforced part of the AuthenticationProvider's contract. It was made an object to support other types of credentials, but the cost of this is a weaker interface that won't guarantee portability. The second parameter, an out parameter, is used to obtain the Identity for the user when the Authenticate method succeeds. Listing 7.12 populates the NamePasswordCredential class that is included as part of the Security Application Block with the name and password for a user who has logged onto the Portalsite and then passes this to the Authenticate method of the default AuthenticationProvider. Listing 7.12. Using the Authenticate Method
The Security CacheOnce an entity has been authenticated, its Identity, Profile, and Principal can be cached so the application does not need to go back to the authentication store for every authentication request. The Security Application Block supplies an interface for caching security information and a provider, the CachingStoreProvider (refer back to Figure 7.5), which implements this interface by leveraging the Caching Application Block for its cache. To use this provider, you must first configure the Caching Application Block for an application. Figure 7.22 shows a CachingStoreProvider that has been added as a Security Cache to the configuration for the Portal site, and its cache has been set equal to the CredentialCache, which was already created in the Caching Application Block's configuration. Figure 7.22. Configuring the Security Cache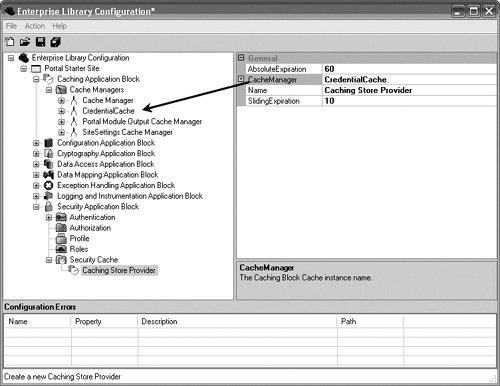 A token (typically a Guid) is returned when an Identity, Principal, or Profile are saved in the Security Cache. The token is the key for the items in the cache and can be used to keep an entity's identity, principal, and profile information together. The ISecurityCacheProvider interface provides methods that make it straightforward to save, retrieve, and remove Identities, Principals, and Profiles from the cache. The SaveIdentity MethodThe SaveIdentity method allows the IIdentity for an authenticated user to be saved to the Security Cache and represented by a temporary security token. The SecurityCacheProvider that Enterprise Library ships with the CachingStoreProvider represents the token as a Guid; however, a custom SecurityCacheProvider can return tokens that are not Guids. Storing an IIdentity in cache involves obtaining the SecurityCache-Provider and calling its SaveIdentity method. Listing 7.13 shows this. Listing 7.13. Calling SecurityCacheProvider.SaveIdentity
When no token is supplied to the SaveIdentity method, the SecurityCacheProvider must create a token. Alternatively, a token can be supplied with the Identity when it is being saved, as shown in Listing 7.14. Listing 7.14. Supplying a Token with the SaveIdentity Method
The GetIdentity MethodOnce an identity has been stored in the Security Cache, the token that represents that user can be employed for any future authentication requests instead of requiring the authentication against the user store every time. The IIdentity can be retrieved by calling GetIdentity on the SecurityCacheProvider. You can use the IIdentity's IsAuthenticated property to determine whether the user has been authenticated. Listing 7.15 shows how to call the GetIdentity method. Listing 7.15. Calling SecurityCacheProvider.GetIdentity
The ExpireIdentity MethodUnder normal conditions, the items (Identity in this case) in the cache will expire according to the sliding time or absolute time expirations that are set. Figure 7.22 shows an absolute expiration of 60 minutes and a sliding time expiration of 10 minutes. In this example, if the identity is not explicitly expired from the cache, it will be expired after 60 minutes or if there is no activity for 10 minutes. However, in cases where a user logs off from a site or exits the application, it is probable that the identity should be explicitly expired from the cache. In such a case, the ExpireIdentity can be called with the token that represents the user to expire from the Security Cache. Listing 7.16 shows how to call the ExpireIdentity method. Listing 7.16. Calling SecurityCacheProvider.ExpireIdentity
The SavePrincipal MethodThe SavePrincipal method is similar to the SaveIdentity method except that it allows the user's IPrincipal to be stored instead of the IIdentity. If the token from a previous SaveIdentity method is also passed to the SavePrincipal method, the CachingStoreProvider will keep the Identity and the Principal together as one item. Listing 7.17 gets a user's Principal from a RolesProvider (via the PortalSecurity façade) and saves it in the Security Cache. Listing 7.17. Calling SecurityCacheProvider.SavePrincipal
The GetPrincipal MethodThe GetPrincipal method is similar to the GetIdentity method except that it returns an IPrincipal instead of an IIdentity. The code in Listing 7.18 sets the IPrincipal for the current user on a portal site from the Security Cache. Listing 7.18. Calling SecurityCacheProvider.GetPrincipal
The ExpirePrincipal MethodExpiring a Principal from the Security Cache can be useful for all the same reasons that expiring an Identity makes sense. You can use the ExpirePrincipal method to remove a Principal from the Security Cache. Listing 7.19 shows how to expire a Principal from the cache. Listing 7.19. Calling SecurityCacheProvider.ExpirePrincipal
The SaveProfile MethodYou can use the SaveProfile method to store profile information in the cache. It can be stored by itself, or a previously acquired token from a SaveIdentity or SavePrincipal call can be used to keep the Profile information with the Identity or Principal. The SaveProfile method expects a serializable object as the Profile information. Listing 7.20 expands on the code for the SavePrincipal method in Listing 7.17 by saving the Profile information with the Principal in the Security Cache. The Profile information is retrieved from a ProfileProvider (via the PortalSecurity façade) and passed to the CachingStoreProvider using the token from the SavePrincipal call. Listing 7.20. Calling SecurityCacheProvider.SaveProfile
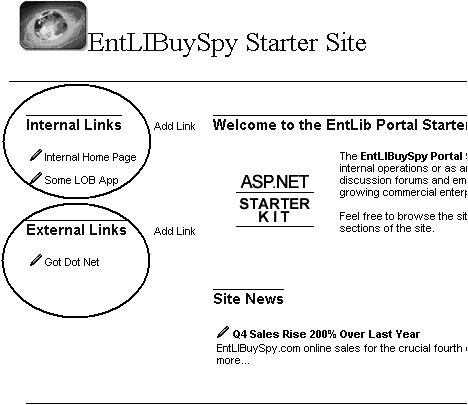
For this to be successful, the PortalProfile object must be serializable. In Listing 7.10, I created a PortalProfile object that was represented as a typed DataSet. This works because DataSets are serializable. An example of some profile information may be maintaining separate sets of favorite hyperlinks for internal sites and external sites in an enterprise portal application, like that shown in Figure 7.23. Figure 7.23. Using Profiles to Personalize a Portal Site The GetProfile MethodThe GetProfile method is most beneficial because you can get a significant improvement in performance when obtaining an object from cache instead of accessing and deserializing an object from a database. The GetProfile method uses the token for which the Profile was saved to retrieve it from the Security Cache. Listing 7.21 gets the Profile from the Security Cache and sets it as the Profile for the current user. Listing 7.21. Getting the Profile from Cache
The ExpireProfile MethodRemoving a Profile from the Security Cache is useful for all the same reasons that expiring an Identity and Principal make sense. You can use the ExpireProfile method to remove a Profile object from the Security Cache. Listing 7.22 shows how to call this function. Listing 7.22. Removing a Profile from Cache
AuthorizationTo configure an AuthorizationProvider, right-click on the Authorization node, select New, and then select an AuthorizationProvider. Enterprise Library ships with three AuthorizationProviders: AuthorizationRuleProvider, AzManProvider (the Authorization Manager Provider), and a custom AuthorizationProvider. You may not see the AzManProvider show up on your installation. This is because it is not a certainty that every desktop will be running Authorization Manager. If you are running Authorization Manager and want to use the AzManProvider, you will need to complete a few tasks.
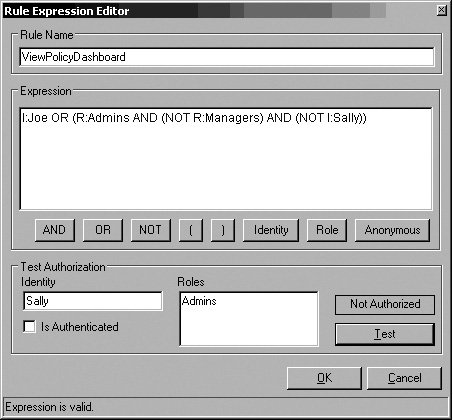
Each AuthorizationProvider has a unique set of properties that are specific to the needs of that provider. The AzManProvider's properties, as illustrated earlier in the chapter, indicate where the authorization store is located, what the name of the application is in the store, an AuditIdentifierPrefix to use when making authorization requests, and the scope, if any, in the application to narrow down the authorization request. Figure 7.24 shows how to configure the AzManProvider. Figure 7.24. Properties for Configuring the AzManProvider Configuring the AuthorizationRuleProvider, however, is much different. The AuthorizationRuleProvider maintains the information about its authorization rules with the rest of the configuration data for the Security Application Block. You can add authorization rules to use with this provider by right-clicking on the AuthorizationRulesProvider node and selecting New Rule. The name for a rule is kept in the Name property, and this is the value that is passed to the Authorize method when referring to the rule in code. Enterprise Library has a Rule Expression Editor to facilitate creating and maintaining rule expressions. It includes buttons that will automatically insert the corresponding token and a feature to test roles and identities against the configured rule expression. This is especially helpful for complex rules to ensure that the expression has been specified correctly. In Figure 7.25, the Rule Expression Editor has been configured for the rule expression example used in the first part of this chapter (i.e., I:Joe OR (R:Admins AND (NOT R:Managers) AND (NOT I:Sally))) and tested with an authenticated user with an identity of Sally that exists in the Admins role. As expected, this user would not be authorized against this rule because of the last part of the expression: (NOT I:Sally). If a syntax problem existed with the rule expression, an error message would be displayed instead. Figure 7.25. The Rule Expression Editor Configuring the custom AuthorizationProvider is just like configuring a custom AuthenticationProvider except that the TypeName property must be of a class that implements the IAuthorizationProvider interface. The Authorize MethodThe complexities of adding and modifying the relationships between users, roles, and rules to determine permission for tasks and operations is best left to the administrators of an application. The details that need to be agreed upon, however, are the names for the rules that will be created. There is only one method, Authorize, which is used to determine authorization for a specific operation or task. Authorize accepts two parameters: the Principal of the entity for which permission is being ascertained and the name of the rule that signifies the operation in question. Listing 7.23 passes the Principal for a user of the portal site and a name of a rule to the default AuthorizationProvider's Authorize method to determine if the user is authorized to execute the operation in question. Listing 7.23. Calling the Authorize Method
Configuring and Using RolesProvidersBefore an authorization request can be made for a particular operation or task, the user's Principal first needs to be obtained. It is this Principal that gets passed with the name of the rule to an AuthorizationProvider's Authorize method. The RolesFactory, RolesProviderFactory, and RolesProviders exist so that an application can be abstracted away from the location for the roles. Two RolesProviders are supplied with Enterprise Library: the DatabaseRolesProvider and the ActiveDirectoryRoles-Provider. Configuring the DatabaseRolesProvider is similar to configuring the DatabaseAuthenticationProvider. Before a DatabaseRolesProvider can be properly configured, a DatabaseInstance must exist that is configured to point to the database where the role information is kept. Typically this will be the Security Database that comes with Enterprise Library or a database that was modified by running the Security Database script. Once the data base information has been configured in the Data Access Application Block, the DatabaseRolesProvider can be added and configured to point to this DatabaseInstance. Figure 7.26 illustrates a DatabaseRolesProvider that has been configured to leverage the Portal database instance. Figure 7.26. Configuring the DatabaseRolesProvider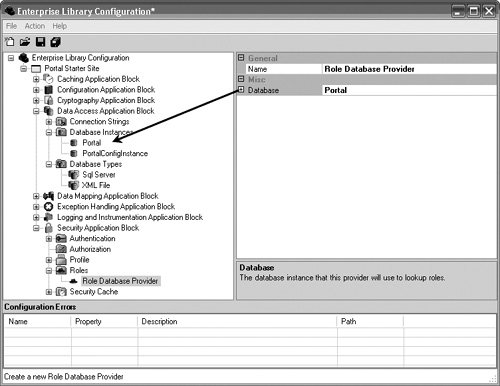 The ActiveDirectoryRolesProvider has no such dependency. When configuring the ActiveDirectoryRolesProvider, the provider needs information to allow it to properly access Active Directory to obtain the roles. This includes the name of the server hosting the Active Directory Service (Server), the provider type name for Active Directory (ProviderType), the partition in the Active Directory that contains the user objects/data (UserPartition), and the name of the field in the schema to use to find the current account name (AccountName). In the sample configuration shown in Figure 7.27, the ActiveDirectoryRolesProvider will bind to Active Directory with LDAP://MyServer:389/ CN=CompanyUsers,O=OrgDept,C=US and search for the entry where CN=<name of Identity>. The AdRolesProvider then uses the names of the groups to which the user belongs as the list of roles to populate in the Principal before it returns. Figure 7.27. Properties for the ActiveDirectoryRolesProvider The Getroles MethodThe design goals of simplicity and flexibility are accomplished by way of the single method for any RolesProvider: GeTRoles. A class that implements the IRolesProvider interface can be obtained by using either the RolesProviderFactory class directly or the wrapper RolesFactory class. Both classes allow for the default RolesProvider or a named Roles-Provider to be obtained via the GeTRolesProvider method. Once a RoleProvider is obtained, acquiring the Principal for a user is a matter of calling the GeTRoles method with that user's IIdentity. Typically, the Identity will be the same one that was retrieved from an AuthenticationProvider's Authenticate method. The code sample in Listing 7.24 gets the Principal for a user from his or her identity. Listing 7.24. Obtaining Roles for a User
Configuring and Using the ProfileProvidersYou have already seen much of the Security Application Block's profile management capabilities in the GetProfile, SaveProfile, and ExpireProfile methods for the Security Cache. Before profiles can be saved in the Security Cache, though, a profile needs to be retrieved from its permanent storage facility. The purpose of the ProfileProviderFactory, ProfileFactory, and ProfileProvider is to abstract an application away from needing to know where the profile data is kept for an application. Enterprise Library ships with the DatabaseProfileProvider, which serializes the profile data to store it in the Security Database and deserializes it when retrieving it from the Security Database. You configure the DatabaseProfileProvider the same way as configuring the DatabaseRolesProvider and the DatabaseAuthenticationProvider. This involves configuring a DatabaseInstance in the Data Access Application Block so that it points to the database where the Profile information will be kept. Then the DatabaseProfilesProvider can be added and configured to point to this DatabaseInstance. Figure 7.28 illustrates a DatabaseProfiles-Provider that has been configured to leverage the Portal database instance. Figure 7.28. Configuring the DatabaseProfileProvider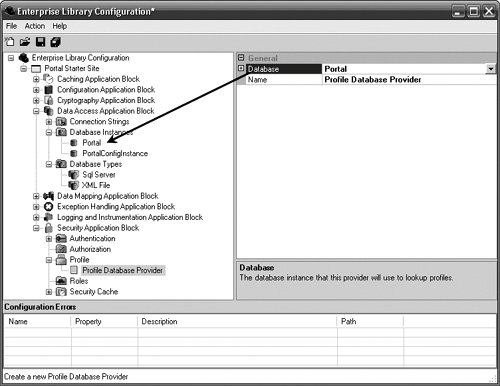 Creating a Profile ObjectIt is important to ensure that the class that is responsible for maintaining the Profile information is serializable. The DatabaseProfileProvider serializes the Profile object to binary before storing it as a Binary Large Object (BLOb) in the database. This brings up another important point to consider. By default, the field that stores the Profile information in the Security Database can hold a maximum of 4MB of data. This should be considered when designing the class that will hold the Profile information so that it doesn't store too much data. Because of this size limitation, I have created an alternate way to represent the PortalProfile information shown earlier in this chapter. Although DataSets are serializable, they also take up a lot of space when they are serialized. Therefore, I've created a PortalProfile class that is serializable and that maintains a list of serializable objects that contain information about hyperlinks in which the user is interested. By maintaining a list of lists, the user can have multiple lists for different types of hyperlinks and can store more data before reaching the size limitation. Listing 7.25 shows this PortalProfile class. Listing 7.25. PortalProfile Class
The SetProfile MethodAfter you create Profile information in an application, you can use the ProfileProvider's SetProfile method to store the Profile information in the backend store. The SetProfile method accepts two arguments: the identity of the user for which the Profile information should be associated and the actual Profile information. In Listing 7.26, the Profile information is being stored for the current user on the portal site. Listing 7.26. Storing Profiles for the Current User
The GetProfile MethodSaving the Profile information isn't of much use if there is no way to retrieve it. The GetProfile method is the obvious counterpart to the SetProfile method and is used to obtain Profile information for a user as specified by an IIdentity. For the DatabaseProfileProvider, the Profile data is retrieved from the database where the name of the user is equal to the Name property for the IIdentity that is passed into this call, and the data is deserialized back to an object instance. Listing 7.27 calls the GetProfile method for the default ProfileProvider and casts it back to a PortalProfile object. Listing 7.27. Obtaining Profile information
DefaultsDefaults can be set for all of the providers detailed in this chapter. These defaults will be used when a name is not provided in the call to get a specific provider. For example, in the GetAuthenticationProvider() call, the name of the AuthenticationProvider is not passed. In this case, the default AuthenticationProvider will be returned. The defaults for each of the security features can be configured in the Property pane of the main Security Application Block node. Figure 7.29 shows how the defaults can be set for each of the providers in the Security Application Block. Figure 7.29. Configuring the Security Application Block's Default Providers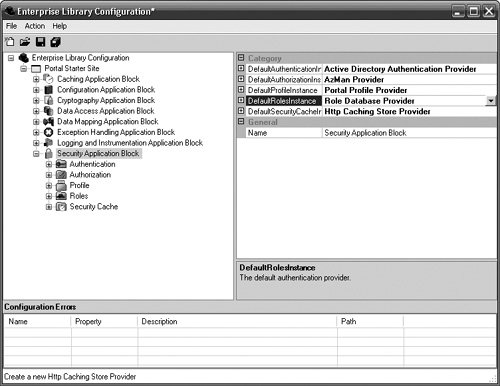 |

EAN: 2147483647
Pages: 103