| The AutoPage feature seldom formats DAP satisfactorily, so you should optimize the size and location of the fields to conform to the form design standards discussed in the chapters of Part IV, "Designing Forms and Reports." The process of resizing and moving controls on DAP, however, differs significantly from that of conventional Access forms and reports. The following are the basic procedures for resizing, relocating, and editing controls and sections of DAP: Resize an element by clicking it once to display eight sizing handles. When you pass the mouse pointer over a sizing handle, the mouse pointer changes from a pointer or an I-beam to a two-headed arrow (see Figure 24.26). Drag the arrow in the direction of the change that you want to make. Figure 24.26. Sizing page controls is similar to the methods used for form and report controls, but the sizing handles differ in appearance.  Move an element by clicking it once to select it, and then position the mouse pointer adjacent to the element, where the pointer turns into a four-headed arrow but is not positioned on a sizing handle. Drag the element to its new location. Note  | The Access 2003 DAP designer lets you multiselect and group controls if you have IE 5.5+ installed. |
Move a label independently of its associated (parent) text box by clicking and dragging it. If you click and drag a text box, the (child) label follows the movement of the text box. Note When moving a text box with a child label, move the parent text box to the desired location, and then move the label independently of the text box.
Change the caption of a label or the default text of a text box by clicking the element twice in succession once to select it and then again to edit its content. In edit mode, a diagonally hatched border surrounds the element (see Figure 24.27). Double-clicking an element opens its ObjectType: ElementName window. Figure 24.27. Editing a label element requires selecting it and then clicking it a second time to edit its content. Most control objects have a much larger number of properties than their native Access control counterparts. 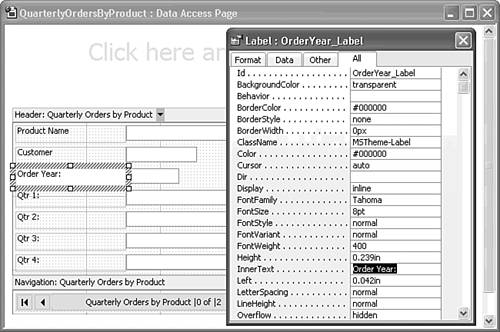 Set the font attributes and alignment of label captions and text box contents by selecting the element and clicking the appropriate button of the Format (Page) toolbar, which closely resembles the Format toolbar for Access forms and reports. Change the depth or width of a section by clicking its header to expose the section's sizing rectangles, and then drag the sizing rectangle in the appropriate direction. The minimum size of a section is the size required to encompass all its elements. Alter the property values of an element by double-clicking the element to open its ObjectName: ElementName window, which is the DAP equivalent of Access's Properties window (refer to Figure 24.27).
Note The "DOM HTML and DHTML" section earlier in the chapter noted that every element (object) of a DHTML page must have a unique Id property value. In most cases, the DAP Designer adds the Id property value, such as OrderYear_Label or Qtr1_Label, for you. Id values shouldn't include spaces or punctuation other than hyphens or underscores, so Qtr 1: shortens to Qtr1. (Some Id values created by AutoForm include spaces.)
To improve the design of your columnar AutoPage and learn to set custom page and object properties, follow these steps:  In Page Design view, a previously hidden element appears for the title of your page. The dynamic elements of the page appear in two sections: Header and Navigation. In Page Design view, a previously hidden element appears for the title of your page. The dynamic elements of the page appear in two sections: Header and Navigation.
Click the default title and type a title for the page, such as 1997 Quarterly Orders by Product. Press the down arrow key, if necessary, to move the empty text region below the title. Type a brief description of what the viewer can do with the page. Make room for a new Customer drop-down list by moving the existing Customer text box and label to the right.  | Drag the CustomerID field of the Quarterly Orders by Product source query from the Field List to the original location of the Customer field controls to create a new label and drop-down list. Adjust the location of the controls, and widen the list to match the Product Name text box. |
Double-click the drop-down list to open the Drop-down List: CustomerID window, click the Other tab, and double-click the Disabled property to change the value to True (see Figure 24.28). Disabling the list prevents users from attempting to change the CustomerName value. Figure 24.28. Only drop-down lists display the lookup value of table fields, so you must disable the list to prevent users from attempting to change the customer name. 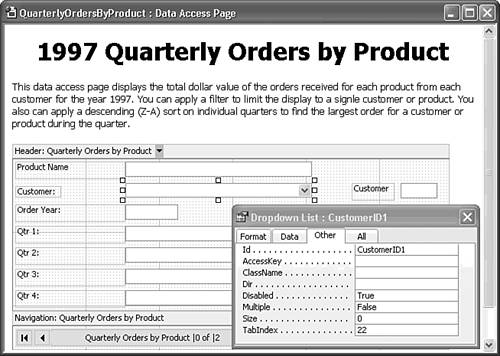 Note You retain the original Customer label and text box so that users can filter on the CustomerID value. You can't filter on the value in a disabled control.  Change the Qtr 1:...Qtr 4: label captions to Quarter 1...Quarter 4, and right-align the labels. Change the caption of the CustomerID text box from Customer: to Customer Code:. Change the name of the OrderYear label to Year: and right-align it. Change the Qtr 1:...Qtr 4: label captions to Quarter 1...Quarter 4, and right-align the labels. Change the caption of the CustomerID text box from Customer: to Customer Code:. Change the name of the OrderYear label to Year: and right-align it.
 Select all controls and apply the Bold attribute. Select all controls and apply the Bold attribute.
Adjust the size of the Year and Quarter text boxes and labels, and reposition them on two lines with the labels above the text boxes (see Figure 24.29). Figure 24.29. Relocating columnar labels and changing background colors gives your page a form-like appearance. 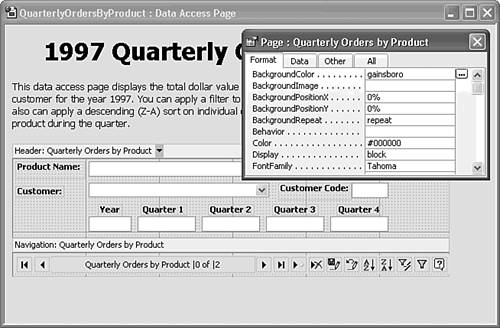 Select the Header section and drag the height-sizing rectangle close to the bottom of the Order Year and Quarter text boxes. (Look ahead to Figure 24.31 for positioning.) Optionally, add a gray background to match the background color of the navigation control. Right-click the page and choose Page Properties to open the Page: Quarterly Orders by Product window's Format page, and replace #ffffff (the code for white) with gainsboro (a named color) as the BackgroundColor property value. If you change the background color, right-click the navigation control bar and then choose Object Properties to open the Table: QuarterlyOrdersbyProductNavigation window. In the Format page, replace gainsboro with #ffffff as the BackgroundColor property value (see Figure 24.29). Press Ctrl+S to save the page, and change to Page view to check the result of your work (see Figure 24.30). Changing to Page view clears the undo/redo stack. Figure 24.30. Page view displays the result of your redesign. Open the View button list and choose Web Page Preview to display the page in IE 6.0. 
Tip Save your DAP frequently during the modification process. Saving changes doesn't clear the undo/redo stack. To check you work, choose Web Page Preview instead of changing to Page view. Viewing the page in IE 6+ doesn't clear the undo/redo stack.
Altering Record Navigation Control Elements The four record-editing buttons of the record navigation control are disabled because the underlying ADO Recordset is read-only. The Help button leads to information that might confuse users. Thus, you should eliminate these buttons from the page. Deleting the buttons doesn't affect the navigation control. Changing the caption of the label from the name of the underlying query to Record Number makes the purpose of the buttons more evident. Note | The Access 2000 (OWC 9) version of the navigation control required changing navigation control property values to hide buttons. Access 2002 made removing and adding navigation buttons much simpler. |
To remove the New (Record), Delete (Record), Save (Edits), Undo (Edits), and Help buttons, and change the label of the record navigation control, do the following:  In DAP design mode, select the New button and press Delete. As you delete buttons, the the remaining buttons adjust their position to fill the empty space. In DAP design mode, select the New button and press Delete. As you delete buttons, the the remaining buttons adjust their position to fill the empty space.
Repeat step 1 for the Delete, Save, Undo, and Help buttons. Double-click the Quarterly Orders by Product label to open its properties window, click the Data tab, and change the first instance of the Quarterly Orders by Product element of the RecordsetLabel property value to Record Number, as shown in Figure 24.31. (Don't make changes to the |0 of |2 elements.) Figure 24.31. Deleting disabled buttons and changing the Recordset label caption improves the usability of the page. 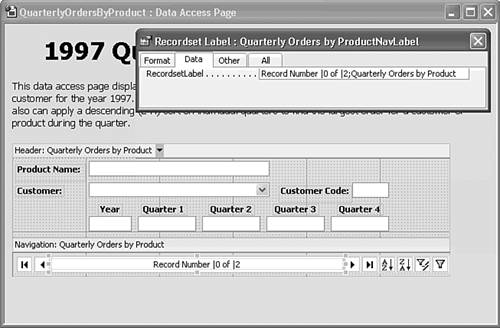 Click the region below the navigation control, which defaults to an HTML paragraph (<P>...</P>) element and, optionally, add instructions for users who are new to DAP.  Open the View menu or right-click the page's title bar and choose Web Page Preview to display the modified navigation bar and added text in IE 6+ (see Figure 24.32). If you have unsaved changes, a message box opens when you change to Web Page Preview. Click Yes to save the changes. Open the View menu or right-click the page's title bar and choose Web Page Preview to display the modified navigation bar and added text in IE 6+ (see Figure 24.32). If you have unsaved changes, a message box opens when you change to Web Page Preview. Click Yes to save the changes.
Figure 24.32. Selecting Web Page Preview from the View button list displays the page with the simplified navigation control and added text in IE 6+. 
Tip Take full advantage of the default text elements of DAP to add instructions for using your pages. By tradition, Web pages contain substantial amounts of text, but forms don't. Adding text instructions to the page rather than in a hyperlinked help document is a convenience that most users appreciate. As you become more familiar with DHTML programming, you can add VBScript code to your page to display or hide the explanatory text.
Substituting SPAN Elements for Navigation Buttons | Access 2002 introduced pages that let you substitute text (<SPAN>) elements or your own graphic images for navigation control buttons. Navigation control buttons have special ClassName property values MsoNavFirst, MsoNavPrevious, MsoNavNext, and MsoNavLast to identify them as navigation elements. You can assign additional elements as navigation controls or replace the existing graphics. |
Note The following procedure for replacing standard navigation buttons with text labels also shows you how to copy controls and move them from one section of the page to another.
To substitute text labels for the navigation controls, do the following: Return to Page Design view, and drag the bottom of the Header section down to make room for a row of labels.   Open the Toolbox, select the Label tool, and draw the label at the bottom left of the Header section. Open the Toolbox, select the Label tool, and draw the label at the bottom left of the Header section.
Type First as the caption, apply the Bold attribute, and adjust the size of the label to fit the text. Double-click the new label to open the Label: Label6 properties window, and click the Other tab. Change the Id property value to navFirst and the ClassName to MsoNavFirst. When you change the ClassName, the label becomes a <SPAN> element (see Figure 24.33). Figure 24.33. Making a label a member of the MsoNav... class changes the label to a <SPAN> element. It's a good practice to apply Id naming conventions similar to those recommended for form controls.  Click the Format tab, open the Cursor property's list, and select hand. If you don't change the cursor type, the cursor defaults to an I-beam. Setting the cursor to hand indicates an active control. Change to Page view and verify that the new span control behaves as expected by clicking the Last button and then the First span. Return to Page Design view and select the First control. Press Ctrl+C and Ctrl+V to create a copy of the control, and drag the copy to the right of the First control. Change the caption to Previous, double-click the control, and change the Id property to navPrevious and the ClassName to MsoNavPrevious. Repeat steps 7 and 8 to add a navNext control as MsoNavNext and a navLast control as MsoNavLast. Change to Page view and test the added span controls. Return to Page Design view and delete the First, Prev, Next, and Last navigation buttons. Then drag the left edge of the navigation bar to the right to make room for the span controls. Select all the added span controls, and press Ctrl+X to remove them from the Header section. Select the Navigation section, and press Ctrl+V to paste the controls. Drag the bottom of the Header section up, adjust the spacing between the controls, and then change to Web Page Preview (see Figure 24.34). Figure 24.34. Web Page Preview displays the hand cursor when the mouse pointer hovers on the replacement <SPAN> navigation controls. 
 | The completed QuarterlyOrdersByProduct.htm page is located in the \Seua11\Chaptr24 folder of the accompanying CD-ROM. |
|