| If the data you want to import into a Jet table was developed in a database management system, word processor, or other application that can't export the data as a .dbf, .wk?, or .xls file, you need to create a text file in one of the text formats supported by Access. Most DOS- and Windows-compatible data files created from data stored by mainframes and mini-computers, and files generated from nine-track magnetic tapes are text files. Access refers to the characters that separate fields as delimiters or separators. In this book, the term delimiter refers to characters that identify the end of a field; text identifiers refers to the single and double quotation marks that you can use to distinguish text from numeric data. Table 8.2 details the text formats that Access supports for import and export operations. Table 8.2. Text File Formats Supported by Access 2003Format | Description |
|---|
Comma-delimited text files (also called CSV files) | Commas separate (delimit) fields. The newline pair, carriage-return (ASCII character 13), and line feed (ASCII character 10), separate records. Some applications enclose all values within double quotation marks, a format often called mail-merge, to prevent commas in a field value from erroneously specifying the end of the field. Other applications enclose only text (strings) in quotation marks to differentiate between text and numeric values, the standard format for files created by the xBase command COPY TO FILENAME DELIMITED. | Tab-delimited text files (also called TAB files) | These files treat all values as text and separate fields with tabs. Records are separated by newline pairs. Most word-processing applications use this format to export tabular text. | Space-delimited files | Some text files use spaces to separate fields in a line of text. The use of spaces as delimiter characters is uncommon because it can cause what should be single fields, such as street addresses, to be divided inconsistently into different fields. | Fixed-width text files (usually called TXT or ASCII files) | Access separates (parses) the individual records into fields based on the position of the data items in a line of text. Newline pairs separate records, and every record must have exactly the same length. Spaces pad the fields to a specified fixed width. Fixed width is the most common format for data exported by mainframes and minicomputers on nine-track tape. |
Note  | Text files in three of these formats (CSV, TAB, and TXT) derived from Northwind.mdb's Orders table are located in the \Seua11\Chaptr08\TextFile folder of the accompanying CD-ROM. |
Using the Import Text Wizard To import any of the text file types listed in Table 8.2, you follow a procedure similar to the procedure for importing any external data into Access. To import a text file, follow these steps:  Open the database you want to import the text file into and make the Database window active. Open the database you want to import the text file into and make the Database window active.
Choose File, Get External Data, Import to open the Import dialog. Select Text Files (*.txt, *.csv, *.tab, or *.asc) in the Files of Type drop-down list. Use the Look In drop-down list to select the folder that contains the text file you want to import and double-click the text file's name. Access starts the Import Text Wizard (see Figure 8.39), which is similar to Excel's Wizard of the same name. Figure 8.39. The first dialog of the Import Text Wizard lets you select between delimited (the default) or fixed-width files, and displays sample data from the file. The two decimal zeros in the OrderID column aren't present in the sample Orders.csv text data. 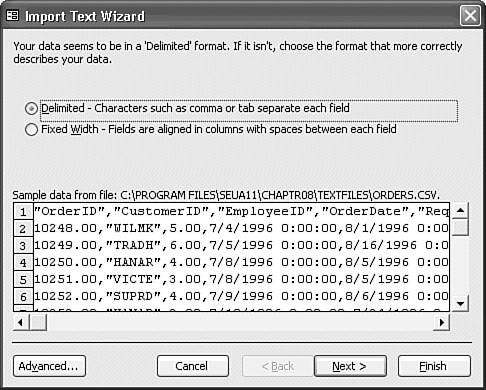 Select the Delimited option to import a delimited text file or select Fixed Width to import a fixed-width text file. The Import Text Wizard displays a sample of the text file's contents in the lower portion of the dialog to help you determine the correct file type. Figure 8.39 shows a comma-delimited text file being imported. Click Next to proceed to the next step in the Import Text Wizard. If you selected Delimited as the file type, the Import Text Wizard displays the dialog shown in Figure 8.40; if you selected the Fixed Width option for the Orders.txt file, the Wizard displays the dialog in Figure 8.41. Figure 8.40. The Wizard's second dialog gives a preview of the table to be created on importing the Orders.csv text file. 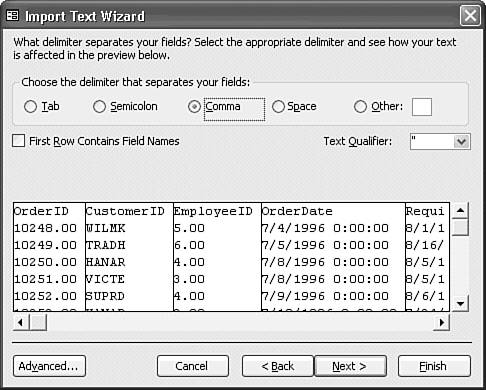 Figure 8.41. If you import from the fixed-width Orders.txt, the second dialog lets you define field boundaries. The Wizard doesn't detect the EmployeeID field, so you must add a break after the five-character CustomerID field. 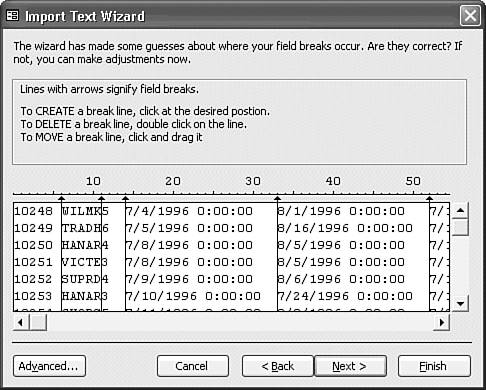 If you're importing a delimited text file, accept the default or select the delimiter character that separates fields in the table (most delimited files use the tab separator). If the text file you're importing uses a text qualifier other than double quotation marks, type it in the Text Qualifier text box. If the first line in the text file contains field names (such as the column headings in a spreadsheet file), select the First Row Contains Field Names check box. Click Next to move to the next step of the Import Text Wizard. If you're importing a fixed-width text file, the Import Text Wizard analyzes the columns and makes an approximation about where the field breaks lie. Scan through the sample data at the bottom of the dialog; if the field breaks aren't in the right place, there are too many field breaks, or there aren't enough field breaks, you can add, delete, or move the field breaks that the Import Text Wizard suggests. To move a field break, drag it with the mouse. To remove a field break, double-click it. To add a field break, click at the desired location. When you're satisfied with the field break arrangement, click Next to continue. The Wizard opens the dialog shown in Figure 8.42. Choose the In a New Table option to create a new Access table for the imported text file. Choose the In an Existing Table option to add the data in the text file to an existing database table; then select the table you want to add the data to in the accompanying drop-down list. Click Next to continue. (If you selected the In an Existing Table option, the Import Text Wizard skips directly to its final step, step 10 of this procedure.) Figure 8.42. The third Wizard dialog lets you select between creating a new table and appending the data to an existing table. 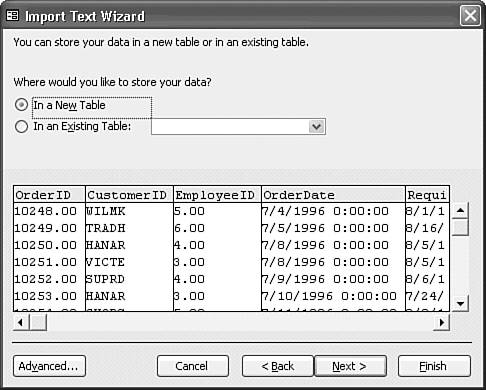 Caution The Wizard matches fields from left to right when you import a text file into an existing table. You must make sure that the data types of the fields in the imported text file match those in the Jet table; otherwise, the added data values aren't inserted into the correct fields. In most cases, you end up with many import errors in the Import Errors table. If you're not certain that the format of your input data exactly matches the format of the desired table, you can choose the In a New Table option and then place your data in the existing table with an append query, as discussed in Chapter 13, "Creating and Updating Jet Tables with Action Queries." The fourth Wizard dialog lets you edit field names, choose whether to use index and what kind to use for each field, and adjust each field's data type (see Figure 8.43). To set the options for a field, click the field column at the bottom of the dialog to select it; you then can edit the field name, select an index method in the Indexed drop-down list, and select the data type for the field in the Data Type drop-down list. Select the Do Not Import Field (Skip) check box if you don't want to import the selected field column. The OrderID, EmployeeID, and ShipVia column require the Long Integer data type to conform to the original table design, and a No Duplicates index selection is appropriate for the OrderID primary-key field. When you're satisfied with your field settings, click Next. Figure 8.43. The fourth dialog lets you change or assign field names, alter data types, specify indexes, and skip fields. 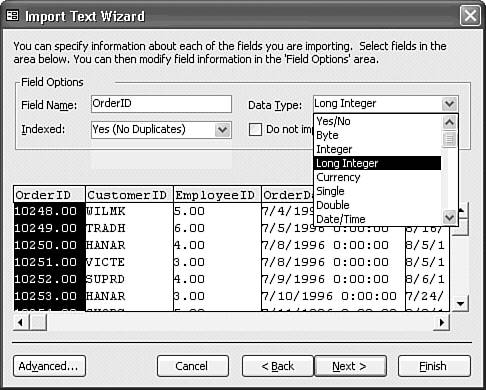 The Wizard displays the dialog in Figure 8.44. Choose the appropriate option for the primary key: allow Access to add a new field with an automatically generated primary key, select an existing field to use as a primary key yourself, or import the table without a primary key. For this example OrderID is the primary key. Click Next. Figure 8.44. The fifth dialog offers three primary key choices. For the Orders table, select Choose My Own Primary Key option and the OrderID field as the primary key. Notice that the change to the Long Integer data type of the OrderID field isn't reflected in the Wizard's display. 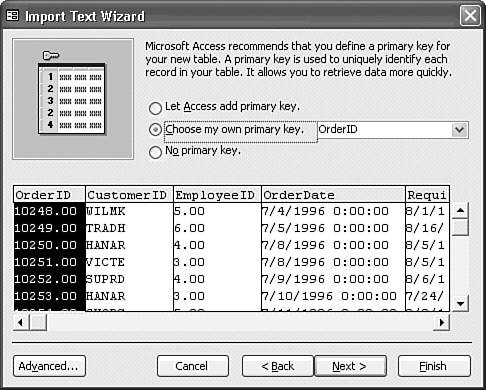 The Wizard displays its final dialog with the filename of the text file or the existing table you specified in step 7 as the default table name (refer to Figure 8.23). Edit the table name, or type a different table name, if you want. Click Finish to import the text file.
The Import Text Wizard imports the text file and displays a success message. As with other import operations, Access creates an Import Errors table to document any errors that occurred during the import process and displays a message informing you that errors occurred. Setting the Import Text Wizard's Advanced Options You're likely to find that you import text data from the same text file more than once or that you have several text files with the same format. A typical situation in many corporations is that data from the company's mainframe computer system is provided to desktop computer users in the form of a text file report. Frequently, reports are delivered over the network in a text file, using the same name for the text file each time. You can use the Import Text Wizard's advanced options to configure Access to import a text file with a specific set of options and save the option values so that you don't have to go through every step in the Wizard every time you import the text file. Every dialog of the Import Text Wizard has an Advanced button. Clicking this button displays the TableName Import Specification dialog that shows all the Import Text Wizard settings in a single dialog and allows you to select a few options, such as date formatting, that don't appear in the regular Import Text Wizard dialogs. If you select the Delimited option and the text file includes field names, the Customers Import Specification dialog has the options and field grid shown in Figure 8.45. Settings in the Data Type and Indexed columns reflect the changes suggested in Figure 8.43. Figure 8.45. The Orders Import Specification dialog for the sample Orders.csv text file lets you create a template for future import of text files in the same format. 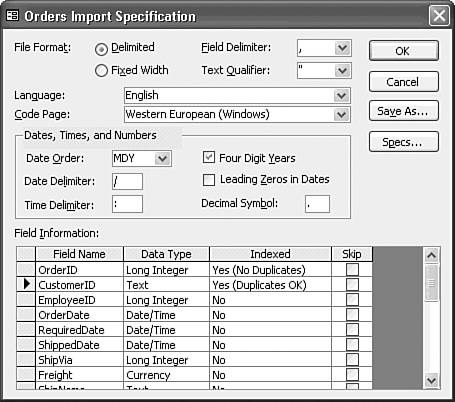 If you select the Fixed-Width option for a file without field names in the first record, the dialog has the options and field grid shown in Figure 8.46. For the Orders.txt sample file, type the field names, specify the data types, and set the indexes as shown previously in Figure 8.45. Figure 8.46. The Orders Import Specification dialog for a fixed-width table without field names in the first row assigns default Field# field names. 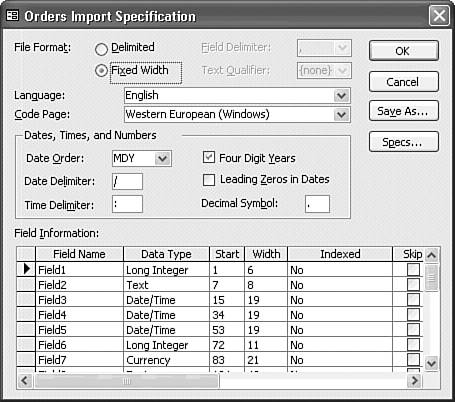 You can select the following options in the TableName Import Specification dialog: File Format Use these option buttons to choose which type of text file format you're importing: delimited or fixed width. The file format you select determines which additional options are available. Field Delimiter Use this drop-down list to select the symbol that delimits fields in the text file. This option is disabled for fixed-width text files. Text Qualifier Use this drop-down list to select the symbol that marks the beginning and end of text strings in the text file. This option is disabled for fixed-width text files. Language and Code Page Use these lists to handle localized text files. Date Order If the data in the text file uses a European or other date format that varies from the month-day-year format typical in the United States, select the appropriate date order in the Date Order drop-down list. Date Delimiter and Time Delimiter Type the symbol used to separate the month, day, and year in a date in the Date Delimiter text box; type the symbol used to separate hours, minutes, and seconds in the Time Delimiter text box. For example, in the United States, the date delimiter is the virgule (/) character, and the time delimiter is the colon (:). Four Digit Years Mark this check box if the dates in the text file use four digits for the year, such as 8/28/1999. Leading Zeros in Dates Mark this check box if the dates in the text file have leading zeros, such as 08/09/1999. Decimal Symbol Type the symbol used for the decimal separator in numeric values in the text box. In the United States, the decimal symbol is the period (.), but many European nations use a comma (,). Field Information The appearance of this grid depends on the file format you select. For a delimited text file, the Field Information grid lets you edit field names, select the field's data type and indexing, and specify whether to skip the field in importing (refer to Figure 8.45). For a fixed-width text file, the Field Information grid lets you perform the same operations but adds specifications for the starting column and width of each field (refer to Figure 8.46). Save As Click this button to display the Save Import/Export Specification dialog. By typing a name for the specification and clicking OK, you can save the file import settings for later use. Specs Click this button to display the Import/Export Specifications dialog (see Figure 8.47). Select a previously saved specification and click OK to use import settings that you defined previously. Figure 8.47. The Import/Export Specifications dialog lets you select a set of saved import specifications to apply when importing a text file. This figure illustrates the import specification for the sample Orders.txt fixed-width file. 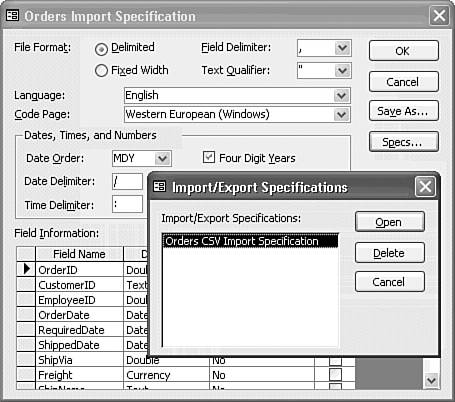
| The LinkTest.mdb sample database in the \Seua10\Chaptr08 folder of the accompanying CD-ROM includes the two import specifications shown in Figure 8.47. |
Tip If you even suspect that you'll need to import the same or a similar text file, save the import specification in your database with a descriptive name. You can edit the specification in the Wizard and resave it, if necessary.
|