Relationships Between Data Sources
3 4
Now that you've had a chance to work with some queries, you're ready to advance to the next level. But first you need to understand how relationships affect a query. You've already learned that you can base a query on more than one data source and that a data source can be a table or a query. When you add more than one data source to the Design view, the query inherits any relationships created via the Relationships window. Access represents those relationships by displaying a join line between the related fields, as shown in Figure 9-38.
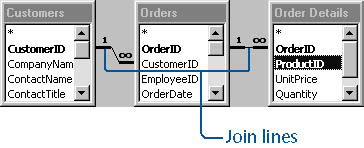
Figure 9-38. Join lines indicating relationships between tables in query Design view.
InsideOut
Access won't update existing queries to reflect changes made to relationships in the query Design view. You'll have to open any existing queries that might be affected by your changes and create the relationship (or relationships) yourself.
Understanding Join Lines
The join line tells a lot about the existing relationship. In Figure 9-38, the join line includes a 1 near the CustomerID field of the Customers table and an infinity symbol (8) near the CustomerID field of the Orders table. The 1 and the infinity symbol indi
cate a one-to-many relationship, which means that there can be many orders for any one customer, but only one customer per order. There's also a one-to-many relationship between the Orders table and the Order Details table based on the OrderID field. This relationship indicates that each order in the Orders table will have one or more detail records in the Order Details table. The presence of the 1 and the infinity symbol is a visual clue that the relationship enforces referential integrity -rules that restrict when you can add and delete records. When a relationship is indeterminate, Access displays the join line, but no symbols. You can temporarily sever a relationship (for the current query only) by clicking the join line and pressing Delete.
For more information about types of relationships and referential integrity, see Chapter 4, "Creating a Database."
Access can still define a relationship between two tables even if you haven't created a relationship yourself. By default, Access creates a relationship between two tables in a query if both of the following conditions are true:
Both tables contain a common field of the same name and data type. There is one exception to this rule: You can relate an AutoNumber field to a Long Integer (if the Field Size property in both is set to Replication ID). You can manually create a relationship between fields of the same data type-even if their names don't match-by dragging a primary key field from one field list to the related field (foreign key field) in another list. All Access really requires in this case is that the fields be of the same data type. If you want Access to create the relationship automatically, the field names must match.
At least one of the fields is a primary key field. This means that every record in the table has a unique value in this field.
You won't always want Access to automatically create a relationship between tables. To turn off this AutoJoin feature, choose Tools, Options, and then click the Tables/Queries tab and clear the Enable AutoJoin check box. Disabling this feature works only with unrelated tables. Permanent relationships established via the Relationships window will still take precedence in a query.
note
Access identifies primary key fields by displaying them in boldface in the field list.
A Cartesian Product
Most multiple-table queries are based on related tables. If tables in a query aren't joined, Access won't know how to associate records. In this case, Access will create a cross (Cartesian) product. That means that Access will join every record in every table. A query based on two unrelated tables-for example, a table with 10 records and another with 20 records-will return 200 records. As a rule, you won't run into this type of query very often.
Self-Join: An Unusual Relationship
A self-join combines records from the same table. In other words, you're relating a table to itself. Although not commonly used, a self-join helps you find records that have common values with other records in the same table.
The Northwind Employees table assigns a unique value to each employee by using an AutoNumber field. In addition, the ReportsTo field stores the corresponding manager's AutoNumber value. As a result of this efficient arrangement, you won't need a second table to identify managers. The ReportsTo field displays names, but they're the result of a lookup field, which you need to delete. (You're deleting this feature so you can review a self-join, not because there's anything wrong with the lookup field method of displaying each manager's name.)
tip
We'll be modifying a table in the Northwind database in the following example. It would be a good idea to make a copy of the database if you haven't already done so.
To delete the lookup field, follow these steps:
- In the Database window's Objects bar, click Tables.
- Select the Employees table, and on the Database window toolbar, click Design. This will open the Employees table in Design view, as shown Figure 9-39.
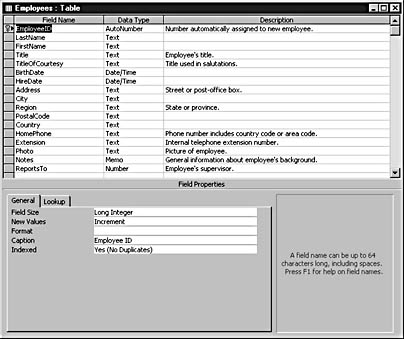
Figure 9-39. The Employees table in Design view.
- Select the ReportsTo field, and then, in the Field Properties pane, click the Lookup tab.
- From the list in the Display Control property, select Text Box.
- On the Table Design toolbar, click the arrow to the right of the View button, and select Datasheet View.
- In the message box asking whether you want to save the table, click Yes.
Take a look at the modified Employees table, shown in Figure 9-40. (Several of the fields that you don't need are hidden.) The ReportsTo field now displays each manager's EmployeeID value.
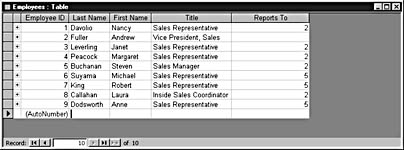
Figure 9-40. After you delete the lookup field, the ReportsTo field identifies the employee's manager by EmployeeID instead of by name.
To create a self-join query that identifies the manager by name instead of by the EmployeeID value, follow these steps:
- In the Database window's Objects bar, click Tables, and then select the Employees table.
- On the Database toolbar, click the arrow to the right of the New Object selector, and select Query.
- In the New Query dialog box, double-click Design View. Access opens the Employees table in query Design view.
- On the Query Design toolbar, click the Show Table button. In the Show Table dialog box, double-click Employees, and then click Close.
Access adds a second instance of the table and assigns the default name Employees_1, as shown in Figure 9-41.
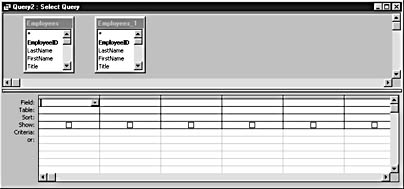
Figure 9-41. Two Employees tables shown in query Design view. Access gives the second instance of the Employees table the name Employees_1.
- Right-click the Employees_1 table, and choose Properties from the shortcut menu.
- In the Field List properties sheet, change the Alias property from Employees_1 to Managers, as shown in Figure 9-42.

Figure 9-42. Change the Alias property for the Employees_1 table.
- Close the property sheet to return to the query Design view. The Employees_1 field list now displays Managers in the title bar. (Assigning a new alias isn't necessary, but it does cut down on the confusion of working with two almost identically named tables.)
note
An alias helps you differentiate between tables in a query without actually modifying the name of the underlying table. Because long table names can be clipped, the Alias property also comes in handy when a table has a long name. Assigning a short alias in the query makes each table name easier to read. - Now you're ready to create the self-join relationship. Drag the ReportsTo field from the Employees table to the EmployeeID field in the Managers table. A join line appears between these two fields.
- Add the LastName, FirstName, and Title fields from the Employees table to the design grid.
- Add a calculated field to the design grid by typing the following expression in the Field cell of the fourth column:
Manager: [Managers].[FirstName] & " " & [Managers].[LastName]
This expression concatenates the contents of the FirstName and LastName fields with a space in between. When finished, the query Design view should look like Figure 9-43.
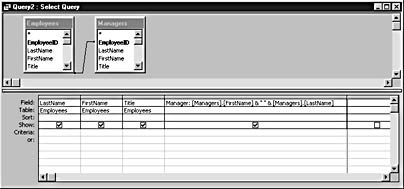
Figure 9-43. Add a calculated field to the self-join query.
- On the Query Design toolbar, click the Run button to see the results shown in Figure 9-44.
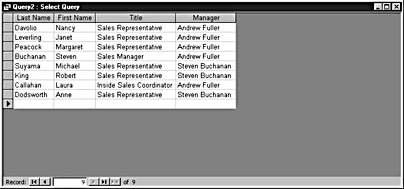
Figure 9-44. The calculated Manager field contains the name of each employee's manager.
There's one problem with the results of this self-join query: Andrew Fuller is not listed in the FirstName and LastName fields. That's because his ReportsTo field is blank, and the default join is an INNER JOIN (the default relationship), which returns only those records in which the values are the same in the related field. You can see this by viewing the query's Jet SQL statement:
SELECT Employees.LastName, Employees.FirstName, Employees.Title, [Managers].[FirstName] & " " & [Managers].[LastName] AS Manager FROM Employees INNER JOIN Employees AS Managers ON Employees.ReportsTo = Managers.EmployeeID;
Access defaults to an INNER JOIN. This query displays those records in which the ReportsTo entry matches an EmployeeID entry. Since Andrew Fuller has no ReportsTo entry, the INNER JOIN omits this record from the results.
This query will include Andrew Fuller if you change the join type to a LEFT JOIN. A LEFT JOIN returns all the records in the left table (Employees) of the join operation, but in the right table (Managers), it returns only the records that match the related field.
To change the join type, follow these steps:
- In Design view, right-click the join line, and choose Join Properties from the shortcut menu.
- In the Join Properties dialog box, select option 2, as shown in Figure 9-45, and click OK.
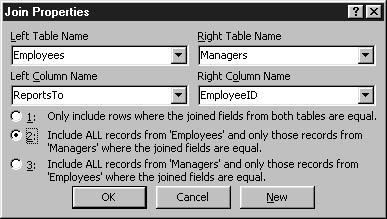
Figure 9-45. Make the join a LEFT JOIN.
- Click the Run button to display the results shown in Figure 9-46. As you can see, this time the query includes Andrew Fuller, but the Manager field is blank.
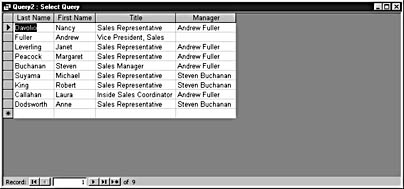
Figure 9-46. This time the query includes Andrew Fuller.
The modified Jet SQL statement is shown here:
SELECT Employees.LastName, Employees.FirstName, Employeees.Title, [Managers].[FirstName] & " " & [Managers].[LastName] AS Manager FROM Employees LEFT JOIN Employees AS Managers ON Employees.ReportsTo = Managers.EmployeeID;
The statement is the same as the previous statement, except the type of join is now a LEFT JOIN. The results confirm this, as they display all the records in the Employees table, including the record for Andrew Fuller.
tip - Change a field's name in a query
In addition to creating an alias for a table, you can create an alias for a field name without affecting the actual field's name in the underlying table. In the design grid, right-click the field in question, and then select Properties from the shortcut menu. In the Field Properties dialog box, enter a new name in the Caption box. The query will display the new Caption property as the field's heading in Datasheet view. Any objects you base on this query will display the Caption property as the field's heading or label, not the underlying table's field name.
EAN: 2147483647
Pages: 172