Importing and Linking Data Using VBA Code
3 4
Now that you understand how to use the Access interface to import and link data, you might want to go beyond the menu selections by writing VBA code to import or link data. VBA, which is included in Microsoft Office XP, lets you import file types that aren’t supported in the Import dialog box. The only requirements for importing data in VBA code are that the source program is an Automation server, and that it contains data.
Although most of the examples in this section deal with importing data, many (but not all) data types support linking as well. Your selection of a named argument when usingthe TransferText, TransferDatabase, or TransferSpreadsheet method determines whether the data is imported or linked. Using acLink as the value for the TransferType argument performs a link; using acImport performs an import.
See Chapter 20, "Customizing Your Database Using VBA Code," for more information about writing VBA code.
You might be wondering why you’d want to write VBA code to do an import when so many importing options are available through the interface. Maybe you just love writing code. Apart from that, there are two main reasons:
- You need to import data from a format that isn’t supported in the interface, such as data in a Word table or custom Outlook contact items.
- You need to do the same import frequently (for example, to import the current month’s sales data from an Excel worksheet), and you want to make the import process quick and easy, without having to go through the wizard every time. Running a function from a toolbar button lets you accomplish this goal.
Import/Export Terminology
You’ll need to know the following terms to understand importing and linking in Access using VBA:
- Automation A technology for exchanging data among applications. An Automation server makes its data available to other applications via its object model; an Automation client works with data made available by Automation servers.
- Object model A set of components published by an Automation server that can be accessed through code by Automation clients. These components, or objects, allow the client to communicate with the server application.
- Enum (Short for enumeration.) A listing of named constants (with corresponding numeric values) that can be used as (among other things) arguments for functions or methods or as the return values of functions.
- Method An action that an object can perform, such as TransferDatabase or CopyObject.
- Parameter (or argument) A piece of information provided to a function or a method.
Access offers three methods for importing data from various types of files to Access: TransferDatabase, TransferSpreadsheet, and TransferText. A fourth method, the new TransferSQLDatabase method, is used to copy one SQL Server database to another. For file formats not supported by these methods, you can write Automation code to work with the object model of the application whose data you want to import, and use the Data Access Objects (DAO) object model to store the data in Access tables. Access has three object models: The Access object model represents interface objects, and the DAO and ADO (ActiveX Data Objects) object models represent data in Access databases. The DAO object model is generally more useful for working with Access data.

The code samples described in this section are available on the companion CD in the basGeneral module of the Link and Import.mdb file.
Choosing Import Methods and Argument Values Based on the Data Source
The VBA method you use when you import or link data will vary depending on the source of the incoming data. Table 16-2 lists the choices for importing or linking data in VBA code.
Table 16-2. Data sources and VBA methods for importing or linking data
| Data source | VBA method and argument values to use |
| Access | Access.DoCmd.TransferDatabase method with acImport or acLink as the TransferType parameter and "Microsoft Access" as the DatabaseType parameter |
| dBASE 5 | Access.DoCmd.TransferDatabase method with acImport or acLink as the TransferType parameter and "dBase 5.0" as the DatabaseType parameter |
| dBASE III | Access.DoCmd.TransferDatabase method with acImport or acLink as the TransferType parameter and "dBase III" as the DatabaseType parameter |
| dBASE IV | Access.DoCmd.TransferDatabase method with acImport or acLink as the TransferType parameter and "dBase IV" as the DatabaseType parameter |
| Delimited text files | Access.DoCmd.TransferText method with acImportDelim or acLinkDelim as the TransferType parameter |
| Excel 3 | Access.DoCmd.TransferSpreadsheet method with acImport or acLink as the TransferType parameter and acSpreadsheetTypeExcel3 as the SpreadsheetType parameter |
| Excel 4 | Access.DoCmd.TransferSpreadsheet method with acImport or acLink as the TransferType parameter and acSpreadsheetTypeExcel4 as the SpreadsheetType parameter |
| Excel 5 | Access.DoCmd.TransferSpreadsheet method with acImport or acLink as the TransferType parameter and acSpreadsheetTypeExcel5 as the SpreadsheetType parameter |
| Excel 7 | Access.DoCmd.TransferSpreadsheet method with acImport or acLink as the TransferType parameter and acSpreadsheetTypeExcel7 as the SpreadsheetType parameter |
| Excel 8 | Access.DoCmd.TransferSpreadsheet method with acImport or acLink as the TransferType parameter and acSpreadsheetTypeExcel8 as the SpreadsheetType parameter |
| Excel 9 | Access.DoCmd.TransferSpreadsheet method with acImport or acLink as the TransferType parameter and acSpreadsheetTypeExcel9 as the SpreadsheetType parameter |
| Fixed-width text files | Access.DoCmd.TransferText method with acImportFixed or acLinkFixed as the TransferType parameter |
| HTML files | Access.DoCmd.TransferText method with acImportHTML or acLinkHTML as the TransferType parameter |
| Jet 2.x | Access.DoCmd.TransferDatabase method with acImport or acLink as the TransferType parameter and "Jet 2.x" as the DatabaseType parameter |
| Jet 3.x | Access.DoCmd.TransferDatabase method with "Jet 3.x" as the DatabaseType parameter |
| Lotus WJ2 (Japanese version only) | Access.DoCmd.TransferSpreadsheet method with acImport or acLink as the TransferType parameter and acSpreadsheetTypeLotusWJ2 as the SpreadsheetType parameter |
| Lotus WK1 | Access.DoCmd.TransferSpreadsheet method with acImport or acLink as the TransferType parameter and acSpreadsheetTypeLotusWK1 as the SpreadsheetType parameter |
| Lotus WK3 | Access.DoCmd.TransferSpreadsheet method with acImport or acLink as the TransferType parameter and acSpreadsheetTypeLotusWK3 as the SpreadsheetType parameter |
| Lotus WK4 | Access.DoCmd.TransferSpreadsheet method with acImport or acLink as the TransferType parameter and acSpreadsheetTypeLotusWK4 as the SpreadsheetType parameter |
| ODBC databases | Access.DoCmd.TransferDatabase method with acImport or acLink as the TransferType parameter and "ODBC Database" as the DatabaseType parameter |
| Paradox 3.x | Access.DoCmd.TransferDatabase method with acImport or acLink as the TransferType parameter and "Paradox 3.X" as the DatabaseType parameter |
| Paradox 4.x | Access.DoCmd.TransferDatabase method with acImport or acLink as the TransferType parameter and "Paradox 4.X" as the DatabaseType parameter |
| Paradox 5.x | Access.DoCmd.TransferDatabase method with acImport or acLink as the TransferType parameter and "Paradox 5.X" as the DatabaseType parameter |
| Paradox 7.x | Access.DoCmd.TransferDatabase method with acImport or acLink as the TransferType parameter and "Paradox 7.X" as the DatabaseType parameter |
As you can see in this table, the oddly named (but very useful) DoCmd object in the Access object model has several methods that are used to import or link to data. These methods are part of Access VBA, not part of the core VBA feature set. If you’ve worked with Microsoft Visual Basic or Excel VBA, they might be new to you.
The TransferDatabase method’s DatabaseType parameter takes a text string, whereas the TransferSpreadsheet method’s SpreadsheetType parameter and the TransferText method’s TransferType parameter both take a named constant from an enum (an enumerated list of constants). Access enums are visible in the Object Browser as classes with the Ac prefix. Hopefully, the DataType parameter will have its own enum in a future version of Access, but for now you have to supply a text string for this parameter.
Importing Data from Another Access Database
One of the easiest ways to add data to your Access database is to simply import it from a table in another Access database. Earlier in this chapter, you learned how to import Access data using the interface. You can perform the same task by creating a function in VBA code.
The following function imports a table named Employees from a copy of the Access Northwind database into a table named tblEmployees in the current database. The function could be run from a toolbar button (see Chapter 13, "Customizing Access Toolbars and Menus (Command Bars)," for details on creating a toolbar button to run a function), or it could be called from another procedure.
Function ImportFromAccess() DoCmd.TransferDatabase transfertype:=acImport, _ databasetype:="Microsoft Access", _ databasename:="D:\Documents\Northwind.mdb", _ objecttype:=acTable, Source:="Employees", _ destination:="tblEmployees", structureonly:=False End Function
Troubleshooting - I need to import from another database in the current path, but I don’t want to hard-code the path because the database might be moved
You can use the Split function (introduced in Access 2000) to get the path of the current database, store it in a String variable, and use it with the name of the source database. The following function returns the path of the current database:
Function ExtractDBPath() As String On Error GoTo ErrorHandler Dim strFilePath As String Dim strFullDBName As String Dim strFileName As String Dim strFullPath() As String Dim strDBName As String Dim intUBound As Integer 'Extract path of current database. Set dbs = CurrentDb strFullDBName = dbs.Name strFullPath = Split(strFullDBName, "\", -1, vbTextCompare) intUBound = UBound(strFullPath) strDBName = strFullPath(intUBound) strFilePath = Mid(dbs.Name, 1, Len(dbs.Name) - Len(strDBName)) Debug.Print "Database path: " & strFilePath ErrorHandlerExit: Exit Function ErrorHandler: MsgBox "Error No: " & Err.Number & "; Description: " & _ Err.Description Resume ErrorHandlerExit End Function
Alternatively, you can simply use the CurrentProject.Path property to get the path of the current database. Just set a variable equal to this property, and use it in your code:
strFilePath =CurrentProjectPath
Importing Data from an Excel Worksheet
Earlier in this chapter, you learned how to import Excel data by using the Access interface. In the interface, you proceed through the pages of the Import Spreadsheet Wizard to specify how the Excel data is to be placed in the Access table. The following function uses a single line of code to import data—from a worksheet named Employee Phones in an Excel workbook named Employee Phones.xls located in the D:\Documents folder—into a table named tblEmployeePhones in the current database. This function calls the TransferSpreadsheet method and supplies as arguments the same information you would enter on the pages of the Import Spreadsheet Wizard if you were importing through the interface.
Function ImportFromExcel() DoCmd.TransferSpreadsheet transfertype:=acImport, _ spreadsheettype:=acSpreadsheetTypeExcel7, _ tablename:="tblEmployeePhones", _ filename:="D:\Documents\Employee Phones.xls", _ hasfieldnames:=True End Function
Importing Data from a Text File
Data in text files isn’t as easy to import into Access as spreadsheet or database data because it isn’t as tightly organized. If the text data is arranged in a fixed-width format (in which all the fields are the same size) or in a delimited format (in which the fields are separated by a special character, such as a comma or a tab), you can import the text in a single line of code using the TransferText method. Unlike with other import types, when you call TransferText, you must supply the name of an import specification—one that was previously saved during a manual import of the same text file or a file with an identical structure.
See the section "Creating Import Specifications for Recurring Import Tasks," for details on creating an import specification.
The following function imports data from a fixed-width text file named Members.txt (located in the D:\Documents folder), using an Import Specification named Members Import Specification, into a table named tblMembers. The function could be run from a toolbar button (see Chapter 13, "Customizing Access Toolbars and Menus [Command Bars]," for details on creating a toolbar button to run a function) or called from another procedure.
Function ImportFromTextFile() DoCmd.TransferText transfertype:=acImportFixed, _ specificationname:="Members Import Specification", _ tablename:="tblMembers", _ filename:="D:\Documents\Members.txt", _ hasfieldnames:=True End Function
Importing Data from a dBASE Database
dBASE was one of the early powerful database applications available for personal computers running MS-DOS. Over the years, dBASE has gone through several upgrades and has increased in power and efficiency as it has changed to take advantage of growing technologies. Although dBASE isn’t as friendly (or, some would say, as intuitive) as Access, you might find yourself with old dBASE data that you want to use in your Access tables, or you might need to work collaboratively with another group that uses dBASE files.
The following function imports data from a dBASE III file named Customer.dbf (located in the D:\Documents folder) into a table named tblNewCustomers in the current database. Note that for dBASE (and other databases that store each table in a separate file), the Databasename parameter of the TransferDatabase method is set to the file path and the Source parameter is set to the file name.
Function ImportFromDBase() DoCmd.TransferDatabase transfertype:=acImport, _ databasetype:="dBASE III", _ databasename:="D:\Documents", _ objecttype:=acTable, _ Source:="CUSTOMER.dbf", _ Destination:="tblNewCustomers", structureonly:=False End Function
Importing Data from Outlook Contacts
If you’re like most Outlook users, you’re continually gathering new data as you work with Outlook. Each time you add a new contact to your Contacts folder, an e-mail address to your address book, an appointment to your calendar, or a task to your Tasks list, you’re updating the MAPI database stored in the Outlook personal folders file (or in Exchange Server folders, if you’re on a network).
You can import that Outlook data into Access. Importing data from Outlook requires much more than a single line of code because none of the Transfer methods can import Outlook data. To import data from Outlook items (such as contacts), you must write a procedure that works through the Outlook object model to specify the folder that contains the items you want to import. The code must then iterate through the items in that folder, filtering them for item type (because most Outlook folders can contain items of various types), and then the data will be saved to records in an Access table.

The following function from the basGeneral module in the Link and Import.mdb sample database, available on the companion CD, imports data from selected fields of standard Outlook contacts in the default local Contacts folder into a table named tblOutlookContacts in the current database.
Function ImportFromOutlook() Dim appOutlook As New Outlook.Application Dim nms As Outlook.NameSpace Dim fld As Outlook.MAPIFolder Dim itm As Object Dim con As Outlook.ContactItem Dim dbs As DAO.Database Dim rst As DAO.Recordset Dim strTable As String On Error Resume Next 'Turn warnings off. DoCmd.SetWarnings False 'Delete old tables. DoCmd.DeleteObject objecttype:=acTable, _ objectname:="tblOutlookContacts" 'Make a fresh copy of the Access table to be filled with 'contact data. strTable = "tblOutlookContacts" DoCmd.CopyObject , newname:=strTable, _ sourceobjecttype:=acTable, _ sourceobjectname:="zstblOutlookContacts" On Error GoTo ErrorHandler 'Set reference to the default local Outlook Contacts folder. Set nms = appOutlook.GetNamespace("MAPI") Set fld = nms.GetDefaultFolder(olFolderContacts) For Each itm In fld.Items 'Check whether the item is a contact item. If itm.Class = olContact Then Set dbs = CurrentDb Set rst = dbs.OpenRecordset(strTable, dbOpenTable) Debug.Print "Processing " & Nz(itm.FullName) & " item" With rst .AddNew !CustomerID = Nz(itm.CustomerID) !FullName = Nz(itm.FullName) !Title = Nz(itm.Title) !FirstName = Nz(itm.FirstName) !MiddleName = Nz(itm.MiddleName) !LastName = Nz(itm.LastName) !Suffix = Nz(itm.Suffix) !NickName = Nz(itm.NickName) !CompanyName = Nz(itm.CompanyName) !Department = Nz(itm.Department) !JobTitle = Nz(itm.JobTitle) !BusinessAddress = Nz(itm.BusinessAddress) !BusinessAddressStreet = _ Nz(itm.BusinessAddressStreet) !BusinessAddressPostOfficeBox = _ Nz(itm.BusinessAddressPostOfficeBox) !BusinessAddressCity = Nz(itm.BusinessAddressCity) !BusinessAddressState = _ Nz(itm.BusinessAddressState) !BusinessAddressPostalCode = _ Nz(itm.BusinessAddressPostalCode) !BusinessAddressCountry = _ Nz(itm.BusinessAddressCountry) !BusinessHomePage = Nz(itm.BusinessHomePage) !ComputerNetworkName = Nz(itm.ComputerNetworkName) !FTPSite = Nz(itm.FTPSite) !HomeAddress = Nz(itm.HomeAddress) !HomeAddressStreet = Nz(itm.HomeAddressStreet) !HomeAddressPostOfficeBox = _ Nz(itm.HomeAddressPostOfficeBox) !HomeAddressCity = Nz(itm.HomeAddressCity) !HomeAddressState = Nz(itm.HomeAddressState) !HomeAddressPostalCode = Nz(itm.HomeAddressPostalCode) !HomeAddressCountry = Nz(itm.HomeAddressCountry) !OtherAddress = Nz(itm.OtherAddress) !OtherAddressStreet = Nz(itm.OtherAddressStreet) !OtherAddressPostOfficeBox = _ Nz(itm.OtherAddressPostOfficeBox) !OtherAddressCity = Nz(itm.OtherAddressCity) !OtherAddressState = Nz(itm.OtherAddressState) !OtherAddressPostalCode = _ Nz(itm.OtherAddressPostalCode) !OtherAddressCountry = Nz(itm.OtherAddressCountry) !MailingAddress = Nz(itm.MailingAddress) !AssistantTelephoneNumber = _ Nz(itm.AssistantTelephoneNumber) !BusinessFaxNumber = Nz(itm.BusinessFaxNumber) !BusinessTelephoneNumber = _ Nz(itm.BusinessTelephoneNumber) !Business2TelephoneNumber = _ Nz(itm.Business2TelephoneNumber) !CallbackTelephoneNumber = _ Nz(itm.CallbackTelephoneNumber) !CarTelephoneNumber = Nz(itm.CarTelephoneNumber) !CompanyMainTelephoneNumber = _ Nz(itm.CompanyMainTelephoneNumber) !HomeFaxNumber = Nz(itm.HomeFaxNumber) !HomeTelephoneNumber = Nz(itm.HomeTelephoneNumber) !Home2TelephoneNumber = _ Nz(itm.Home2TelephoneNumber) !ISDNNumber = Nz(itm.ISDNNumber) !MobileTelephoneNumber = _ Nz(itm.MobileTelephoneNumber) !OtherFaxNumber = Nz(itm.OtherFaxNumber) !OtherTelephoneNumber = _ Nz(itm.OtherTelephoneNumber) !PagerNumber = Nz(itm.PagerNumber) !PrimaryTelephoneNumber = _ Nz(itm.PrimaryTelephoneNumber) !RadioTelephoneNumber = _ Nz(itm.RadioTelephoneNumber) !TTYTDDTelephoneNumber = _ Nz(itm.TTYTDDTelephoneNumber) !TelexNumber = Nz(itm.TelexNumber) !Account = Nz(itm.Account) 'Use 1/1/4501 to indicate a blank date in Outlook. If itm.Anniversary <> "1/1/4501" Then !Anniversary = Nz(itm.Anniversary) End If !AssistantName = Nz(itm.AssistantName) !BillingInformation = Nz(itm.BillingInformation) If itm.Birthday <> "1/1/4501" Then !Birthday = Nz(itm.Birthday) End If !Categories = Nz(itm.Categories) !Children = Nz(itm.Children) !PersonalHomePage = Nz(itm.PersonalHomePage) !Email1Address = Nz(itm.Email1Address) !Email1DisplayName = Nz(itm.Email1DisplayName) !Email2Address = Nz(itm.Email2Address) !Email2DisplayName = Nz(itm.Email2DisplayName) !Email3Address = Nz(itm.Email3Address) !Email3DisplayName = Nz(itm.Email3DisplayName) 'Use Switch function to convert numeric Gender 'codes in Outlook into text for the Access table. !Gender = Switch(itm.Gender = 1, "Female", _ itm.Gender = 2, "Male", itm.Gender = 0, _ "Unspecified") !GovernmentIDNumber = Nz(itm.GovernmentIDNumber) !Hobby = Nz(itm.Hobby) !Initials = Nz(itm.Initials) !Language = Nz(itm.Language) !ManagerName = Nz(itm.ManagerName) !Body = Nz(itm.Body) !OfficeLocation = Nz(itm.OfficeLocation) !OrganizationalIDNumber = _ Nz(itm.OrganizationalIDNumber) !Profession = Nz(itm.Profession) !ReferredBy = Nz(itm.ReferredBy) 'Use Switch function to convert numeric Sensitivity 'codes in Outlook into text for the Access table. !Sensitivity = Switch(itm.Sensitivity = 3, _ "Confidential", itm.Sensitivity = 0, _ "Normal", itm.Sensitivity = 1, _ "Personal", itm.Sensitivity = 2, "Private") !Spouse = Nz(itm.Spouse) !User1 = Nz(itm.User1) !User2 = Nz(itm.User2) !User3 = Nz(itm.User3) !User4 = Nz(itm.User4) !WebPage = Nz(itm.WebPage) .Update End With End If Next itm rst.Close dbs.Close MsgBox "All contacts imported!" DoCmd.OpenTable strTable ErrorHandlerExit: Exit Function ErrorHandler: MsgBox "Error No: " & Err.Number & "; Description: " & _ Err.Description Resume ErrorHandlerExit End Function After the function imports the data, a message will tell you that the import has been successful, and when you click OK, the newly filled table will open. The table will contain several useful fields (such as CustomerID and GovernmentIDNumber) that can be imported only using code.
Troubleshooting - I get a message when I try to import Outlook data
If you get the message shown in Figure 16-26 when you try to import Outlook data, select the Allow Access For check box, and specify 10 minutes. This will set 10 minutes as the amount of time to allow for the import process. (You can specify a shorter time period if you have only a few contacts to import.)
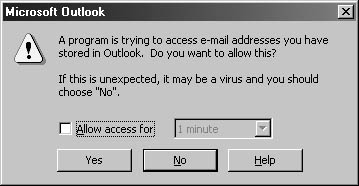
Figure 16-26. A message notifies you that a program is trying to access your Outlook data.
If the import is a lengthy one, the message will pop up again after 10 minutes; you can click the button again to set another period of time.
Importing Data from a Word Table
If you’re an experienced Word user, you might be comfortable entering, organizing, and maintaining data lists in Word tables. After all, Word has some basic but functional sorting capabilities, and you can publish your information easily in a form supported seamlessly by a number of applications. Word documents can be opened and printed by all Office users, and users of many non-Microsoft programs as well, whereas Access reports aren’t so widely supported for non-Access users.
But what happens if you want to import the data from your Word tables into Access tables? Unfortunately, even though you can store data in a tabular form in Word tables, you can’t import data directly from Word tables using the Access interface. You can import Word tables using VBA code, however, by using components of the Word object model.
The following function imports data from a series of tables in a Word document (shown in Figure 16-27) into two Access tables related one-to-many. The Word document organizes the data using styles as well as tables. Each table has a title in Heading 3 style (one of the standard Word styles) indicating the site name, and the table contains a listing of the logon IDs and other information related to that site.
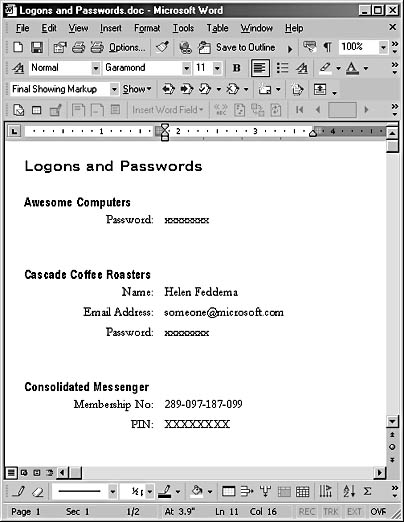
Figure 16-27. This Word document has tables of data to import into Access.
To import this information into the two related Access tables, the site names must be identified, which is done by looking for elements with a Heading 3 style, and written to the SiteName field in tblLogons (the "one" table in the one-to-many relationship). The data in the table rows must be picked up from the table cells and written to tblLogonValues (the "many" table). The tblLogons table has an AutoNumber primary key field used to link records to tblLogonValues as the foreign key field. Each record in each Word table becomes a record in the "many" table. Complex though it might seem, you can do all this in Automation code, using components of the Word object model.
Function ImportFromWord() On Error Resume Next Dim strSiteName As String Dim strIDName As String Dim strIDValue As String Dim dbs As DAO.Database Dim rstOne As DAO.Recordset Dim rstMany As DAO.Recordset Dim strDocsDir As String Dim lngID As Long Dim lngStartRows As Long Dim lngRows As Long Dim appWord As New Word.Application Dim doc As Word.Document Dim strDoc As String 'Delete old tables (if they exist). DoCmd.SetWarnings False DoCmd.DeleteObject acTable, "tblLogons" DoCmd.DeleteObject acTable, "tblLogonValues" 'Copy fresh tables from backups. DoCmd.CopyObject , "tblLogons", acTable, "zstblLogons" DoCmd.CopyObject , "tblLogonValues", acTable, "zstblLogonValues" On Error GoTo ErrorHandlerError strDoc = "D:\Documents\Logons and Passwords.doc" Set dbs = CurrentDb 'Set up recordsets based on the empty one and many tables. Set rstOne = dbs.OpenRecordset("tblLogons", dbOpenTable) Set rstMany = dbs.OpenRecordset("tblLogonValues", dbOpenTable) Set doc = appWord.Documents.Open(strDoc) appWord.Visible = True appWord.Selection.HomeKey Unit:=wdStory With appWord.Selection NextItem: 'Pick up site name from Heading 3 style. .Find.ClearFormatting .Find.Style = ActiveDocument.Styles("Heading 3") With .Find .Text = "" .Replacement.Text = "" .Forward = True .Wrap = wdFindStop .Format = True End With .Find.Execute If .Type = wdSelectionIP Then 'Selection is an insertion point. Done with the document. GoTo ErrorHandlerExit End If strSiteName = .Text Debug.Print "Site name: " & strSiteName rstOne.AddNew rstOne!SiteName = strSiteName lngID = rstOne!ID Debug.Print "ID: " & lngID rstOne.Update 'Go to next table. .MoveRight Unit:=wdCharacter, Count:=1 .Goto What:=wdGoToTable, Which:=wdGoToNext, _ Count:=1, Name:="" 'Determine how many rows are in the table. lngStartRows = .Information(wdMaximumNumberOfRows) Debug.Print "Rows in table: " & lngStartRows If lngStartRows = -1 Then GoTo ErrorHandlerExit End If 'Select current cell. .MoveRight Unit:=wdCell .MoveLeft Unit:=wdCell AddValues: If .Type = wdSelectionIP Then GoTo NextItem .MoveLeft Unit:=wdCharacter, Count:=1, Extend:=wdExtend 'Save ID name and value to variables. strIDName = .Text Debug.Print "ID name: " & strIDName .MoveRight Unit:=wdCell strIDValue = .Text Debug.Print "ID value: " & strIDValue 'Write ID name and value to many table. rstMany.AddNew rstMany!ID = lngID rstMany!ItemName = strIDName rstMany!ItemValue = strIDValue rstMany.Update 'Check whether still in table, and go to next heading if not. .MoveRight Unit:=wdCell lngRows = .Information(wdMaximumNumberOfRows) Debug.Print "Start rows: " & lngStartRows & vbCrLf & _ "Rows: " & lngRows If lngRows = lngStartRows Then If .Information(wdWithInTable) = True Then 'Still in table GoTo AddValues Else 'Not in table any more GoTo NextItem End If End If End With ErrorHandlerExit: 'Close recordsets. rstOne.Close rstMany.Close Exit Function ErrorHandlerError: Resume ErrorHandlerExit End Function Figure 16-28 shows the two tables of imported Word data.
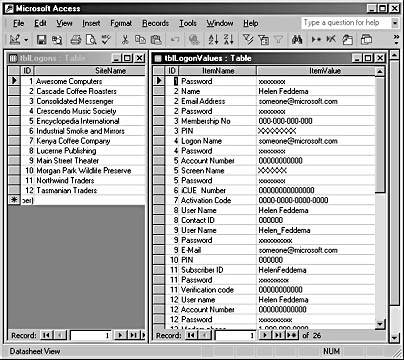
Figure 16-28. These two tables contain linked data imported from Word tables.
Figure 16-29 shows a report listing the data.
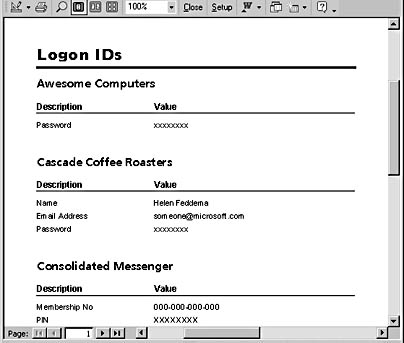
Figure 16-29. This report displays data imported from Word tables.
Creating Import Specifications for Recurring Import Tasks
Let’s say you need to do a specific import regularly, such as importing data from an Excel worksheet or a comma-delimited text file on a monthly or quarterly basis. You can save time by saving a specification file for the import. A specification file saves all the options you select manually in the Import Text Wizard or the Import Spreadsheet Wizard. You can apply all the saved options by selecting the specification file from a list that appears when you click Advanced in the Import Text Wizard, or you can call the file by name in a macro or in VBA code.
To create an import specification (generally referred to as a spec), you have to step through the appropriate wizard manually and then save your settings to a specification file for future use. You do this by performing the following steps:
- Follow the instructions for importing a text file outlined in the section "Comma-Delimited File Import."
- When you reach the last page of the wizard, name your file—for this example, CurEmp. Now before clicking Finish, click Advanced. This will open the CurEmp Import Specification dialog box, shown in Figure 16-30. This dialog box shows all the specifications selected for the current file.
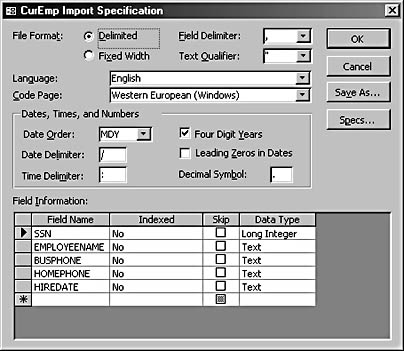
Figure 16-30. The CurEmp Import Specification dialog box shows all the specifications selected for the current file.
- Click Save As, and enter a name for the spec in the Save Import/Export Specification dialog box, as shown in Figure 16-31.
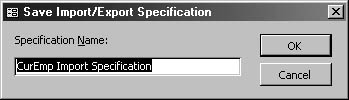
Figure 16-31. Save your import specification with a name that’s easy to remember.
- Close the CurEmp Import Specification dialog box, and click Finish to complete the import.
Now that you’ve saved the spec, you can use it in the interface, in a macro, or in VBA code, as in the TransferText code in the section "Importing Data from a Text File." To use the spec through the interface, start the Import Wizard with the text file you used to create the CurEmp spec, and click the Advanced button on the first page of the wizard. Click Specs in the CurEmp Import Specification dialog box, and then select CurEmp Import Specification in the Import/Export Specifications dialog box, as shown in Figure 16-32.
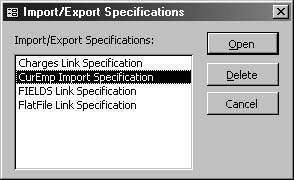
Figure 16-32. Select your saved spec in the Import/Export Specifications dialog box.
InsideOut
Saved specs don’t include the name of the Access target table. When you import data using the interface, after you select a saved spec, click Next to go to the last page of the wizard and then enter the table name. In VBA code, the table name is specified as the tablename parameter of the TransferText method.
EAN: 2147483647
Pages: 172
- Chapter III Two Models of Online Patronage: Why Do Consumers Shop on the Internet?
- Chapter IX Extrinsic Plus Intrinsic Human Factors Influencing the Web Usage
- Chapter XIII Shopping Agent Web Sites: A Comparative Shopping Environment
- Chapter XIV Product Catalog and Shopping Cart Effective Design
- Chapter XVII Internet Markets and E-Loyalty