Special Controls
I use the term special controls to describe those controls that are available to all Access users, but are not part of the set of controls that have been part of Access since the earliest version. One of the special controls (the tab control) is available on the Access Toolbox, but the others are not. They must be inserted onto a form using the Insert|ActiveX Control command on the toolbar, or by clicking the More Controls tool on the Toolbox and selecting the control from a long and confusing list.
The list of controls that is opened from the More Controls tool on the Toolbox has (as far as I can see) an entry for every file on your computer that might represent a control for use in some application on your computer. It is not (as it should be) filtered for just those controls that will work when placed on an Access form.
Tab Control
The tab control is a familiar interface from Options dialogs in Access and other Windows programs; clicking on a tab at the top of the control makes a page visible. The tab control allows you to divide up data from a record with many fields into groups, each of which is displayed on its own page. Additionally, you can display linked (or unlinked) data from other data sources, using subforms placed on pages of the tab control. See the “Creating and Embedding Datasheet and Single Form Subforms” section of Chapter 2, Forms, for an example of using a tab control to display data from the main form and linked subforms.
Calendar Control
The Calendar control displays a calendar for selection of a date; you can advance it by month or year. This control takes up a good deal of room on a form, so it may not be useful except when you need to select dates from a calendar (say, because appointments have to be scheduled on certain days of the week only), and you have lots of room available. The calendar control doesn’t appear on the Toolbox by default, but you can add it to the Toolbox if you find it useful. To place a calendar control on a form, click the More Tools button on the Toolbox (it’s the one with the hammer and wrench), and select Calendar Control 9.0 (or whatever version is available on your computer) from the list of available controls. Alternatively, you can select Insert|ActiveX Control and select the control from the Insert ActiveX Control dialog. The control can be bound to a Date/Time field, using its Control Source property. Figure 3.12 shows frmEmployeesCalendar, a version of frmEmployees that uses calendar controls to enter or edit the employee’s birth date and hire date.
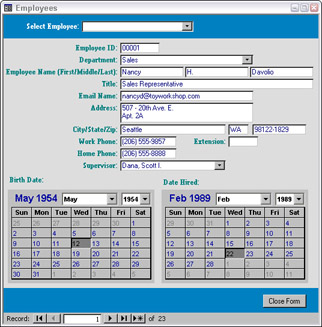
Figure 3.12
To place the calendar control (or any other special control from the list of available controls) on the Toolbox, follow the steps below:
-
Click the Toolbar Options button at the end of the Toolbox.
-
Select Add or Remove Buttons, and then Customize from the context menu.
-
Click the Commands tab.
-
Select ActiveX Controls from the Categories list.
-
Locate Calendar Control 9.0 (or another control of your choice) in the Commands list, and drag it to the desired location on the Toolbox.
-
If desired, use the Modify Selection button in the Customize dialog to display an image instead of text on the button.
For a more compact control you can use to select dates, see the section on the DateTimePicker control later in this chapter.
TreeView Control
The TreeView control has been around for a number of Office versions, and in Access 97 it had a useful wizard that helped you create the complex code needed to fill the control with data. The wizard disappeared in Access 2000, and has not reappeared since then. This control can be placed on a form by selecting Microsoft TreeView Control, v. 6.0 (or whatever version you have) from the list of controls opened from the More Controls button on the Toolbox. The frmTreeViewEBookNotes form in the EBookCompanion sample database featured in Chapter 9, Reworking an Existing Application, uses a treeview control to display data about ebooks. The treeview control is especially suited to displaying hierarchical data. The interface is similar to the folder tree in the Windows Explorer pane, and you can write code to run from the user’s selection in the control.
The treeview control is filled with data by a function (tvwBooks_Fill) that is run from the form’s Load event. The tvwBooks_Fill() function follows. The original code was generated by the Access 97 TreeView Wizard; I modified it to fit the requirements of this form, and when I need a treeview control on another form, I just copy the function again and modify it as needed.
Function tvwBooks_Fill() ‘======================================================== ‘Modified from a procedure generated by the Treeview Control Wizard ‘ ‘PURPOSE: Fill the ActiveX Treeview Control ‘tvwBooks’ ‘ACCEPTS: Nothing ‘RETURNS: Nothing ‘CALLED FROM: Form Load event ‘======================================================== On Error GoTo ErrorHandler Dim strMessage As String Dim dbs As DAO.Database Dim rst As DAO.Recordset Dim intVBMsg As Integer Dim strQuery1 As String Dim strQuery2 As String Dim nod As Object Dim strNode1Text As String Dim strNode2Text As String Dim strVisibleText1 As String Dim strVisibleText2 As String Set dbs = CurrentDb() strQuery1 = "qryEBookAuthors" strQuery2 = "qryEBooksByAuthor" With Me![tvwBooks] ‘Fill Level 1 Set rst = dbs.OpenRecordset(strQuery1, dbOpenForwardOnly) ‘Add a node object for each record in the "qryEBookAuthors" table/query. ‘For parent nodes, the Key property is based on the the level of the tree ‘in which the node exists and the Link Master field(s) you selected when ‘linking levels in the wizard. For child nodes, the Relative property ‘is based on the level of the tree in which the Parent node exists and ‘the Link Child field(s) you selected when linking levels in the wizard. Do Until rst.EOF Debug.Print "Adding Level 1 item: " & rst![AuthorID] strNode1Text = StrConv("Level1 - " & rst![AuthorID], vbLowerCase) Debug.Print "Node 1 text: " & strNode1Text strVisibleText1 = rst![LastNameFirst] Debug.Print "Level 1 visible text: " & strVisibleText1 Set nod = .Nodes.Add(Key:=strNode1Text, Text:=strVisibleText1) nod.Expanded = True rst.MoveNext Loop rst.Close ‘Fill Level 2 Set rst = dbs.OpenRecordset(strQuery2, dbOpenForwardOnly) ‘Add a node object for each record in the "qryEBooksByAuthor" ‘table/query. For parent nodes, the Key property is based on the ‘level of the tree in which the node exists and the Link Master ‘field(s) you selected when linking levels in the wizard. For child ‘nodes, the Relative property is based on the level of the tree in ‘which the Parent node exists and the Link Child field(s) you selected ‘when linking levels in the wizard. Do Until rst.EOF Debug.Print "Adding Level 2 item: " & rst![Title] strNode1Text = StrConv("Level1 - " & rst![AuthorID], vbLowerCase) Debug.Print "Node 1 text: "; strNode1Text strNode2Text = StrConv("Level2 - " & rst![AuthorID] & " - " & rst![Title], vbLowerCase) Debug.Print "Node 2 text: " & strNode2Text strVisibleText2 = rst![Title] & rst![BeenRead] Debug.Print "Visible text: " & strVisibleText2 .Nodes.Add relative:=strNode1Text, relationship:=tvwChild, Key:=strNode2Text, Text:=strVisibleText2 rst.MoveNext Loop rst.Close End With dbs.Close ErrorHandlerExit: Exit Function ErrorHandler: Select Case Err.Number Case 35601 ‘Element not found strMessage = "Possible Causes: You selected a table/query" & " for a child level which does not correspond to a value" & " from its parent level." intVBMsg = MsgBox(Error$ & strMessage, vbOKOnly + vbExclamation, "Run-time Error: " & Err.Number) Case 35602 ‘Key is not unique in collection strMessage = "Possible Causes: You selected a non-unique" & " field to link levels." intVBMsg = MsgBox(Error$ & strMessage, vbOKOnly + vbExclamation, "Run-time Error: " & Err.Number) Case Else intVBMsg = MsgBox(Error$ & "@@", vbOKOnly + vbExclamation, "Run-time Error: " & Err.Number) End Select Resume ErrorHandlerExit End Function
Each node in a treeview control needs a unique key expression and a field or expression containing text to display. In the sample treeview control, AuthorID is the unique key field for Node 1, and the author’s name is displayed (last name first). Node 2 uses AuthorID concatenated with the book title as the unique expression text, and the book title plus a symbol indicating whether it has been read as the visible text. The nodes are linked to each other using the key fields, so you need to ensure that the key expressions are unique; generally this is done by including a key field from the underlying table. Figure 3.13 shows the treeview control on frmTreeViewEBookNotes in the EBookCompanion database.
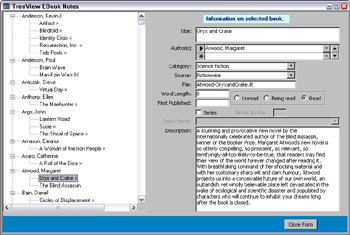
Figure 3.13
EAN: 2147483647
Pages: 124