Tutorial: Creating a Podcast
| Now that I've covered the basic equipment and process of creating a podcast, I'll take you step by step through the process of creating a podcast for both Macintosh and Windows PC computers. In the case of the Macintosh, I used a third-party microphone, a preamp, and GarageBand in OS X to create the show. On the PC, I used a third-party microphone, no preamp, and Audacity for recording and sound editing.
I realize that there are literally hundreds of combinations of software, equipment, and operating systems, so I chose two relatively generic setups for creating the podcasts on each platform. The important thing to remember is that the process is fundamentally the same, no matter what is being used to create the show. It goes without saying that a complex preamp/mixing board and a high-end digital recorder will alter the process, but for the purpose of following from idea to finished podcast, these tutorials do the trick.
Creating a Macintosh podcastAlthough other Macintosh programs are available, the fact that GarageBand is bundled with new machines makes it the most ubiquitous sound recording/editing software for the Macintosh. For this reason, I chose to use GarageBand as the software for this tutorial. The list of equipment I used is as follows:
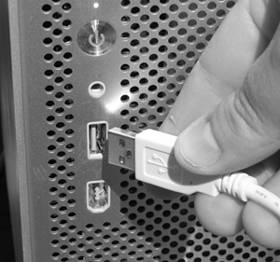
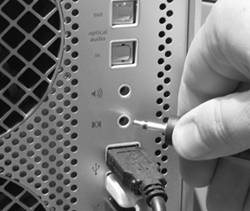
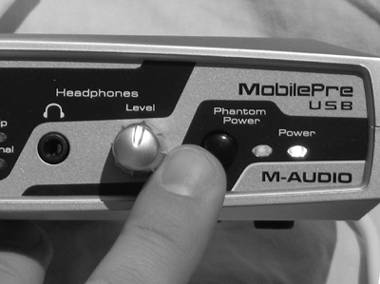
1 Connect the equipmentI am assuming that you came up with the concept for the podcast, an outline, and possibly even a script before you made it to this point. That said, the first step is to connect all the equipment properly, starting with connecting the preamp to the USB port and then the microphone to the preamp (Figures 3.37 through 3.40). When this is accomplished, ensure that the preamp is receiving power (the lights are on). Figure 3.37. Connect the preamp to the computer via the USB port.
Figure 3.40. If you have no preamp, the micro phone can be plugged directly into the Line-In jack on the Macintosh.
Figure 3.38. Check to see that the power is active on the preamp.
Figure 3.39. Insert the microphone jack into the preamp microphone input; then set up your microphone with your pop screen (if you have one) in front of you.
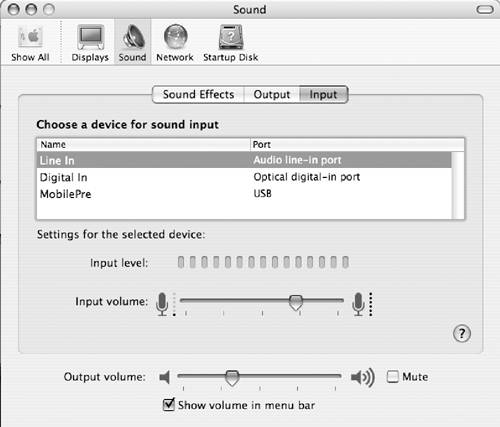
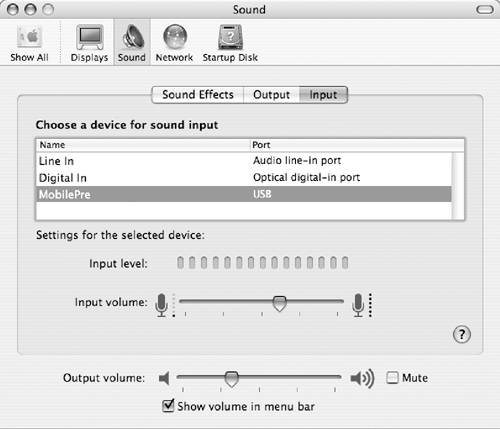
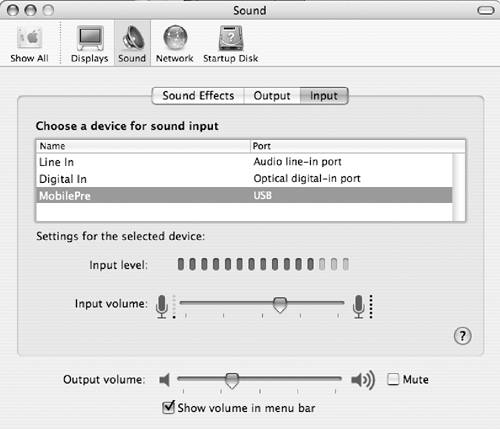
2 Configure the application and OSThis next step is important, because if the correct inputs aren't selected in System Preferences, the microphone will not work properly. You must also open GarageBand and create a new project for your podcast to be created in. Follow the steps in Figures 3.41 through 3.48 to set up a straight vocal track (without any effects) so that recording can begin. Figure 3.41. Open System Preferences, and click the Sound icon. Then click the button labeled Input.
Figure 3.48. In the New Track dialog box, click the Real Instrument button and then select Vocals. The default effect position will be No Effects; leave this as is. For these purposes, Mono is also acceptable (although if you have a stereo microphone, you can click the Stereo button). Click OK to continue.
Figure 3.42. In the list box, select MobilePre. (This is the M-Audio MobilePre USB preamp device I am using.)
Figure 3.43. Using the microphone, test the Input Level by watching the meter above the volume control. Adjust the volume so that normal speech brings the meter up to about 70 percent of maximum.
Figure 3.44. Open GarageBand, and select Create New Song.
Figure 3.45. When you select Create New Song, you will get this dialog box, asking you what to name it and where to save it. The Tempo, Time, bpm, and Key settings at the bottom of the dialog box can be left as is.
Figure 3.46. When the GarageBand project opens, you will see a Grand Piano track. Choose Track > Delete Track to delete it.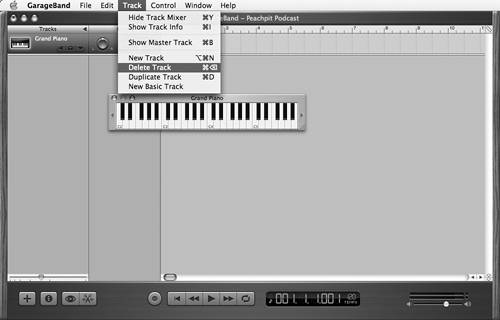 Figure 3.47. Now choose Track > New Track.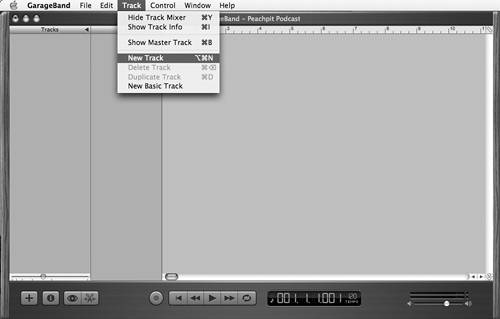
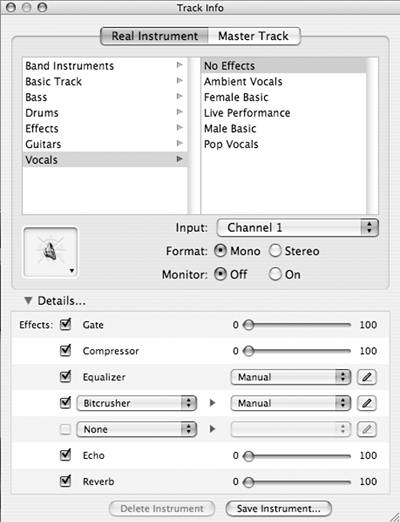
3 Record your podcastNow that everything is set up and ready to go, it's time to record the podcast. Before you start the actual podcast, record the first couple lines of your podcast; then go back and listen to it (Figure 3.49). If you feel that your vocal track needs some adjustment, open the Track Info dialog box by choosing Track > Track Info. Here, you can adjust the equalizer, add effects, and manage echo and reverb. After you have set up your vocals just so, get your script out, and click the Record button to start the podcast (Figures 3.50 and 3.51). Figure 3.49. After recording a short test track, if you don't like the sound, you can open the Track Info dialog box (choose Track > Track Info) and make any changes you feel are necessary.
Figure 3.50. Click the Record button, and start talking!
Figure 3.51. If you make a mistake, just pause for a second and then pick up where you left off (the mistake can be edited out later). The other option is to stop the recording and begin a new track. 4 Edit your vocal contentThe podcast recording is now in the bag. Unfortunately, you made a few verbal flubs and had to repeat yourself in several places to ensure that the material was covered cleanly. This is what editing was made for, and fortunately, it's what GarageBand was made for as well. Using the Track Editor, you can selectively remove (or move around) any portions of the recording that you want (Figures 3.52 through 3.56). Figure 3.52. Begin by selecting the main track (there may only be one); then click the scissor-shaped icon. This brings up the Track Editor, where you can manipulate the recording quickly and easily. Figure 3.56. Using the simple cut-and-paste interface in GarageBand, manipulate the recording so that it represents the intended broadcast. This usually involves simple cutting of mistakes and rejoining of the audio track.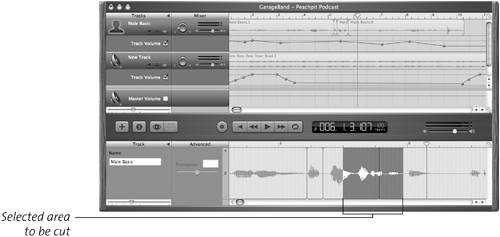 Figure 3.53. In the bottom-left corner of the Track Editor is a slider that allows you to enlarge the scale of the recording strip. Enlarge the scale to between the third and fourth notches. Figure 3.54. Now move to the areas that you want to cut. Using the mouse, select the individual sections of the recording you want to eliminate; then choose Edit > Cut (Command-X).
Figure 3.55. When the portion is cut out, there will be a gap in the soundtrack. Use your mouse to grab the far end of the soundtrack to slide the two halves back together again. In this manner, you can remove any unwanted content and join up the recording again so that the listener never knew anything was cut. 5 Add music and finishing touchesNow is the time to import any music (see "Legalities" earlier in this chapter) into the background and/or at the beginning and end of the podcast. On the Mac, iTunes makes this very simple, because you can drag and drop files directly from iTunes into your podcast (Figure 3.57). Similarly, you can drag an MP3 or AAC file from the Desktop into GarageBand. When the music is in place, click the tiny inverted triangle under the track name to open the Track Volume control (Figure 3.58). With this control, you can adjust the volume of the track in detail, fading in and out as you please (Figure 3.59). Figure 3.57. Drag files directly out of iTunes and into GarageBand, if you want. Here, an original version of "Row Row Row Your Boat" is being dragged into GarageBand.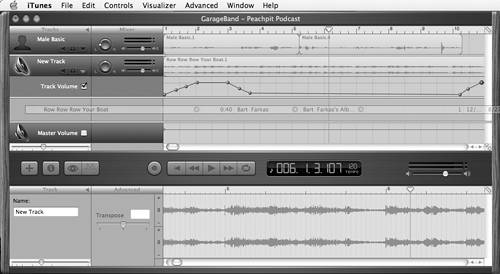 Figure 3.58. When the music is in place, click the inverted triangle to bring up the Track Volume bar. By clicking the volume line in this bar, you create points that you can manipulate to control the volume in minute or heavy-handed ways. Using a series of four points, make your music fade in at the beginning of the podcast and then fade out at the end. Figure 3.59. Depending on the volume variability of your voice during the recording, you may want to adjust the volume on the main voice track, although I recommend against doing so unless it is absolutely necessary. 6 Export the podcast to MP3 formatThe last phase of the podcast creation process is outputting the file in a usable format. Ideally, the MP3 format is the one that can be accessed by the widest range of listeners, so I recommend that you choose that format. That said, GarageBand does not export in MP3 format; it exports in AAC format into iTunes. For this reason, you must export to iTunes first and then convert to an MP3 file in iTunes to complete the process (Figures 3.60, 3.61, and 3.62). Figure 3.60. To export your podcast to iTunes, choose File > Export to iTunes.
Figure 3.61. When the export is complete, your podcast will show up in iTunes as the latest file added. Figure 3.62. In iTunes, select the podcast; then choose Advanced > Convert Selection to MP3 to finish the process. Congratulations you've completed your first podcast! For instructions on how to publish your podcast, turn to Chapter 4.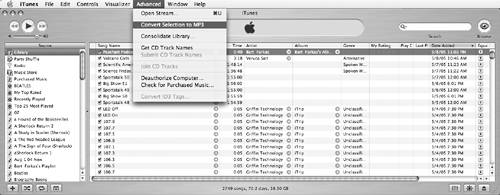 Creating a PC podcastWindows PCs have the largest library of software available for creating podcasts. They also have by far the largest variation in equipment components. PCs have a large variety of motherboards, sound cards, video cards, types of RAM, and even CPUs, and for this reason, it is difficult to present an example of a common PC setup for creating podcasts. That said, the vast majority of PCs have sound cards with microphone inputs, and the lion's share of them run the Windows operating system. I came up with a process for creating a podcast on a PC that a preponderance of PC users will be able to follow, using the following items:
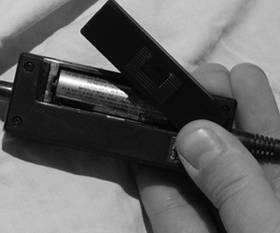
1 Connect the equipmentAs in the Macintosh tutorial, I am assuming that you came up with the concept for the podcast, an outline, and possibly even a script before you made it to this point. When you are ready to begin, you must make the necessary connections to get the ball rolling (Figures 3.63, 3.64, and 3.65). In this case, the connections need only be that the microphone is plugged into the microphone or Line-In jack of the sound card on the back of the PC. Figure 3.63. In the case of the Realistic (Radio Shack) PZM omnidirectional condenser microphone, check to see that it has a fresh battery (there is no preamp to provide phantom power) before you plug it in.
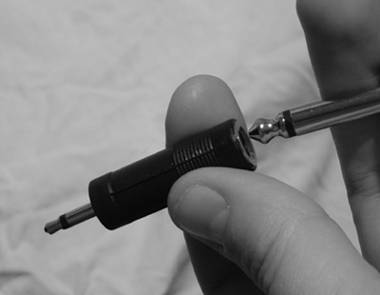
Figure 3.64. If your microphone has a 6.5mm (1/4-inch) jack, you will likely need an adapter to turn the jack into a standard 3.5mm jack that PC sound cards accept.
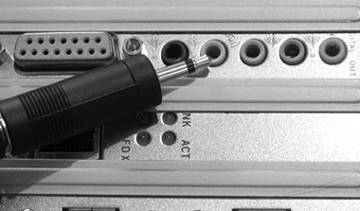
Figure 3.65. Plug the microphone into the microphone input on the sound card (located on the back of your computer). If you make a mistake and plug it into the Line-In jack, it won't be the end of the world; you can always change the input in Audacity later. If you have a pop filter, this is also the time to set it up in front of the microphone.
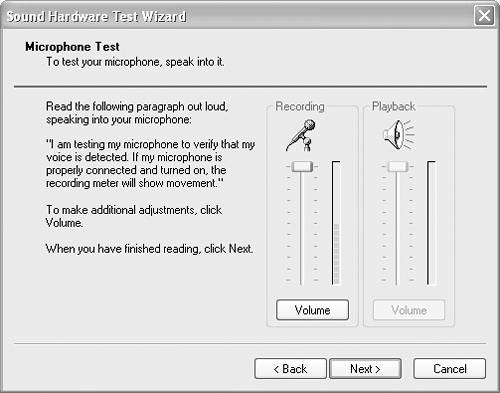
2 Configure the application and OSThis next step involves making sure that the microphone is working as an input device in Windows. To do this, you must enter the Windows Sounds and Audio Devices control panel and ensure that the microphone is working (Figures 3.66 through 3.71). Then you must open Audacity, create a new file, and test your microphone to ensure that it is working properly with that program (Figures 3.72 through 3.75). Figure 3.66. From the Start menu, choose Settings > Control Panel > Sounds, Speech, and Audio Devices.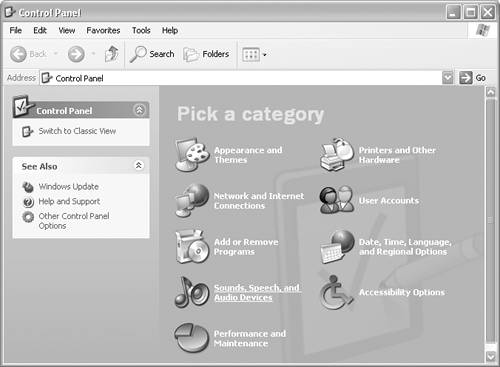 Figure 3.71. After a short time analyzing your system, the wizard shows this dialog box, which allows you to test the functioning of your microphone. When the wizard is complete, the microphone should be working properly.
Figure 3.72. Now it's time to launch Audacity. When it's up and running, choose File > Save Project As to name and save your podcast. Figure 3.75. The left portion of the Audio Track window will tell you what the recording settings are. These should say Mono, 44100 Hz, and 32-bit float rate. If you are using a stereo microphone, you can click the Audio Track control to select a Stereo input. Likewise, if you want to increase or decrease the sampling rate, you can do that in this menu as well. 44100 Hz is 44.1 kHz, which will produce a CD-quality recording. Figure 3.67. Clicking Sounds, Speech, and Audio Devices brings up the Sounds and Audio Devices Properties dialog box. There are five tabs at the top of this dialog box; click the tab labeled Voice.
Figure 3.68. In the Voice Recording area, there is a menu from which you can choose the default recording device. This should already be set to the sound card that is in your computer (in this case, a C-Media card). If you have more than one device available, you can select it here.
Figure 3.69. While still in the Sounds and Audio Devices Properties window, if you want to adjust the balance or the volume of the various inputs to the computer, click the Volume button in the Default Device window. This brings up the Recording Control dialog box, which allows you to adjust the volume and balance for four inputs: Microphone, CD Audio, Line In, and Wave.
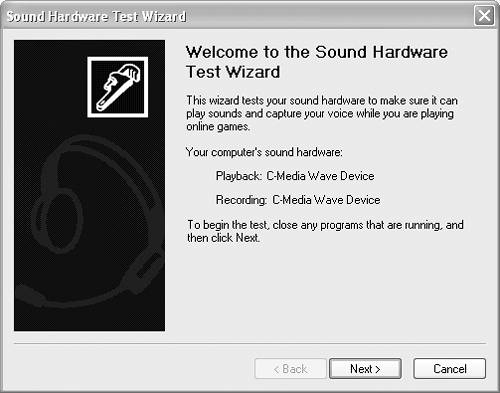
Figure 3.70. If you want to test that the microphone is working properly, click the Test Hardware button. This will bring up the Sound Hardware Test Wizard.
Figure 3.73. In the middle of the main Audacity window is a drop-down menu labeled Microphone. If your microphone is plugged into the microphone jack of your sound card, you're all set. If, however, your microphone is plugged into the Line-In jack, you must select the appropriate input from the Microphone drop-down menu. Figure 3.74. Next, choose Project > New Audio Track. 3 Record your podcastNow that everything is set up and ready to go, it's time to record the podcast. Before you start the actual podcast, record the first couple lines of your podcast; then go back and listen to it (Figure 3.76). If you feel that your vocal track needs some adjustment, and you want to add an effect to it, you can add it after the recording (Audacity doesn't add effects dynamically). When you have completed the practice run, start the recording, and let it rip (Figures 3.77 and 3.78)! Figure 3.76. After recording a short test track, play back the recording to ensure that it sounds OK. Figure 3.77. When you're ready, click the Record button, and start talking! Figure 3.78. If you make a mistake, just pause for a second and then pick up where you left off (the mistake can be edited out later). The other option is to stop the recording and begin a new track. I recommend that you pause and then restart at the point where you made your mistake. This way, you will be editing just one track.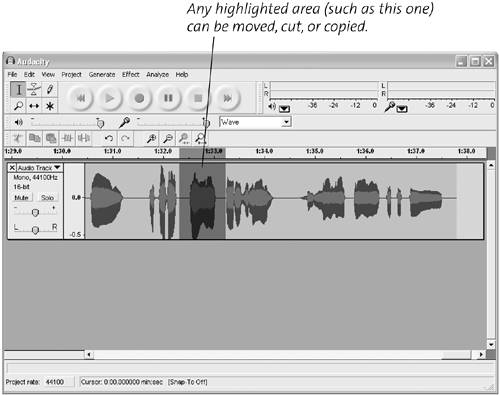 4 Edit your vocal contentThe podcast recording is now in the bag. Unfortunately, you made a few verbal flubs and had to repeat yourself in several places to ensure that the material was covered cleanly. This is what editing was made for, and fortunately, the folks who made Audacity have made it easy for us to edit out any verbal mistakes (Figures 3.79 through 3.82). Figure 3.79. Audacity allows you to edit the tracks right in the Audio Track window. To edit a specific portion or add an effect to it, highlight that portion of the track. Figure 3.82. To move a portion of the recording around, choose Edit > Cut. Then, using the selection tool, click the place in the recording where you want the cut piece of audio to be placed. When the area is selected (a line will appear in the recording showing the exact point of insertion), choose Edit > Paste. Figure 3.80. When the portion of the track you want to alter is highlighted, click the Effect menu and drag down to the effect you want to apply to the recording. In this case, you are adding an Echo effect to the selection.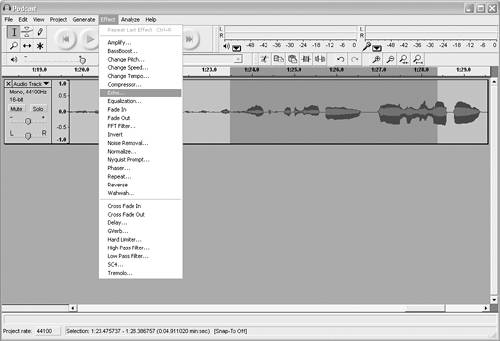 Figure 3.81. If you want to remove a specific portion, select that portion; then choose Edit > Cut. When you do this, the portion you selected will be cut from the recording. 5 Add music and finishing touchesThe voice recording is now just right, but it's just a plain voice recording. Now is the time to import any music (see "Legalities" earlier in this chapter) into the background and/or at the beginning and end of the podcast. Audacity allows for the easy drag-and-drop addition of any MP3 or WAV file. Simply pick up the MP3 file you want, and drag it to the area beneath your main sound track (Figure 3.83). The MP3 will be added as a separate audio track. When the music is in place, you can highlight specific sections and adjust the volume or apply effects such as a fade-in or fade-out as you see fit (Figures 3.84, 3.85, and 3.86). Figure 3.83. Drag audio files directly to Audacity. When you do, the files will be imported automatically.
Figure 3.84. When the music is in place, you can adjust the volume control on the bar on the left, or you can select portions of the music and add effects to it. This is where you can add the Fade In and Fade Out effects. Figure 3.85. Note the (very loud) MP3 recording and how it is tapered at both ends. This file has had a short Fade In and a longer Fade Out effect added to it.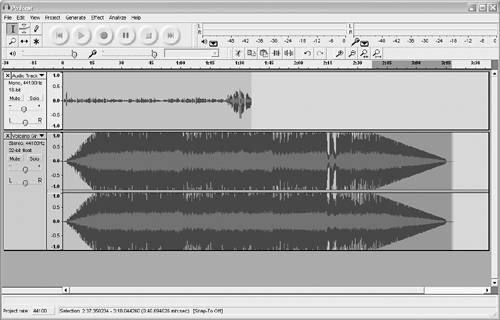 Figure 3.86. If you want to add any effects to any portion of the recording, now is the time to do it. To add an effect, simply select the portion of the recording that you want to alter; then choose the effect you want to add from the Effect menu. You can undo the addition of effects, if need be.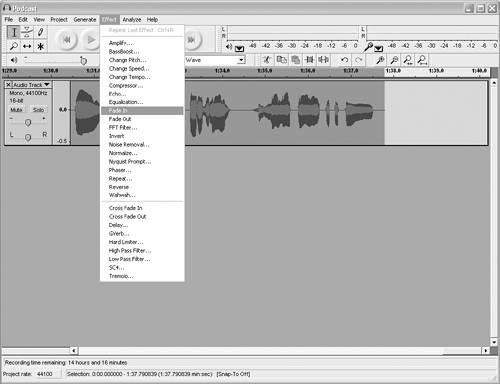 6 Export the podcast to MP3 formatThe last phase of the podcast creation process is outputting the file in a usable format. Ideally, the MP3 format is the one that can be accessed by the widest range of listeners, so I recommend that you choose that format (Figures 3.87, 3.88, and 3.89). Audacity can export files as .WAV files, MP3 files, or Ogg Vorbis files. For the purposes of mass acceptance, the MP3 is the file of choice. Figure 3.87. When the podcast is complete, choose File > Export As MP3.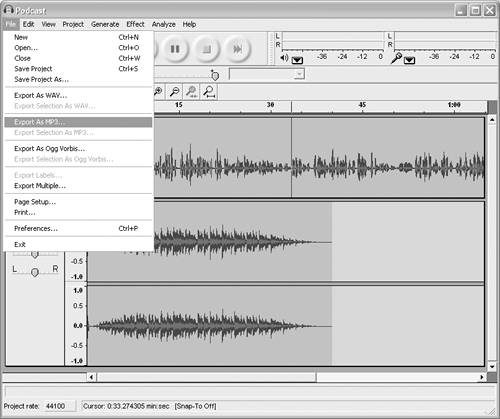 Figure 3.88. When you select the Export as MP3 file, a warning appears that the file will be mixed down into two tracks (a stereo recording). This is fine.
Figure 3.89. Next, a dialog box asks you to name the file and select a place to save it. This dialog box also allows you to change your mind about what kind of file format to save it in. That's it! When the file has been exported as an MP3 file, the job is complete.
|

EAN: N/A
Pages: 80