The Outlook Object Model
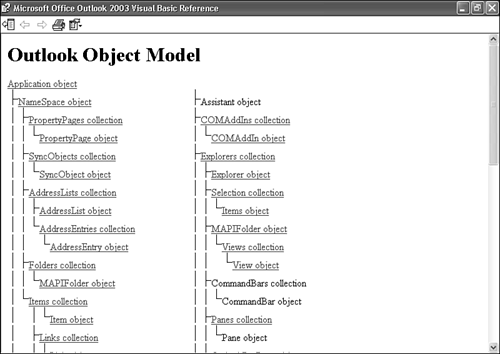
| All Office development depends on the use of object models to access all the items, properties, and methods of an application. An object represents an actual item. In Outlook, an object could be a mail item, a toolbar, a command button, or the entire application. Each object has properties, methods, and events that determine the type of data contained in the object and the operations that can be performed on that object. Objects in Outlook exist in a hierarchical relationship. Most Outlook objects have another object as their parent. That object is usually, but not always, a different object type and might have many different properties and methods. This hierarchical relationship enables all Outlook objects to be grouped into one object model. One of the easiest ways to view the Outlook object model is through the Microsoft Outlook Object Library Help file, which is accessible from the Help menu in the Script Editor of a custom Outlook form. Selecting this menu option displays the Outlook Object Library Help window (see Figure 33.3). This Help file lists many of the valid Outlook objects and their relationships to other objects. To drill down to view the properties, methods, and events available on an object, select the object. Figure 33.3. The Outlook Object Library Help is a graphical representation of the object model.
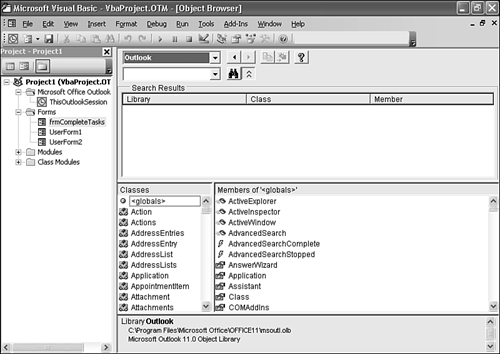
Using the Object BrowserVBA in Outlook provides another method for viewing Outlook objects, the Object Browser. The Object Browser enables you to search the Outlook object model for objects and their associated properties, methods, and events. To open the Object Browser, select View, Object Browser, or press F2 to display Figure 33.4. Figure 33.4. Use the Object Browser to view objects and their properties, methods, and events.
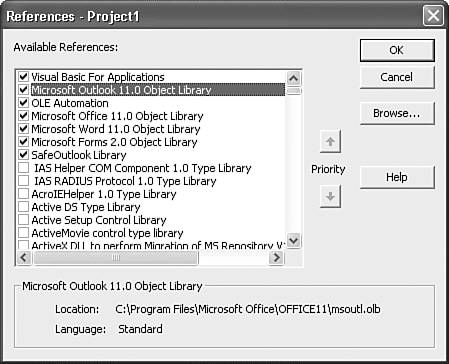
When you first open the Object Browser, you have access to a variety of object libraries. The default libraries are Office, VBA, Outlook, and OLE Automation. You can choose to search only one of these libraries or add additional libraries to your Object Browser. If you plan to use Outlook VBA to control other applications, such as Word and Excel, consider adding all the appropriate object libraries to your Object Browser. To add a library to your Object Browser, select Tools, References, to display Figure 33.5. Figure 33.5. Use the References dialog box to add additional object libraries.
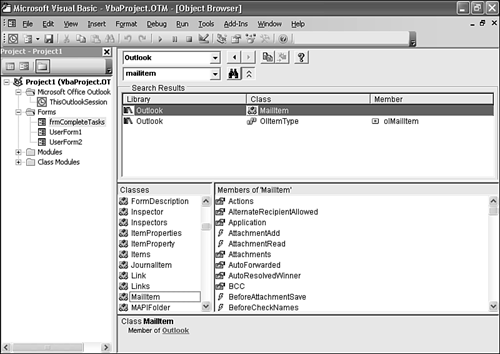
Scroll through the list of available libraries and check the box next to each library you want to add to your Object Browser. You can also add a custom or third-party library by clicking the Browse button and navigating to the type library file. Click OK when you're done to return to the Object Browser. The Object Browser has several main components. The first is a Project/Library drop-down list. This box enables you to choose the specific project or library you want to search. You can search all libraries (the default) or choose to search only one library. Because we're primarily concerned with programming Outlook in this book, choose the Outlook library from the drop-down list. The Search drop-down list is immediately below the Project/Library drop-down list. Enter a search term in this drop-down box and press Enter on the keyboard. A Search Results pane will open directly below the search box displaying all the matching classes and members. If you don't know the name of the item you're searching for, you might end up with a large number of search results you don't need. For example, if you want to determine all the properties, methods, and events of a mail item but don't know the specific object name, you might just search on Mail. This search, shown in Figure 33.6, not only will show you the mail item (actually called MailItem), but will also show you any class, property, method, or event with the letters mail in its name. Figure 33.6. If you use general search terms, you'll receive a large number of results.
When you find the search result you're interested in, click the line containing that search item in the Search Results pane. The bottom two panes of the Object Browser, the Classes and Members panes, will update to display the selected class and all members of that class, including properties, methods, and events. For more information about a member of a class, click the member name. Information about that member is displayed in the bottom pane of the Object Browser. Depending on the specific property, method, or event you select, you can view the data type, parent, or event syntax. If you want more detailed information about a specific item, select any class or member. Then either press F1 or click the Help icon. Outlook will display help for that specific class or member. You can hide the search results at any time by clicking the Hide Search Results button next to the Search drop-down list. To retrace your steps through the Object Browser, use the forward or back button next to the Project Library drop-down list. TIP If you want to close the Object Brower and return to your code, select View, Code or press F7. To start your code, expand Project1 and then expand Microsoft Outlook Objects to display ThisOutlookSession. Double-click ThisOutlookSession to begin writing your code. Declaring an ObjectWhen you know the object you want to work with, you need to declare and use it. It isn't absolutely necessary to declare your object (known as dimensioning), but it is good programming practice to do so. If you want to force all variables to be declared, put the words Option Explicit at the top of your code in the declarations section of the general object. This statement will cause an error to be displayed when your code runs if you have any variables that aren't explicitly declared. To declare an object, use the following syntax: Dim objMailItem as Outlook.MailItem This statement declares an object variable named objMailItem as an Outlook mail item. After you declare your variable, you can use the Set and New keywords to create your object. To create a new mail item with the objMailItem variable, use the following statement: Set objMailItem = New Outlook.MailItem Now you can work with objMailItem's properties, methods, and events. When you declare an object variable, you should always set it to Nothing at the end of your code. This ensures that all references to the object are closed and disposed of properly when your code is finished running. NOTE Although VBA is supposed to clean up all of your objects when your code finishes, it doesn't always do a perfect job. If you have a large number of object variables, failing to set your variables to Nothing can cause slow performance. Important Outlook ObjectsThe Application object is probably the most important object in Outlook VBA development. It is at the top level of the Outlook object model and is known as the root object because all other objects descend from the Application object. When writing code in Outlook, the Application object already exists. There's no need to declare a variable as an Outlook.Application. If you're attempting to write code in another application to access Outlook, you must explicitly declare and create the Outlook.Application object. The Application object's immediate child is the NameSpace object. This object provides direct access to all the native Outlook objects including folders, address lists, property pages, and items. The only supported namespace is MAPI. To reference the NameSpace object, use the following VBA code: Application.GetNamespace("MAPI") Directly under the NameSpace object is the Folders collection. This collection enables you to access every folder in Outlook and items within those folders. However, you can also access members of the Folders collection directly from the NameSpace object. Use the GetDefaultFolder method of the NameSpace object to return any of Outlook's default folders. This method requires a parameter, olDefaultFolders, which has a different value for each of Outlook's default folders. Table 33.2 lists the constants used with the GetDefaultFolder method as well as their numeric equivalents (used in VBScript).
All of these constants refer to your default folder store. If you have a mailbox on the Exchange Server as well as a Personal Folders file, the GetDefaultFolder method returns the folder in your Exchange Mailbox. If you have multiple Personal Folders files, the GetDefaultFolder method returns the folder in the Personal Folders file that is your default delivery location. The following code listing shows the GetDefaultFolder method in action to return a count of the number of items in your inbox: Sub GetInboxCount() Dim olNS As Outlook.NameSpace Dim olFolder As Outlook.MAPIFolder Dim intCount As Integer Set olNS = Application.GetNamespace("MAPI") 'Get the NameSpace object Set olFolder = olNS.GetDefaultFolder(olFolderInbox) 'Get the Inbox folder intCount = olFolder.Items.Count 'Get the item count of the Inbox 'Do something with that count Set olFolder = Nothing 'Release all object variables Set olNS = Nothing End Sub
You can place this function in a user-created module or directly in the ThisOutlookSession module. Using Explorers and InspectorsIn addition to the Application and NameSpace objects, three other objects feature prominently in Outlook development. An Explorer object is the window that displays a folder. When you view your Inbox, you're using an Explorer object. If you open your calendar in a new window, you are creating a new Explorer. You can set a reference to the currently active Explorer by using the following code: Application.ActiveExplorer To return the Explorer associated with a particular folder and display its caption in a dialog box, use this code: Set olNS = Application.GetNamespace("MAPI") Set objFolder = olNS.GetDefaultFolder(olFolderContacts) Set objExplorer = objFolder.GetExplorer Msgbox objExplorer.Caption An Inspector object is the window that displays the actual Outlook item. Double-clicking an email opens a new Inspector. You can have multiple Explorer and Inspector objects open at any one time. To set a reference to the active Inspector, use the following code: Application.ActiveInspector You can use the Explorer and Inspector objects to activate Outlook windows, display items, and work with command bars and menu items. |
EAN: 2147483647
Pages: 426