Sending Secure Messages

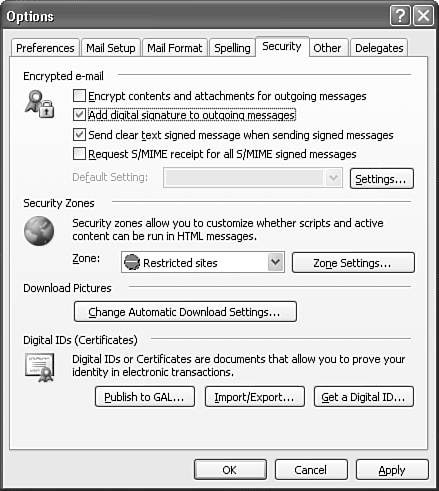
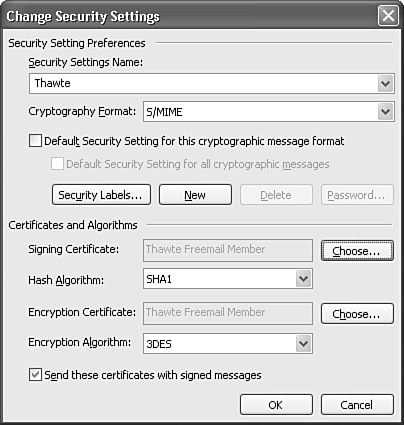
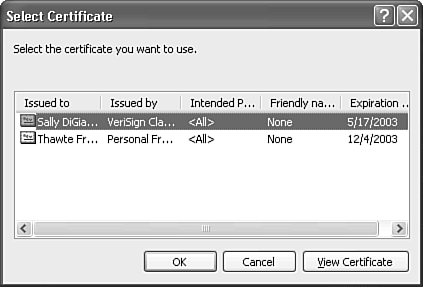
Now that you know how to secure the individual items within Outlook and secure your computer, you can take security one step further by learning to send secure messages. Sending secure messages is a bit like requiring a driver's license when making a credit card purchase. A digital certificate guarantees that you are who you say you are much like your driver's license assures a retail store that you're really the same person whose name is on the credit card.

A digital certificate is an electronic driver's license, in a way. Composed of a public and private key, a certificate can accomplish two things. First, it can assure the recipient of your email that it really did come from you. Second, it can guarantee that the email wasn't changed between the sender's machine and the recipient's machine.

Using Certificates

As alluded to previously, a certificate can provide two very valuable services: authentication and encryption. You can use a certificate for authentication to verify that the person sending you email is the same person who owns the email address the email was sent from. In other words, I can't send an email from john@doe.com unless my email account actually is john@doe.com. I can't spoof an email address and attach a digital certificate to the email at the same time.

Encryption involves taking your plain text email messages and encoding the data so that only the intended recipient can decode the data. Your recipient must have a copy of your public key to decrypt the email message. Anyone else who might try to intercept the email message and open it would see only garbage where the text should be.

NOTE

A certificate works by using the Secure Multipurpose Internet Mail Extensions (S/MIME) protocol that Outlook supports. You can exchange secure messages with anyone who uses an email client that supports S/MIME.


A certificate is made up of two parts: a private key and a public key. The private key is stored on your computer, in the Windows Registry. It isn't known or distributed to anyone. You can use your private key to sign the messages you send.

The public key is a file that you can send to others who want to send you encrypted messages. You can attach the public key to your contact record and share it with others by sending them your contact record. When someone wants to send you an encrypted email, they must use your public key. When you receive the email, you use your private key to decrypt that email. If you want to receive encrypted messages from someone with a digital certificate, you must have a copy of her public key available and attached to her contact record in your Contacts folder.

Obtaining a Certificate

You can obtain a certificate from a certificate authority (CA). Two of the most popular CAs are VeriSign and Thawte. VeriSign offers a free trial digital certificate that's valid for 60 days. If you want to continue using that digital certificate, the price at the time this book was written was $14.95 per year. Thawte offers a free personal digital certificate. To obtain a digital certificate from either of these companies, you need to connect to its Web site and register with a valid email address. You'll receive a confirmation email that requires you to validate your email address before you receive your digital certificate.

After you receive your digital certificate, you can set up Outlook to use that digital certificate to send and receive signed and encrypted email.

Setting Up Certificates

When you sign up for a digital certificate from a certificate authority, it will send you a confirmation email, usually with a PIN that you must enter on the CA's Web site to download and install your digital certificate. After you've downloaded the digital certificate, use the following steps to install that certificate in Outlook 2003:

  1. From Outlook, choose Tools, Options, and click the Security tab to display Figure 25.9.

    Figure 25.9. Use the Security tab to configure digital certificate settings.

    graphics/25fig09.jpg

  2. If you want to send a digital signature with all outgoing messages, check the box marked Add Digital Signature to Outgoing Messages.

  3. Click the Settings button to display Figure 25.10 and configure your digital signature.

    Figure 25.10. Your digital signature might already appear in the drop-down box.

    graphics/25fig10.gif

  4. You can enter a name in the Security Settings Name box, although it's likely that a name will already be entered in this field when you install the digital certificate.

  5. Your next choice depends on whether you want to use your digital certificate for Exchange email or Internet email. Chances are if you're sending mail within your Exchange Server, you don't need a digital certificate. After all, you should be authenticated on the domain if you're using Exchange Server, and very few companies require authenticated email between members of the same Exchange Server. If you're using your digital certificate for Internet email, accept the default choice of S/MIME for the Cryptographic Message drop-down list. If you need the digital certificate for Exchange email, you can change this drop-down choice to Exchange Server Security.

  6. You'll usually want to leave the next two check boxes checked. The first, Default Security Setting for This Cryptographic Message Format, means that for all S/MIME messages you send, you want Outlook to use these security settings. The second check box, Default Security Settings for All Cryptographic Messages means that you want all messages, regardless of format, to use these security settings.

  7. In the Certificates and Algorithms section, click the Choose button next to the Signing Certificate text box to display Figure 25.11.

    Figure 25.11. Choose the signing and encryption certificates.

    graphics/25fig11.gif

  8. If you have multiple certificates installed on this machine, choose the certificate you want to use for this email account. It's possible that you'll have multiple profiles in Outlook with different email addresses. You can install a different certificate for each email address and configure the settings in each Outlook profile. Choose your certificate and click OK to return to the Change Security Settings dialog box. You'll see values in both the Hash Algorithm box and the Encryption Algorithm box. Do not change these values they're set by the certificate.

  9. If you want to send your public key to other users, make sure the check box marked Send These Certificates with Signed Messages is checked. Otherwise, your public key won't be sent with your messages and recipients won't be able to receive encrypted email from you.

  10. Click OK twice to save your settings.

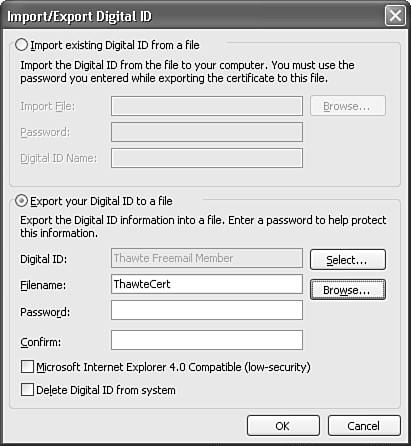
You've now completed the setup for your digital certificate and you're ready to send and receive signed messages.

Backing Up Your Digital Certificate

After you've installed and configured your digital certificate, you can use the following procedure to make a backup copy. A backup copy can be helpful in case of a hard drive failure or if you need to change computers.

  1. Within Outlook choose Tools, Options and click the Security tab.

  2. In the Digital ID section at the bottom of the dialog, click Import/Export to display Figure 25.12.

    Figure 25.12. You can export your Digital ID to a file for backup purposes.

    graphics/25fig12.gif

  3. Choose Export Your Digital ID to a File.

  4. Click Select to choose your digital ID, click OK when you have selected the proper digital ID.

  5. Enter a filename for the exported digital ID or click Browse to choose a location on your hard drive to save the file. Click Save when you've selected a location and entered a filename to return to the Import/Export Digital ID options.

  6. Enter a password (and confirm it) for your saved digital ID. This prevents unauthorized users from attempting to import your digital ID. You must enter a password to save your digital ID.

  7. Leave the Microsoft Internet Explorer 4.0 Compatible check box unchecked. If you want to remove your digital ID from the system (for example, when trading computers with a colleague), check the box marked Delete Digital ID from system; otherwise, leave this box unchecked.

  8. Click OK to export your digital ID.

You should keep the backup copy of your digital ID in a safe place. It's a good idea to back up the file to a CD or disk and keep that copy in a fire safe or somewhere secure.

Importing a Digital ID from a Backup

It is relatively simple to import a digital ID from a backup copy. Use the following steps to import a digital ID:

  1. Select Tools, Options, and click the Security tab.

  2. Click Import/Export to display the dialog shown previously in Figure 25.12.

  3. If it's not selected, select Import Existing Digital ID from a File.

  4. Click Browse to select the file you want to import.

  5. Enter the password of the saved digital ID.

  6. In the Digital ID Name box, enter a name that you want Outlook to use to refer to your digital ID. Any name is acceptable.

  7. Click OK to import your digital ID.

NOTE

After you install your digital ID, Outlook automatically adds two buttons to your email toolbar: Sign and Encrypt. You can use these buttons to sign messages you send to others.


Special Edition Using Microsoft Office Outlook 2003
ISBN: 0789729563
EAN: 2147483647
Year: 2003
Pages: 426

flylib.com © 2008-2017.
If you may any questions please contact us: flylib@qtcs.net