Personal Information Manager Improvements
| Many of the improvements in Outlook 2003 are in the area of personal information manager (PIM) functionality. These improvements make it easier to find the information you need and enable you to view, organize, track, and respond to information quickly and accurately. Navigation PaneThe Navigation Pane is a context-sensitive pane designed to show the user only the information she needs, only when she needs it. The Mail view of the Navigation Pane, shown in Figure 1.3, does not show any folders that contain Contact items, Task items, Calendar items, Journal items, or Notes items. This makes the list of folders displayed in the folder pane significantly easier to navigate. Figure 1.3. The Mail view of the Navigation Pane shows you only mail folders.
Each folder type is represented by a button on the Navigation Pane. By default, when you install Outlook 2003, the Mail, Calendar, Contacts, and Tasks buttons will be displayed in large horizontal banners. The other buttons, Notes, Folder List, and Shortcuts, are displayed below those banners. The Journal button is hidden by default, but you can add it back by customizing the Navigation Pane. To change the size of the buttons and add or remove buttons from the horizontal banners, drag the top of the Navigation Pane's buttons up or down. If you choose to view the Navigation Pane in Contact view, as shown in Figure 1.4, you'll see any Contacts folders to which you have access. These could be Contacts folders within your own mailbox, public contact folders, or shared contact folders from a colleague. Figure 1.4. The Contact view of the Navigation Pane shows you all your Contacts folders.
In addition to showing you the Contacts folders you can access, the Navigation Pane can also show you a list of all available views for the folder. You can change views by just clicking on the view you need. Each item type has its own Navigation Pane. The last Navigation Pane we'll discuss here is the Calendar Navigation Pane (see Figure 1.5). Figure 1.5. The Calendar folder's Navigation Pane is very different: It includes the Date Navigator as well as the ability to open others' calendars.
One of the first things you'll notice about the Calendar Navigation Pane is the new location of the Date Navigator. Previous versions of Outlook included the Date Navigator on the right of the Calendar folder and displayed the TaskPad by default. Outlook 2003 removes the TaskPad from the default Calendar view and moves the Date Navigator to the Navigation Pane. The Calendar Navigation Pane also includes a view section that enables you to switch your Calendar view with a single mouse click. You can easily access a shared calendar folder by using the quick links in the Navigation Pane. If you want to work with your TaskPad and prefer your monthly calendar back on the right, you can easily change your view. Just click View, TaskPad to return the TaskPad to the right of the screen. The monthly calendar returns to the top of the TaskPad and your Navigation Pane changes slightly, as shown in Figure 1.6. Figure 1.6. You can return your Calendar folder to the classic view.
The other views of the Navigation Pane can be seen by clicking on the individual buttons for each of the different folder types.
Quick FlagsAnother new feature in Outlook 2003 is Quick Flags. You could always flag a message for follow-up; in fact, it was a relatively quick and easy way to set yourself a reminder for an item. You could right-click a message, choose Flag for Follow Up, enter a follow-up message, choose a date and time, and click OK. Outlook 2003 took those multiple steps and reduced them to one. Now, every default mail view has an additional column added to it, as shown in Figure 1.7. Figure 1.7. The Quick Flag column is present in all mail views.
All you have to do to flag a message is click once in the Quick Flag column. The default flag color is red. You can choose from six different flag colors: red, blue, yellow, green, orange, and purple. To select a different flag color, right-click the Quick Flag column and choose a different colored flag. You can also change your default flag color by right-clicking the Quick Flag column to display the Quick Flag context menu. Choose Set Default Flag and choose your new default flag color. Unfortunately, Outlook 2003 doesn't have a way to label your different flag colors. A red flag is always a red flag, never an Important flag or a Personal flag. To mark a flagged item as complete, simply click the Quick Flag column again. The flag is marked complete with one click. If you really liked the reminder feature of the Flag for Follow Up method in previous versions of Outlook, you can still add a reminder to a flag with just a couple of steps. Right-click the Quick Flag column and choose Add Reminder to display Figure 1.8, the Flag for Follow Up dialog box. You can choose a Flag To value, a due date and time, and a flag color. Click OK to set your Quick Flag and follow-up reminder. Figure 1.8. You can still add a reminder to your Follow-Up flag.
Because it's so easy to set a Quick Flag, you might find a situation in which you accidentally click the Quick Flag column while trying to select the message. If you flagged a message by mistake, right-click the Quick Flag column and choose Clear Flag. After you set a number of Quick Flags in your Inbox, you'll probably find that it's very easy to determine which items are flagged with a quick glance. The large colorful flags really stand out and serve as a visual reminder of the items you need to complete.
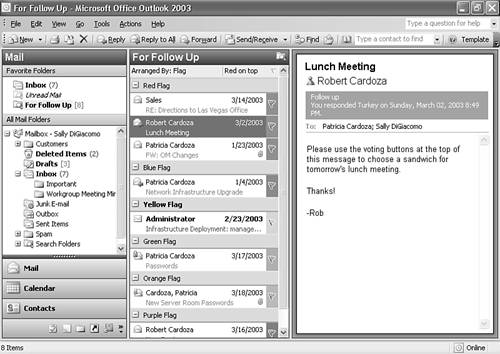
Search FoldersAn additional feature that makes Quick Flags so useful is Outlook 2003's Search Folders. A Search Folder is very much like a virtual folder. It's a folder that performs an Advanced Find, searching all folders in your mailbox for items that meet a certain criteria. Outlook 2003 ships with three default Search Folders: Unread Mail, Large Messages, and For Follow Up. By default, two search folders, Unread Mail and For Follow Up, are included in the Favorite Folders pane at the top of the Navigation Pane. You don't have to do anything to use the default Search Folders; just select one of them from the Favorite Folders pane or from your folder list. The For Follow Up Search Folder, shown in Figure 1.9, lists all items that have a Quick Flag set. Items are grouped by flag color so that you can see which items are flagged red, green, purple, and so on. Figure 1.9. The For Follow Up search folder displays all items with a Quick Flag set.
A Search Folder is not an actual folder. It exists only as a collection of items in Outlook. You can create your own Search Folder to group all items that meet a criterion or set of criteria in one virtual folder. You can also change the criteria for existing Search Folders.
Intelligent GroupingAll views in Outlook can now take advantage of a new feature: intelligent grouping. Intelligent grouping is a new way of arranging items by real-world groups. For example, attempting to group items by the date they were received in previous versions of Outlook would display a group of items for each date and time, even down to the second. Unless you really needed to know which messages were received at 8:52:06 a.m. and which were received at 8:52:39 a.m., this grouping wasn't very useful. In Outlook 2003, each group is based on logical breakdowns. For example, grouping items by date produces the following groups:
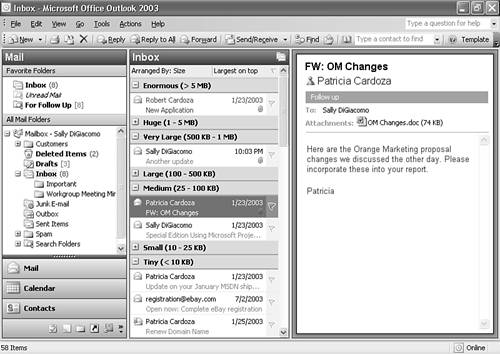
Grouping items by size produces seven different categories, as shown in Figure 1.10: Enormous (>5MB), Huge (1 5MB), Very Large (500KB 1MB), Large (100 500KB), Medium (25 100KB), Small (10 25KB), and Tiny (<10KB). Each type of grouping produces different categories within the group. Figure 1.10. Grouping by size creates seven different groups.
ArrangementsAlong with intelligent grouping, Outlook 2003 introduces another new feature: arrangements. An arrangement is really a fancy new name for a view in Outlook. Each folder type ships with its own set of default arrangements. You can access those arrangements in two ways. First, you can click between the folder name and the displayed messages on the words Arranged By. This displays a pop-up menu like the one seen in Figure 1.11. Figure 1.11. You can quickly choose an arrangement from the Arrange By context menu.
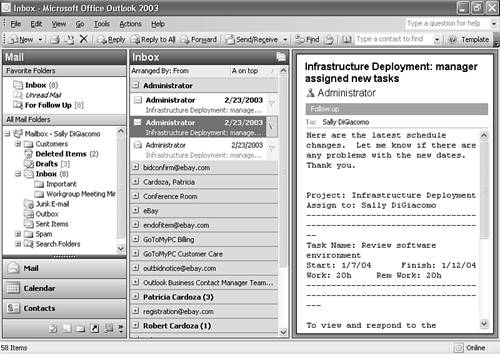
You can choose your arrangement from any available arrangement on the list. You can also access arrangements much like you previously accessed views in Outlook. Select View, Arrange By, and choose your arrangement. Arrangements haven't replaced views; they supplement them. You can still access and customize views in Outlook by selecting View, Arrange By, Current View and choosing from any default or custom view. So, if arrangements are really only enhanced views, why have both? Well, you can't customize arrangements. They're predefined views with specific sorting and grouping. For example, the Attachments arrangement groups messages into two separate groups: With Attachments and No Attachments. This way, it's easier to find a message with an attachment. Within the groups, your messages are still sorted by received date. Each arrangement has a default sort order. That sort order is displayed next to the arrangement name between the folder name and the message list. For example, in Figure 1.12, the chosen arrangement is to list items grouped by sender. The default sort order for this arrangement is in alphabetical order with a first. You can change this sort order by clicking on the banner marked A on Top. This changes the sort of the arrangement and changes the banner name to Z on Top. You can use this technique to change your sort order for any of Outlook's arrangements. Figure 1.12. Arranging items by From groups by the From field and displays the results in alphabetical order.
Arrangements were designed as an easy way to select some of the most common grouped views users need.
|

 For more information about the Navigation Pane,
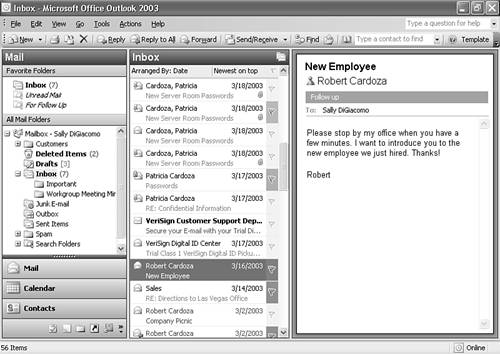
EAN: 2147483647
Pages: 426
- Chapter II Information Search on the Internet: A Causal Model
- Chapter X Converting Browsers to Buyers: Key Considerations in Designing Business-to-Consumer Web Sites
- Chapter XI User Satisfaction with Web Portals: An Empirical Study
- Chapter XVII Internet Markets and E-Loyalty
- Chapter XVIII Web Systems Design, Litigation, and Online Consumer Behavior