Creating a New Task in the Tasks Folder
| There are a variety of ways to create a new task, but the Tasks folder offers the most direct and flexible method of creating tasks. Other methods for creating tasks can be found later in this chapter. TIP One of the most powerful methods of creating a task is dragging an email directly to the Tasks folder. This method, called AutoCreate, is discussed later in this chapter. To open the Tasks folder, click on the Tasks banner on the Navigation Pane or select Go, Tasks from the menu bar. Outlook's default Task view is the Timeline view. If you're familiar with Microsoft Project, the Timeline view will make sense and probably be quite helpful. Otherwise, you might find it hard to glean much useful information from the Timeline view. Many people find the Active Tasks table view simpler to use and navigate.
Figure 14.3. The Navigation Pane enables you to see the currently active view and select a new view with a single mouse click.
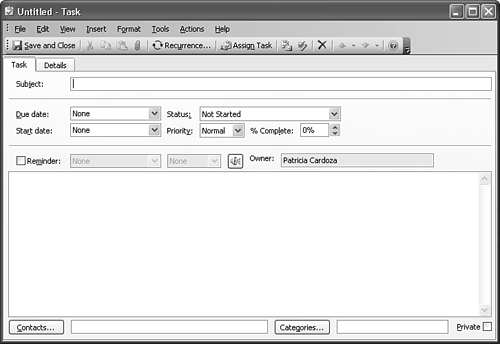
To create a new task in this view, click the New button on the toolbar or select File, New, Task from the menu bar. A blank task form opens as seen in Figure 14.4. Figure 14.4. A blank Task form loads with your name in the Owner field, no start date or due date and no reminder.
When you create a new task, you're the owner of that task by default. You cannot change the owner unless you assign the task to someone else. If he accepts the task assignment, he becomes the new owner of the task. By default, new tasks have no start date or due date, no reminder, and normal priority. They have a status of Not Started and % Complete value of 0%.
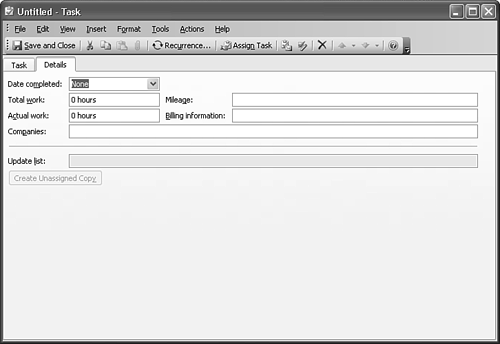
Setting Task OptionsThe Task page is fairly straightforward. The Start Date, Due Date, and Reminder date fields are drop-down calendars that enable you to select a date. Click the drop-down arrow to display the calendar and click your desired date. Clicking None clears any previously selected date. The Details page of the task form, shown in Figure 14.5, contains additional task information, including a list of individuals who should be notified when an assigned task is updated. Figure 14.5. The Details page of the task form enables you to view additional information about the task.
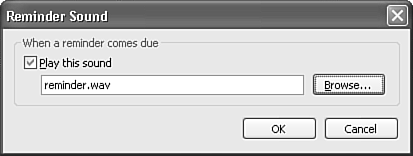
Many people never use the Details page of the Task form. The fields on this page include Total Work, Actual Work, Milea ge, Com panies, and Billing Information. These fields are very helpful to an organization such as a law firm that must track detailed information for every email, meeting, and task a lawyer performs. Although these fields are static fields (meaning that the information in them doesn't affect the operation of the task), they provide the ability to track very specific information that can later be extracted for reporting purposes through code or a third-party program. The default status of a new task is Not Started. You can change this status when you create the task or any time after the task has been created. You can choose from the following status choices for your task: Not Started, In Progress, Completed, Waiting on Someone Else, or Deferred. The status of a task and the percentage complete are related fields. If your task status is Not Started and you change the % Complete to something greater than 0% and less than 100%, the status of the task changes to In Progress. Outlook assumes that by completing a percentage of the task, you want to mark it as In Progress. If you set the percentage to 100%, the task is marked Complete. This functionality also works in reverse. If you mark a task as Complete, the % Complete changes to 100%, whereas marking a task as Not Started changes the % Complete to 0%. By default, a reminder is not set for a new task. If you choose to enter a due date for your task, a reminder is automatically set to the same day as the due date. The default reminder time is 8:00 a.m. You can uncheck the reminder box to remove the reminder or set the reminder for another date or time. TIP To change the default reminder time from 8:00 a.m. to another time of day, open the Options dialog from the Tools menu. Use the Reminder Time drop-down list to select a different time of day. TIP If you don't want to automatically create reminders on tasks with due dates, change the global setting in Outlook's Options dialog box, under Task Options. If you set the start date for a task that does not yet have a due date, the due date will default to the start date. For complicated tasks, you might want to change the start date to several days before the due date and set the reminder to trigger on the start date. You can change the sound that plays when your reminder is triggered by clicking the bell icon next to the reminder time to bring up the dialog box shown in Figure 14.6. The new sound you select is valid only for the current task. All other tasks will continue to use the default reminder sound. You can also select to not play a sound when a reminder triggers. Figure 14.6. To choose your reminder sound, click Browse to select any .wav file. This sound will play when your reminder triggers.
Going Further with TasksAlthough creating simple tasks can be a helpful reminder tool, tasks can serve as a very powerful organization tool when used to their full potential. A task can be much more than a subject and a due date. For particularly complicated tasks, or even those that just need more explanation than Turn in Budget Proposal, the Notes field is very helpful. This field can store text as well as attached files or Outlook items. You can associate contacts with your task by clicking the Contacts button at the bottom of the task form. This displays a list of all the contacts in your default Contacts folder, as shown in Figure 14.7. You can use the folder list at the top of the window to select other Contacts folders you might have. Double-click on a contact to associate it with your task, or use the Control or Shift keys to select multiple contacts before clicking OK or Apply. By associating a contact with a task, you list that task in the Activities page of that contact. Figure 14.7. Double-click on a contact to add that contact to your task.
To assign a category to your task, click the Cate gories button to display your Master Category List or just type in a new or existing category. The Private box on a Task form is used in several ways. If you're sharing your Tasks folder with another user in an Exchange environment, items marked private aren't displayed to the other user. If you use Delegate Access, you can specify whether your delegate has access to your Private items.
NOTE Some personal digital assistants (PDAs) use the Private field to determine what items are synchronized between the PDA and the Tasks folder. Check your PDA documentation to determine whether your PDA offers this functionality. |
 For more information about integrating Outlook with Microsoft Project,

EAN: 2147483647
Pages: 426