Queued Components
The traditional component programming model is very much a synchronous one. Put simply, you invoke a method and you get a result. Unfortunately, very many real-world problems are inherently asynchronous. You can’t always wait for a response to your request before moving on to the next task. The real-world analogy here is the difference between phoning someone and sending an e-mail. Phoning is a synchronous process. Either the phone is answered (a successful transaction) or it isn’t (or you’ve called a wrong number, another form of unsuccessful transaction). E-mailing someone is asynchronous; you have no control over how long the e-mail takes to arrive, or when the person will actually look at it. Therefore, in order to tackle everything that the real world throws at us, we need an asynchronous component model for those scenarios where it is appropriate.
Why only some scenarios? The synchronous model is quite simple to manage, because the three possible outcomes of a request are quite straightforward to handle. First, the request can be successful. Second, the software can crash. Finally, the software can simply not respond at all, in which case it times out. However, when dealing with asynchronous requests, expect all manner of unusual conditions. For example, the target system may not currently be operational, so you have to make a decision regarding how long to wait before it comes back up again. Each outstanding request takes up system resources, so they need to be managed carefully; you need to be able to determine when the response comes back; you need to make certain that the recipient only receives a given message once, and so on. We are, in fact, dealing with a different infrastructure than MTS here, an infrastructure to handle reliable messaging. Microsoft’s product to tackle this type of problem is Microsoft Message Queue (MSMQ).
The idea behind reliable messaging is that once you have asked the system to send a message to a given target, you can effectively stop worrying about it. The system handles storing and forwarding of messages to their target, and handles retries and timeouts, ensuring it is received only once, and returning messages to the dead letter queue if all else fails. MSMQ is, in fact, a whole technology in itself, and can seem quite complex. However, Enterprise Services provides a handy, simple abstraction called queued components.
Queued components take the sometimes gnarly aspects of working with MSMQ and make them easier to work with than the raw queue handling. Instead, you have the concepts of recorders, listeners, and players. Recorders create messages that are put on a queue. Eventually, a listener receives the message. This could happen immediately or it could take weeks if the two components are disconnected. Finally, the player does whatever the message requests. Naturally, this places some restrictions on the kind of component that can be used. For example, you can’t have any output arguments or return values. If you have either of these, the values can’t be set until the action is complete, removing the benefit of the asynchronous aspects of the call. However, there are some cool things that you can do, explored in the next section.
| Important | In order to run the queued components examples, MSMQ is needed, which comes with Windows 2000 and XP. However, you need to install it separately using the Add Windows Components dialog. |
An Example of Queued Components
This example creates a very simple logging component that takes a string as its input and writes it out to a sequential file, as well as outputs it in a message box. For the purposes of a simple example, the client and the server are on the same machine; in a production scenario they would be separate. The benefit of using queued components here is that the logging doesn’t slow down the main process.
Create a Class Library project called Reporter. As usual, add a reference to the System.EnterpriseServices namespace. First define an interface:
Imports System.IO Imports System.EnterpriseServices Public Interface IReporter Sub Log(ByVal message As String) End Interface Notice that the Log method follows the requirements listed previously. There is no return value, and all parameters are input only. We need to separate out the interface from the implementation because the implementation, residing on the server, is going to be sitting on another machine somewhere. The client isn’t the slightest bit interested in the details of this; all it needs to know is how to interface to it.
Take a look at the actual implementation. As with the transactional component, we inherit from ServicedComponent, and implement the interface just defined. However, notice the <InterfaceQueuing()> attribute that indicates to the component services runtime that the interface can be queued (we did the same for the interface):
<InterfaceQueuing(Interface:="IReporter")> Public Class Reporter Inherits ServicedComponent Implements IReporter In the logging method, simply output a message box, open a StreamWriter component to append to the log file, and then close it:
Sub Log(ByVal message As String) Implements IReporter.Log MsgBox(strText) Using writer As StreamWriter = _ New StreamWriter("c:\account.log", True) writer.WriteLine(String.Format("{0}: {1}", _ DateTime.Now, message)) writer.Close() End Using End Sub End Class That’s it for the code for the component. To enable queuing, click the Show All Files button on the Solution Explorer to see the hidden files for the project. Open the My Project item and then open the AssemblyInfo.vb file. Ensure that it has these attributes:
'Enterprise Services attributes <Assembly: EnterpriseServices.ApplicationAccessControl(False, _ Authentication:=EnterpriseServices.AuthenticationOption.None)> <Assembly: EnterpriseServices.ApplicationQueuing(Enabled:=True, _ QueueListenerEnabled:=True)> <Assembly: EnterpriseServices.ApplicationName("WroxQueue")> Next, ensure that queuing is correctly enabled for this component. The next line is a special line to enable message queuing to work correctly in a workgroup environment, by switching off authentication. If we didn’t do this, we would need to set up an entire domain structure. (In a production scenario, that’s exactly what you would use, so you would need to remove this line.) Finally, ensure that the component runs as a server, rather than as a library. This was optional in the case of transactional components, but it’s mandatory for queued components. You’ll soon see why. In addition, you should add a strong name file to your project, as you did with the Transactions component.
Consoles Again
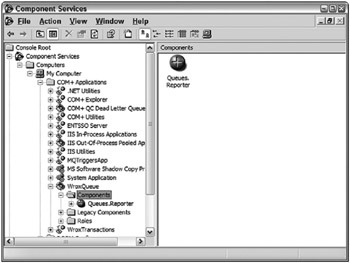
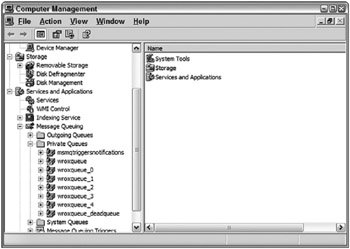
It’s time to build your component. Once built, register it using RegSvcs just as you did with the Transactions component. Take a look at the Component Services Console to see how it’s going. Also, look again more closely at Figure 28-16. That looks fine, but there’s one other console to check out: the Computer Management Console. Access this either from the system console or by right-clicking the My Computer icon and selecting Manage from the menu. Tucked away at the bottom is the relevant part. Open Services and Applications to find it. Component Services has set up some queues for us. There are five queues feeding into the main one, so the infrastructure is ready. Keep in mind that all this would be running on the server machine in a production scenario, not the client.

Figure 28-16
Building the Client
The problem is that all the code you’ve written in this project is built on top of the MSMQ infrastructure, which is, inevitably, a COM infrastructure. Worse, the current tasks involve marshaling COM objects into a stream suitable for inserting into a queued message. For the purposes of this discussion, think of marshaling as intelligently serializing the contents of a method invocation on an interface. We do this in such a way that they can then be deserialized at the other end and turned into a successful invocation of the same method in a remote implementation of the interface. We get COM to do this for us by constructing a moniker, which is basically an intelligent name.
Begin by creating a Windows Application project called TestReporter. Add a reference to the Reporter component in the usual manner. Figure 28-17 shows the form.

Figure 28-17
The text box is called MessageField, and the button is called SendButton. Here’s the code:
Imports System.Runtime.InteropServices Public Class MainForm Inherits System.Windows.Forms.Form Private Sub SendButton_Click(ByVal sender As System.Object, _ ByVal e As System.EventArgs) _ Handles SendButton.Click Here’s the crucial section. Note the references to the interface and how the object is instantiated:
Dim logger As Queues.IReporter Try logger = CType(Marshal.BindToMoniker("queue:/new:Queues.Reporter"), _ Queues.IReporter) Here’s the queued call:
logger.Log(Me.MessageField.Text) Finally, release the reference to the underlying COM object:
Marshal.ReleaseComObject(logger) MessageBox.Show("Message sent") Catch ex As Exception MessageBox.Show(ex.Message, "Error sending message") End Try It’s not pretty, but you only have to do it once to use it repeatedly.
Queuing Invocations
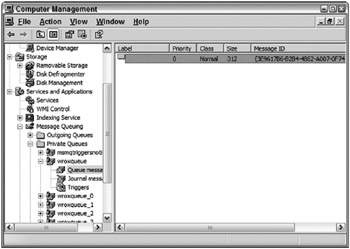
Now try using this application to put a message onto the queue. Run it up and enter a suitable message, such as “Hello everyone” (see Figure 28-18).

Figure 28-18
We’ve definitely created a message, so that represents our invocation. If we were able to read it, we would see the message you typed in earlier embedded somewhere in it. (Unfortunately, the console only allows us to inspect the start of the message, but we can see the name of the component in there.) Why hasn’t anything happened? We haven’t actually started our server. Recall that our component has to run as a server. This is why. The server has to sit there all the time, serving the incoming queue. Therefore, go to the Component Services Console, right-click Reporter, select Start from the menu, and you’re off. Lo and behold, there’s the message box (see Figure 28-19).

Figure 28-19
Now that the message has been delivered, return to the Component Services Console. Right-clicking over the message queue and selecting Refresh confirms that the message has indeed been removed from the queue. Look in account.log and notice that it has been updated as well. Now, running the application results in the message boxes popping up right away.
Transactions with Queued Components
Why were you instructed to call that file account.log? MSMQ, like SQL Server, is a resource manager, and it can take part in transactions. At first, this is a little counterintuitive because how on earth can anything as asynchronous as MSMQ have anything to do with transactions? The point is that it is reliable. Anything you put into a queue is guaranteed to come out the other end. If we take the transaction to the point at which a message is securely in the queue, we definitely have something that can participate. What happens at the other end of the queue is an entirely separate transaction. Of course, if something goes wrong there, you may need to look at setting up a compensating transaction coming back the other way to trigger some kind of rollback.
For the final example, then, we’re going to take our original transactional component and add in a queued element, so that not only does the transfer of money take place, but that fact is also logged to a remote file. Use exactly the same queued component as last time, which is why we called the file account.log.
Begin by making a clone of TestTransactions called TestQueuedTransactions. Add a reference to Queues and an Imports statement:
Imports System.Runtime.InteropServices You also need a new private subroutine:
Private Shared Sub LogTransaction(ByVal amount As Decimal, _ ByVal sourceBank As String, ByVal sourceAccount As String, _ ByVal destinationBank As String, ByVal destinationAccount As String) Dim logger As Queues.IReporter Try logger = CType(Marshal.BindToMoniker("queue:/new:Queues.Reporter"), _ Queues.IReporter) logger.Log(String.Format("{0:c} transfered from {1}:{2} to {3}:{4}", _ amount, _ sourceBank, sourceAccount, _ destinationBank, destinationAccount)) Marshal.ReleaseComObject(logger) MessageBox.Show("Message sent") Catch ex As Exception MessageBox.Show(ex.Message, "Error sending message") End Try End Sub This may look similar to the previous queued component example application. Finally, add a call to this subroutine in the Button_Click event handler:
Private Sub TransferButton_Click(ByVal sender As System.Object, _ ByVal e As System.EventArgs) Handles TransferButton.Click Dim txn As New Transactions.BankTransactions Try txn.TransferMoney(CDec(Me.TransferField.Text), _ "BankOfWrox", "Professional VB", _ "BankOfMe", "Me") LogTransaction(CDec(Me.TransferField.Text), _ "BankOfWrox", "Professional VB", _ "BankOfMe", "Me") MessageBox.Show(String.Format("{0:C} transfered from {1} to {2}", _ CDec(Me.TransferField.Text), "BankOfWrox", "BankOfMe"), _ "Transfer Succeeded", _ MessageBoxButtons.OK, _ MessageBoxIcon.Information) Catch ex As Exception MessageBox.Show(ex.Message, "Transfer failed", _ MessageBoxButtons.OK, _ MessageBoxIcon.Error) End Try End Sub Here, we’re including a queued component in our transaction. It’s been deliberately placed at the beginning to determine whether it genuinely takes part in the two-phase committal. If the transaction fails, you shouldn’t see any messages come through
You also need to make a small change to the Reporter component, but you need to shut it down via the Component Services Console first. The change is very simple. To ensure that the queued component takes part in the transaction it must be marked with the Transaction attribute:
<InterfaceQueuing(Interface:="Reporter.IReporter"), _ Transaction(TransactionOption.Required)> _ Public Class Reporter If you now transfer $1,000, we see the usual “Transfer complete” message box, and if you start up the Reporter component, you also see the message box from our queued component (see Figure 28-20).

Figure 28-20
If you try it again, you see the queued message coming through first, so you know it’s OK for valid transfers. What happens if you try to transfer $100? As we know from the earlier example, this will fail, and indeed, we see the “Transfer failed” message box from the main component, but not a peep out of the queued component.
EAN: 2147483647
Pages: 267