Transactional Components
What components are actually managed by Enterprise Services? What purpose do they serve? To answer that, you need to consider what a typical real-world n-tier application looks like. The bottom tier is the persistent datastore, typically an industry-standard database such as SQL Server or Oracle. However, there are other possible datastores, including the file system. These are termed resource managers because they manage resources. The software here is concerned with maintaining the integrity of the application’s data and providing rapid and efficient access to it. The top tier is the user interface. This is a completely different specialization, and the software here is concerned with presenting a smooth, easy-to-follow front end to the end user. This layer shouldn’t actually do any data manipulation at all, apart from whatever formatting is necessary to meet each user’s presentational needs. The interesting stuff is in the tiers in between - in particular, the business logic. In the .NET/COM+ transactional model, the software elements that implement this are components running under the control of the Enterprise Services runtime.
Typically, these components are called into being to perform some sort of transaction and then, to all intents and purposes, disappear again. For example, a component might be called into play to transfer information from one database to another in such a way that the information was either in one database or the other, but not both. This component might have a number of different methods, each of which did a different kind of transfer. However, each method call would carry out a complete transfer:
Public Sub TransferSomething() TakeSomethingFromA AddSomethingToB End Sub Crucially, this means that most transaction components have no concept of state; there are no properties that hold values between method calls. You can see the reason for this if you imagine what would happen if you had a number of instances of the preceding components all vying for the attention of the database. If instance one of the control started the transfer, remembering the state or current values of A and B just after instance two had done the same, you could end up with the state being different between the two instances. This would violate the isolation of the transaction. Persistence is left to the outside tiers in this model. This takes a little bit of getting used to at first, because it runs counter to everything that you learned in Object-orientation 101 classes, so take a minute or two to consider what you’re actually gaining from this.
The business logic is the area of the system that requires all the transactional management. Anything that happens here needs to be monitored and controlled to ensure that all the ACID requirements are met. The neatest way to do this in a component-oriented framework is to develop the business logic as components that are required to implement a standard interface. The transaction management framework can then use this interface to monitor and control how the logic is implemented from a transactional point of view. The transaction interface is a means for the business logic elements to talk to the transaction framework and for the transaction framework to talk back to the logic elements.
So what’s all this about not having state? Well, if you maintain state inside your components, then you immediately have a scaling problem. The middle tiers of your application are now seriously resource-hungry. If you want an analogy from another area of software, consider why the Internet scales so well: because HTTP is a stateless protocol. Every HTTP request stands in isolation, so no resources are tied up in maintaining any form of session. It’s the same with transactional components.
This is not to say that you can’t ever maintain state inside your transactional components. You can, but it’s not recommended, and the examples in this chapter don’t illustrate it.
An Example of Transactions
For our transaction example, we’re going to build a simple business-logic component that transfers data from one bank account (Wrox’s, in fact) to another one. Wrox’s bank account will be represented by a row in one database, while the other will be represented by a row in another one.
Before beginning, note one important point: You can’t have transactions without any resource managers. It’s very tempting to think that you can experiment with transactional component services without actually involving, say, a database, because (as you shall see) none of the methods in the transactional classes makes any explicit references to one. However, if you do try to do this, then you will find that your transactions don’t actually trouble the system’s statistics. Fortunately, you don’t need to lay out your hard-earned cash for a copy of SQL Server (nice though that is), because Visual Studio 2005 comes with a lightweight (but fully functional) copy of SQL Server, which goes under the name of SQL Server 2005 Express Edition, or more simply SQL Express. In addition, SQL Express is available separately, so you can even work with databases if you use Visual Basic Express.
Creating the Databases
First, set up the databases. Check whether the Server Explorer tab is visible in Visual Studio 2005 (see Figure 28-1). If not, open it by selecting View ![]() Server Explorer. Create a new database in the Data Connections tree.
Server Explorer. Create a new database in the Data Connections tree.

Figure 28-1
Next, right-click Data Connections and select New Database from the menu. Alternately, you can click the icon that looks like a plus sign over a can with a plug (not quite the universal symbol for a database, but it will have to do). A new dialog box appears (see Figure 28-2).
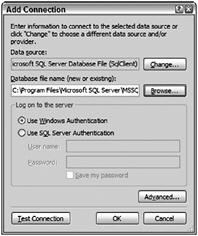
Figure 28-2
Enter the database name (BankOfWrox) and select Use Windows Authentication. After clicking OK, you are prompted to create the database if it doesn’t exist. You should now see BankOfWrox in the list of data connections (see Figure 28-3).
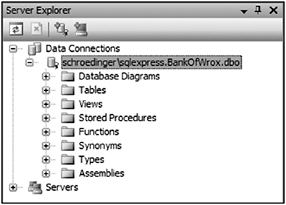
Figure 28-3
Set up the database. If you open up the new node, you should see a number of other nodes, including Tables. Right-click this and then select New Table from the menu. Another dialog box should appear (see Figure 28-4). Create two columns, Name and Amount, as shown. Make sure that Name is set up to be the primary key. When you click the close box, you’ll be asked if you want to save the changes to Table1. Select Yes, and another dialog box will appear (see Figure 28-5).
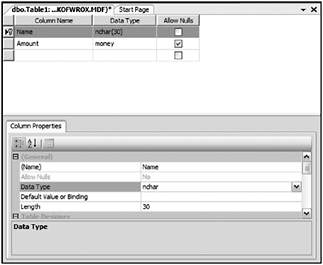
Figure 28-4

Figure 28-5
Use the name Accounts for the table. You should now see a child node called Accounts below Tables in the tree. That completes the creation of BankOfWrox. Repeat the process for BankOfMe. The structure is exactly the same (although it doesn’t need to be for the purposes of this example). Don’t forget to set Name as the primary key. We could have created these two as separate rows in the same database, but it doesn’t really simulate the scenario where Enterprise Services is intended (inter-application communication).
Populating Your Databases
The next thing to do is populate the databases. If you right-click over Accounts for either database and select Show Table Data from Table from the menu, you will see a grid that enables you to add rows and initialize the values of their columns (see Figure 28-6).

Figure 28-6
Enter two accounts in BankOfWrox - Professional Visual Basic 2005 and Beginning XML - and allocate $5,000 to each. Now repeat the process for BankOfMe, setting up one account, Me, with $0 in it (so you’re either (a) broke or (b) wise enough not to leave any cash lying around in this sort of account).
The Business Logic
The next step is to create the transactional component to support the business logic. Create a new Class Library project called Transactions. Then, add a reference to System.EnterpriseServices (see Figure 28-7).
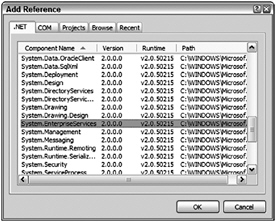
Figure 28-7
This reference is needed because in order to come under the control of the Enterprise Services runtime, the component must inherit from the System.EnterpriseServices.ServicedComponent class:
Imports System.EnterpriseServices Imports System.Configuration Imports System.Data.SqlClient <Assembly: ApplicationName("WroxTransactions")> <Assembly: ApplicationAccessControl(True)> Public Class BankTransactions Inherits ServicedComponent Here’s the main function in the component, TransferMoney:
Public Sub TransferMoney(ByVal amount As Decimal, _ ByVal sourceBank As String, _ ByVal sourceAccount As String, _ ByVal destinationBank As String, _ ByVal destinationAccount As String) Try Withdraw(sourceBank, sourceAccount, amount) Try Deposit(destinationBank, destinationAccount, amount) Catch ex As Exception 'deposit failed Throw New _ ApplicationException("Error transfering money, deposit failed.", _ ex) End Try 'both operations succeeded ContextUtil.SetComplete() Catch ex As Exception 'withdraw failed Throw New _ ApplicationException("Error transfering money, withdrawal failed.", _ ex) End Try End Sub Ignoring for the moment the references to ContextUtil, you can see that we have effectively divided up the logic into two halves: the half that takes money from the Wrox account (represented by the private function Withdraw), and the half that adds it to your account (represented by the private function Deposit). For the function to complete successfully, each of the two halves must complete successfully.
So what does ContextUtil do? The ContextUtil class represents the context of the transaction. Within that context are basically two bits that control the behavior of the transaction from the point of view of each participant: the consistent bit and the done bit. The done bit determines whether or not the transaction is finished, so that resources can be reused. The consistent bit determines whether or not the transaction was successful from the point of view of the participant. This is established during the first phase of the two-phase commit process. In complex distributed transactions involving more than one participant, the overall consistency and doneness are voted on, so that a transaction is only consistent or done when everyone agrees that it is. If a transaction completes in an inconsistent state, it is not allowed to proceed to the second phase of the commit.
In this case, there is only a single participant, but the principle remains the same. We can determine the overall outcome by setting these two bits, which is done via SetComplete and SetAbort, which are static methods in the ContextUtil class. Both of these set the done bit to True. SetComplete also sets the consistent bit to True, whereas SetAbort sets the consistent bit to False. In this example, SetComplete is only set if both halves of the transaction are successful.
The First Half of the Transaction
Now it’s time to see what’s going on in the two halves of the transaction itself. The component is responsible for reading and writing to the two databases, so it needs two connection strings. You could hard-code these into the component, but a better solution is to use the new My Settings feature to include them. Double-click My Project in the Solution Explorer and navigate to the Settings tab. Add the two connection strings using the names BankOfWrox and BankOfMe, as shown in Figure 28-8.
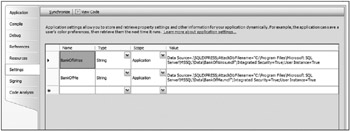
Figure 28-8
-
Here’s the function that removes money from the Wrox account:
Private Sub Withdraw(ByVal bank As String, _ ByVal account As String, _ ByVal amount As Decimal) -
Establish a connection to the database, and retrieve the current account balance from it:
Dim ConnectionString As String Dim SQL As String Dim conn As SqlConnection = Nothing Dim cmdCurrent As SqlCommand Dim currentValue As Decimal Dim cmdUpdate As SqlCommand ConnectionString = My.Settings.Item(bank).ToString SQL = String.Format("SELECT Amount FROM Accounts WHERE Name = '{0}'", _ account) -
The call to ExecuteScalar retrieves a single value from the database - in this case, the amount for the requested account. Note that we have started an exception handler with the Try keyword. We’ll finish the Try block in a moment:
Try conn = New SqlConnection(ConnectionString) conn.Open() cmdCurrent = New SqlCommand(SQL, conn) currentValue = CDec(cmdCurrent.ExecuteScalar()) -
Note the current balance and determine whether you can afford to transfer the amount asked for. If not, raise an Exception:
'check for overdrafts If amount > currentValue Then Throw New ArgumentException("Attempt to overdraft account") End If -
Otherwise, subtract the amount, and update the table accordingly:
'otherwise, we're good to withdraw SQL = _ String.Format("UPDATE Accounts SET Amount = {0} WHERE Name = '{1}'", _ currentValue - amount, account) cmdUpdate = New SqlCommand(SQL, conn) cmdUpdate.ExecuteNonQuery() -
Close the exception handler and the database:
Catch ex As Exception Throw New DataException("Error withdrawing", ex) Finally If Not conn Is Nothing Then conn.Close() End If End Try End Sub
The Second Half of the Transaction
The second half of the transaction is similar, except that the failure conditions are slightly different. First, we stipulate that we don’t want any transfer of less than $50. Second, we’ve inserted a bug such that an attempt to transfer a negative amount will cause a divide by zero. (You’ll see why we added this rather bizarre act of sabotage in a moment.) Here’s the code:
Private Sub Deposit(ByVal bank As String, _ ByVal account As String, _ ByVal amount As Decimal) Dim ConnectionString As String Dim SQL As String Dim conn As SqlConnection = Nothing Dim cmdCurrent As SqlCommand Dim currentValue As Decimal Dim cmdUpdate As SqlCommand ConnectionString = My.Settings.Item(bank).ToString SQL = String.Format("SELECT Amount FROM Accounts WHERE Name = '{0}'", _ account) If amount < 0 Then amount = amount / 0 ElseIf amount < 50 Then Throw New ArgumentException("Value of deposit must be greater than $50") Else Try conn = New SqlConnection(ConnectionString) conn.Open() 'get the current value cmdCurrent = New SqlCommand(SQL, conn) currentValue = CDec(cmdCurrent.ExecuteScalar()) SQL = _ String.Format("UPDATE Accounts SET Amount = {0} WHERE Name = '{1}'", _ currentValue + amount, account) cmdUpdate = New SqlCommand(SQL, conn) cmdUpdate.ExecuteNonQuery() Finally If Not conn Is Nothing Then conn.Close() End If End Try End If End Sub The business logic component is complete. Let’s see how you can bring it under the control of Enterprise Services. First, of course, you need to build your DLL in VS.NET.
Why did we add the divide by zero error? This gives you a chance to see what happens to the transaction when an exception occurs in your code. The transaction will automatically fail and rollback, which means that your data will still be in a good state at the end.
Registering Your Component
Because the Enterprise Services infrastructure is COM-oriented, you need to expose the .NET component as a COM component, and register it with Component Services. Component Services handles all transaction coordination; that is, Component Services tracks any changes and restores the data should the transaction fail. First, some changes to the component are needed to enable this COM interaction. Prepare to take a trip down memory lane.
All COM components must have a GUID (Global Unique Identifier) that uniquely identifies it to the COM infrastructure. This was done for you in Visual Basic 6.0, but with .NET it requires you to add a value. In addition, your component needs an attribute to make it visible to COM. You can set both of these in the Assembly Information dialog. Double-click My Project in the Solution Explorer. On the Application page, click Assembly Information. There should already be a Guid assigned to your component. Check off Make Assembly COM-Visible. This makes all of the Public types accessible to COM. (see Figure 28-9)
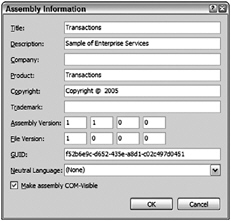
Figure 28-9
You should also update the Assembly Version fields as you make changes to the component.
| Tip | Chapter 21 contains more information about strong names and assemblies. |
The problem is that the assembly is a private assembly. In order to make it available to the transaction framework, it needs to be a shared assembly. To do this, give the assembly a cryptographically strong name, generally referred to as its strong name.
Cryptographically strong means that the name has been signed with the private key of a dual key pair. This isn’t the place to go into a long discussion on dual-key cryptography, but essentially a pair of keys is generated, one public and one private. If something is encrypted using the private key, it can only be decrypted using the public key from that pair, and vice versa. It is therefore an excellent tool for preventing tampering with information. If, for example, the name of an assembly were to be encrypted using the private key of a pair, then the recipient of a new version of that assembly could verify the origin of that new version, and be confident that it was not a rogue version from some other source. This is because only the original creator of the assembly retains access to its private key.
Giving the Assembly a Strong Name
You now have to make sure that your assembly uses the strong name. You can create a new strong name file, or assign an existing strong name file on the Signing tab of the Project Designer dialog (see Figure 28-10).
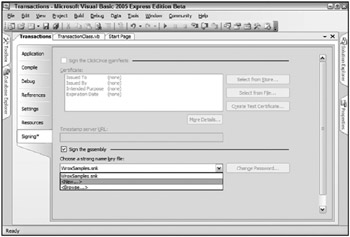
Figure 28-10
Registering with Component Services
Once you’ve built the DLL again, you can run RegSvcs to register the DLL with Component Services (see Figure 28-11).
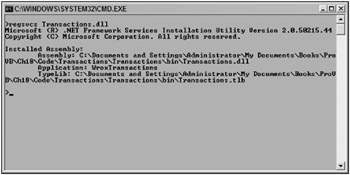
Figure 28-11
RegSvcs does a few things at this point. It creates a COM Type Library for the DLL. This enables it to communicate with COM. In addition, it creates a COM+ application for the component.
The Component Services Console
The Component Services Console is the control interface for Component Services. This is an MMC snap-in, which you can find (on Windows 2000 and XP) by selecting Control Panel ![]() Administrative Tools
Administrative Tools ![]() Component Services. If you open it, you’ll see something like what is shown in Figure 28-12.
Component Services. If you open it, you’ll see something like what is shown in Figure 28-12.
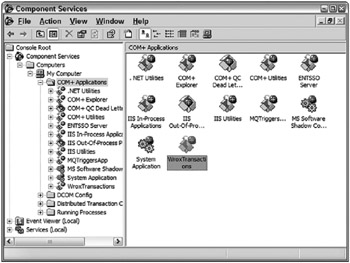
Figure 28-12
You should be able to find the sample under COM+ Applications. A COM+ application is a set of related COM+ components that have been packaged together. RegSvcs creates a new application for every component that it registers. If you want to bundle together a series of components from separate DLLs, you can do this, but you can only do it by creating a new application via the Component Services Console (try right-clicking COM+ Applications and then selecting New). We’ll explore the console a little more as we go on.
Now you need a test application. Second, and more important, you need to tell Component Services that you’re interested in transactions.
A Test Application
Deal with the first problem right away by creating a Windows Application project called TestTransactions and a very simple form (see Figure 28-13).

Figure 28-13
The text field is called TransferField and the command button is called TransferButton. In order to access the transactional component, add references to a couple of DLLs. First, add a reference to the transactional component DLL itself. You’ll need to browse for this, as it isn’t currently in the global assembly cache. Second, in order to access the objects in this DLL, you also need to make the application aware of the System.EnterpriseServices assembly, so add a reference to that as well. Having done that, it’s time to import Transactions into the application:
Imports Transactions Here’s the code behind the TransferButton button:
Private Sub TransferButton_Click(ByVal sender As System.Object, _ ByVal e As System.EventArgs) Handles TransferButton.Click Dim txn As New BankTransactions Try txn.TransferMoney(CDec(Me.TransferField.Text), _ "BankOfWrox", "Professional Visual Basic 2005", _ "BankOfMe", "Me") MessageBox.Show(String.Format("{0:C} transfered from {1} to {2}", _ CDec(Me.TransferField.Text), "BankOfWrox", "BankOfMe"), _ "Transfer Succeeded", _ MessageBoxButtons.OK, _ MessageBoxIcon.Information) Catch ex As Exception MessageBox.Show(ex.Message, "Transfer failed", _ MessageBoxButtons.OK, _ MessageBoxIcon.Error) End Try End Sub
The Transaction Attribute
Now it’s time to tell Component Services how the component should enter a transaction. There are two ways of doing this: via the Component Services Console or via an attribute in code. To do it via the Component Services Console, open the Explorer tree to locate the Transactions component (as shown in Figure 28-14).
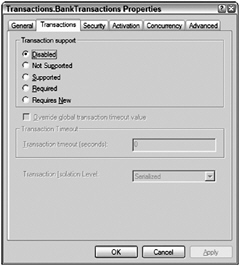
Figure 28-14
Select one of the available options; you’ll learn what these all mean in a moment. It’s a little tiresome to require the system manager to do this every time, especially if you already know that your component is always going to have the same transaction characteristics. An alternative mechanism is available: You can explicitly set up an attribute in the code for your component.
Attributes are items of declarative information that can be attached to the elements of code, such as classes, methods, data members, and properties. Anything that uses these can query their values at runtime. One such attribute is called TransactionAttribute, which, unsurprisingly, is used for specifying the transaction characteristics of a component class. The value of this attribute is taken from an enumeration called TransactionOption. Both TransactionAttribute and TransactionOption are found within the System.EnterpriseServices namespace. The enumeration can take the following values:
| Value | Description |
|---|---|
| Disabled | Ignore any transaction in the current context. This is the default. |
| NotSupported | Create the component in a context with no governing transaction. |
| Required | Share a transaction if one exists; create a new transaction if necessary. |
| RequiresNew | Create the component with a new transaction, regardless of the state of the current context . |
| Supported | Share a transaction if one exists. If it doesn't, create the component. |
The available values are exactly the same as the ones shown in the Transaction tab. This case is a standalone transaction, so either RequiresNew or Required are equally valid.
Before changing the component, deregister the current version to avoid any confusion (see Figure 28-15).
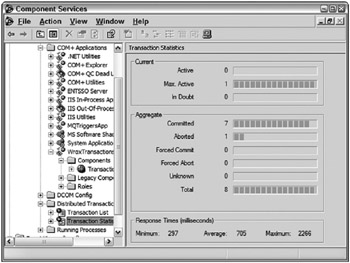
Figure 28-15
Now go back to the Transactions project and make the change:
<Assembly: ApplicationName("WroxTransactions")> <Assembly: ApplicationAccessControl(True)> <Transaction(TransactionOption.RequiresNew)> _ Public Class BankTransactions Inherits ServicedComponent Having made the change, rebuild Transactions and then reregister it as before. Now run the test application. Enter 1000 and click the Confirm button. You might be able to see the number of current active transactions briefly go from none to one (depending on your computer, this may be too fast to see), followed by the number of committed transactions and the total both going up by one. Great, you’ve implemented your first transaction. If you check the two databases, the amount in BankOfWrox’s Professional Visual Basic account has been reduced to $4,000, whereas Jon’s account in BankOfMe has been increased by $1,000.
Invalid Data
What happens if you enter a value that you know is invalid? There are two options here: either try to transfer more money than there is in the Professional Visual Basic account, or try to transfer less than the “approved limit.” Run the application again and try to transfer $10. As expected, the transaction will fail, and no changes will be made to the accounts. Professional Visual Basic still has $4,000, and your account still has $1,000. This isn’t too much of a big deal, because the invalid condition is spotted before any database manipulation is carried out. If you look at the transaction statistics, the number of aborted transactions has been incremented this time.
Now try to transfer $10,000. This time, the first part of the transaction is successful, but the second part fails. Again the number of aborted transactions is incremented, but what’s happened to the database? Well, fortunately for everyone concerned, there is still $4,000 in the Professional Visual Basic account, and still $1,000 in your account. The entire transaction has failed.
When Something Goes Wrong
Recall that bit of mindless vandalism that we did to the Deposit function so that it would divide by zero if we entered a negative value? Here’s where we get to try it out. Run the application again, and try to transfer $-1. You should receive an error message. It was halfway through a transaction, but never mind, because when you look at the transaction statistics, the aborted count has gone up by one. More important, if you check the databases, the Pro VB account still has $4,000, and the other account still has $1,000, so you’re protected against software failures as well.
EAN: 2147483647
Pages: 267