COM and .NET in Practice
It’s time to get serious and see if all this seamless integration really works. To do this, we have to simulate a legacy situation. Suppose your enterprise depends on a particular COM object that was written for you a long time ago by staff who are no longer in the organization. All you know about the component is that the code within it works perfectly and you need to employ it for your .NET application.
You have one, possibly two, options in this case. If you have the source code of the COM component (which is not always the case) and you have sufficient time (or, to put it another way, money), you can upgrade the object to .NET and continue to maintain it under Visual Studio 2005. For the purist, this is the ideal solution for going forward. However, maintaining the source as it exists under Visual Studio isn’t really a viable option. Visual Studio does offer an upgrade path, but it doesn’t cope well with COM objects using interfaces specified as abstract classes.
If upgrading the object to a .NET component isn’t an option for you, all you really can do is include the DLL as it stands as a COM object, register it on the server containing the .NET Framework, and use the .NET interoperability tools to integrate the two technologies. This is the path that this chapter takes for the example.
Therefore, what you need for this example is a genuine legacy COM object. This chapter uses a genuine legacy VB6 component to integrate within a .NET application. For the next section, this chapter steps back in time and uses VB6 for the classic component required. If you aren’t very interested in VB6, then feel free to skip this section. In any case, the DLL created is available as part of the code download from this book.
A Legacy Component
For the legacy component, imagine that you have some kind of analytics engine that requires a number of calculations. Because of the highly complex nature of these calculations, their development has been given to specialists, while the user interface for the application has been given to some UI specialists. A COM interface has been specified to which all calculations must conform. This interface has the name IMegaCalc and has the following methods:
| Method | Description |
|---|---|
| Sub AddInput(InputValue as Double) | Adds the input value to the calculation |
| Sub DoCalculation( ) | Performs the calculation |
| Function GetOutput( ) as Double | Gets the output from the calculation |
| Sub Reset( ) | Resets the calculation for the next time |
Step 1: Defining the Interface
When building any component, the first thing you have to do is define your interface. In VB6, the way to do this is to create an abstract class - that is, one without any implementation. Therefore, create an ActiveX DLL project called MegaCalculator. You do this by creating a new project and then changing its name to MegaCalculator by means of the Project ![]() Project1 Properties dialog box. Then, create a class called IMegaCalc. This is what the code should looking like:
Project1 Properties dialog box. Then, create a class called IMegaCalc. This is what the code should looking like:
Option Explicit Public Sub AddInput(InputValue As Double) End Sub Public Sub DoCalculation() End Sub Public Function GetOutput() As Double End Function Public Sub Reset() End Sub From the main menu, select File ![]() Make MegaCalculator.dll to define and register the interface.
Make MegaCalculator.dll to define and register the interface.
Step 2: Implementing the Component
For the purposes of this demonstration, the actual calculation that you’re going to perform is fairly mundane: In fact, the component is going to calculate the mean of a series of numbers. Create another ActiveX DLL project called MeanCalculator. Add a reference to the type library for the interface that you’re going to implement by selecting the MegaCalculator DLL via the References dialog box that appears when you select Project ![]() References.
References.
Having done that, go ahead and write the code for the mean calculation. You do this in a class called MeanCalc:
Option Explicit Implements IMegaCalc Dim mintValue As Integer Dim mdblValues() As Double Dim mdblMean As Double Private Sub Class_Initialize() IMegaCalc_Reset End Sub Private Sub IMegaCalc_AddInput(InputValue As Double) mintValue = mintValue + 1 ReDim Preserve mdblValues(mintValue) mdblValues(mintValue) = InputValue End Sub Private Sub IMegaCalc_DoCalculation() Dim iValue As Integer mdblMean = 0# If (mintValue = 0) Then Exit Sub For iValue = 1 To mintValue mdblMean = mdblMean + mdblValues(iValue) Next iValue mdblMean = mdblMean / mintValue End Sub Private Function IMegaCalc_GetOutput() As Double IMegaCalc_GetOutput = mdblMean End Function Private Sub IMegaCalc_Reset() mintValue = 0 End Sub As before, you select File ![]() Make MeanCalculator.dll to build and register the component. It has a default interface called MeanCalc (which contains no methods, and is thus invisible to the naked eye), plus an implementation of IMegaCalc.
Make MeanCalculator.dll to build and register the component. It has a default interface called MeanCalc (which contains no methods, and is thus invisible to the naked eye), plus an implementation of IMegaCalc.
Step 3: Registering the Legacy Component
If you have made it this far, then you should now have your legacy component. When developing your new .NET application on the same machine, you don’t need to do anything more because your component is already registered by the build process. However, if you’re working on an entirely new machine, you need to register it there. To do that, open a command window and register it with the following command using regsvr32.exe found at C:\Windows\system32:
regsvr32 MeanCalculator.dll
From there, you should then see the result shown in Figure 23-1.

Figure 23-1
Because MeanCalculator implements an interface from MegaCalculator, you have to repeat the trick with that DLL:
regsvr32 MegaCalculator.dll
That action should yield the results shown in Figure 23-2. You’re now ready to use your classic component from a .NET application.

Figure 23-2
The .NET Application
For the .NET application used in this chapter, you only need to instantiate an instance of the MeanCalc object and get it to work out a mean calculation for you. In order to accomplish this task, create a .NET Windows Application project in Visual Basic called CalcApp. Laid out, the form looks like what is shown in Figure 23-3.
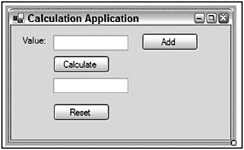
Figure 23-3
The two text boxes are called txtInput and txtOutput, respectively; the second one is not enabled for user input. The three command buttons are btnAdd, btnCalculate, and btnReset, respectively.
Referencing the Legacy COM Component from .NET
Before you dive into writing the code behind the buttons on the form, you first need to make your new application aware of the MeanCalculator component. Add a reference to the component via the Project ![]() Add Reference menu item. This brings up the Add Reference dialog box, which contains five tabs: .NET, COM, Projects, Browse, and Recent. From the COM tab, select MeanCalculator and MegaCalculator in turn (see Figure 23-4).
Add Reference menu item. This brings up the Add Reference dialog box, which contains five tabs: .NET, COM, Projects, Browse, and Recent. From the COM tab, select MeanCalculator and MegaCalculator in turn (see Figure 23-4).
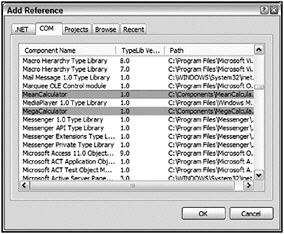
Figure 23-4
Press the OK button after you highlight both of the required components. Note that in the list of references in the Solution Explorer, you can now see the MeanCalculator and MegaCalculator components. This view is presented in Figure 23-5.
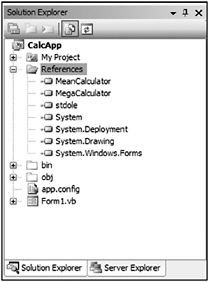
Figure 23-5
Inside the .NET Application
Now that you have successfully referenced the components in the .NET application, you can go ahead and finish coding the application, using the functionality provided via the COM components. To start making use of the new capabilities provided from the COM component, add a global variable (mobjMean) to the code that will hold a reference to an instance of the mean calculation component, as shown here:
Public Class Form1 Dim mobjMean As MeanCalculator.MeanCalc Next, create a Form1_Load event to which you will add the following instruction, which creates the component you’re going to use:
Private Sub Form1_Load(ByVal sender As Object, _ ByVal e As System.EventArgs) Handles Me.Load mobjMean = New MeanCalculator.MeanCalc() End Sub Finally, you need to add the code behind the buttons on the form. First, working with the Add button, add the following code that calls the COM component:
Private Sub btnAdd_Click(ByVal sender As Object, _ ByVal e As System.EventArgs) _ Handles btnAdd.Click mobjMean.AddInput(CDbl(txtInput.Text)) End Sub Here, you’re adding whatever is in the input text box into the list of numbers for the calculation. Next, here’s the code-behind for the Calculate button:
Private Sub btnCalculate_Click(ByVal sender As Object, _ ByVal e As System.EventArgs) _ Handles btnCalculate.Click mobjMean.DoCalculation() txtOutput.Text = mobjMean.GetOutput() End Sub This performs the calculation, retrieves the answer, and puts it into the output text box - all of this from the COM component. Finally, the code behind the Reset button simply resets the calculation:
Private Sub btnReset_Click(ByVal sender As Object, _ ByVal e As System.EventArgs) Handles btnReset.Click mobjMean.Reset() End Sub
Trying It All Out
Of course, the proof of the pudding is in the eating, so let’s see what happens when you run your application. Compile and run the application and place one value in the first text box, for example, − 2, and click the Add button on the form. Next, enter another value, for example, − 3, and click the Add button again. When you click Calculate, you’ll get the mean of the two values (2.5 in this case), as shown in Figure 23-6.
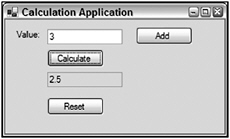
Figure 23-6
Using TlbImp Directly
In the preceding example, there’s actually quite a lot going on under the covers. Every time you import a COM DLL into Visual Studio, it creates a default interop assembly, which is basically a .NET assembly that acts as a wrapper for the COM object. If you’re doing this a lot, it might be better to do the wrapping once and for all, and then let your application developers import the resulting .NET assembly instead. Let’s see how you might accomplish this task.
The process that creates the default interop assembly on behalf of Visual Studio is called TlbImp.exe. The name stands for Type Library Import, and that’s pretty much what it does. It’s included in the .NET Framework SDK, and you might find it convenient to extend the PATH environment variable to include the \bin directory of the .NET Framework SDK.
TlbImp takes a COM DLL as its input and generates a .NET assembly DLL as its output. By default, the .NET assembly has the same name as the type library, which will - in the case of VB6 components - always be the same as the COM DLL. This means you have to explicitly specify a different output file. You do this by using the /out: switch. If you want to see what’s going on at each step in the process, then you should also specify the /verbose flag:
tlbimp MegaCalculator.dll /out:MegaCalculatorNet.dll /verbose
For this example, start with MegaCalculator, because MeanCalculator has a reference to MegaCalculator. If you start with MeanCalculator, you get an error indicating that there is a reference to MegaCalculator and that TlbImp will not be able to overwrite the MegaCalculator.dll. The way to get around this is to start with MegaCalculator by giving TlbImp the command, as shown previously. Once this is accomplished, TlbImp will inform you of the success or failure in creating a .NET assembly of the name MegaCalculatorNet.dll.
Now that you have MegaCalculatorNet.dll in place, you can work with MeanCalculator and make sure that the reference now points to the new MegaCalculatorNet.dll. You can accomplish this by using the following command:
tlbimp MeanCalculator.dll /out:MeanCalculatorNet.dll reference:MegaCalculatorNet.dll /verbose
The result of this command is shown in Figure 23-7.
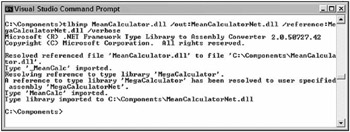
Figure 23-7
Notice that TlbImp has encountered a reference to another COM type library, MegaCalculator, and it has very kindly in turn imported MegaCalculatorNet instead. Having converted your COM DLLs into .NET assemblies, you can now reference them in an application as you would any other .NET DLL.
Late Binding
You’ve seen that you can successfully do early binding on COM components within a .NET application, but what if you want to do late binding instead? What if you don’t have access to a type library at application development time? Can you still make use of the COM component? Does the .NET equivalent of late binding even exist?
The answer is that, yes, it does, but, no, it’s not as transparent as with VB6. Let’s take a look at what one used to do in VB6. If you wanted to do early binding, you would do this:
Dim myObj As MyObj Set myObj = New MyObj MyObj.MyMethod (...) For late binding, it would look like this instead:
Dim myObj As Object Set myObj = CreateObject ("MyLibrary.MyObject") MyObj.MyMethod (...) There’s actually an enormous amount of activity going on under the covers here; if you’re interested in looking into this further, try Building N-Tier Applications with COM and Visual Basic 6.0 by Ash Rofail and Tony Martin (Wiley, 1999).
An Example for Late Binding
For the sample being built in this chapter, let’s extend the calculator to a more generic framework that can feed inputs into a number of different calculation modules, rather than just the fixed one it currently implements. For this example, you’ll keep a table in memory of calculation ProgIDs and present the user with a combo box to select the correct one.
The Sample COM Object
The first problem you encounter with late binding is that you can only late bind to the default interface, which in this case is MeanCalculator.MeanCalc, not MeanCalculator.IMegaCalc. Therefore, you need to redevelop your COM object as a standalone library, with no references to other interfaces.
As before, you’ll build a DLL under the VB6 IDE, copy it over to your .NET environment, and reregister it there. You’ll call this new VB6 DLL MeanCalculator2.dll, and the code in the class (called MeanCalc) should look as follows:
Option Explicit Dim mintValue As Integer Dim mdblValues() As Double Dim mdblMean As Double Private Sub Class_Initialize() Reset End Sub Public Sub AddInput(InputValue As Double) mintValue = mintValue + 1 ReDim Preserve mdblValues(mintValue) mdblValues(mintValue) = InputValue End Sub Public Sub DoCalculation() Dim iValue As Integer mdblMean = 0# If (mintValue = 0) Then Exit Sub For iValue = 1 To mintVal mdblMean = mdblMean + mdblValues(iValue) Next iValue mdblMean = mdblMean / mintValue End Sub Public Function GetOutput() As Double GetOutput = mdblMean End Function Public Sub Reset() mintValue = 0 End Sub As before, move this across to your .NET server and register it using RegSvr32.
The Calculation Framework
For your generic calculation framework, you’ll create a new application in Visual Basic 2005 called CalcFrame. You’ll basically use the same dialog box as last time, but with an extra combo box at the top of the form. This new layout is illustrated in Figure 23-8.
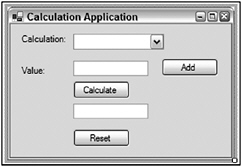
Figure 23-8
The new combo box is called cmbCalculation. For this to work, you also need to disable the controls txtInput, btnAdd, btnCalculate, and btnReset, until you know whether the selected calculation is valid. Begin your application by importing the Reflection namespace; you need this for handing the application’s late binding:
Imports System.Reflection Once the form is in place, add a few member variables to the code of your application:
Public Class Form1 Inherits System.Windows.Forms.Form Private mstrObjects() As String Private mnObject As Integer Private mtypCalc As Type Private mobjcalc As Object From there, add a few new lines to Form1_Load:
Private Sub Form1_Load(ByVal sender As Object, _ ByVal e As System.EventArgs) Handles Me.Load mnObject = 0 AddObject("Mean", "MeanCalculator2.MeanCalc") AddObject("StdDev", "StddevCalculator.StddevCalc") If (mnObject > 0) Then cmbCalculation.SelectedIndex = 0 End If End Sub What you’re doing here is building a list of calculations. Once finished, you select the first one in the list. Let’s take a look at that subroutine AddObject:
Private Sub AddObject(ByVal strName As String, ByVal strObject As String) cmbCalculation.Items.Add(strName) mnObject = mnObject + 1 ReDim Preserve mstrObjects(mnObject) mstrObjects(mnObject - 1) = strObject End Sub The preceding code segment adds the calculation name to the combo box, and its ProgID to an array of strings. Neither of these is sorted, so you get a one-to-one mapping between them. Check out what happens when you select a calculation via the combo box:
Private Sub cmbCalculation_SelectedIndexChanged(ByVal sender As Object, _ ByVal e As System.EventArgs) _ Handles cmbCalculation.SelectedIndexChanged Dim intIndex As Integer Dim bEnabled As Boolean intIndex = cmbCalculation.SelectedIndex mtypCalc = Type.GetTypeFromProgID(mstrObjects(intIndex)) If (mtypCalc Is Nothing) Then mobjcalc = Nothing bEnabled = False Else mobjcalc = Activator.CreateInstance(mtypCalc) bEnabled = True End If txtInput.Enabled = bEnabled btnAdd.Enabled = bEnabled btnCalculate.Enabled = bEnabled btnReset.Enabled = bEnabled End Sub There are two key calls in this example. The first is to Type.GetTypeFromProgID. This takes the incoming ProgID string and converts it to a Type object. This process either succeeds or fails; if it fails, you disable all controls and let the user try again. If it succeeds, however, you create an instance of the object described by the type. You do this in the call to the static method Activator.CreateInstance().
For this example, assume that your user has selected a calculation that you can successfully instantiate. What next? The user enters a number and clicks the Add button on the form:
Private Sub btnAdd_Click(ByVal sender As Object, _ ByVal e As System.EventArgs) Handles btnAdd.Click Dim objArgs() As [Object] = {CDbl(txtInput.Text)} mtypCalc.InvokeMember("AddInput", BindingFlags.InvokeMethod, _ Nothing, mobjcalc, objArgs) End Sub The important call here is to the InvokeMember() method. Let’s take a closer look at what is going on. Five parameters are passed into the InvokeMember() method:
-
The first parameter is the name of the method that you want to call: AddInput in this case. Therefore, instead of going directly to the location of the routine in memory, you ask the .NET runtime to find it for you.
-
The value from the BindingFlags enumeration tells it to invoke a method.
-
The next parameter provides language-specific binding information, which isn’t needed in this case.
-
The fourth parameter is a reference to the COM object itself (the one you instantiated using Activator.CreateInstance).
-
Finally, the fifth parameter is an array of objects representing the arguments for the method. In this case, there’s only one argument, the input value.
Something very similar to this is going on underneath VB6 late binding, except that here it’s exposed in all its horror. In some ways, that’s not a bad thing, because it should bring it home that late binding is something to avoid if possible. Anyway, let’s carry on and complete the program. Here are the remaining event handlers for the other buttons:
Private Sub btnCalculate_Click(ByVal sender As Object, _ ByVal e As System.EventArgs) Handles btnCalculate.Click Dim objResult As Object mtypCalc.InvokeMember("DoCalculation", BindingFlags.InvokeMethod, _ Nothing, mobjcalc, Nothing) objResult = mtypCalc.InvokeMember("GetOutput", _ BindingFlags.InvokeMethod, Nothing, mobjcalc, Nothing) txtOutput.Text = objResult End Sub Private Sub btnReset_Click(ByVal sender As Object, _ ByVal e As System.EventArgs) Handles btnReset.Click mtypCalc.InvokeMember("Reset", BindingFlags.InvokeMethod, _ Nothing, mobjcalc, Nothing) End Sub
Running the Calculation Framework
Let’s quickly complete the job by running the application. Figure 23-9 shows what happens when you select the nonexistent calculation StdDev.
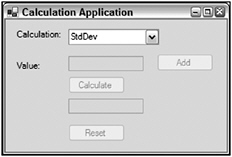
Figure 23-9
As shown in the screen shot, the input fields have been disabled, as desired. Figure 23-10 shows what happens when you repeat the earlier calculation using Mean. This time, the input fields are enabled, and the calculation can be carried out as before.
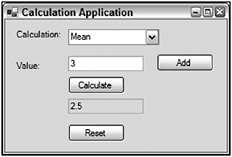
Figure 23-10
One final word about late binding. You took care to ensure that you checked whether the object was successfully instantiated. In a real-life application, you also need ensure that the method invocations were successful and that all exceptions were caught - you don’t have the luxury of having the compiler find all your bugs for you.
EAN: 2147483647
Pages: 267