Working with the ASP.NET Provider Model
When ASP.NET 2.0 was being developed, plenty of requests for new capabilities came into the ASP.NET team. Users wanted to be able to store sessions by means other than the three methods - InProc, StateServer, and SQLServer. One such request was for a provider that could store sessions in an Oracle database. This might seem like a logical thing to add to ASP.NET in the days of ASP.NET 1.1, but if the team added a provider for Oracle, they would soon get requests to add even more providers for other databases and data storage methods. For this reason, instead of building providers for every possible scenario, the developers designed a provider model that enabled them to add any providers they wished. Thus was born the new provider model found in ASP.NET 2.0.
ASP.NET 2.0 introduced a lot of new systems that require state storage of some kind. In addition, instead of recording state in a fragile mode (the way sessions are stored by default), many of these new systems require their state to be stored in more concrete datastores such as databases or XML files. This also enables a longer-lived state for the users visiting an application - something else that is required by these new systems.
The systems found in ASP.NET 2.0 that require advanced state management include the following:
-
Membership
-
Role management
-
Site navigation
-
Personalization
-
Health-monitoring Web events
-
Web parts personalization
-
Configuration file protection
The membership system enables ASP.NET to work from a user store of some kind to create, delete, or edit application users. Because it is apparent that developers want to work with an unlimited amount of different datastores for their user store, they need a means to change the underlying user store for their ASP.NET applications easily. The provider model found in ASP.NET 2.0 is the answer.
Out of the box, ASP.NET 2.0 provides two membership providers that enable you to store user information: the SQL Server and the Active Directory membership providers (found at System.Web.Security .SqlMembershipProvider and System.Web.Security.ActiveDirectoryMembershipProvider, respectively). In fact, for each of the systems (as well as for some of the ASP.NET 1.x systems), a series of providers is available to alter the way the state of that system is recorded. Figure 20-33 illustrates these providers.
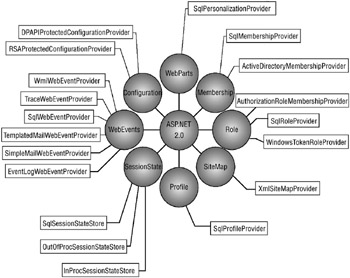
Figure 20-33
As shown in the diagram, ASP.NET provides a large number of providers out of the box. Some systems have only a single provider (such as the profile system, which includes only a provider to connect to SQL Server), whereas other systems include multiple providers (such as the WebEvents provider, which includes six separate providers). The next section describes how to set up SQL Server to work with a number of the providers presented in this chapter. You can use SQL Server 7.0, 2000, or 2005 for the back-end datastore for many of the providers presented (although not all of them). After this explanation is an overview of the available providers built into ASP.NET 2.0.
Working with Microsoft SQL Server 7.0, 2000, or 2005
Quite a number of providers work with SQL Server. For instance, the membership, role management, personalization, and other systems work easily with SQL Server. However, all these systems work with the new Microsoft SQL Server Express Edition file (.mdf) by default instead of with one of the fullblown versions of SQL Server, such as SQL Server 7.0, SQL Server 2000, or SQL Server 2005.
To work with either Microsoft SQL Server 7.0, 2000, or 2005, you must set up the database using the aspnet_regsql.exe tool. Working with aspnet_regsql.exe creates the necessary tables, roles, stored procedures, and other items needed by the providers. To access this tool, open the Visual Studio 2005 Command Prompt by selecting Start ![]() All Programs
All Programs ![]() Visual Studio 2005
Visual Studio 2005 ![]() Visual Studio Tools
Visual Studio Tools ![]() Visual Studio 2005 Command Prompt. This gives you access to the ASP.NET SQL Server Setup Wizard. The ASP.NET SQL Server Setup Wizard is an easy to use tool that facilitates setup of SQL Server to work with many of the systems built into ASP.NET 2.0, such as the membership, role management, and personalization systems. The Setup Wizard provides two ways for you to set up the database: using a command-line tool or using a GUI tool.
Visual Studio 2005 Command Prompt. This gives you access to the ASP.NET SQL Server Setup Wizard. The ASP.NET SQL Server Setup Wizard is an easy to use tool that facilitates setup of SQL Server to work with many of the systems built into ASP.NET 2.0, such as the membership, role management, and personalization systems. The Setup Wizard provides two ways for you to set up the database: using a command-line tool or using a GUI tool.
The ASP.NET SQL Server Setup Wizard Command-Line Tool
The command-line version of the Setup Wizard gives developers optimal control over how the database is created. Working from the command line using this tool is not difficult, so don’t be intimidated by it.
You can get at the actual tool, aspnet_regsql.exe, from the Visual Studio Command Prompt if you have Visual Studio 2005. At the command prompt, type aspnet regsql.exe -? to get a list of all the command-line options at your disposal for working with this tool.
The following table describes some of the available options for setting up your SQL Server instance to work with the personalization framework:
| Command Option | Description |
|---|---|
| -? | Displays a list of available option commands |
| -W | Uses the Wizard mode. This uses the default installation if no other parameters are used. |
| -S <server> | Specifies the SQL Server instance to work with |
| -U <login> | Specifies the username for logging in to SQL Server. If you use this, then you also use the -P command. |
| -P <password> | Specifies the password to use for logging in to SQL Server. If you use this, then you also use the -U command. |
| -E | Provides instructions to use the current Windows credentials for authentication |
| -C | Specifies the connection string for connecting to SQL Server. If you use this, you don’t need to use the -U and -P commands because they are specified in the connection string itself. |
| -A all | Adds support for all the available SQL Server operations provided by ASP.NET 2.0, including membership, role management, profiles, site counters, and page/control personalization |
| -A p | Adds support for working with profiles |
| _R all | Removes support for all the available SQL Server operations that have been previously installed. These include membership, role management, profiles, site counters, and page/control personalization. |
| -R p | Removes support for the profile capability from SQL Server |
| -d <database> | Specifies the database name to use with the application services. If you don’t specify a database name, then aspnetdb is used. |
| /sqlexportonly <filename> | Instead of modifying an instance of a SQL Server database, use this command in conjunction with the other commands to generate a SQL script that adds or removes the features specified. This command creates the scripts in a file that has the name specified in the command. |
To modify SQL Server to work with the personalization provider using this command-line tool, you enter a command such as the following:
aspnet_regsql.exe −A all −E After you enter the preceding command, the command-line tool creates the features required by all the available ASP.NET 2.0 systems. The results are shown in the tool itself, as illustrated in Figure 20-34.
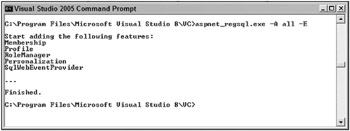
Figure 20-34
When this action is completed, you can see that a new database, aspnetdb, has been created in the SQL Server Enterprise Manager of Microsoft SQL Server 2000 (the database used for this example). You now have the appropriate tables for working with all the ASP.NET 2.0 systems that are able to work with SQL Server (see Figure 20-35).
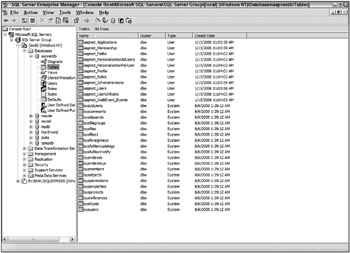
Figure 20-35
One advantage of using the command-line tool, rather than the GUI-based version of the ASP.NET SQL Server Setup Wizard, is that you can install in the database just the features you’re interested in working with, instead of installing everything (as the GUI-based version does). For instance, if you want only the membership system to interact with SQL Server 2000 - not any of the other systems (such as role management and personalization) - then you can configure the setup so that only the tables, roles, stored procedures, and other items required by the membership system are established in the database. To set up the database for the membership system only, use the following on the command line:
aspnet_regsql.exe −A m −E
The ASP.NET SQL Server Setup Wizard GUI Tool
Instead of working with the tool through the command line, you can also work with a GUI version of the same wizard. To get at the GUI version, type the following at the Visual Studio command prompt:
aspnet_regsql.exe At this point, the ASP.NET SQL Server Setup Wizard welcome screen appears, as shown in Figure 20-36.
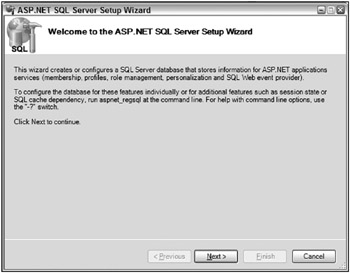
Figure 20-36
Clicking the Next button gives you a new screen that offers two options: one to install management features into SQL Server and the other to remove them (see Figure 20-37).
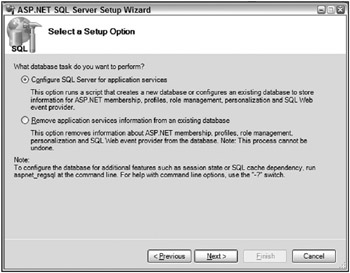
Figure 20-37
From here, choose “Configure SQL Server for application services” and click Next. The third screen (see Figure 20-38) asks for the login credentials to SQL Server and the name of the database to perform the operations. The Database option is <default> - meaning the wizard creates a database called aspnetdb. If you want to choose a different folder, such as the application’s database, choose the appropriate option.
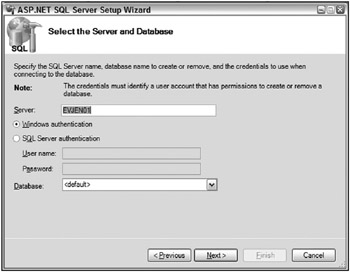
Figure 20-38
After you have made your server and database selections, click Next. The screen shown in Figure 20-39 asks you to confirm your settings. If everything looks correct, click the Next button - otherwise, click Previous and correct your settings.
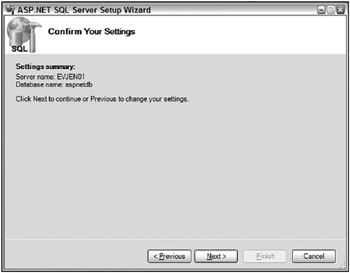
Figure 20-39
When this is complete, you get a notification that everything was set up correctly.
Connecting Your Default Provider to a New SQL Server Instance
After you set up the full-blown Microsoft SQL Server to work with the various systems provided by ASP.NET 2.0, you create a connection string to the database in your machine.config.comments or web.config file, as shown in the following code:
<configuration> <connectionStrings> <add name="LocalSql2000Server" connectionString="data source=127.0.0.1;Integrated Security=SSPI" /> </connectionStrings> </configuration> You may want to change the values provided if you are working with a remote instance of SQL Server, rather than an instance that resides on the same server as the application. Changing this value in the machine.config file changes how each ASP.NET application uses this provider. Applying this setting in the web.config file causes only the local application to work with this instance.
After the connection string is set up, look further in the <providers> area of the section you are going to work with. For instance, if you are using the membership provider, you want to work with the <membership> element in the configuration file. The settings to change SQL Server are shown here:
<configuration> <connectionStrings> <add name="LocalSql2000Server" connectionString="data source=127.0.0.1;Integrated Security=SSPI" /> </connectionStrings> <system.web> <membership defaultProvider="AspNetSql2000MembershipProvider"> <providers> <add name="AspNetSql2000MembershipProvider" type="System.Web.Security.SqlMembershipProvider, System.Web, Version=2.0.0.0, Culture=neutral, PublicKeyToken=b03f5f7f11d50a3a" connectionStringName="LocalSql2000Server" enablePasswordRetrieval="false" enablePasswordReset="true" requiresQuestionAndAnswer="true" applicationName="/" requiresUniqueEmail="false" passwordFormat="Hashed" maxInvalidPasswordAttempts="5" minRequiredPasswordLength="7" minRequiredNonalphanumericCharacters="1" passwordAttemptWindow="10" passwordStrengthRegularExpression="" /> </providers> </membership> </system.web> </configuration> With these changes in place, the SQL Server 2000 instance is now one of the providers available for use with your applications. The name of this instance is AspNetSql2000MembershipProvider. You can see that this instance also uses the connection string of LocalSql2000Server, which was defined earlier.
Pay attention to some important attribute declarations in the preceding configuration code. For example, the provider used by the membership system is defined via the defaultProvider attribute found in the main <membership> node. Using this attribute, you can specify whether the provider is one of the built-in providers or whether it is a custom provider that you have built yourself or received from a third party. With the code in place, the membership provider now works with Microsoft SQL Server 2000 (as shown in this example) instead of the Microsoft SQL Server Express Edition files.
EAN: 2147483647
Pages: 267