Chapter 20: ASP.NET 2.0 Advanced Features
ASP.NET is an exciting technology. It enables the creation and delivery of remotely generated applications (Web applications) accessible via a simple browser - a container that many are rather familiar with. The purpose of Web-based applications (in our case, ASP.NET applications) is to deliver only a single instance of the application to the end user over HTTP. This means that the end users viewing your application will always have the latest and greatest version at their disposal. Because of this, many companies today are looking at ASP.NET to not only deliver the company’s website, but also to deliver some of their latest applications for their employees, partners, and customers.
The last chapter took a look at some of the basics of ASP.NET 2.0. This chapter continues on that path and shows you some additional and exciting technologies that you’ll find in ASP.NET 2.0, including master pages, configuration, data access, and more.
This chapter touches upon many topics, as ASP.NET has become a rather large offering with many possibilities and capabilities. Sit back, pull up that keyboard, and enjoy!
Applications and Pages
The previous chapter took a look at the structure of ASP.NET pages and their life cycle. There’s quite a bit you can do with the applications and pages in ASP.NET to change how they behave or how you compile and deliver them. This section looks at some of these possibilities.
Cross-Page Posting
The way in which Active Server Pages 2.0/3.0 (also called classic ASP) worked was that values from forms were usually posted to other pages. These pages were typically steps in a process that the end user worked through. With the introduction of ASP.NET, pages in this environment posted back results to themselves in a step called a postback. One of the most frequent requests of Web developers in the ASP.NET world has been the capability to do postbacks, not only to the page from which the values originated, but also to other pages within the application. This feature has been provided with the release of ASP.NET 2.0.
Cross-page posting (as it is referred to) is an easy functionality to achieve now. It gives you the capability to post page values from one page (Page1.aspx) to an entirely different page (Page2.aspx). Normally, when posting to the same page (as with ASP.NET 1.0/1.1), you could capture the postback in a postback event, as shown here:
If Page.IsPostBack Then ' do work here End If Now take a look at Page1.aspx and see how you accomplish cross-page posting with ASP.NET 2.0:
<%@ Page Language="VB" %> <script runat="server"> Protected Sub Button1_Click(ByVal sender As Object, _ ByVal e As System.EventArgs) Label1.Text = "Your name is: " & TextBox1.Text & "<br>" & _ "Your appointment is on: " & Calendar1.SelectedDate.ToLongDateString() End Sub </script> <html xmlns="http://www.w3.org/1999/xhtml" > <head runat="server"> <title>Cross-Page Posting</title> </head> <body> <form runat="server"> <div> What is your name?<br /> <asp:TextBox runat="server"></asp:TextBox> <br /> <br /> When is your appointment?<br /> <asp:Calendar runat="server"> </asp:Calendar><br /> <asp:Button OnClick="Button1_Click" runat="server" Text="Do a PostBack to this Page" /> <br /> <br /> <asp:Button runat="server" Text="Do a PostBack to Another Page" PostBackUrl="~/Page2.aspx" /> <br /> <br /> <asp:Label runat="server"></asp:Label> </div> </form> </body> </html> With Page1.aspx, there is nothing really different about this page - except for the Button2 server control. This page contains a new attribute, which you will find with the Button, ImageButton, and LinkButton controls - the PostBackUrl attribute. The value of this attribute points to the location of the file that this page should post to. In this case, the PostBackUrl attribute states that this page should post to Page2.aspx. This is the only thing needed on the Page1.aspx to cause it to post back to another page. As for Button1, you can see that this is a simple button that will cause the page to post back to itself. This is nothing; this was the case even in ASP.NET 1.x. You can see the event handler for this postback in the OnClick attribute within the Button1 control. Pressing this button causes the page to post back to itself and to populate the Label1 control at the bottom of the page.
Clicking on the second button, though, will post to the second page, which is shown here:
<%@ Page Language="VB" %> <script runat="server"> Protected Sub Page_Load(ByVal sender As Object, ByVal e As System.EventArgs) Dim pp_TextBox1 As TextBox Dim pp_Calendar1 As Calendar pp_TextBox1 = CType(PreviousPage.FindControl("TextBox1"), TextBox) pp_Calendar1 = CType(PreviousPage.FindControl("Calendar1"), Calendar) Label1.Text = "Your name is: " & pp_TextBox1.Text & "<br>" & _ "Your appointment is on: " & _ pp_Calendar1.SelectedDate.ToLongDateString() End Sub </script> <html xmlns="http://www.w3.org/1999/xhtml" > <head runat="server"> <title>Second Page</title> </head> <body> <form runat="server"> <div> <asp:Label runat="server"></asp:Label> </div> </form> </body> </html> In this page, the first step is the creation in the Page_Load event of instances of both the TextBox and Calendar controls. From here, these instances are populated with the values of these controls on the previous page (Page1.aspx) by using the PreviousPage.FindControl() method. The String value assigned to the FindControl method is the ID value of the ASP.NET server control from the originating page (in our case, TextBox1 and Calendar1). Once you have assigned the values to these control instances, you can then start working with the new controls and their values as if they were posted from the same page.
You can also expose the server controls and other items as properties from Page1.aspx, as illustrated in this partial code sample:
<%@ Page Language="VB" %> <script runat="server"> Public ReadOnly Property pp_TextBox1() As TextBox Get Return TextBox1 End Get End Property Public ReadOnly Property pp_Calendar1() As Calendar Get Return Calendar1 End Get End Property Protected Sub Button1_Click(ByVal sender As Object, _ ByVal e As System.EventArgs) Label1.Text = "Your name is: " & TextBox1.Text & "<br>" & _ "Your appointment is on: " & Calendar1.SelectedDate.ToLongDateString() End Sub </script> Once you have exposed the properties you want from Page1.aspx, you can easily get at these properties in the cross-page postback by using the new PreviousPageType page directive, as shown in the following example:
<%@ Page Language="VB" %> <%@ PreviousPageType VirtualPath="~/Page1.aspx" %> <script runat="server"> Protected Sub Page_Load(ByVal sender As Object, ByVal e As System.EventArgs) Label1.Text = "Your name is: " & PreviousPage.pp_TextBox1.Text & "<br>" & _ "Your appointment is on: " & _ PreviousPage.pp_Calendar1.SelectedDate.ToLongDateString() End Sub </script> After your properties are on Page1.aspx, you can access them easily by strongly typing the PreviousPage property on Page2.aspx by using the PreviousPageType directive. The PreviousPageType directive specifies the page from which the post will come. Using this directive enables you to specifically point at Page1.aspx. This is done using the VirtualPath attribute of the PreviousPageType directive. The VirtualPath attribute takes a String whose value is the location of the directing page.
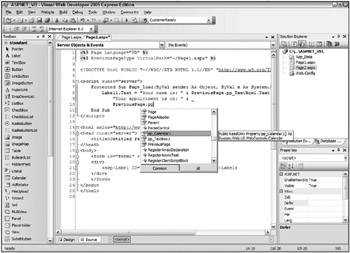
Once this association has been made, you can then use the PreviousPage property, and you will see that the pp_TextBox1 and pp_Calendar1 properties that were created on Page1.aspx are now present in Visual Studio 2005’s IntelliSense (see Figure 20-1). Working with the PreviousPage property is a bit easier and is less error prone than using weak typing.

Figure 20-1
One thing to guard against is a browser hitting a page that is expecting information from a cross-page post; this action causes errors if the information the second page is expecting isn’t there. You always had to guard against pages that were looking for postback information - even when dealing with ASP.NET pages (1.0/1.1) that performed postbacks to themselves. With standard pages that aren’t cross-page posting, you could protect your code from this postback behavior through the use of the Page.IsPostBack property, as shown here:
If Page.IsPostBack Then ' code here End If When cross-page posting, use the Page.IsCrossPagePostBack property:
<%@ Page Language="VB" %> <%@ PreviousPageType VirtualPath="~/Page1.aspx" %> <script runat="server"> Protected Sub Page_Load(ByVal sender As Object, ByVal e As System.EventArgs) If PreviousPage.IsCrossPagePostBack Then Label1.Text = "Your name is: " & PreviousPage.pp_TextBox1.Text & "<br>" & _ "Your appointment is on: " & _ PreviousPage.pp_Calendar1.SelectedDate.ToLongDateString() Else Response.Redirect("Page1.aspx") End If End Sub </script>
In this example, if someone hits this page without going to Page1.aspx first to get cross-posted to Page2.aspx, then the request will be checked to determine whether the request is a cross-post. If it is (checked using the Page.IsCrossPagePostBack property), then the code is run; otherwise, the request is redirected to Page1.aspx.
ASP.NET Compilation
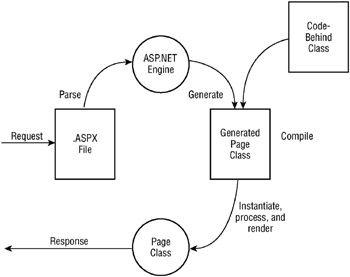
With ASP.NET. you can observe this compilation process and how it works when you hit one of the ASP.NET pages you have built for the first time. You’ll notice that it takes a few seconds for the page to be generated. When an ASP.NET page is referenced in the browser for the first time, the request is passed to the ASP.NET parser that creates the class file in the language of the page. It is passed to the parser based on the file’s extension (.aspx) because ASP.NET realizes that this file extension type is meant for its handling and processing. After the class file has been created, it is compiled into a DLL and then written to the disk of the Web server. At this point, the DLL is instantiated and processed, and an output is generated for the initial requester of the ASP.NET page. This process is detailed in Figure 20-2.

Figure 20-2
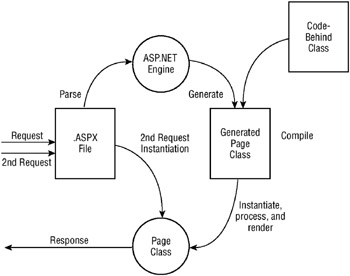
On the next request, great things happen. Instead of going through the entire process again for the second and subsequent requests, the request simply causes an instantiation of the already created DLL, which sends out a response to the requester (see Figure 20-3).

Figure 20-3
Previously, because of the mechanics of this process, if you made changes to your .aspx code-behind pages, it was necessary to recompile your application. This was quite a pain if you had a larger site and didn’t want your end users to experience the extreme lag that occurs when an .aspx page is referenced for the first time after compilation. Many developers, consequently, began to develop their own tools that automatically hit every single page within the application to remove this first-time lag hit from the end user’s browsing experience.
ASP.NET 2.0 offers a few ways to precompile your entire application with a single command that you can issue through a command line. One type of compilation is referred to as in-place precompilation. In order to precompile your entire ASP.NET application, you must use the aspnet_compiler.exe tool that comes with ASP.NET 2.0. To do so, open the Command Prompt window and navigate to C:\Windows\Microsoft.NET\Framework\v2.0.xxxxx\. Once there, you can work with the aspnet_ compiler tool. You can also access this tool directly by pulling up the Visual Studio 2005 Command Prompt window. Choose Start ![]() All Programs
All Programs ![]() Microsoft Visual Studio 2005
Microsoft Visual Studio 2005 ![]() Visual Studio Tools
Visual Studio Tools ![]() Visual Studio 2005 Command Prompt.
Visual Studio 2005 Command Prompt.
After you get the command prompt, use the aspnet_compiler.exe tool to perform an in-place precompilation using the following command:
aspnet_compiler ?p "C:\Inetpub\wwwroot\WROX" ?v none In the example just shown, -v is a command for the virtual path of the application - which is provided by using /WROX. The next command is -p, which points to the physical path of the application. In this case, it is C:\Websites\WROX. Finally, the last bit, C:\Wrox, is the location of the compiler output. The following table describes the possible commands for the aspnet_compiler.exe tool:
| Command | Description |
|---|---|
| -m | Specifies the full IIS metabase path of the application. If you use the -m command, you cannot use the -v or -p command. |
| -v | Specifies the virtual path of the application to be compiled. If you also use the -p command, the physical path is used to find the location of the application. |
| -p | Specifies the physical path of the application to be compiled. If this is not specified, the IIS metabase is used to find the application. |
| [targetDir] | Specifies the target directory in which the compiled files should be placed. If this is not specified, the output files are placed in the application directory. |
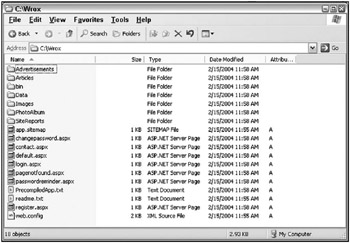
After compiling the application, you can go to C:\Wrox to see the output. Here, you see all the files and file structures that were in the original application, but if you look at the content of one of the files, the file is simply a placeholder. In the actual file is the following comment:
This is a marker file generated by the precompilation tool and should not be deleted!
In fact, you find a Code.dll file in the bin folder where all the page code is located. Because it is in a DLL file, it provides great code obfuscation as well. From here on, all you do is move these files to another server using FTP or Windows Explorer, and you can run the entire Web application from these files. When you have an update to the application, you simply provide a new set of compiled files. Sample output is displayed in Figure 20-4.

Figure 20-4
Note that this compilation process doesn’t compile every type of Web file. In fact, it compiles only the ASP.NET-specific file types, omitting from the compilation process the following types of files:
-
HTML files
-
XML files
-
XSD files
-
web.config files
-
Text files
You can’t do much to get around this, except in the case of the HTML files and the text files. For these file types, just change the file extension of these file types to .aspx; they are then compiled into the Code.dll like all the other ASP.NET files.
EAN: 2147483647
Pages: 267