Project ProVB.NET in Visual Studio
The Form Designer opens by default when a new project is created. If you have closed it, you can easily reopen it by right-clicking Form1.vb in the Solution Explorer and selecting View Designer from the popup menu. From this window, you can also bring up the code view for this form. However, Figure 13-13 illustrates the default view you get when your project template completes. On the screen is the design surface upon which you can drag controls from the Toolbox to build your user interface and update properties associated with your form.
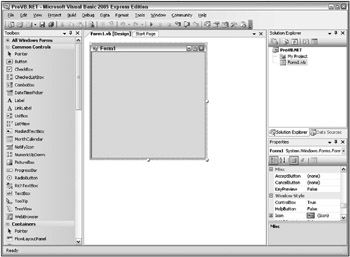
Figure 13-13
The Properties pane, shown in more detail in Figure 13-14, is by default placed in the lower-right corner of the Visual Studio window. Like many of the other windows in the IDE, if you close it, it can be accessed through the View menu. Alternatively, you can use the F4 key to reopen this window. The Properties window is used to set the properties of the currently selected item control in the display.
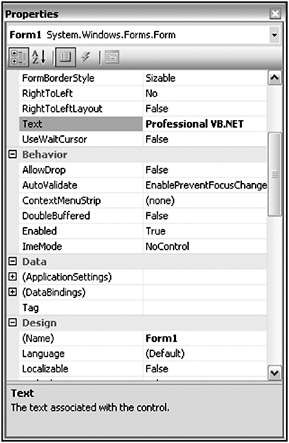
Figure 13-14
Each control you place on your form has its own distinct set of properties. For example, in the design view, select your form. You’ll see the Properties window adjust to display the properties of Form1, as shown in Figure 13-14. This is the list of properties associated with your form. If you want to limit how small a user can reduce the display area of your form, then you can now define this as a property. For your sample, go to the Text property and change the default of Form1 to Professional VB.NET. Once you have accepted the property change, the new value is displayed as the caption of your form. Later in this section, you’ll set form properties in code. You’ll see that .NET properties are defined within your source file, unlike other environments where properties you edit through the user interface are hidden in some binary or proprietary portion of the project.
Now that you’ve looked at the form’s properties, open the code associated with this file by either right-clicking Form1.vb in the Solution Explorer and selecting code view, or right-clicking the form in the View Designer and selecting View Code from the pop-up menu.
You can see that the initial display of the form looks very simple. There is no code in the Form1.vb file. This is a change from Visual Studio 2003, where you would have a generated section of code in a collapsed region in your source file. Instead, Visual Basic 2005 introduces a capability called partial classes. Partial classes are covered in Chapter 3, and Visual Studio leverages them for the code, which is generated as part of the user interface designer.
Visual Studio places all the generated source code for your form in the file Form1.Designer.vb. Because the “Designer” portion of this name is a convention that Visual Studio can recognize, it will hide these files by default when you review your project in the Solution Explorer. As noted earlier, by asking Visual Studio to “show all files,” you can find these generated files. If you open a “Designer.vb” file, you’ll see that quite a bit of custom code is generated by the Visual Studio already in your project.
To do this, go to the toolbar located in the Solution Explorer window and select the Show All Files button. This will change your project display and a small plus sign will appear next to the Form1.vb file. Expanding this entry displays the Form1.Designer.vb file, which you can open within the IDE. Doing this for Form1.Designer.vb for the ProVB.NET project you created will result in a window similar to the one shown in Figure 13-15.
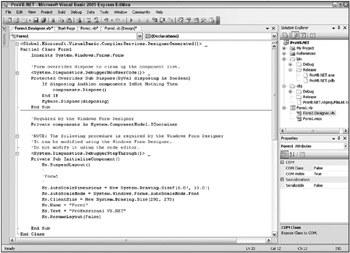
Figure 13-15
Note that the contents of this file are generated; for now, don’t try to make any changes. Visual Studio automatically regenerates the entire file when a property is changed, so any changes may be lost. The following lines start the declaration for your form in the file Form1.Designer.vb:
<Global.Microsoft.VisualBasic.CompilerServices.DesignerGenerated()> _ Partial Public Class Form1 Inherits System.Windows.Forms.Form The first line is an attribute that can be ignored. Next is the line that actually declares a new class called Form1. Note that in spite of the naming convention used by Visual Studio to hide the generated UI class implementation, the name of your class and the file in which it exists are not tightly coupled. Thus, your form will be referenced in the code as Form1 unless you modify the name used in the class declaration. Similarly, you can rename the file that contains the class without changing the actual name of the class.
One of the powerful results of forms being implemented as classes is that you can now derive one form from another form. This technique is called visual inheritance, although the elements that are actually inherited may not be displayed.
Form Properties Set in Code
As noted earlier, Visual Studio keeps every object’s custom property values in the source code. To do this, Visual Studio adds a method to your form class called InitializeComponent. As the name suggests, this method handles the initialization of the components contained on the form. A comment before the procedure warns you that the Form Designer modifies the code contained in the procedure, and that you should not modify the code directly. This module is part of the Form1.Designer.vb source file, and Visual Studio updates this section as changes are made through the IDE.
'NOTE: The following procedure is required by the Windows Form Designer 'It can be modified using the Windows Form Designer. 'Do not modify it using the code editor. <System.Diagnostics.DebuggerStepThrough()> Private Sub _ InitializeComponent() Me.SuspendLayout() ' 'Form1 ' Me.AutoScaleDimensions = New System.Drawing.SizeF(6.0!, 13.0!) Me.AutoScaleMode = System.Windows.Forms.AutoScaleMode.Font Me.ClientSize = New System.Drawing.Size(292, 266) Me.Name = "Form1" Me.Text = "Professional VB.NET" Me.ResumeLayout(False) End Sub The seven lines of the InitializeComponent procedure assign values to the properties of your Form1 class. All the properties of the form and controls are now set directly in code. When you change the value of a property of the form or a control through the Properties window, an entry is added to InitializeComponent that assigns that value to the property. Previously, while examining the Properties window, you set the Text property of the form to Professional VB.NET Intro, which caused the following line of code to be added automatically:
Me.Text = "Professional VB.NET Intro" The properties of the form class that are set in InitializeComponent by default are shown in the following table:
| Property | Description |
|---|---|
| Suspend Layout | This property tells the form to not make updates to what is displayed to the user. It is called so that as each change is made, the form doesn’t seem to appear in pieces. |
| AutoScaleDimensions | Initializes the size of the font used to lay out the form at design time. At runtime, the font that is actually rendered is compared with this property, and the form is scaled accordingly. |
| AutoScaleMode | Indicates that the form will use fonts that are automatically scaled based on the display characteristics of the runtime environment |
| ClientSize | Sets the area in which controls can be placed (the client area). It is the size of the form minus the size of the title bar and form borders. |
| Name | This property is used to set the textual name of the form. |
| ResumeLayout | Tells the form that it should resume the normal layout and displaying of its contents |
Code Regions
Source files in Visual Studio allow you to collapse blocks of code. The idea is that in most cases you can reduce the code seen on screen, and which seems to separate other modules within a given class, by collapsing the code so it isn’t visible; this feature is known as outlining. For example, if you are comparing the load and save methods and in between you have several other blocks of code, then you can “hide” this code, which isn’t part of your current focus.
By default, there is a minus sign next to every method (sub or function). This makes it easy to hide or show code on a method-by-method basis. If the code for a method is hidden, the method declaration is still shown and has a plus sign next to it indicating that the body code is hidden. This feature is very useful when a developer is working on a few key methods in a module and wishes to avoid scrolling through many screens of code that are not relevant to the current task.
It is also possible to hide custom regions of code. The #Region directive is used for this within the IDE, though it has no effect on the actual application. A region of code is demarcated by the #Region directive at the top and the #End Region directive at the end. The #Region directive that is used to begin a region should include a description. The description appears next to the plus sign shown when the code is minimized.
The outlining enhancement was probably inspired by the fact that the Visual Studio designers generate a lot of code when a project is started. Being able to see the underpinnings of your generated UI does make it is easier for the developer to understand what is happening, and possibly to manipulate the process in special cases. However, as you can imagine, it can become problematic; hence the #Region directive, which can be used to organize groups of common code and then visually minimize them.
Visual Studio 2005 developers, but not Express Edition developers, can also control outlining throughout a source file. Outlining can be turned off by selecting Edit ![]() Outlining
Outlining ![]() Stop Outlining from the Visual Studio menu. This menu also contains some other useful functions. A section of code can be temporarily hidden by highlighting it and selecting Edit
Stop Outlining from the Visual Studio menu. This menu also contains some other useful functions. A section of code can be temporarily hidden by highlighting it and selecting Edit ![]() Outlining
Outlining ![]() Hide Selection. The selected code will be replaced by an ellipsis with a plus sign next to it, as if you had dynamically identified a region within the source code. Clicking the plus sign displays the code again.
Hide Selection. The selected code will be replaced by an ellipsis with a plus sign next to it, as if you had dynamically identified a region within the source code. Clicking the plus sign displays the code again.
Tabs versus MDI
You may have noticed in Figure 13-15 that the Code View and Form Designer windows open in a tabbed environment. This environment is the default for working with the code windows inside Visual Studio, but you can toggle this setting, which enables you to work with a more traditional MDI-based interface. Such an interface opens each code window within a separate frame instead of anchoring it to the tabbed display of the integrated development environment (IDE).
To change the arrangement that is used between the tabbed and MDI interface, use the Options dialog box (accessible via Tools ![]() Options); this setting is available as one of the environment settings. You can also force the development environment to use the MDI as opposed to the tabbed interface (for a single session) by using the command-line option /mdi when Visual Studio is started.
Options); this setting is available as one of the environment settings. You can also force the development environment to use the MDI as opposed to the tabbed interface (for a single session) by using the command-line option /mdi when Visual Studio is started.
Running ProVB.NET
Now that you’ve reviewed the elements of your generated project, let’s test the code before you continue. To run an application from within Visual Studio, there are several options; the first is to click the Start button, which looks like the play button on a tape recorder. Alternatively, you can go to the Debug menu and select Start. Finally, the most common way of launching applications is to press F5.
Once the application starts, you will see an empty form display with the standard control buttons (in the upper-right corner) from which you can control the application. The form name should be Professional VB.NET Intro, which you applied earlier. At this point, the sample doesn’t have any custom code to examine, so the next step is to add some simple elements to this application.
Customizing the Text Editor
In addition to being able to customize the overall environment provided by Visual Studio, you can customize several specific elements related to your development environment. Both Visual Studio 2005 and Visual Basic 2005 Express Edition have a rich set of customizations related to a variety of different environment and developer settings. Admittedly, Visual Studio 2005’s feature set results in a larger number of available options for editing, but rest assured that the Express Edition contains many more options for editing than most people expect. A good example that’s common to both IDEs is the way the Text Editor allows for much more customization. If you’ve ever had to show code to an audience - for example, in a group code review - the ability to adjust things such as font size and other similar options is great.
To leverage Visual Studio’s settings, go to the Tools menu and select Options to open the Options dialog box, shown in Figure 13-16. Within the dialog box, make sure the Show All Settings check box is selected. Next, select the Text Editor folder, and then select the All Languages folder. This section allows you to make changes to the Text Editor, which are applied across every supported development language. Additionally, you can select the Basic folder to make changes that are specific to how the Text Editor will behave when you edit VB source code.
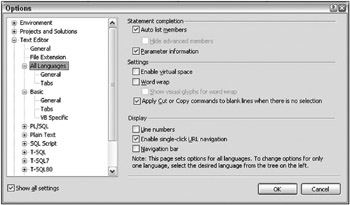
Figure 13-16
From this dialog box, it is possible to modify the number of spaces that each tab will insert into your source code and to manage several other elements of your editing environment. One little-known but useful capability of the Text Editor is line numbering. Checking the Line numbers check box will cause the editor to number all lines, which provides an easy way to unambiguously reference lines of code.
A new feature of Visual Studio 2005 is the capability to track your changes as you edit. Enabling the Track Changes setting under the Text Editor options causes Visual Studio to provide a colored indicator in places where you have modified a file. This indicator is a color bar at the left margin of your display. It shows which portions of a source file have been recently edited and whether those changes have been saved to disk.
IntelliSense, Code Expansion, and Code Snippets
One of the reasons Microsoft Visual Studio is one of the most popular development environments is that it has been designed to support developer productivity. That sounds really good, but let’s back it up. People who are unfamiliar with Visual Studio might just assume that “productivity” refers to organizing and starting projects. Certainly, as shown with the project templates and project settings discussed so far, this is true, but those features don’t speed your development after you’ve created the project.
This section covers three features that target your productivity while writing code. They are of differing value and are specific to Visual Studio. IntelliSense has always been a popular feature of Microsoft tools and applications. Code Expansion is a new feature with Visual Studio 2005; it enables you to type a keyword, such as “select,” and then press the Tab key to automatically insert a generic select-case code block, which you can then customize. Going beyond this, you can use the right mouse button and insert a code snippet at the location of your mouse click. As you can tell, each of these builds on the developer productivity capabilities of Visual Studio.
IntelliSense
IntelliSense has been enhanced in Visual Studio 2005, enabling you to not only work with the methods of a class, but also automatically display the list of possible values associated with an enumerated list of properties when one has been defined. IntelliSense also provides a tooltip-like list of parameter definitions when you are making a method call. You’ll see an example of this feature later in this chapter.
Additionally, if you type Exit and a space, IntelliSense displays a drop-down list of keywords that could follow Exit. Other keywords that have drop-down lists to present available options include Goto, Implements, Option, and Declare. IntelliSense generally displays more tooltip information in the environment than before and helps the developer match up pairs of parentheses, braces, and brackets.
Finally, note that IntelliSense is based on your editing context. While editing a file, there may come a point at which you are looking for a specific item to show up in IntelliSense. You repeatedly type slightly different versions but nothing appears. IntelliSense has recognized that you aren’t in a method or are outside of the scope of a class, so it has removed those items that are inappropriate for your current location in your source code from the list of items available from IntelliSense.
Code Expansion
Going beyond IntelliSense is Code Expansion. Code Expansion recognizes that certain keywords are consistently associated with other lines of code. At the most basic level, this occurs when you declare a new Function or Sub: Visual Studio automatically inserts the End Sub or End Function line once you press Enter. Essentially, Visual Studio is expanding the declaration line to include its matching end point.
However, real code expansion goes beyond this. With real code expansion, you can type a keyword such as For, ForEach, Select, or any of a number of Visual Basic keywords. If you then use the Tab key, Visual Studio will attempt to recognize that keyword and insert the block of code that you would otherwise need to remember and type yourself. Instead of needing to remember how to format the control values of a Select statement, you can just type this first part of the command and then press Tab to get the following code block:
Select Case VariableName Case 1 Case 2 Case Else End Select Unfortunately, this is one case where just showing you the code isn’t enough. That’s because the code that is inserted has active regions within it that represent key items you will customize. Thus, Figure 13-17 provides a better representation of what is inserted when you expand the Select keyword into a full Select Case statement.
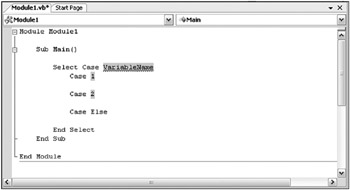
Figure 13-17
When the block is inserted the editor automatically positions your cursor in the first highlighted block - VariableName. When you start typing the name of the variable that applies, the editor automatically clears that static VariableName string, which is acting as a placeholder. Once you have entered the variable name you want, you can just press Tab. At that point the editor automatically jumps to the next highlighted item. This capability to insert a block of boilerplate code and have it automatically respond to your customization is a great feature.
Another advantage of the code expansion is that Visual Studio not only enables you to quickly shift between the values that need to be customized, but these values are also linked where appropriate. Another popular, potentially the most popular, code expansion shortcut is the one for creating a new property in a class. If at the class level you type the word “property” followed by Tab, you will find the code shown in Figure 13-18 inserted into your code. On the surface this code is very similar to what you see when you expand the Select statement. Note that although you type “property,” even the internal value is part of this code expansion.
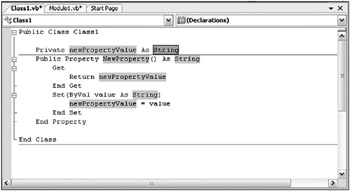
Figure 13-18
The difference, however, is that the same value String in Figure 13-18 is repeated for the property. The value you see is actually not the default; the default everywhere you see String in Figure 13-18 is Integer. However, when you change the first such entry from Integer to String, Visual Studio automatically updates all three locations because it knows they are linked.
It is this capability to fully integrate the template supporting the expanded code with the edits you’ll need to make that makes code expansion such a valuable tool. Moreover, Visual Studio went one step further and included blocks of code that don’t translate to language keywords.
Code Snippets
It is possible, with a click of your mouse, to browse a library of code blocks, which, as with code expansion, you can insert into your source file. However, unlike code expansion, these snippets aren’t triggered by a keyword. Instead, you right-click and (as shown in Figure 13-19) select Insert Snippet from the context menu. This starts the selection process for whatever code you want to insert.
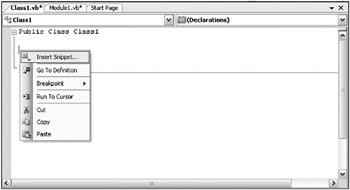
Figure 13-19
The snippet library is installed with Visual Studio 2005 and is fully expandable, as discussed later in this chapter. Snippets are categorized by the function each is focused on. For example, all the code you can reach via code expansion is also available as snippets, but snippets go well beyond that list. There are snippet blocks for XML related actions, for operating system interface code, for items related to Windows Forms, and, of course, a lot of data-access-related blocks. The whole idea is that, unlike code expansion, which enhances the language in a way similar to IntelliSense, code snippets are blocks of code focused on functions developers often write from scratch.
As shown in Figure 13-20, the insertion of a snippet triggers the creation of a placeholder tag and a context window showing the categories of snippets. Each of the folders can contain a combination of snippet files or subdirectories containing still more snippet files. Visual Basic 2005 Express contains a subset of the folders provided with Visual Studio 2005. Visual Studio 2005 includes additional categories not shown in Figure 13-20. In addition, Visual Studio 2005 includes the folder My Code Snippets, to which you can add your own custom snippet files.
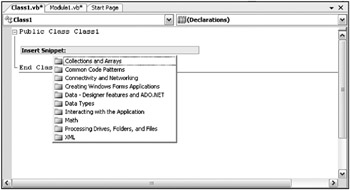
Figure 13-20
Selecting a folder enables you to select from one of its subfolders or a snippet file. Once you select the snippet of interest, Visual Studio inserts the associated code into your source file. Figure 13-21 shows the results of adding an operating system snippet to some sample code. The specific snippet in question is the code within the sub ReviewAppErrors. The selected snippet was Windows Operating System>Event Logs>Read Entries Created by a Particular Application from the Event Log, which isn’t included with Visual Basic 2005 Express, although the code is still valid.
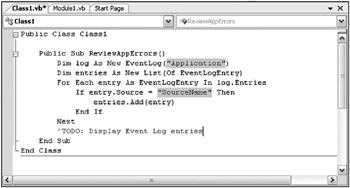
Figure 13-21
As you can see, this code snippet isn’t just a block of code that can be used anywhere. Instead, it is specific to reading the Application Log, and its use in the ReviewAppErrors method is based on the idea that many applications log their errors to the Event Log so that they can be reviewed either locally or from another machine in the local domain. The key, however, is that the snippet has pulled in the necessary class references, many of which might not be familiar to you, and has placed them in context. This speeds not only the time spent typing this code, but also the time spent recalling exactly which classes need to be referenced and which methods need to be called and customized.
Finally, it is also possible to shortcut the menu tree. Specifically, if you know the shortcut for a snippet, you can type that and press Tab to have Visual Studio insert that snippet. For example, typing evReadApp followed by Tab will insert the same snippet shown in Figure 13-21.
Tools such as Code Snippets and especially Code Expansion are even more valuable when you work in multiple languages. Keep in mind, however, that Visual Studio isn’t limited to the features that come in the box. It’s possible to extend Visual Studio not only with additional controls and project templates, but also with additional editing features.
Additional Components for Visual Studio 2005
You might be interested in adding two additional tools that work with Visual Studio. Even better, both are free. The first is a tool for creating your own Visual Basic snippets. As discussed, snippets can be powerful tools when you need to replicate relatively small but commonly used blocks of code that will be customized. While Visual Studio ships with several such snippets, Microsoft probably hasn’t thought of the snippet you want the most.
This is where the first tool comes in: a Snippet Editor for Visual Basic code snippets. This editor doesn’t actually live within Visual Studio 2005; it just updates the snippet files you want to use from Visual Studio. Behind the scenes, snippets are actually XML files with embedded text that represents the code used in the snippet. What the Snippet Editor does is read that XML and interpret all of the embedded logic related to things such as replacement blocks. This tool makes it possible for Visual Basic developers to create custom snippets without worrying about the XML formatting details. It is available from MSDN at http://msdn2.microsoft.com/en-us/vbasic/ms789085.aspx.
The second tool is a true add-in to Visual Basic 2005. When Microsoft was announcing features for .NET 2.0, it was apparent that Visual Basic and C# had different feature lists. As time went by, the developers in each community started to better understand what these features represented, and in many cases demanded their inclusion. One such feature was native support in C# for refactoring, the ability to modify a variable name to take “i” and call it “loopControl” so that it’s more readable. Modifying code to improve the underlying structure, performance, and maintainability is referred to generically as refactoring.
Traditionally, such changes might make code more maintainable but were often more risk than reward; as a result they seldom were made. The problem, of course, is that a human tends to miss that one remaining reference to the old version of that method or variable name. More important, it was time-consuming to find all of the correct references. However, the compiler knows where these are, and that’s the idea behind automated refactoring; you tell Visual Studio what you want to change and it goes through your code and makes all the necessary changes, using the same rules the compiler uses to compile your code.
This is a great maintenance tool; unfortunately, by the time most Visual Basic developers understood what it implied it was too late for the Visual Basic team to implement a solution in Visual Studio 2005. However, the team did step up, rather than just say, “So sad, too bad.” They found a commercial product that actually had more features than what the C# team was developing from scratch. Then they bought a license for every Visual Studio developer, allowing free download of that tool. With it, you can quickly clean up some gnarly, hard-to-read code and turn it into well-structured logic that’s much more maintainable. The free version of that tool is available at www.devexpress.com/Products/NET/IDETools/VBRefactor/.
EAN: 2147483647
Pages: 267