Looking at Microsoft s Web Services Enhancements 3.0
Looking at Microsoft's Web Services Enhancements 3.0
Microsoft and the other vendors are not in the business of creating specifications; they're in the business of making software. When the specifications for advanced features in Web services were developed, Microsoft had to implement them within its Web services model. It wanted to allow .NET Web service developers to start building Web services immediately using these features. The capabilities of Web services are defined and established within the .NET Framework. The .NET Framework can't keep up with the new specifications that are being pumped out by Microsoft, IBM, and others. The new versions of the .NET Framework are planned to be years apart-not months-and users want these specifications now.
Therefore, Microsoft has decided to release the capabilities to work with Web Services Enhancements for Microsoft .NET (WSE) sooner than the release of the next version of the .NET Framework.
The first version the WSE was released as a beta in the summer of 2002 and, although not a full implementation of all the available WS-* specifications, it included a number of classes that allow you to build advanced Web Services using selected specifications from the various specs out at the time. Since then, two other releases of WSE have come from Microsoft. The following details what is in each of the WSE releases.
The WSE 1.0 Contents
The first release of the WSE was not a full implementation of all the advanced Web service specifications available, but instead represented a smaller subset of specifications from the advanced Web service protocols. This WSE version one includes some of the more important specifications that many customers will consider number-one priorities. This first version of WSE included the capabilities for working with:
-
q WS-Security
-
q WS-Routing
-
q WS-Referral
-
q WS-Attachments (using DIME)
The WSE 2.0 Contents
WSE 2.0 release in 2003 offered the following WS-* specification implementations as well as the following functionality:
-
q WS-Security 1.0 full implementation
-
q WS-Trust
-
q WS-SecureConversation
-
q A new adapter for Microsoft's BizTalk
The WSE 3.0 Contents
The WSE 3.0 is the most recent WSE release and further extends the previous two releases. The WSE 3.0 release includes the following specification releases as new functionalities:
-
q WS-Security 1.1
-
q Updated WS-Trust and WS-SecureConversation sections
-
q MTOM support
-
q 64-bit support
-
q A new adapter for Microsoft's BizTalk 2006
Functionality Provided by the WSE
As you can see, some important specifications are provided via WSE. The WS-Security implementation is by far the largest and most exciting aspect of the WSE. It is also the most asked-for implementation among all the advanced Web service specifications. WSE allows you to use this implementation to provide credentials with your Web services. You can send in usernames and passwords in the SOAP header of the SOAP messages that are sent onto the Web service provider. The passwords that in the SOAP messages are encrypted, thereby providing a higher level of security. An additional feature, a companion to the capability to provide credentials for verification with your SOAP messages, is the capability to use X.509 certificates in addition to usernames and passwords.
In addition to being able to provide credentials with your SOAP messages, you can digitally sign your SOAP messages. This is done to assure the receiver of a digitally signed SOAP message that the message was not altered in transport by some known or unknown entity.
The last thing provided with the WS-Security implementation is the capability to encrypt and decrypt SOAP messages. This is an important feature when you start dealing with SOAP routing Your SOAP messages go beyond point-to-point services and hop off paths that are protected by SSL.
WS-SecureConversation and WS-Trust provide the means to manage and authenticate message exchanges between parties using security context exchanges or session keys.
The WSE 3.0 implementation works with MTOM and enables you to send items, such as images, that are expensive to serialize into XML for SOAP message transport. The initial WSE 1.0 version provided a WS-Attachments implementation that works with DIME.
These capabilities as a whole have been collected and are available as the final version of WSE. You can use them to build the advanced Web services scenarios required for working with Web services in the enterprise.
How the WSE Works
The WSE is a powerful collection of classes that allow you to work with the advanced Web service specifications. It does this by intercepting all SOAP requests and SOAP responses and running these requests through various WSE filters.
Your XML Web service can receive SOAP messages (incoming requests) through a WSE input filter. Any SOAP messages that are sent from the XML Web service (outgoing requests) are sent through a WSE output filter.
On the client-side of things, the client application that is working with an XML Web service sends out all SOAP messages to the XML Web service through a WSE output filter. Then all SOAP responses that come from the XML Web service are intercepted and run through a WSE input filter. This entire process is shown in Figure 21-5.
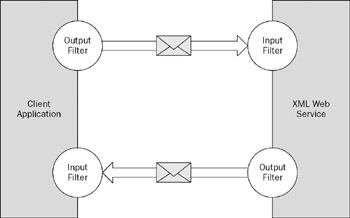
Figure 21-5
The XML Web service automatically uses these input and output filters from the WSE because of certain settings in the Web.config file. The client application automatically uses the WSE's filters when you make changes to the proxy class. In the end, it is these filters that give you the powerful capability to build advanced WS-* specifications into your SOAP messages whether you are working on the client- side, the server-side or both.
So what are these filters doing for you? The output filters take the SOAP messages and, in most cases, apply element constructions to the SOAP header of the SOAP message. In some cases, they also work with the SOAP body of the SOAP message to apply encryption. The input filters are doing the reverse. They take incoming SOAP messages and analyze the SOAP headers and any decode any encrypted SOAP bodies to automatically make sense of their construction.
Building a WSE 3.0 Example-The Server
As an example of using WSE 3.0, you now build a server and a client that utilize some of the features provided via this framework. In this example, you build a Web service (the server-side application) which will provide a simple Add() method. This Add() method, however, requires a username and password combination that must be packaged in the SOAP header in the WS-Security format.
The WSE provides you with an implementation of WS-Security that you can use in the construction of your Web service for consumers and providers. WS-Security provides you with a number of different security implementations including credential exchange, encryption, and digital signing. This chapter focuses on the first aspect of WS-Security mentioned here-credential exchange.
WSE's WS-Security implementation enables both the consumer and the provider of the Web Service to get credentials verified from a source that is trusted by both parties. The request for the credential verification and the token that is generated from the request are placed directly in the SOAP message itself, in most cases in the SOAP header. Wherever the message is sent, the sender is assured that the security credentials and the related authorization token are always with the message, even if it is transported through any number of intermediaries. You will see this later in the book when working with the routing and referral of SOAP messages.
One of the great things about the WSE implementation of WS-Security is that not only can you work with username and password combinations to provide authentication and authorization to your XML Web services, but you can use with other security credential mechanisms such as using X.509 certificates along with your SOAP messages.
Just as in the previous chapter you created your own class to apply usernames and passwords to the SOAP header of the SOAP message, you now work with the classes of the WSE that apply your user- names and passwords to the SOAP header. The difference is that the WSE classes do this in a manner that conforms to the specifications for credential exchange laid out in WS-Security. The structure that is applied to the SOAP header for credential representation is, therefore, consistent and understandable when passed to other vendor's platforms, such as IBM's WebSphere.
The WSE provides us with a class, the UsernameTokenManager class, for working with credential exchanges that involve usernames and passwords. In order to work with the UsernameTokenManager class, you use credential verifier source that can inherit from this class. After this class is in place, you configure the Web.config file that is contained within the Web service's application root to work with this particular class. You can then program the Web service to work with this new class.
Creating a Class That Verifies Credentials
For authorizing access to the XML Web service, you need a source that can obtain username and password combinations from some type of data store. The class that you create must be able to perform necessary validation on the usernames and passwords coming in with the SOAP messages. In this simple example, our password validation process ensures only that the password is exactly the same as the username in the message.
Your first step is to create a Web service project within Visual Studio 2005 using C#. Within the project, right- click the project's name and choose Add ASP.NET Folder ![]() App_Code. After you have the App_Code folder in place, right-click the project again and select Add New Item. You are adding a class to the Web Service project. Name the file myPasswordProvider.cs.
App_Code. After you have the App_Code folder in place, right-click the project again and select Add New Item. You are adding a class to the Web Service project. Name the file myPasswordProvider.cs.
In order to start applying WSE techniques to this class and to the Web service that you are going to build in a bit, you make a reference to the WSE class within your project. To do this, right-click the project again and this time select Add Reference.
The Add Reference dialog opens on the .NET tab by default. From this section of the dialog, you make reference to the Microsoft.Web.Services3.dll (shown here in Figure 21-6). If you don't see this DLL, you haven't installed WSE 3.0. This requires a separate download from the .NET Framework 2.0 download.
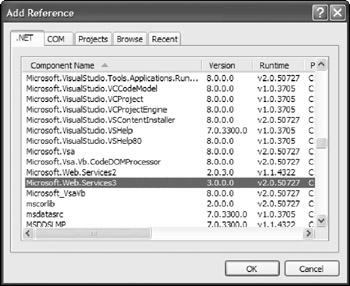
Figure 21-6
To make reference to this assembly, highlight this DLL and click the OK button in the Add Reference dialog. Notice the reference to the assembly in the Web.config file.
<assemblies> <add assembly="Microsoft.Web.Services3, Version=3.0.0.0, Culture=neutral, PublicKeyToken=31BF3856AD364E35" /> </assemblies>
Now you can start building the myPasswordProvider class. This class inherits from UsernameToken Manager. The purpose of this class is to validate the username and password combinations. To accomplish this, you override the AuthenticateToken() method provided via UsernameTokenManager and obtain the correct password from the username. In this example, the AuthenticateToken() method simply returns the Username property in string form as the password, meaning that the username and the password are required to be the same for the credential set to be considered valid. Listing 21-1 shows the code required for the myPasswordProvider.cs file.
Listing 21-1: The my PasswordProvider.cs file
using Microsoft.Web.Services3.Security.Tokens; namespace WSExample { /// <summary> /// Validates the username and password found in a SOAP message /// </summary> public class myPasswordProvider : UsernameTokenManager { protected override string AuthenticateToken(UsernameToken token) { string password = token.Username; return password; } } } Looking this class over, you can see that the myPasswordProvider class inherits from UsernameToken Manger and overrides the AuthenticateToken() method, which in this case simply returns the Username property as the password required from the consumer. Next, you review how to configure the application to use WSE 3.0 and to apply the rest of the required settings.
Configuring the Application To Use the WSE 3.0
Now that you have your myPasswordProvider class in place, you have to make reference to the WSE from within the Web.config file. To do all the wiring required to get the WSE framework up and running in your application, you apply a lot of different configuration settings in both the Web.config and any policy files that you are using. You can easily just go through these XML files yourself and apply all the configurations, but you can also use the WSE Settings 3.0 Tool.
The WSE Settings 3.0 Tool installs itself within Visual Studio along with the rest of the WSE 3.0 framework, so you have to use Visual Studio if you want to utilize the Settings Tool.
The Settings Tool makes it quite easy to configure your Web service to get you up and running rather quickly. To configure your Web service to work with the WSE by using the Settings Tool, right-click the project name within Solution Explorer and select WSE Settings 3.0. Clicking WSE Settings 3.0 pulls up the Settings Tool dialog. This dialog includes a number of tabs including General, Security, Routing, Policy, TokenIssuing, Diagnostics, and Messaging, as shown in Figure 21-7.
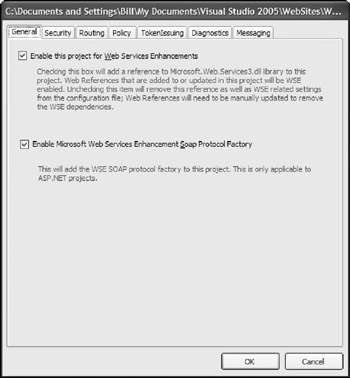
Figure 21-7
To get started building a Web service to work with the WSE, you click the first check box of the General tab. This check box enables the project to work with the WSE. It does this by automatically making a reference to the Microsoft.Web.Services3 DLL in your project. Because you are working with an ASP.NET Web Service project, also click the second check box.
The Security tab (shown in Figure 21-8) allows you to make changes to the Web.config file through the GUI that handles the WSE's security implementation. From this page, you can specify your token managers as well as details on any certificates.
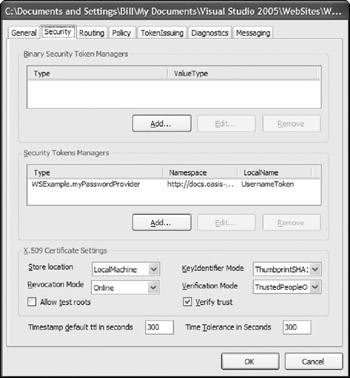
Figure 21-8
Using the Security tab, you can configure the WSE to use the new class you created, myPasswordProvider, as the token manager. To accomplish this, click the Add button within the Security Token Managers section of the dialog. This launches the SecurityToken Manager dialog as shown in Figure 21-9.
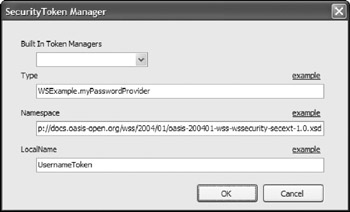
Figure 21-9
Provide the following values to the dialog.
Type: WSExample.myPasswordProvider
Namespace: http://docs.oasis-open.org/wss/2004/01/ oasis-200401-wss-wssecurity-secext-1.0.xsd
LocalName: UsernameToken
Click OK in the SecurityToken Manager dialog and open the Policy tab. This tab can establish a policy for using a specific username. It is presented in Figure 21-10.
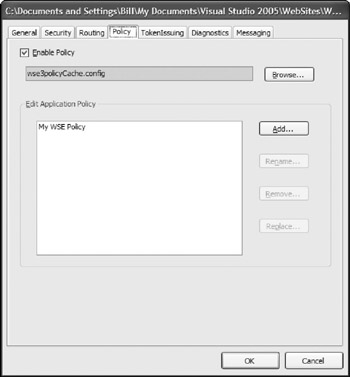
Figure 21-10
To set a policy, check the Enable Policy check box and select the Add button to add a new policy. The first step in the dialog is to establish whether you want to secure a service or a client. In this case, you are interested in securing a service through the use of a username setting. Your dialog should be similar to the one presented in Figure 21-11.
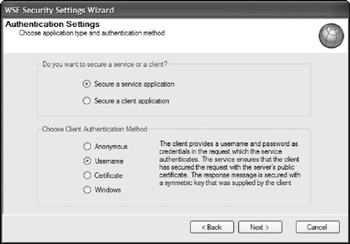
Figure 21-11
If you click the Next button, you see the option to have WSE to perform the authorization process. For this example, you want to select this option. Therefore, check the Perform Authorization check box and click the Add User button to specify a specific user. In this case, I have selected BEvjen as the user. This dialog is presented in Figure 21-12.
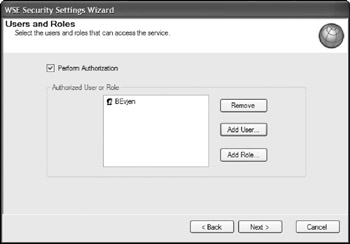
Figure 21-12
The next page in the dialog allows you to set the message-protection level. In this case, you can simply leave the default settings which allow for WS-Security 1.1 Extensions. You could also require the credentials to be signed and encrypted and used with an X.509 certificate, but for this example simply select None (rely on transport protection). This dialog is presented in Figure 21-13.
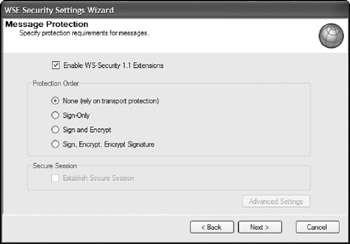
Figure 21-13
If you are working with an X.509 certificate, the last page in the dialog allows you to determine details about the X.509 certificate. You can check the check box that signifies the certificate will be signed within the code.
After these pages in the dialog, you are finally offered a summary page that details everything to be applied. All these setting are actually applied in the set wse3policyCache.config file.
Configuring Diagnostics
The service is now configured for the WSE, but as the final step in the configuration process, go to the Diagnostics tab and select the check box to enable this feature. This means that all the SOAP messages that are sent to and from the client are recorded to an XML file. This is quite handy when analyzing your Web services. This page in the dialog is presented in Figure 21-14.
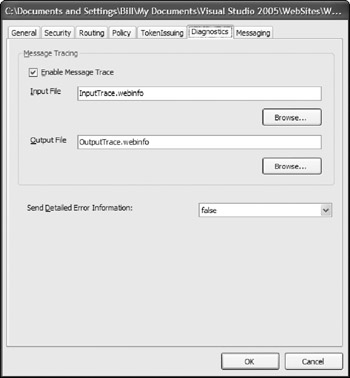
Figure 21-14
| Note | Don't leave the tracing feature on with production Web services. Performance is greatly hindered when this capability is enabled. |
The Result of the WSE Settings 3.0 Tool Configuration
After you have set all these values for your service through the settings tool, you may notice that a wse3policyCache.config file has been added to your project. In the Web.config file, you see that the WSE is engineered to work with this file. The settings applied to the Web.config file are presented in Listing 21-2.
Listing 21-2: The Web.config file after using the WSE Settings 3.0 Tool (partial file)
<microsoft.web.services3> <security> <securityTokenManager> <add type="WSExample.myPasswordProvider" namespace="http://docs.oasis-open.org/wss/2004/01/ oasis-200401-wss-wssecurity-secext-1.0.xsd" localName="UsernameToken" /> </securityTokenManager> </security> <policy fileName="wse3policyCache.config" /> <diagnostics> <trace enabled="true" input="InputTrace.webinfo" output="OutputTrace.webinfo" /> </diagnostics> </microsoft.web.services3>
In this partial bit of configuration code found in the Web.config file, you can see that the security token manager is the myPasswordProvider class that was built earlier. Also, the policy that is used is assigned through setting the filename of the policy file within the <policy> element.
<policy fileName="wse3policyCache.config" />
Looking at the wse3policyCache.config file, you can see all the settings you applied are contained within the file as shown in Listing 21-3.
Listing 21-3: The wse3policyCache.config file
<policies xmlns="http://schemas.microsoft.com/wse/2005/06/policy"> <extensions> <extension name="authorization" type="Microsoft.Web.Services3.Design.AuthorizationAssertion, Microsoft.Web.Services3, Version=3.0.0.0, Culture=neutral, PublicKeyToken=31bf3856ad364e35" /> <extension name="usernameForCertificateSecurity" type="Microsoft.Web.Services3.Design.UsernameForCertificateAssertion, Microsoft.Web.Services3, Version=3.0.0.0, Culture=neutral, PublicKeyToken=31bf3856ad364e35" /> <extension name="x509" type="Microsoft.Web.Services3.Design.X509TokenProvider, Microsoft.Web.Services3, Version=3.0.0.0, Culture=neutral, PublicKeyToken=31bf3856ad364e35" /> <extension name="requireActionHeader" type="Microsoft.Web.Services3.Design.RequireActionHeaderAssertion, Microsoft.Web.Services3, Version=3.0.0.0, Culture=neutral, PublicKeyToken=31bf3856ad364e35" /> <extension name="usernameOverTransportSecurity" type="Microsoft.Web.Services3.Design.UsernameOverTransportAssertion, Microsoft.Web.Services3, Version=3.0.0.0, Culture=neutral, PublicKeyToken=31bf3856ad364e35" /> </extensions> <policy name="My WSE Policy"> <authorization> <allow user="BEvjen" /> <deny user="*" /> </authorization> <usernameOverTransportSecurity /> <requireActionHeader /> </policy> </policies>
In this case, you can see that the named policy, My WSE Policy, has an authorization section that denies all users except user BEvjen.
<authorization> <allow user="BEvjen" /> <deny user="*" /> </authorization>
Now with the wiring to the WSE framework in place, you are now ready to build your Web service.
Building the Web Service
With the wiring for the framework of the WSE in place, you don't have to do much to have your Web services make use of this established framework. For an example of creating a service that requires the client to work with the settings applied to the Web.config and policy file, build the sample service shown in Listing 21-4.
Listing 21-4: Building a service that uses the WSE
using System.Web.Services; using Microsoft.Web.Services3; [WebService(Namespace = "http://tempuri.org/")] [WebServiceBinding(ConformsTo = WsiProfiles.BasicProfile1_1)] [Policy("My WSE Policy")] public class Service : System.Web.Services.WebService { [WebMethod] public int Add(int a, int b) { return (a + b); } } In this case, you have a Web service that performs a simple Add() function. This isn't much different from how you would normally go about building a C# Web service, but there are some minor differences.
From Listing 21-4, a different namespace is imported into the file-Microsoft.Web.Services3. This allows you to apply the class attribute Policy, which you use to specify the policy file that you wish to use for this service.
[Policy("My WSE Policy"] public class Service : System.Web.Services.WebService { } That's it. Now you can review how to create a simple ASP.NET client that works with this new service.
Building a WSE 3.0 Example-The Client Application
A little extra work is involved in creating a Web service that works according to the WS-Security specifications, but it is well worth this extra price. Now that you have a Web Service that accepts SOAP headers that conform to this structure, your consumers can construct their SOAP headers accordingly.
First, to create a client application that can make use of this new service, create a new ASP.NET Web project and within this project, make a reference to the new service that you built in the example earlier in this chapter. To make this reference, right-click on the project where you are creating your ASP.NET page and select Add Web Reference. Then type in the URL path of the WSDL file of the Web Service or of an .asmx file in the Add Web Reference dialog's address bar. If the dialog finds the Web service's endpoint, you just click the Add Reference button to create a reference to this remote object.
After you make a reference to the WSE_Auth Web Service, Visual Studio 2005 reviews and validates the WSDL document, and then makes the proper references to the service in your project. Notice that the Web Reference folder in your project has expanded and is either showing localhost (meaning that the Web Service is local on your server), or it shows the root URL of the location of the Web Service (but backwards!), for example, com.wrox.www.
The name of this reference here is important, and my recommendation is to change it to something meaningful by right-clicking the name and choosing Rename. This helps you understand your code a little better, especially if you are consuming multiple Web Services. This name is how you make reference to the Web Service in your code.
As when you created the WSE 3.0 Web service, you are going to have to enable the project for Web Services Enhancements in the WSE Settings 3.0 dialog. This adds the Microsoft.Web.Service3.dll to your project and makes the necessary changes to the Web.config file.
By creating an instance of this proxy class in the code of your project, you have programmatic access to the methods provided from the Web Service. To see an example of this, use the Page_Load event handler in the Default.aspx page and input the following code. (See Listing 21-5.)
Listing 21-5: The Page_Load event in the Default.aspxpage
using System; using Microsoft.Web.Services3.Security.Tokens; public partial class _Default : System.Web.UI.Page { protected void Page_Load(object sender, EventArgs e) { localhost.ServiceWse ws = new localhost.ServiceWse(); UsernameToken ut = new UsernameToken("BEvjen", "BEvjen"); ws.SetClientCredential<UsernameToken>(ut); ws.SetPolicy("examplePolicy"); int result = ws.Add(10, 20); Response.Write(result.ToString()); } } Try to understand what is going on with the consuming side of the application. First of all, you are working with a Web service in much the same manner as you would have before the WSE came along, although some differences exist.
The first step is to import the Microsoft.Web.Services3.Security.Tokens namespace to get access to the UsernameToken object. This object is used to provide your username and password to be incorporated in the SOAP message.
The next step is the same as it was before the WSE. You instantiate the proxy class that you have created. In this case, however, you find that new service has the Wse extension.
localhost.ServiceWse ws = new localhost.ServiceWse();
Next, you create an instance of the UsernameToken object that populates your username and password into the SOAP header. This UsernameToken object reference is called ut. In addition to instantiating the object, this bit of code also gives ut a value. In this case, you assign it the value of BEvjen as the user- name and the same string, BEvjen, as the password.
UsernameToken ut = new UsernameToken("BEvjen", "BEvjen"); After you have given your application side UsernameToken object the appropriate values, you then assign the UsernameToken object to the SOAP request that the consuming application sends off to the Web Service.
ws.SetClientCredential<UsernameToken>(ut); ws.SetPolicy("examplePolicy"); You assign your UsernameToken object using the SetClientCredential() method. You must have a policy for security credentials in place. To accomplish this task, you need to create a wse3policyCache.config file in your project. This configuration file has the following code:
<policies xmlns="http://schemas.microsoft.com/wse/2005/06/policy"> <extensions> <extension name="usernameOverTransportSecurity" type="Microsoft.Web.Services3.Design.UsernameOverTransportAssertion, Microsoft.Web.Services3, Version=3.0.0.0, Culture=neutral, PublicKeyToken=31bf3856ad364e35" /> <extension name="requireActionHeader" type="Microsoft.Web.Services3.Design.RequireActionHeaderAssertion, Microsoft.Web.Services3, Version=3.0.0.0, Culture=neutral, PublicKeyToken=31bf3856ad364e35" /> </extensions> <policy name="examplePolicy"> <usernameOverTransportSecurity /> <requireActionHeader /> </policy> </policies>
In this case, the policy is called examplePolicy and is the value which is used in the SetPolicy() method from earlier.
You have finished constructing the SOAP header that is used in the request, and you can then continue to work with the Web service request in the same manner as you did before the WSE. In this case, you simply call the particular Web Method you want and pass it any needed parameters. In this case, two parameters are required and you are assigning the value of the instantiation to a Response.Write() statement in order to display the result of the call on the ASP.NET page.
int result = ws.Add(10, 20); Response.Write(result.ToString());
The Result of the Exchange
So, in the end, what happened in the request and response to the Web service? This is actually the more important part of the entire discussion and the reason that you want to use the WSE for building the Web service. Take a look at the request from the consumer to the provider first. You do this by reviewing the .webinfo files that you had the WSE to create for you. This SOAP message is shown in Listing 21-6.
Listing 21-6: The SOAP request from the consumer to the provider
<soap:Envelope xmlns:soap="http://schemas.xmlsoap.org/soap/envelope/" xmlns:xsi="http://www.w3.org/2001/XMLSchema-instance" xmlns:xsd="http://www.w3.org/2001/XMLSchema" xmlns:wsa="http://schemas.xmlsoap.org/ws/2004/08/addressing" xmlns:wsse="http://docs.oasis-open.org/wss/2004/01/ oasis-200401-wss-wssecurity-secext-1.0.xsd" xmlns:wsu="http://docs.oasis-open.org/wss/2004/01/ oasis-200401-wss-wssecurity-utility-1.0.xsd"> <soap:Header> <wsa:Action>http://tempuri.org/Add</wsa:Action> <wsa:MessageID>urn:uuid:</wsa:MessageID> <wsa:ReplyTo> <wsa:Address> http://schemas.xmlsoap.org/ws/2004/08/ addressing/role/anonymous </wsa:Address> </wsa:ReplyTo> <wsa:To>http://localhost:2263/WSE/Service.asmx</wsa:To> <wsse:Security soap:mustUnderstand="1"> <wsu:Timestamp wsu:> <wsu:Created>2006-09-23T22:43:21Z</wsu:Created> <wsu:Expires>2006-09-23T22:48:21Z</wsu:Expires> </wsu:Timestamp> <wsse:UsernameToken xmlns:wsu="http://docs.oasis-open.org/wss/2004/01/ oasis-200401-wss-wssecurity-utility-1.0.xsd" wsu:> <wsse:Username>BEvjen</wsse:Username> <wsse:Password Type="http://docs.oasis-open.org/wss/2004/01/ oasis-200401-wss-username-token-profile-1.0#PasswordDigest"> Ifj+616Z9JM+eMHcyVj7RFzHiVE= </wsse:Password> <wsse:Nonce>7nb2/FzjzpYsrnoeJseL1Q==</wsse:Nonce> <wsu:Created>2006-09-23T22:43:21Z</wsu:Created> </wsse:UsernameToken> </wsse:Security> </soap:Header> <soap:Body> <Add xmlns="http://tempuri.org/"> <a>10</a> <b>20</b> </Add> </soap:Body> </soap:Envelope>
There is a lot to this message it seems, but if you look at the actual SOAP body, only the instantiating of the SOAP WebMethod is taking place.
<soap:Body> <Add xmlns="http://tempuri.org/"> <a>10</a> <b>20</b> </Add> </soap:Body>
All the real action is taking place in the SOAP header. This is where all the WSE action is occurring. Quite a bit of information is concentrated into three areas. The first section is the WS-Addressing part of the message and this section deals with the routing of SOAP messages among other actions. The second section is the <wsu:Timestamp> node. This section deals with the time stamping of SOAP messages. The last section in this SOAP header example is the <wsse:UsernameToken> node. This is the area of the SOAP header that you concentrate in this chapter. This is where the SOAP request security credentials are represented.
<wsse:UsernameToken xmlns:wsu="http://docs.oasis-open.org/wss/2004/01/ oasis-200401-wss-wssecurity-utility-1.0.xsd" wsu:> <wsse:Username>BEvjen</wsse:Username> <wsse:Password Type="http://docs.oasis-open.org/wss/2004/01/ oasis-200401-wss-username-token-profile-1.0#PasswordDigest"> Ifj+616Z9JM+eMHcyVj7RFzHiVE= </wsse:Password> <wsse:Nonce>7nb2/FzjzpYsrnoeJseL1Q==</wsse:Nonce> <wsu:Created>2006-09-23T22:43:21Z</wsu:Created> </wsse:UsernameToken>
The first thing to note is that this bit of XML in the SOAP header is an XML representation of the UsernameToken object that is created on the consuming side and which is passed to the Web service provider. Within the <wsse:UsernameToken> node is a unique ID which is given to the UsernameToken instance to differentiate it from other requests.
More importantly, a representation of the username and password that the user entered into the application appears in the SOAP header. Notice that it has been hashed and that this is specified by a type definition in the password node of the SOAP header.
The <wsse:Nonce> node, which is generated from cryptographic random number generators, uniquely identifies the request. A timestamp is also put on the request with the <wsu:Created> node.
After the credentials are verified and accepted by the Web service, the response is sent back to the client as shown in Listing 21-7.
Listing 21-7: The SOAP response from the provider to the consumer
<soap:Envelope xmlns:soap="http://schemas.xmlsoap.org/soap/envelope/" xmlns:xsi="http://www.w3.org/2001/XMLSchema-instance" xmlns:xsd="http://www.w3.org/2001/XMLSchema" xmlns:wsa="http://schemas.xmlsoap.org/ws/2004/08/addressing" xmlns:wsse="http://docs.oasis-open.org/wss/2004/01/ oasis-200401-wss-wssecurity-secext-1.0.xsd" xmlns:wsu="http://docs.oasis-open.org/wss/2004/01/ oasis-200401-wss-wssecurity-utility-1.0.xsd"> <soap:Header> <wsa:Action>http://tempuri.org/AddResponse</wsa:Action> <wsa:MessageID>urn:uuid:</wsa:MessageID> <wsa:RelatesTo>urn:uuid:</wsa:RelatesTo> <wsa:To>http://schemas.xmlsoap.org/ws/2004/08/ addressing/role/anonymous </wsa:To> <wsse:Security> <wsu:Timestamp wsu:> <wsu:Created>2006-09-24T14:47:03Z</wsu:Created> <wsu:Expires>2006-09-24T14:52:03Z</wsu:Expires> </wsu:Timestamp> </wsse:Security> </soap:Header> <soap:Body> <AddResponse xmlns="http://tempuri.org/"> <AddResult>30</AddResult> </AddResponse> </soap:Body> </soap:Envelope>
For this return, only a small amount of information in the SOAP header deals with the SOAP message's timestamp and validity. Beyond this bit of information, there isn't anything else needed in the SOAP header. The SOAP body contains a return value.
EAN: 2147483647
Pages: 215