Managing Files and Folders Within a Project
Visual InterDev lets you manage a site's various files and folders. You can create new files and folders, copy files and folders, delete files and folders, and so forth.
Figure 2-8, shown in "Task List," shows the Project Explorer for a typical Web site. This is a simple site with a few folders and several files. It was created with the New Web Project Wizard.
You should carefully plan the directory structure of your site. The Visual InterDev tools help you manage the site, but you must take the time to create the proper structure to hold the various files for the site. For instance, the site wizards automatically create the Images folder for a site. If you select a color theme in a wizard or after you have created a project, Visual InterDev creates the appropriate folders to hold those components and copies the files into the new folders. In a typical department, you might have subdepartments that report to the parent department. If so, create appropriate folders for each.
Adding New Items
You can add items such as folders, files, graphics, and other items to a site by using the IDE. To add a new folder:
- Right-click the site name or parent folder.
- Select New Folder.
- In the New Folder dialog box, enter the new folder's name.
If you right-click any folder in the site, the New Folder command appears on the popup menu. If you choose the New Folder command for a subfolder, the new folder is created under the selected folder.
The Add Item command on the Project menu (and on the toolbar and Project Explorer popup menu) provides tools that let you add many other items to a project. Figure 2-11 shows the Add Item properties with the New tab selected. The New tab contains several options for new files.
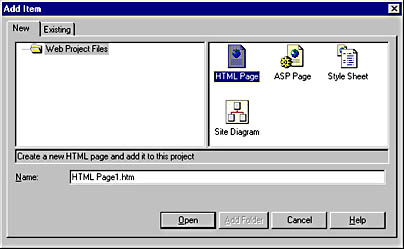
Figure 2-11. The Add Item dialog box with the New tab selected.
Table 2-3 describes the standard options for new files. Select the appropriate file type when creating a new file. Selecting the HTML Page option, for instance, creates a new HTML document complete with the appropriate tags at the beginning and end of the file.
Table 2-3. Options on the New tab.
| Option | File Type |
|---|---|
| Active Server Page | (.asp) ASP file that contains server scripting |
| HTML Page | (.htm) HTML file |
| Style Sheet | (.css) cascading style sheet |
| Site Diagram | (.wdm) site diagram for building and managing Web pages |
To add a new file to a project, take the following steps:
- Right-click the site name in Project Explorer.
- Choose Add from the popup menu.
- Select the file type to add.
- Enter the file's name.
- Click Open. The new file is created.
The new file is automatically created in the site on the server, and it shows up in Project Explorer page. A copy of the file is placed in the Visual InterDev working directory.
Adding an Existing File or Folder
You can also add existing files and folders to your site in one of several ways. The following sets of step-by-step instructions demonstrate the flexibility you have in managing files.
To add an existing file to a site, take these steps:
- Right-click the project name or the folder to which you want to add the files in Project Explorer.
- Choose the Add command from the popup menu.
- Select Add Item from the submenu.
- Click the Existing tab.
- Select the file or files to add.
- Click Open.
Each file you selected is added to the project.
To add the contents of an existing folder to your project:
- In Windows Explorer, select the folder to be added.
- Drag the folder and drop it onto its new location in Project Explorer.
The folder's contents are added to the current project.
You can also add an existing file to your site using drag-and-drop by dragging a file or folder from Windows Explorer and dropping it on the File View page of the Project Workspace. The file is copied to the Web site, and a local working copy is downloaded to your system. You simply need to add the links in your project to the files.
Deleting a File or a Folder
Deleting a file or a folder is as simple as deleting a file in Windows Explorer. Take the following steps:
- In Project Explorer, select the file or folder to delete.
- Press the Delete key, or right-click the file or folder and choose the Delete command.
- Click Yes when you're asked whether you want to delete the file or folder.
The file or folder is deleted from both your local working copy and the Web site.
Renaming a File or a Folder
Renaming a file or a folder is similar to deleting a file. Just take the following steps:
- Select the file or folder you want to rename.
- Right-click the file or folder, and select Release Working Copy.
- Right-click the file or folder, and choose the Rename command. (Or press F2. Or click the file or folder twice—slowly.)
- Enter the new name for the file or folder.
- Press the Enter key.
The file or folder is renamed on both your local working copy and the Web site. Any links within your project to the file or the folder are updated automatically.
Working with Sites
A Visual InterDev Web project contains all the files associated with your Web pages as well as a set of project definition files that Visual InterDev uses to maintain and manage the project itself. A Web project is only a reference to a collection of Web files on the Web server; it is not the Web application itself. The application's master files are contained on the Web server hosting the application. You can have a Web application without a project, but not a Web project without a Web application.
In a multideveloper environment, each developer creates a Web project that references the same Web application residing on the Web server. You should refresh or synchronize your local working copy of a site occasionally during the day to make sure it is synchronized with the Web site master copy. If other people are working on the same site, your local copy can get out of sync with the master copy. In fact, everyone's local copy can get out of sync when multiple people make changes. This can cause problems such as broken links and loss of source documents as one copy overwrites another.
To refresh your local working copy, select the Project you wish to refresh in Project Explorer and then choose Refresh from the View menu. Refreshing your local working copy picks up any changes to files or folders and any new files that have been added. Files or folders deleted on the Web site are not deleted on your local working copy. This can cause your local working copy to include files that the Web site does not. It also lets you place the files back on the server if you think they have been deleted erroneously.
Refreshing a project does not replace any local write-enabled copy of your files with files from the server. If the master files have changed, your local copies will remain the same.
You can also synchronize a project or files with the master site. Synchronizing a site does not retrieve a list of new files from the server, but it does synchronize all changes to files. To synchronize a project or multiple files, select the Project or files you want to synchronize in Project Explorer and then select Synchronize from the Project|Web Project menu.
Visual InterDev 6 contains a feature that allows you to isolate your development site from the master site. The files for the Web application reside in two places: the project directory of the developer workstation and the virtual directory on the master Web server. When you are working in a project, you are working on the local files. How changes you save are made to the version on the master Web server depends on the mode the project is in: local or master.
In local mode, changes made to the files are not immediately saved to the master Web server. The new versions are sent to the master Web server only when you explicitly request that the master Web server be updated. If you used the New Project Wizard to create your project and you have a Web server on your workstation, the project is set in local mode by default. In master mode, changes are saved to the local version and the master version at the same time, each time you save a file.
If you are working online, when you save files they will be saved on your local system. They may also update the master Web project depending upon the mode the project is in, as shown in Table 2-4.
Table 2-4. Local and master modes.
| Mode | Action |
|---|---|
| Local | The page is saved locally. |
| Master | The page is saved locally and updated on the master Web server. |
Moving a File or a Folder
Visual InterDev automates many aspects of site creation and management. Moving files and folders is a good example. If you need to move a file or a folder, open Project Explorer, drag the file or folder to its new location, and drop it in. When you drop the file or folder in its new location, Visual InterDev automatically fixes all the links to the files that were moved.
When you move files and folders, the site is automatically updated. The changes are also reflected in your local working copy of the site, but not to other users who have the site open. They must refresh their local working copy to see the changes.
If you receive a message that your working files are out of sync, you must manually resolve the issue with the file(s) shown. For example, suppose you move a file called feedback.htm to the Images directory on another system and then choose the Refresh command from the View menu. Visual InterDev discovers the discrepancy between the local files and those on the Web server and tries to resolve it. When it cannot guarantee that it has resolved the links, a dialog box appears to tell you that your working files are out of sync. If you look at your working directory in Windows Explorer, you can see that the file is still there. (See Figure 2-12.)

Figure 2-12. The feedback.htm file appears in Windows Explorer.
While Figure 2-12 shows that feedback.htm is still in the root directory for the Web site, the File View page of the Project Workspace in Figure 2-13 below shows that the file has been moved within the Web site.
Figure 2-13. The feedback.htm file has been moved on the Web site and in Project Explorer.
Figures 2-12 and 2-13 demonstrate how a workspace can get out of sync with a Web site. You can either delete feedback.htm from the working copy or use it to manually update the server. For instance, you can move feedback.htm to the Images directory and replace the existing feedback.htm file that was retrieved from the site. Or you can simply delete feedback.htm from the working copy's root directory and use the new copy retrieved from the server.
Visual InterDev might also inform you that a file you are trying to open has a newer version on the Web server. If this occurs, you can select the new file from the dialog box, and your working copy will be updated automatically. The automatic update does not update pages with links to the moved files if the pages are not in your project. Visual InterDev has no way of knowing about those links.
These scenarios all suggest why it is a good idea to use a tool such as Microsoft Visual SourceSafe to manage your Web applications. This is the only way you can assure that your Web pages and associated files are in sync and are protected.
Copying a Web Site
Visual InterDev lets you copy a Web site to another site. You can copy a site to either another server or another site on the same server using the same steps:
- In Project Explorer, select the project name or a component of the project to copy.
- Choose the Copy Web Application command from the Project|Web Project menu, or click the Copy Web Application button on the Project Explorer toolbar. The Copy Project dialog box appears.
- Enter the destination server name, or use the default name to copy the site on the same server.
- Enter the name of the site for the destination server.
- If you are copying the project to a new Web, uncheck the Add To Existing Web Project check box.
- Click OK.
Figure 2-14 shows the Copy Project dialog box with the current server as the default destination server.
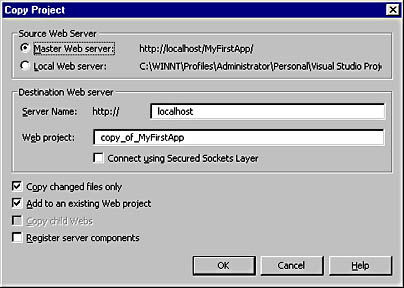
Figure 2-14. The Copy Project dialog box.
If the server requires you to connect using Secure Sockets Layer (SSL), you must select the Connect Using Secured Sockets Layer check box.
File Status
Visual InterDev tracks the status of each file in your project. A file that is a working copy is considered updatable and is shown with a pencil icon in Project Explorer. Any changes you make to a working copy of a file are updated to the Web site whenever you save the file. The changes are also saved locally in the working directory.
A lock icon to the left of the file indicates a released file, which is not updatable. You can release a working copy of a file when you no longer need to update it. Releasing the file will delete the file from the working directory. The next time you try to edit the file, Visual InterDev can automatically retrieve a new copy from the site (that is, a copy of the server version of the file is downloaded to your working directory). If you try to open a file and do not have a working copy of that file, Visual InterDev will prompt you with the dialog box shown in Figure 2-15.
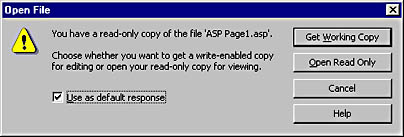
Figure 2-15. The Open File dialog box allows you to determine what action to take regarding working copies of files.
When the Open File dialog box is displayed, you can click Get Working Copy and Visual InterDev will retrieve a working copy of the file from the server and open it. If you want only to read the file, click Open Read Only. You can also check the Use As Default Response check box and Visual InterDev will use this answer in the future rather than displaying this dialog box to prompt you.
If you wish to reset your response to the Open File question, you can do this with Tools|Options. Figure 2-16 shows Tools|Options with the Web Projects settings displayed. The settings in the When Opening A File area control what Visual InterDev does when you open a file and do not have a working copy. If you set the default answer and wish to change it, you must change it here.
The Open File settings help ensure that you always work with the most current copy of a file. Releasing a file does not keep you from updating the file further; it simply marks the file as released from the working directory by displaying the gray icon on the FileView page.
To release a working copy of a file, right-click the filename and choose the Release Working Copy command. When you double-click a released file to open it for editing, Visual InterDev contacts the server and retrieves a new copy of the file.
To retrieve a working copy of both the released and current files, right-click the file you want to retrieve and choose the Get Working Copy command.
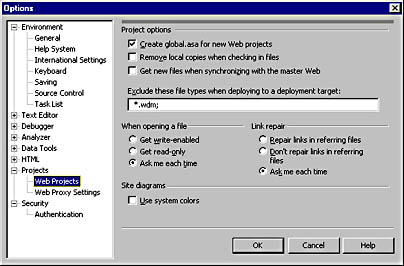
Figure 2-16. The Tools|Options page allows you to change system options such as the default answer to the Open File dialog box.
If you try to save a file and do not have a working copy, the Save Of Read-Only File dialog box shown in Figure 2-17 appears. This dialog box lets you determine how Visual InterDev should update the file.
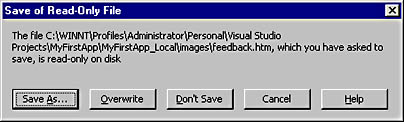
Figure 2-17. The Save Of Read-Only File dialog box.
The Save Of Read-Only File dialog box lets you specify whether to keep the existing file (Save As) or update the read-only file (Overwrite). Before clicking one of the buttons, make sure you pick the right file.
If you try to open a project and your file copy is either newer or older than the same file on the server, the Confirm Update dialog box might appear. You can then accept the suggested update with one mouse click. Be sure to carefully resolve issues with file versions; you can easily have a file that is older or newer than the server version and incorrectly overwrite one or the other.
You can select multiple files and use both the Release and Get options on all selected files simultaneously. This lets you treat files as a group and perform the tasks faster. Use Ctrl-Click or Shift-Click to select the files. Do not hold down the mouse button and drag to select files because Developer Studio treats this as a drag operation. After you select the files, right-click a selected file and then choose Get Working Copy or Release Working Copy from the popup menu.
Using Visual InterDev with an Existing Web Site
You can use Visual InterDev with any existing Web site. You first need to create a new workspace that incorporates the site you want to work with. You can then use that workspace just as if you had created a new site from scratch.
The options for creating the new workspace and incorporating it into the existing site depend on whether the site was created with a server that had the Microsoft FrontPage Server Extensions installed. The FrontPage Server Extensions provide the interface between the Web server and Visual InterDev. You can automatically load sites created on servers running the FrontPage Server Extensions into a Visual InterDev project.
For sites without the FrontPage Server Extensions, the process is slightly more complex. The steps for both options are shown below.
To load a site on a server that has the FrontPage Server Extensions installed, use the same New project steps we covered earlier in this chapter, except connect the new project to an existing site. Your new project will contain the existing site, which you can use just like any other that you create with Visual InterDev.
To load a site that was not created on a FrontPage Server Extensions-enabled server, perform the steps below. The files that you wish to load must exist on a file share that is accessible with Windows Explorer. Make sure you complete each step, or you will have extra files on your server.
- Create a new site on the target server.
- Find the parent folder for the Web site with Windows Explorer.
- Select all the files and folders in the folder that contains the site you want to add, and drop them on the project in Project Explorer. This will add the entire contents of files and folders to the parent folder for the new Web site.
- Test the new site to verify that it contains the correct files and works the way you want it to.
The contents of the existing site's folders are added to the current project. The new site contains all the files that were added from the original site plus any new ones that the Web Project Wizard created, such as global.asa, search.htm, and the Images folder.
EAN: 2147483647
Pages: 143