3.2 Program Development Steps
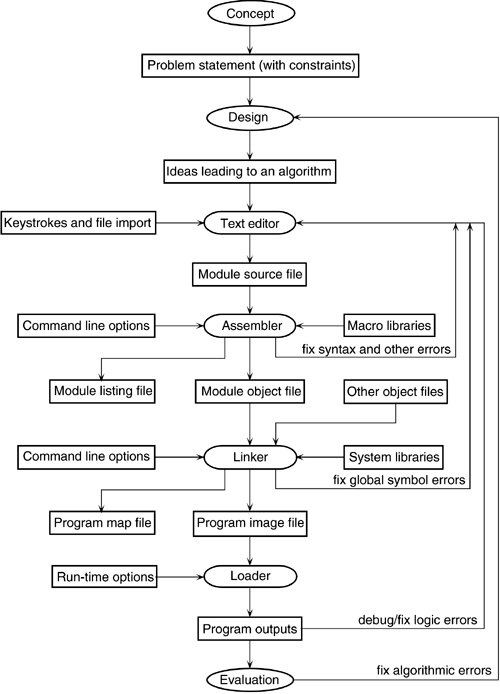
| Few computer programs are successfully produced in final form in a single pass. Large real-world software development projects usually involve the endeavors of teams of designers, coders, and testers. Even when only one person's efforts are involved, a measure of discipline and order in the development process almost always leads to a better result. Figure 3-1 outlines the stepwise process of developing software using the typical tools of a programming environment: a text editor, an assembler (or compiler for a higher level language), a linker, and a loader (or the system facility that runs a program). Not all of the features in Figure 3-1 are provided with every programming environment, which is a major reason why we present illustrations from multiple programming environments throughout this book. Figure 3-1. Stepwise development using programming environment tools
Figure 3-1 also shows several phases throughout this process, including specification of the project, design and development of the program, and evaluation of the result (quality control). If you are a member of a professional development team, you may concentrate on just one or a few of the phases. On the other hand, if you are a student, you will be expected to take on all phases as part of your learning experience. Numerous feedback loops in this diagram emphasize the importance of comprehending and correcting errors. It is most efficient to intervene with corrections at the first point where anomalies arise. Moreover, if you see a discouraging flood of error messages, a good strategy is to understand and attempt to fix only the first few of them in any one iteration. The flood may then subside, permitting you to concentrate on another trouble spot in the next iteration. With Figure 3-1 as a guide, we can outline the major steps and system tools used for programming in assembly language, whether we are writing a simple routine or producing a complex application:
When the program runs satisfactorily, you can (and should) produce a final version without the inclusion of debugging aids. For the illustrative programs presented in the next few chapters, the typical command lines for steps 4 and 5 will resemble one of the following sequences for HP-UX (H) or for typical Linux (L) environments:
where cc_bundled, cc, aCC, gcc, and ecc are compiler/assembler command names; where the +DD64 option specifies 64-bit virtual addresses; where -Ae tells the aCC compiler that your program is C or assembly language, not C++; where the option -o introduces a name for the output executable file; where the option +O0 or -O0 inhibits any optimization or rearrangement of the flow of your program; where the option +w, Wall, or w2 requests watching for situations that warrant warnings, as well as serious errors; where the nm command requests information about symbol values; where the option -x requests hexadecimal output; and where adb and gdb are debugger command names. In order to indicate opportunities for organizing one's work in directory structures, we have shown the use of a user-level bin subdirectory to contain executable programs. Appendix A briefly introduces subdirectories. The cc (HP-UX), gcc (open-source GNU software), and ecc (Intel) commands for compiling and linking can use assembly, C, or C++ language files as input and ensure that additional implicit inputs from system libraries are considered both in the compilation or assembly process and in the linkage process (Figure 3-1). Those library inputs facilitate the use of such capabilities as standardized mathematical functions and support routines provided by the operating system. In large development projects, additional libraries of previously produced or purchased routines may be available, or even specified, for use according to the overall project design, methodology, and management. Programs presented in later chapters will have multiple components, for which different or additional command lines and specifications will be needed. We should also take up the topic of case sensitivity here. By convention, many things in the HP-UX and Linux programming environments are case-sensitive, with a preponderance of lowercase. For example, both lowercase letter "oh" (-o) and uppercase "oh" with the numeral "zero" (-O0) occur in a command for step 4 above. Other programming environments may accept either lowercase or uppercase and may construe them as equivalent. |
EAN: N/A
Pages: 223
