Chapter 10: FreeHand and Web Graphics
|
| < Day Day Up > |
|
![]() Download CD Content
Download CD Content
FreeHand can get you well on your way to designing for the World Wide Web even if you have little knowledge of HTML programming. The program makes it easy for you to design the basic graphic look and function of a site in such a way that there's little left to do but apply finishing touches in Dreamweaver MX. Naturally, when you get the pages into Dreamweaver, you'll find lots of things to do, but you already completed the heavy lifting in FreeHand.
Turning a FreeHand Page into an HTML Page
Macromedia wants you to be able to develop Web pages in FreeHand so bad that they even have a default Web page in the Document inspector drop-down menu. This page is set to 550-pixels wide by 400-pixels tall. A page that size is fine, but if you have another size in mind, feel free to adjust it. For instance, you may be designing a banner ad or just the navigation system for a site.
To make your design time and ultimate production as worry free as possible, you should start by making a master page (or a custom template) that contains all the graphics, colors, fonts, and styles that will be common throughout your site. Continuing with your goal of workflow efficiency, you should also think about using FreeHand to generate a comprehensive layout for the site. You've probably made a sketch of how the site will flow, and therefore you know approximately how many pages will be involved. Start your document with at least that many pages. Then transfer your sketchy ideas onto the pages.
| Tip | With the Page tool, it's easy to lay the pages out on the Pasteboard in a logical order, similar to a flow chart. By doing this, you can track your ideas better and decide what kind of navigational aids or graphics will make the site more user-friendly. To move the pages around the Pasteboard, click the Zoom tool and zoom to a viewing range that enables you to see all or most of your pages. Then turn on the Snap To Grid feature in the Edit menu. Select the Page tool, and arrange the pages to suit the flow of the site. It's a good idea to move your first page up to the upper-left corner of the Pasteboard so you don't run out of room later. |
In the following pages, you see how easy it is to publish to the Web through FreeHand.
Export as HTML
The basic premise to HTML conversion is simple: Make a page, choose File ® Publish As HTML, select some parameters, and view your page in a browser. But, some additional work will result in a more polished Web page. This chapter uses files found in the Chapter 10 folder on the CD that came with this book. To begin, open the FreeHand HTML Output folder and take a look at a completed Web page layout, which was constructed completely within FreeHand 10. Inside that, you'll find three Web-page-prep00x.html pages. Double-click the 001 file's icon to open Netscape Navigator; drag it over an Internet Explorer icon to open it in that browser.
This site is just an example of different ways to make buttons or links work. Later in this section, you can make changes to the pages and publish your own HTML page. For the moment, experiment with the three word links on the right side of the page. Text was input in FreeHand and then converted to paths. Each word was then given a link as described in the instructions below. This makes for a quick-and-easy way to maintain a particular font and size, but a user must touch the graphics with the cursor to activate the links. White space (or whatever the background color is) doesn't count; you must put the cursor directly over the graphic, and I think that approach is too tough on the viewer.
Click the Act button to go to page 2. Not much changes other than color, and the appearance of the links. If you have the Lithos Bold font installed on your computer, you can view the text as it was designed. If not, you view whatever your browser sees fit. The underscore indicates a hyperlink, and the cursor changes immediately when you pass it over the text.
Clicking the Support link takes you to page 3, where I converted the text to paths, but to make the button easier to hit I placed a filled rectangle behind the text. Then I grouped the text and rectangle and applied a link. With this combination of objects, the link is easy to hit, and I maintain the integrity of my font. It's important to note that if you stroke an object, give it a fill of None, and then apply a link to that object, the cursor is active only over the stroke itself. For that reason, I delete any stroke (to avoid my own confusion) and fill the shape with the background color.
Navigation panel
Unless you have a single-page Web site, you need links or buttons on your Web pages. Those links are easy to apply through the Navigation panel (Windows ® Panels ® Navigation) as shown in Figure 10-1. This panel is described fully in Chapter 4, but you actually use the panel in this chapter. Select any object on your page and open the Navigation panel, which provides a Name field for naming the object. By naming a linked object, you can search and select that object in the Find Graphics dialog box. The Search feature is case-sensitive, so keep your naming conventions consistent.
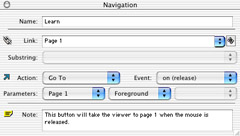
Figure 10-1: The Navigation panel links objects on your page to the entire Web.
Beneath the Name field is the Link field, where you can make a link to another page in the FreeHand site, or type a URL address to take the viewer anywhere. If you are entering your first link, the drop-down menu is empty, but each link you add is automatically added to the menu. This feature can save you a lot of typing and head-scratching when you are creating several pages that need common links. To the right of the text field is a binocular icon. Choose a link from the drop-down menu, and click the binoculars to perform a search of the entire document for items with that link. All will be selected; you can use this feature to assure yourself that each page has the correct number of links, or to make a global change to the links themselves.
Open the Web page prep.FH10 file, and save it to your hard drive. Give it a new name. For this project, you add a fourth page and make some changes. Go to page 3, and choose Duplicate from the Document inspector pop-up menu. The FreeHand page indicator at the bottom-left corner of the application window tells you that you're on page 4, but you're really on page 3. Click the cursor anywhere on the page. (The page indicator changes to reflect your actual page view.) Then move to page 4.
This page is identical in every way to page 3, but you want to know that you've actually moved to another page in your project, so follow these steps to change the color of the major elements:
-
Click Control+A (Command+A) or choose Edit ® Select ® All; then shift+click the text block to deselect it.
-
Build a reddish color in the Color Mixer panel (see Chapter 5 for help if you need it), and add that color to the Swatches panel by dragging a swatch of it into the Swatches panel body.
-
Select Edit ® Find And Replace ® Graphics, and click the Replace tab. Then, select Fills And Strokes, and check Include Tints.
-
Choose Color from the drop-down menu, and select Black from the available colors.
-
Select the red color you just made from the Change In menu.
-
Click Apply.
All of your graphics are now red. To be able to navigate to this new page, though, you must put links on the other pages. Surprisingly, that doesn't take much time, but the following steps allow you to experiment along the way:
-
Zoom to view all four pages. Select the bottom piece of the circle graphic on page 1, and give it a fill — any color will do.
-
Select the same graphic on page 2, and give it a different colored fill, but delete the stroke.
-
Now select the bottom circle graphic on all four pages and choose Window ® Panels ® Navigation.
-
Type Page 4 button in the Name field, and choose page 4 from the drop-down menu in the Link field. This links all four graphics to page 4 of this site.
-
Click the cursor on an element on page 4, and choose View ® Fit To Page. Double-click the cursor in the text block that begins "Page 3," and when the cursor changes to the text tool, change the number 3 to 4.
-
Select the rest of the text in that text block and type the words, Back to the beginning on a substring. Note that this replaces selected text in the document.
-
Select Back to the beginning, and open the Navigation panel if it's not still open. Choose Page 1 from the Link menu. Notice that the selected text is now entered in the Substring field. Set the Action to Go To, the Event to On (Release), and Parameters to Page 1 (it happens to be there by default). Leave Foreground selected.
Now you're ready to make the HTML page. This part can seem intimidating if you've never had anything to do with Web-page construction before, but only because the terminology is a little strange. If you are in this category, you can have the Wizard (Windows) or Assistant (Mac) help you through the process painlessly. The following steps do that first; then they go through it manually:
-
Choose File ® Publish As HTML. The HTML Output dialog box opens as shown in Figure 10-2. The first time you open this window, you'll only have the Default choice for an HTML setting. If you save your setups, you can name them and choose for later projects.
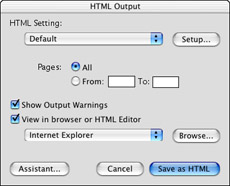
Figure 10-2: The HTML Output dialog box has basic settings for your Web page. -
Select Pages: All; check Show Output Warnings, and check View in browser or HTML editor. Select your preferred browser from the drop-down menu, or click the Browse button to find the browser you want.
-
Click the Wizard or Assistant button (depending on the computer's operating system). The first window is an introduction to the process. After reading it, move to the next page.
-
Page 2 lets you decide whether to set up your page using layers or tables. Layers are not supported on 3.0 version browsers, and that may prevent some viewers from seeing your site as you designed it. Tables work on all browsers, but they don't support overlapping objects, and slicing may occur. Call me a rebel, but since the 4.0 browsers are now one or two generations old, I don't worry about people with 3.0 browsers. The choice is yours, though. For the purposes of this exercise, choose Layers, and move to the next page.
-
This page dictates how your vector art will be converted when the HTML page is generated. You have a choice of SWF, GIF, JPEG, or PNG. I encourage you to experiment with these settings. I found that in this particular project, PNG worked best. SWF actually lost button functionality, and GIF and JPEG both lost entire chunks of the graphics. Choose PNG, and continue to the next page.
-
You only have bitmaps for the credit cards, but you must choose a method for reproducing them. The choices are the same as with vector art, but in this instance, use JPEG. Click the arrow for the next page.
-
Page 5 tells you where FreeHand wants to place the HTML files. Because you'll probably make changes and adjustments in your pages, it's a good idea to place the folder where it can easily access it. I use the desktop. FreeHand creates a folder called FreeHand HTML Output and places all the necessary files inside. Do not rename any of these files. Move to the next page.
-
This page enables you to save your settings with a name that you can access from the menu on the first page of the HTML Output window. Name this setting MX Bible PNG and click the Next arrow.
-
Page 7 is a wrap-up page explaining what you've done so far and what you can still do. Read it and click the Finish button. Hold tight until we're through with the manual HTML Output setup.
If you've made Web pages before, you can make your decisions on file types and so on without using the Wizard or Assistant. Instead, click the Setup button to open the HTML Setup dialog box as shown in Figure 10-3.
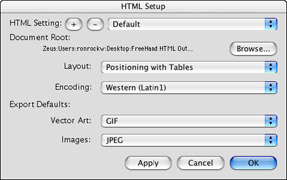
Figure 10-3: Use the HTML Setup window to choose page attributes manually. -
There is a Setting Plus and Minus button at the top of the window. For first-time visitors, the menu reads Default, and the buttons are basically dead. Click the Minus button to delete a setting, and Plus to add a setting that you make in this window. For now, ignore the buttons.
-
Immediately beneath the buttons is the Document Root field, which was filled out by the program. Make a mental (or written) note of the folder's location, or select the Browse button to put the folder where you want it.
-
In the Layout menu, choose whether to use layers or tables to make your page.
-
In the Encoding menu, you can choose a language for the HTML encoding. For North American and British English, choose Western (Latin1). There are 17 other language choices.
-
Under Export Defaults, select the file type you want for vector art and bitmap images from their respective menus.
-
Click Apply.
-
If you want to save the settings, click the Plus button to open a dialog box in which you name the settings. Give them names, and click OK.
-
Click OK to close the HTML Setup dialog box and return to the HTML Output dialog box. Click the Save as HTML button.
-
Now Freehand creates a new untitled document and selects objects on the pages without any intervention from you. Finally everything spins to a stop, and you can continue with your work.
-
Navigate to the folder that you set up in the HTML Wizard or Assistant, or Setup page.
Now you're ready to test your new site. By default, FreeHand is set to open your browser as soon as the conversion is complete. If you've turned this option off, then open the FreeHand HTML Output folder and look inside. You'll find another folder named Images, and four pages named with a sequential number. To view the pages, double-click the –001 page and drag its icon over your browser's icon, or click File ® Open File to open the page in your browser. It should look and react the same as the sample file on the CD, with the exception of the changes you made and the additional page. Experiment with the different types of buttons you created to go to page 4. Note how the cursor works on page 3, where the button is actually the stroke. Test the subscript link you built on page 4. If things have gone awry, double-check your HTML output settings in the FreeHand document and export the pages again.
If you took my advice and checked the Show Output Warnings option in the HTML Output dialog box, a dialog box appears after the HTML output process is complete. This window notes every possible thing that can go wrong in your site. Most times the notes concern version 3 browser problems. You should attend to any of the errors it lists to make an error-free site. You can correct most errors more easily in Dreamweaver than in FreeHand.
| Caution | You cannot change the names of any of the files inside the FreeHand HTML Output folder and expect the site to function. It won't. It's cast in stone. Code has been written that includes filenames. To make a change in a filename, you also have to go into each page and adjust link names. It's really not worth the trouble. |
This short project gave you a chance to see how parts of the Navigation panel and HTML Output windows work. More importantly, you learned that you can make a quick, rough page to test basic ideas and the flow of your site before launching full-bore into Dreamweaver.
|
| < Day Day Up > |
|
EAN: 2147483647
Pages: 491