Graphic Hose Tool
|
| < Day Day Up > |
|
![]() A further use of symbols lies in the Graphic Hose tool (seen at the left). With this feature, you can place multiple instances of a graphic element on the page, make each instance a different size, rotate each a little or a lot, and adjust the spacing from tight overlapping to wide gaps. Or, the instances can be scattered along the path just as a custom brush would do — it's all up to you.
A further use of symbols lies in the Graphic Hose tool (seen at the left). With this feature, you can place multiple instances of a graphic element on the page, make each instance a different size, rotate each a little or a lot, and adjust the spacing from tight overlapping to wide gaps. Or, the instances can be scattered along the path just as a custom brush would do — it's all up to you.
Working with the Graphic Hose involves two different phases of its dialog box. Open the dialog box by double-clicking the Graphic Hose icon in the Xtras toolbar. Hose is the first window you should work in, as shown in Figure 8-5. If it's not open, click the Hose button in the dialog box.
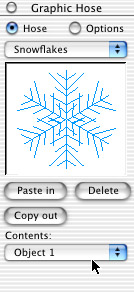
Figure 8-5: Choose groups to spray, or place graphics in the Hose window.
To make a new Graphic Hose group, do the following:
-
Select a graphic element in the document and copy it to the Clipboard.
-
Double-click the Graphic Hose Xtra button in the Main toolbar. Then select New from the menu at the top of the Hose dialog box.
-
In the next panel, name the group and click Save. The preview window will be empty.
-
Click the Paste In button. Your graphic appears in the preview window and a new item named Object 1 is added to the Contents menu at the bottom of the dialog box.
-
Select and copy other elements and use the Paste In button to get them into your Graphic Hose. (If you decide at any time that you want to remove an object from the hose, find it in the Contents menu and click Delete. If you want to use an object, but you don't want it to be associated with the Graphic Hose, simply choose it and use the Copy Out button. Then paste the item on your page.)
Now you have to decide how the Graphic Hose will spray objects on the page. Click the Options button to open that dialog box. Refer to Figure 8-6 to see the available options.
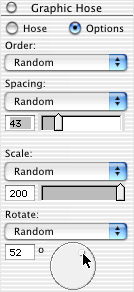
Figure 8-6: The Options dialog box enables you to change many attributes of sprayed objects.
-
Order — Dictates the order in which the objects are sprayed; the variables are Loop, Random, and Back and Forth.
-
Spacing — Modifies the spacing of the objects. Choose from Grid, Random, and Variable. Use the slider or enter a number to program the distance between objects.
-
Scale — Adjusts the size of sprayed objects from Uniform to Random. Again, use the slider to input the amount of change you desire. Regardless of the settings here, you can use the up/down or left/right arrow keys on your keyboard to enlarge or reduce the size of the objects as you're spraying them on the page.
-
Rotate — Change the orientation of the objects. Zero places objects in the same attitude as they were placed in the hose, but you can enter a number or use the wheel to set the angle of rotation within Uniform, Random, and Incremental variables.
You should test and experiment with the Graphic Hose. Each type of graphic you place in the hose necessitates a different group of Options settings, according to what you're trying to accomplish.
After you've filled the hose with objects and set the options, it's time to put the hose to work. Check to see that you're still in the Graphic Hose tool — it's an arrowhead without a shaft. Then click and drag. Depending on how fast you move the cursor, and the direction you drag, you'll get different results. Overlapping is permitted — you can drag the tool across an area as many times as you need. Figure 8-7 shows the grass hose I made using seven freeform grass shapes. You could do this by drawing each of the elements individually, but without a graphics tablet, each stroke must be carefully placed, and the random effect is lost completely. I'm pretty rigid and grid-like in my work, so when I need a truly random effect, the Graphic Hose is the tool I use, without question.
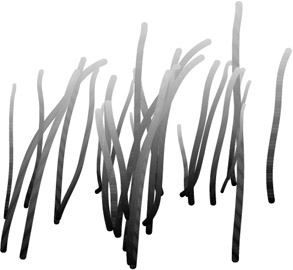
Figure 8-7: The effects of a simple Graphic Hose swamp as used in the Habitat Alert logo.
If you make a spray pattern and decide that it's close but needs a little work, choose the Pointer tool (or hold down the Control (Command) key to temporarily invoke the Pointer tool) to move or delete individual objects. The object that has been sprayed is a simple grouped object, so you can change colors, stroke widths, and fills just as you would with any other regular object.
FreeHand enables you to have as many as 10 objects in any single hose. You can export your hoses and import hoses from other artists or your other computers. All you need to do is copy the hose into the FreeHand 10 ® English ® Xtras ® Graphic Hose folder. Any hoses that you no longer need can be deleted by dragging the file to the Trash.
|
| < Day Day Up > |
|
EAN: 2147483647
Pages: 491